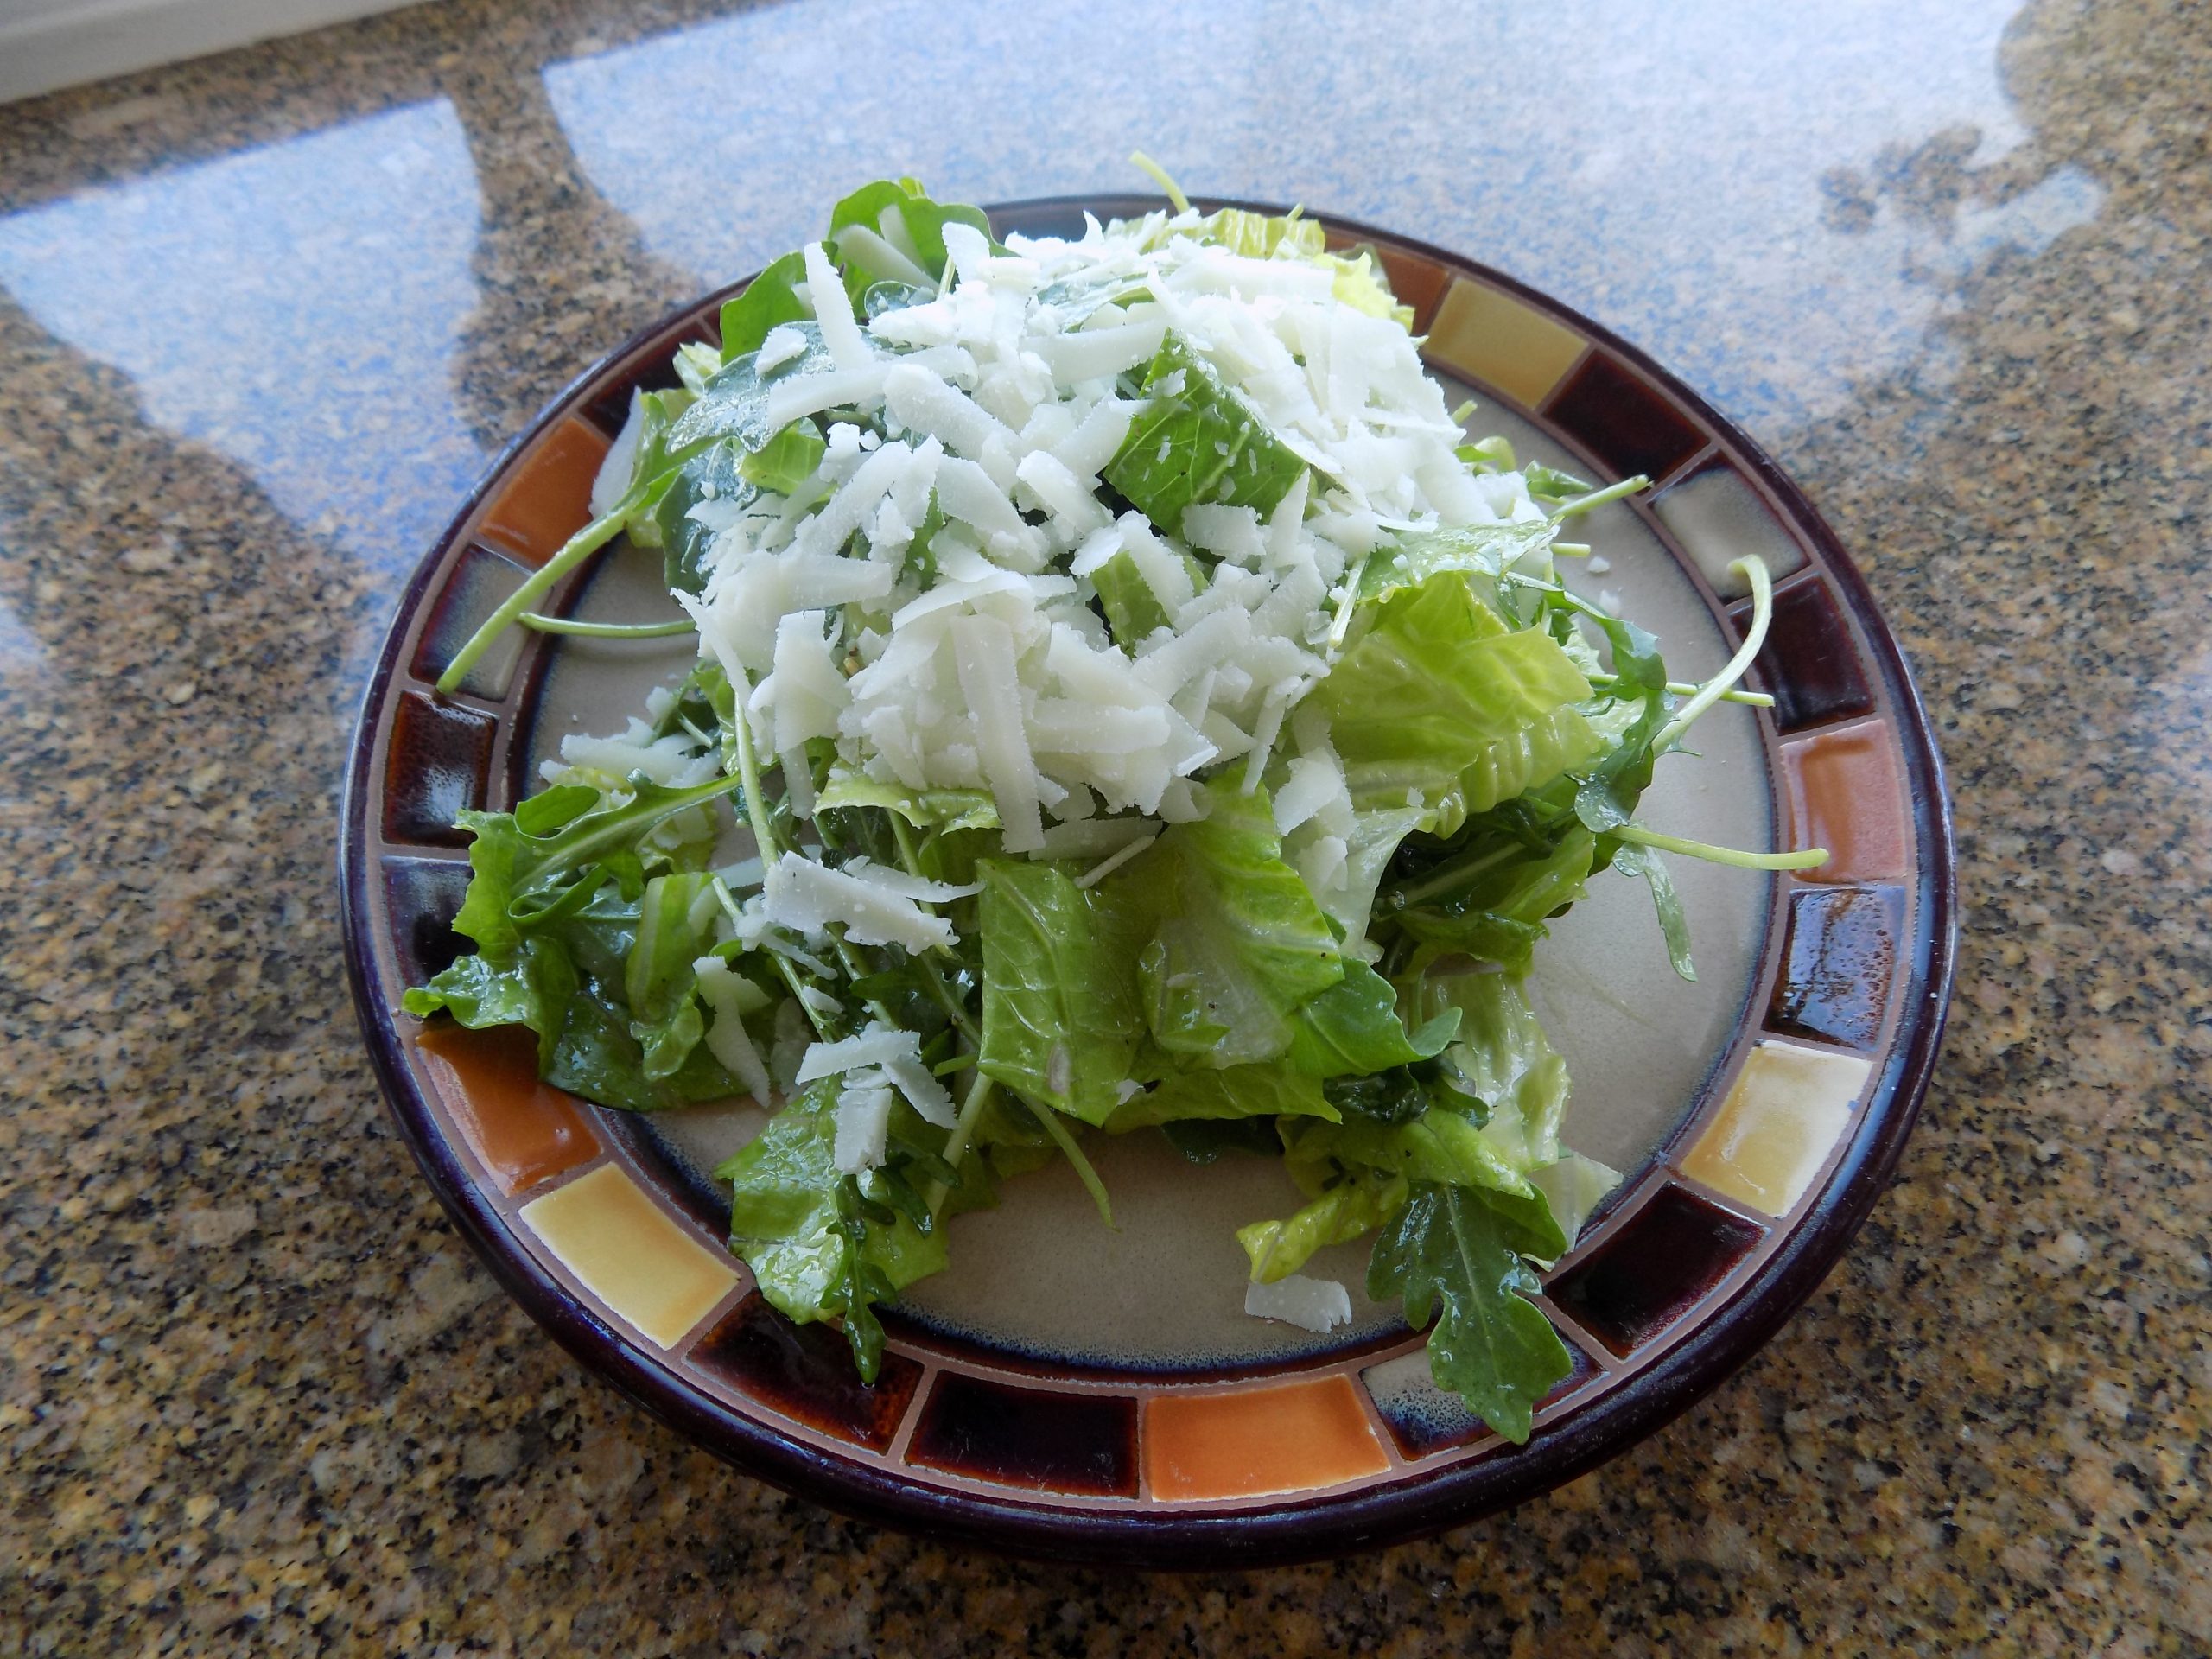
So, the other day Mr. C. comes home from the grocery store with a tub of baby arugula. We had been talking about how much we liked arugula, but I hadn’t included it on my shopping list. Never-the-less I was delighted with the purchase. So, that evening I made this salad. The recipe from saltpepperskillet.com didn’t call for romaine, but I felt that using a combination of the two different kinds of lettuce would be delicious. The arugula providing the spicy, peppery, slightly bitter component, while the romaine offered a nice crunch. And then, when tossed with this lemon dressing, well, to put it succinctly, we were blown away! This made for an absolutely delicious, simple to prepare salad. One that we will be enjoying over and over. A salad that will go very well with any kind of simply prepared meat or seafood I choose to serve. Yum, I can’t wait.
We are avid lemon lovers to begin with. But when you add the other ingredients to the firm lemon base in this dressing, magic happens. And of course, you could add other ingredients besides lettuce to this salad. But honestly, why bother! This is perfect as is. So, thank you Justin for this marvelous recipe.
As always, eat your vegetables! They are good for you and when they taste as good as they do in this salad, there is no excuse for not gulping them down!
Peace and love to all.
¼ tsp. lemon zest
2 T. lemon juice
2 T. extra virgin olive oil
¼ tsp. Dijon mustard
2 tsp. minced shallot
1 T. honey
1/8 tsp. kosher salt
freshly ground black pepper
baby arugula
romaine lettuce, chopped
coarsely grated Parmesan or Pecorino-Romano cheese
Whisk or shake the lemon zest, lemon juice, olive oil, Dijon mustard, shallot, honey, salt, and pepper together.
Place the arugula and romaine lettuce in a salad bowl. (I use equal amounts of each.) Toss with enough of the dressing to coat the lettuce leaves without drowning them. Serve immediately. Pass the Parmesan.
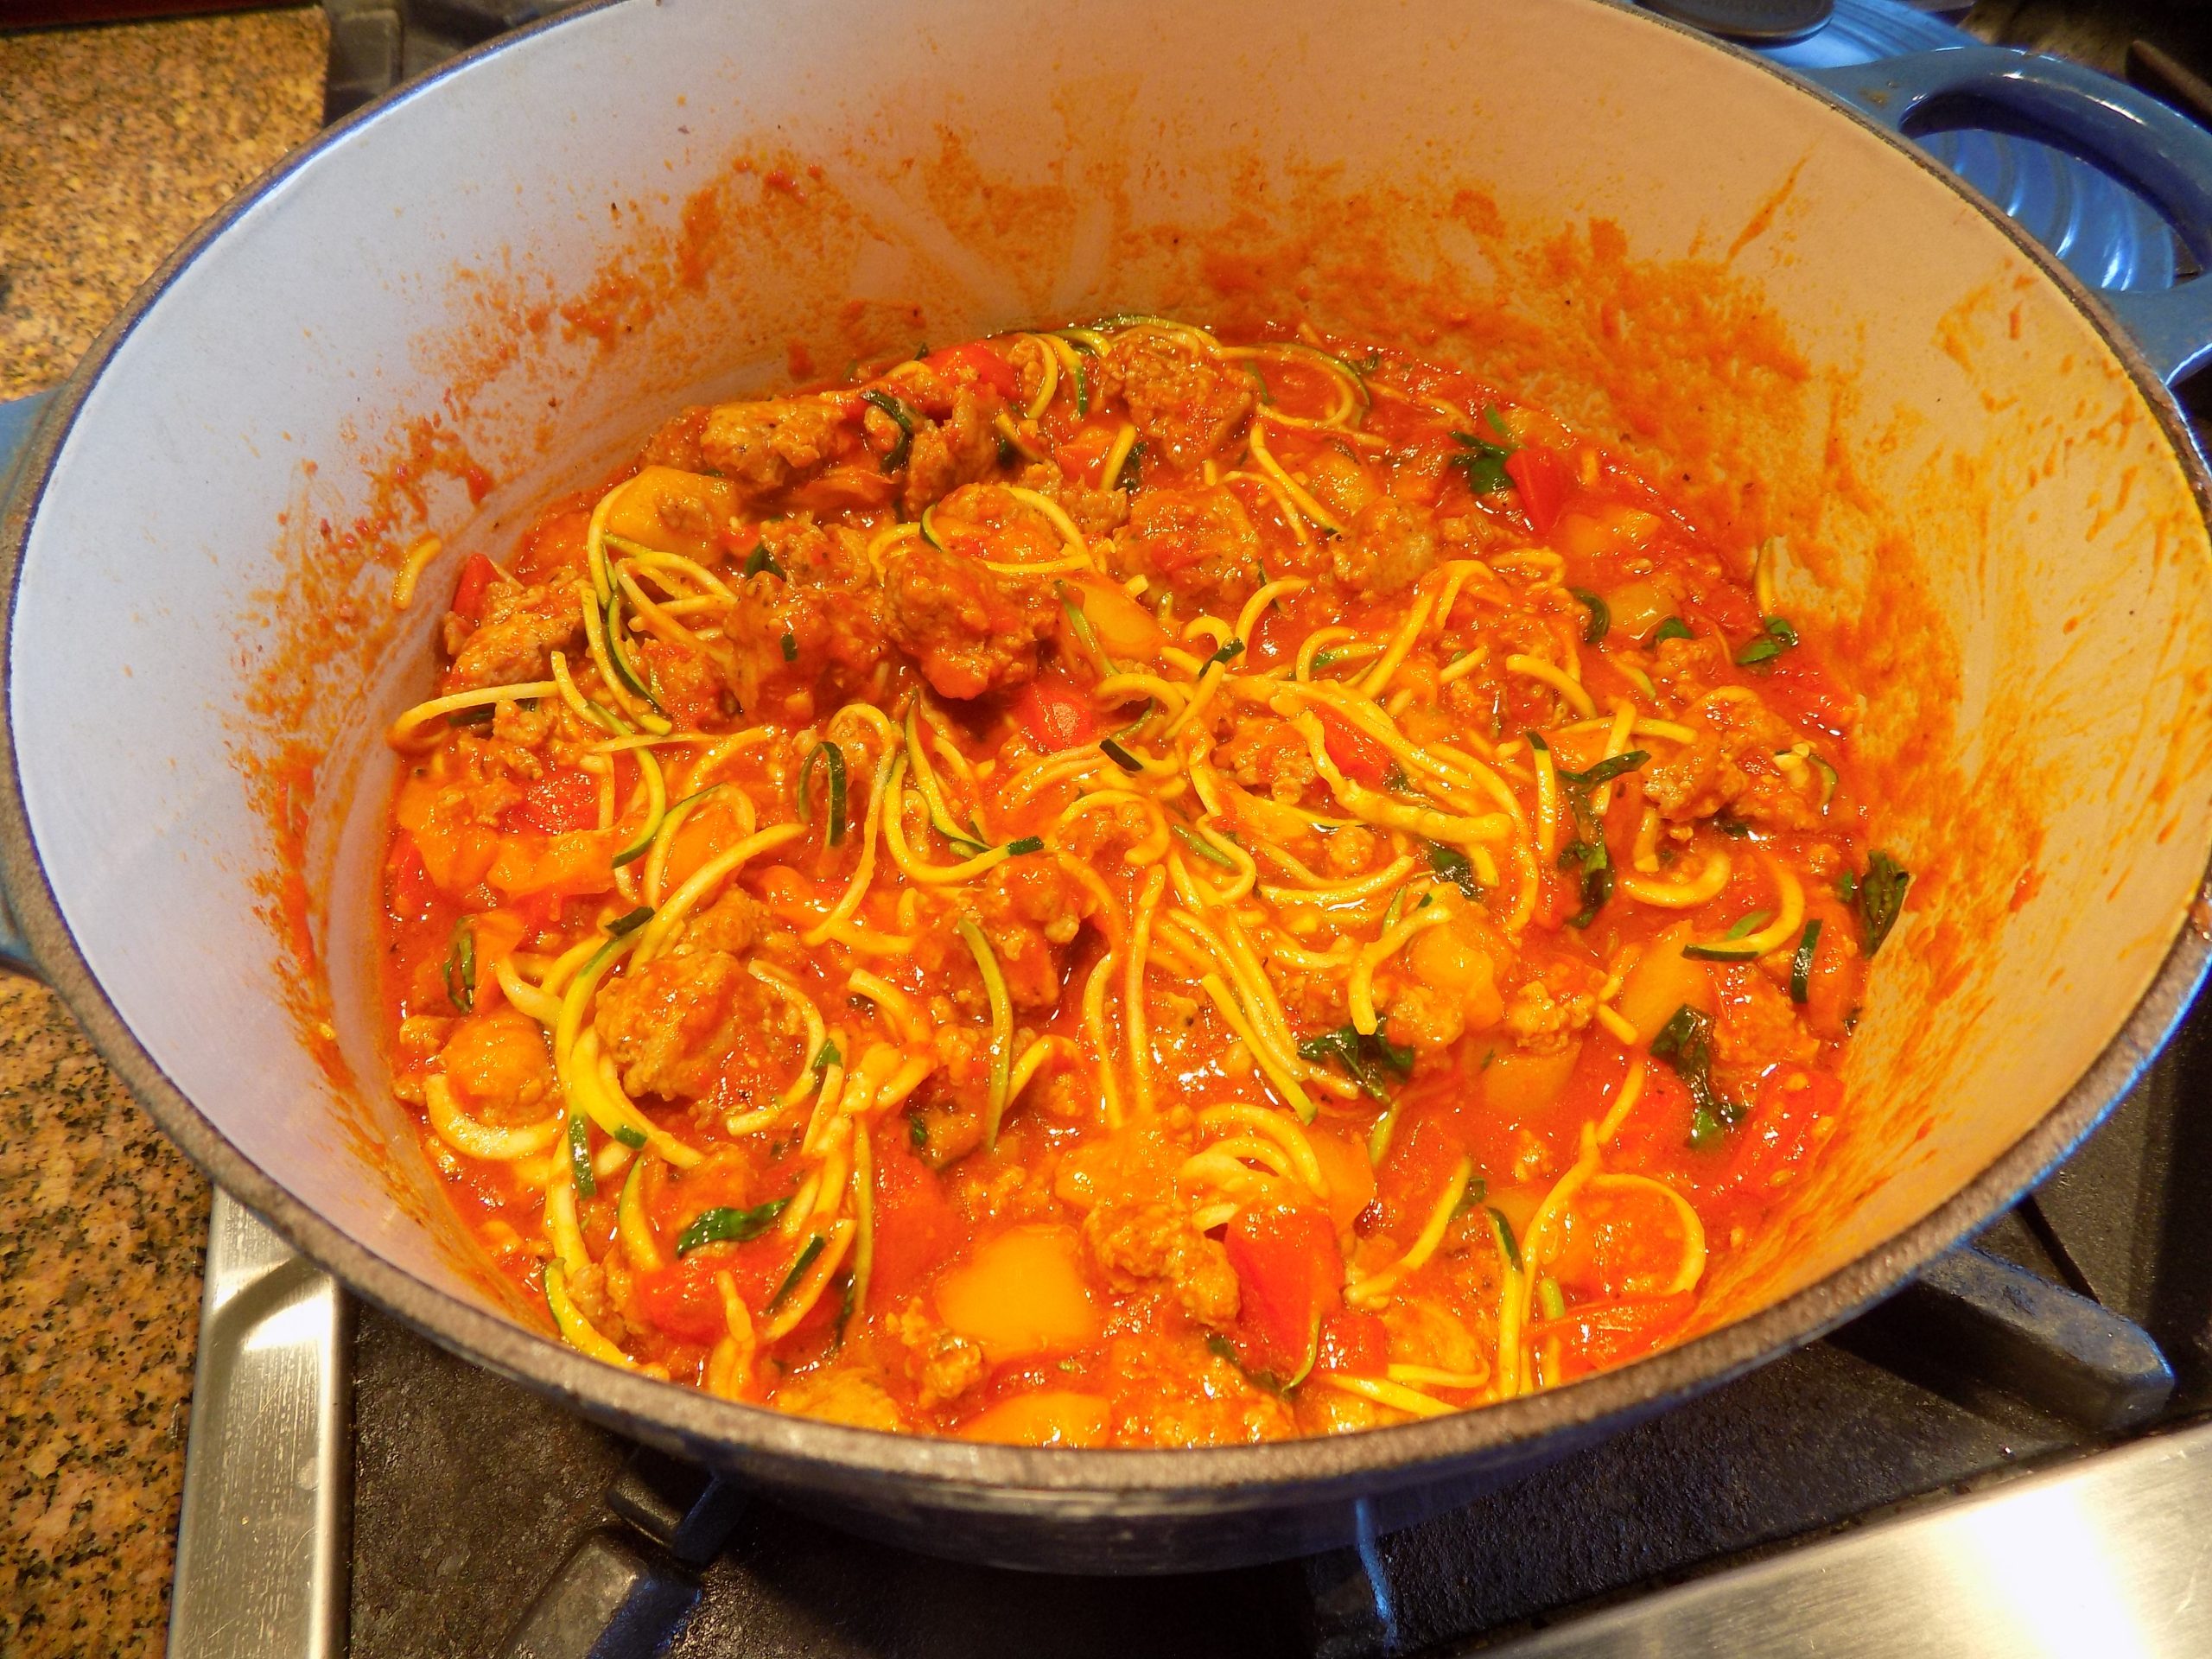
When it comes to pasta, I am a complete sucker. I like it all. Doesn’t matter in what form the pasta takes, be it shells, rotini, spaghetti, fettuccine, egg noodles, etc. etc., I enjoy every variation. But in hoping to trim off some of the carbs in our diet, and since I now own a spiralizer and have been reading splendiferous reviews about the use of zoodles instead of noodles, I decided to join the throng and substitute zucchini for “the real thing” in one of my favorite pasta dishes.
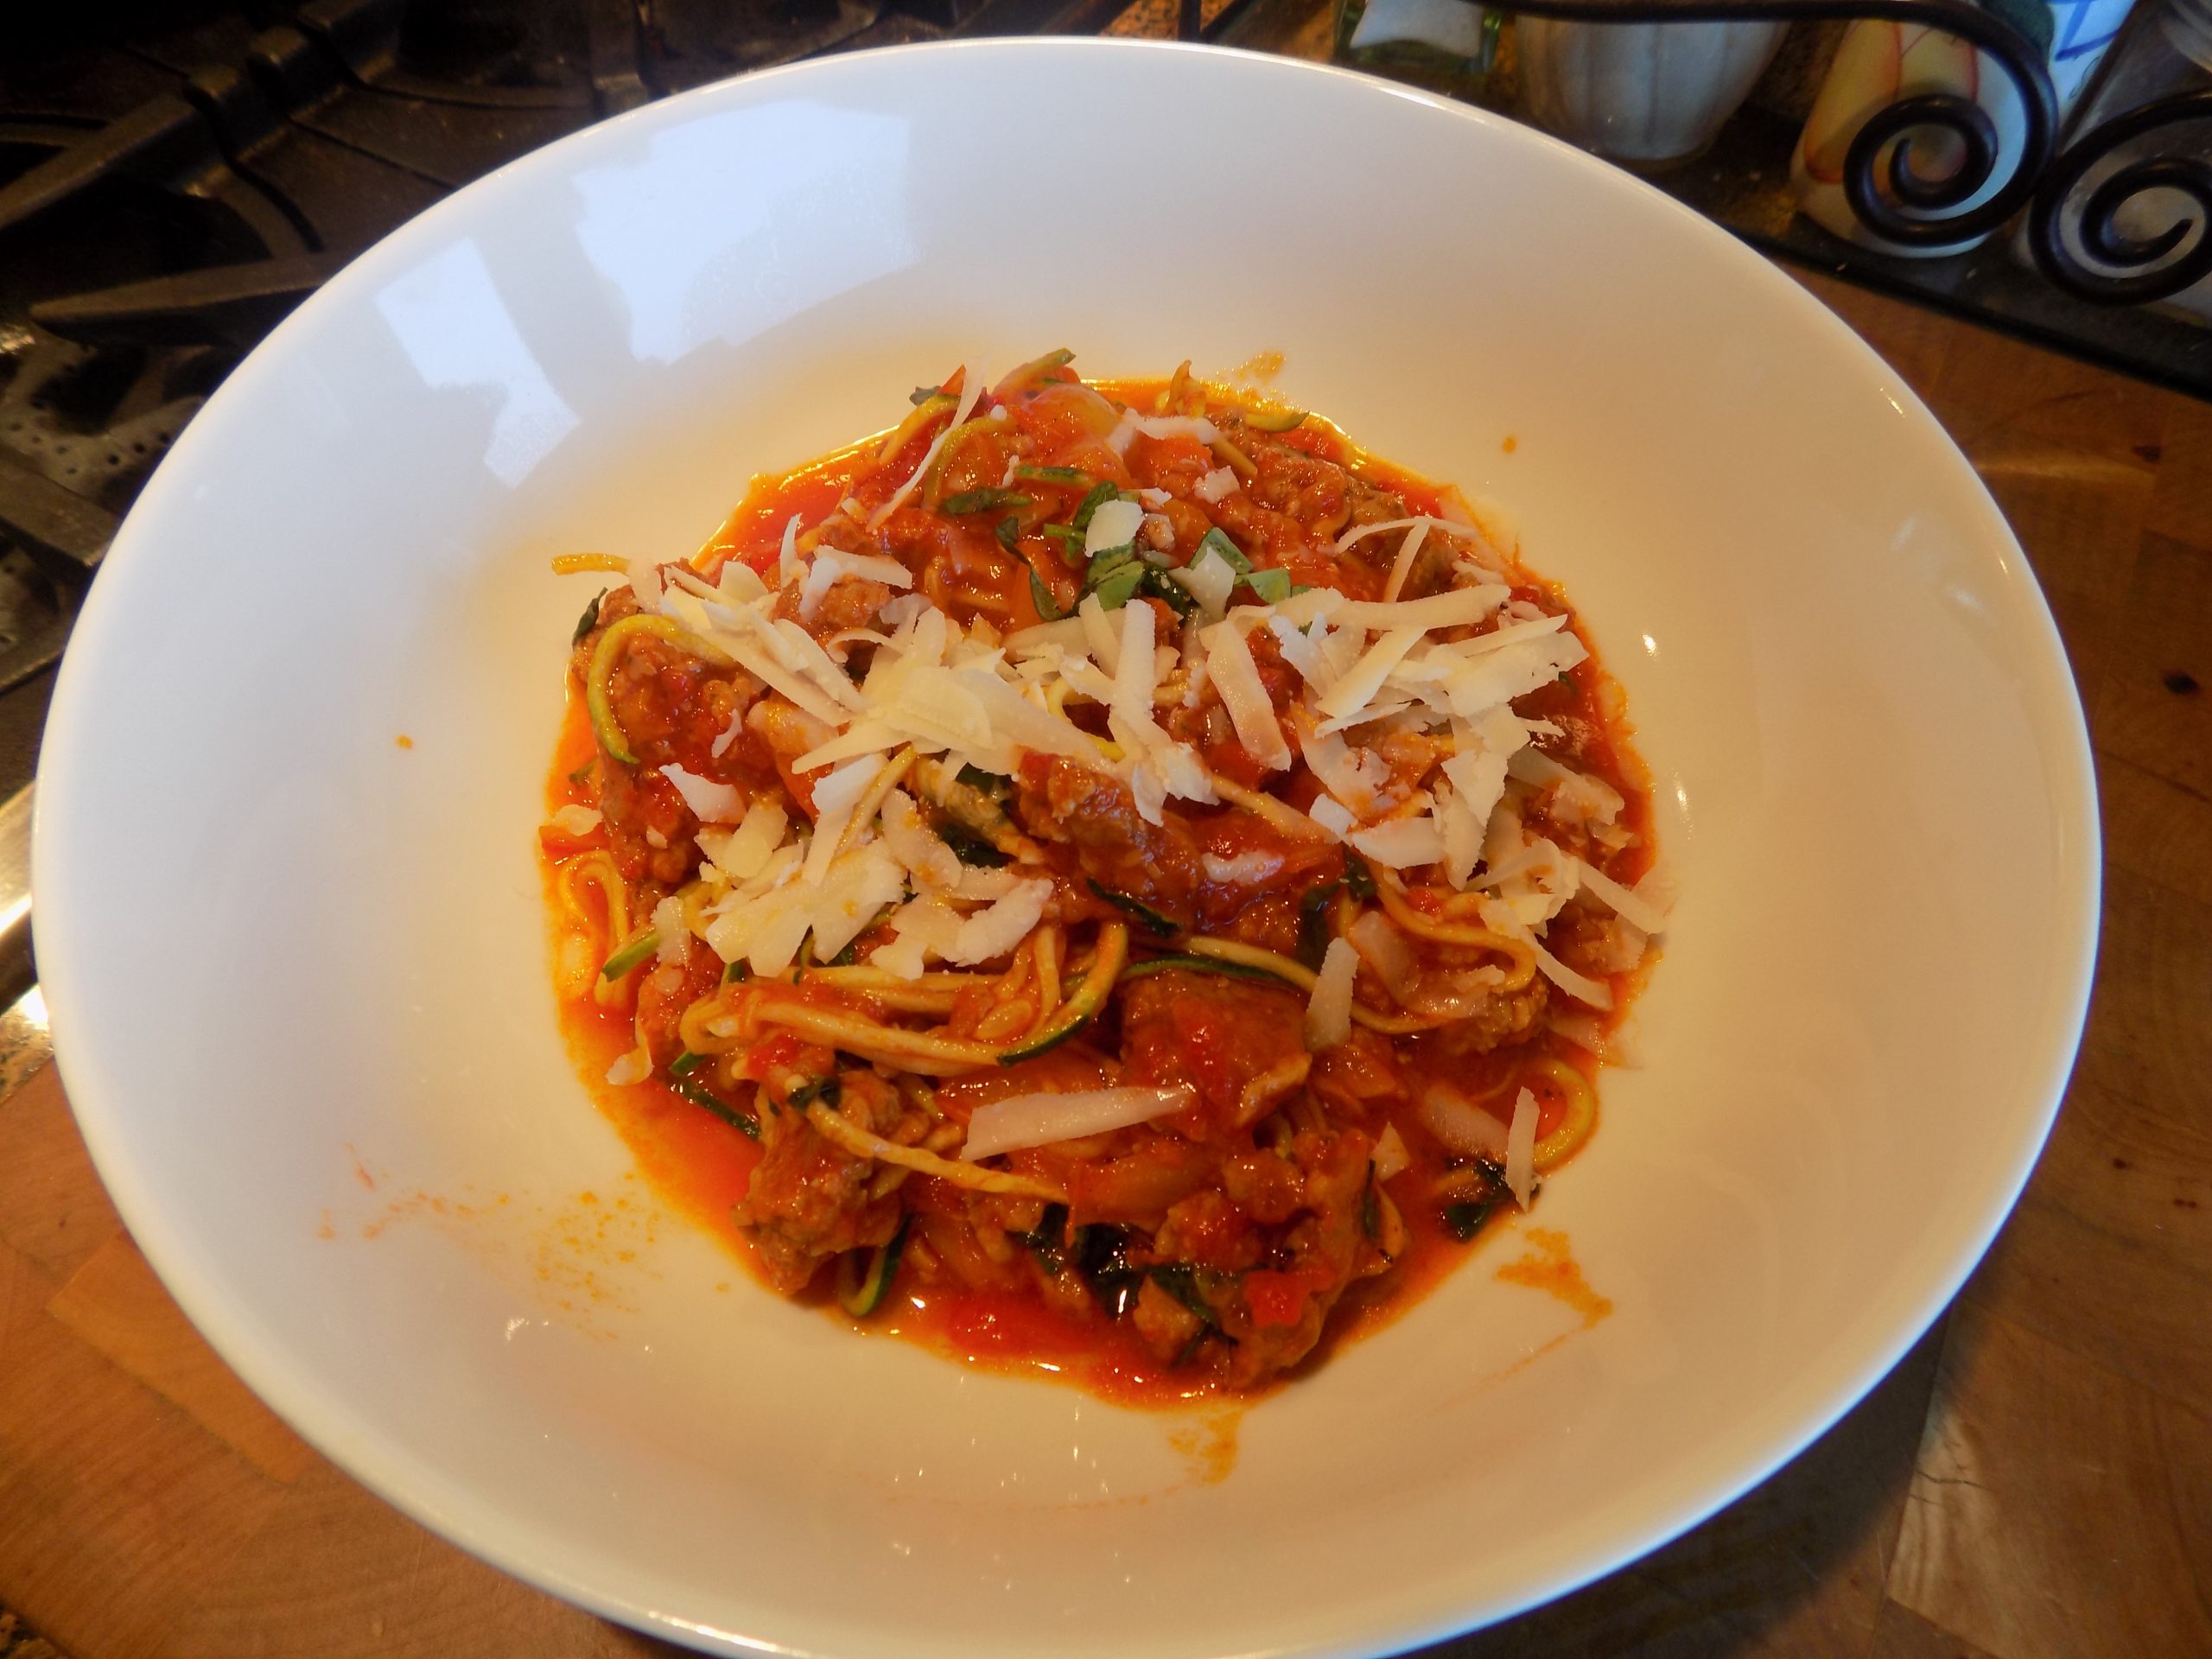
Well, boy howdy, was I delighted with the result. I DID NOT MISS REAL PASTA IN THE LEAST!!!! Not kidding here folks. This “pasta” dish was the best Italian food I have made or eaten in quite some time. And although I know many of you have been using spaghetti squash in lieu of pasta, I truly like the taste of zoodles better. Or should I say, the lack of taste better. I too have used spaghetti squash, but the flavor wasn’t ever quite right. Not to mention the texture. And I’m a devoted fan of any kind of squash! But with zucchini, it seems to take on any flavor you put with it. And since the simple sauce in this recipe is so darn delicious, who wants any outside flavor detracting from the essence of Italian sausage, bell peppers, and basil? Not me!
And I’m sure you have noticed, with only a cursory glance at the ingredients, this is a really simple dish to prepare. And no, you don’t need onion, garlic, crushed red pepper flakes, etc. Don’t even be tempted. Just trust me on this one. This is a KISS principle recipe. (Keep It Simple Sister.)
So, as always, have fun creating healthy and delicious dishes for your family. And anytime you can get your family to eat (and enjoy) more veggies, give yourself a gold star.
Peace and love to all.
1 T. extra virgin olive oil
1 lb. bulk Italian sausage, pork or chicken
1 tsp. fennel seeds
3 bell peppers, diced (yellow, orange, or red) – I use one of each
1 28-oz. can Italian peeled whole tomatoes (Roma or other)
freshly ground black pepper
½ c. loosely packed basil chiffonade
2 med. sized (about 6-inch each) zucchini
¼ tsp. kosher salt
grated Parmesan or Pecorino Romano cheese
Heat the olive oil in a heavy, large-covered pan. Add the sausage and fry until it is nicely browned. Add the fennel seeds, diced peppers, canned tomatoes (I cut the canned tomatoes into small pieces with a scissors before adding to the pot), and black pepper. Bring to a boil, reduce heat, cover, and cook, stirring occasionally for about 45 minutes or until the peppers are very tender, but not mushy.
Meanwhile, spiralize the zucchini. (I leave the skin on.) Place in a colander in your sink, and sprinkle with the kosher salt. Give the zucchini a toss with the salt, then let it sit until you are ready to add it to the sauce. (Salt and all.)
When ready to serve, add the zoodles and basil to the sauce and cook for 3-4 minutes.
Serve liberally sprinkled with Parmesan or Pecorino-Romana, or my favorite, a combination of the two cheeses.
When I think of biscotti, I always envision traditional anise flavored biscuits. Because I happen to be someone who truly loves a strong, licorice-like taste. But if you are familiar with this site, you know I have several biscotti recipes already posted that do not include anise. So, if you happen to fall in the category that is not anise addicted, I still have you covered. (Just search under “biscotti”, and all will be revealed.)
And I should mention that I already have an anise biscotti recipe on site that is the same as this one except for the addition of anise seed in this recipe. I could have simply updated the original recipe, but I thought it would be more fun to publish this version too. (After all, choices are always nice.) Anyway, these are now my new favorite traditional anise flavored biscotti.
So, lets talk a bit about how easy biscotti biscuits are to build. The dough is basically like many cookie doughs. Cream the butter and sugar together, add eggs and flavoring. Then whisk the flour, leavening (in this case baking powder), and salt together. Then combine the whole mess. But where in drop cookies you simply plop balls of dough on a baking sheet, or rolled cookies, where you cut the rolled-out dough into various shapes, with biscotti you form logs. Then you bake the logs for a short time, remove them from the oven, let them cool a bit, then cut the logs into slices, and bake them a second time until they are done. It may sound like more work then plopping or rolling, but it actually takes very little skill to make perfectly formed biscotti biscuits.
And I’m telling you true, there is just nothing better than a biscotto (singular of biscotti) dunked in your morning coffee or tea. So, you simply must give biscotti a try. And if you have been making biscotti for decades – Saluti!
As always, stay safe and stay focused on the well being of others. If you haven’t been vaccinated against covid, please consider the health of those with whom you make contact. You may be extremely healthy, but you can’t tell from just looking at someone whether or not they too share your good fortune. They could have an immune deficient condition that is not apparent. And even if they have been vaccinated, it would still be very unhealthy for them to contract the disease. So, please don’t make this all about you. Because it is not all about you or your personal rights or about your being a faithful member of your chosen political party! Politics has absolutely nothing to do with fighting a disease. Covid-19 has no affiliation with any political party. It has no political agenda. It’s only mission, if you care to define it as a mission, is to attack people’s lungs and possibly cause an overactive immune response which can lead to increased inflammation throughout our bodies. So, getting vaccinated is necessary if we hope to stop the spread of this deadly disease. Getting vaccinated is simply about saving lives! Yours included. Nothing else. Please do your part.
Peace and love to all.
½ c. unsalted butter, room temperature
1 c. granulated sugar
3 lg. eggs, room temp.
1 tsp. vanilla extract
1 tsp. good anise extract
2 tsp. ground anise seed
3 c. unbleached all-purpose flour
1 T. baking powder
½ tsp. kosher salt
1 c. slivered almonds, lightly toasted
Cream butter and sugar together until light and creamy. Add the eggs, vanilla, anise extract, and ground anise seeds. In a separate bowl, whisk together the flour, baking powder, and salt. Combine with butter mixture. Stir in the slivered almonds.
Using your hands liberally coated with flour, divide the dough into 4 pieces on a floured surface. Pat each piece into a 12×1½-inch rectangle. Place on a large lightly greased baking sheet about 4 inches apart. (Use more than one baking sheet if necessary.) Bake the logs in a pre-heated 350-degree oven for about 20 minutes, or until a light golden brown. Remove from oven.
Cool for 15 minutes. Then cut each roll on a slight diagonal into ¾-inch thick slices. Turn the slices cut side down on the baking sheet. Bake for 10-13 minutes or until each piece is firm and nicely browned. Remove from oven and cool on the baking sheet(s). Cool completely before storing in an airtight container.
Note: I suggest baking biscotti with straight oven heat. Convection baking browns them too quickly.
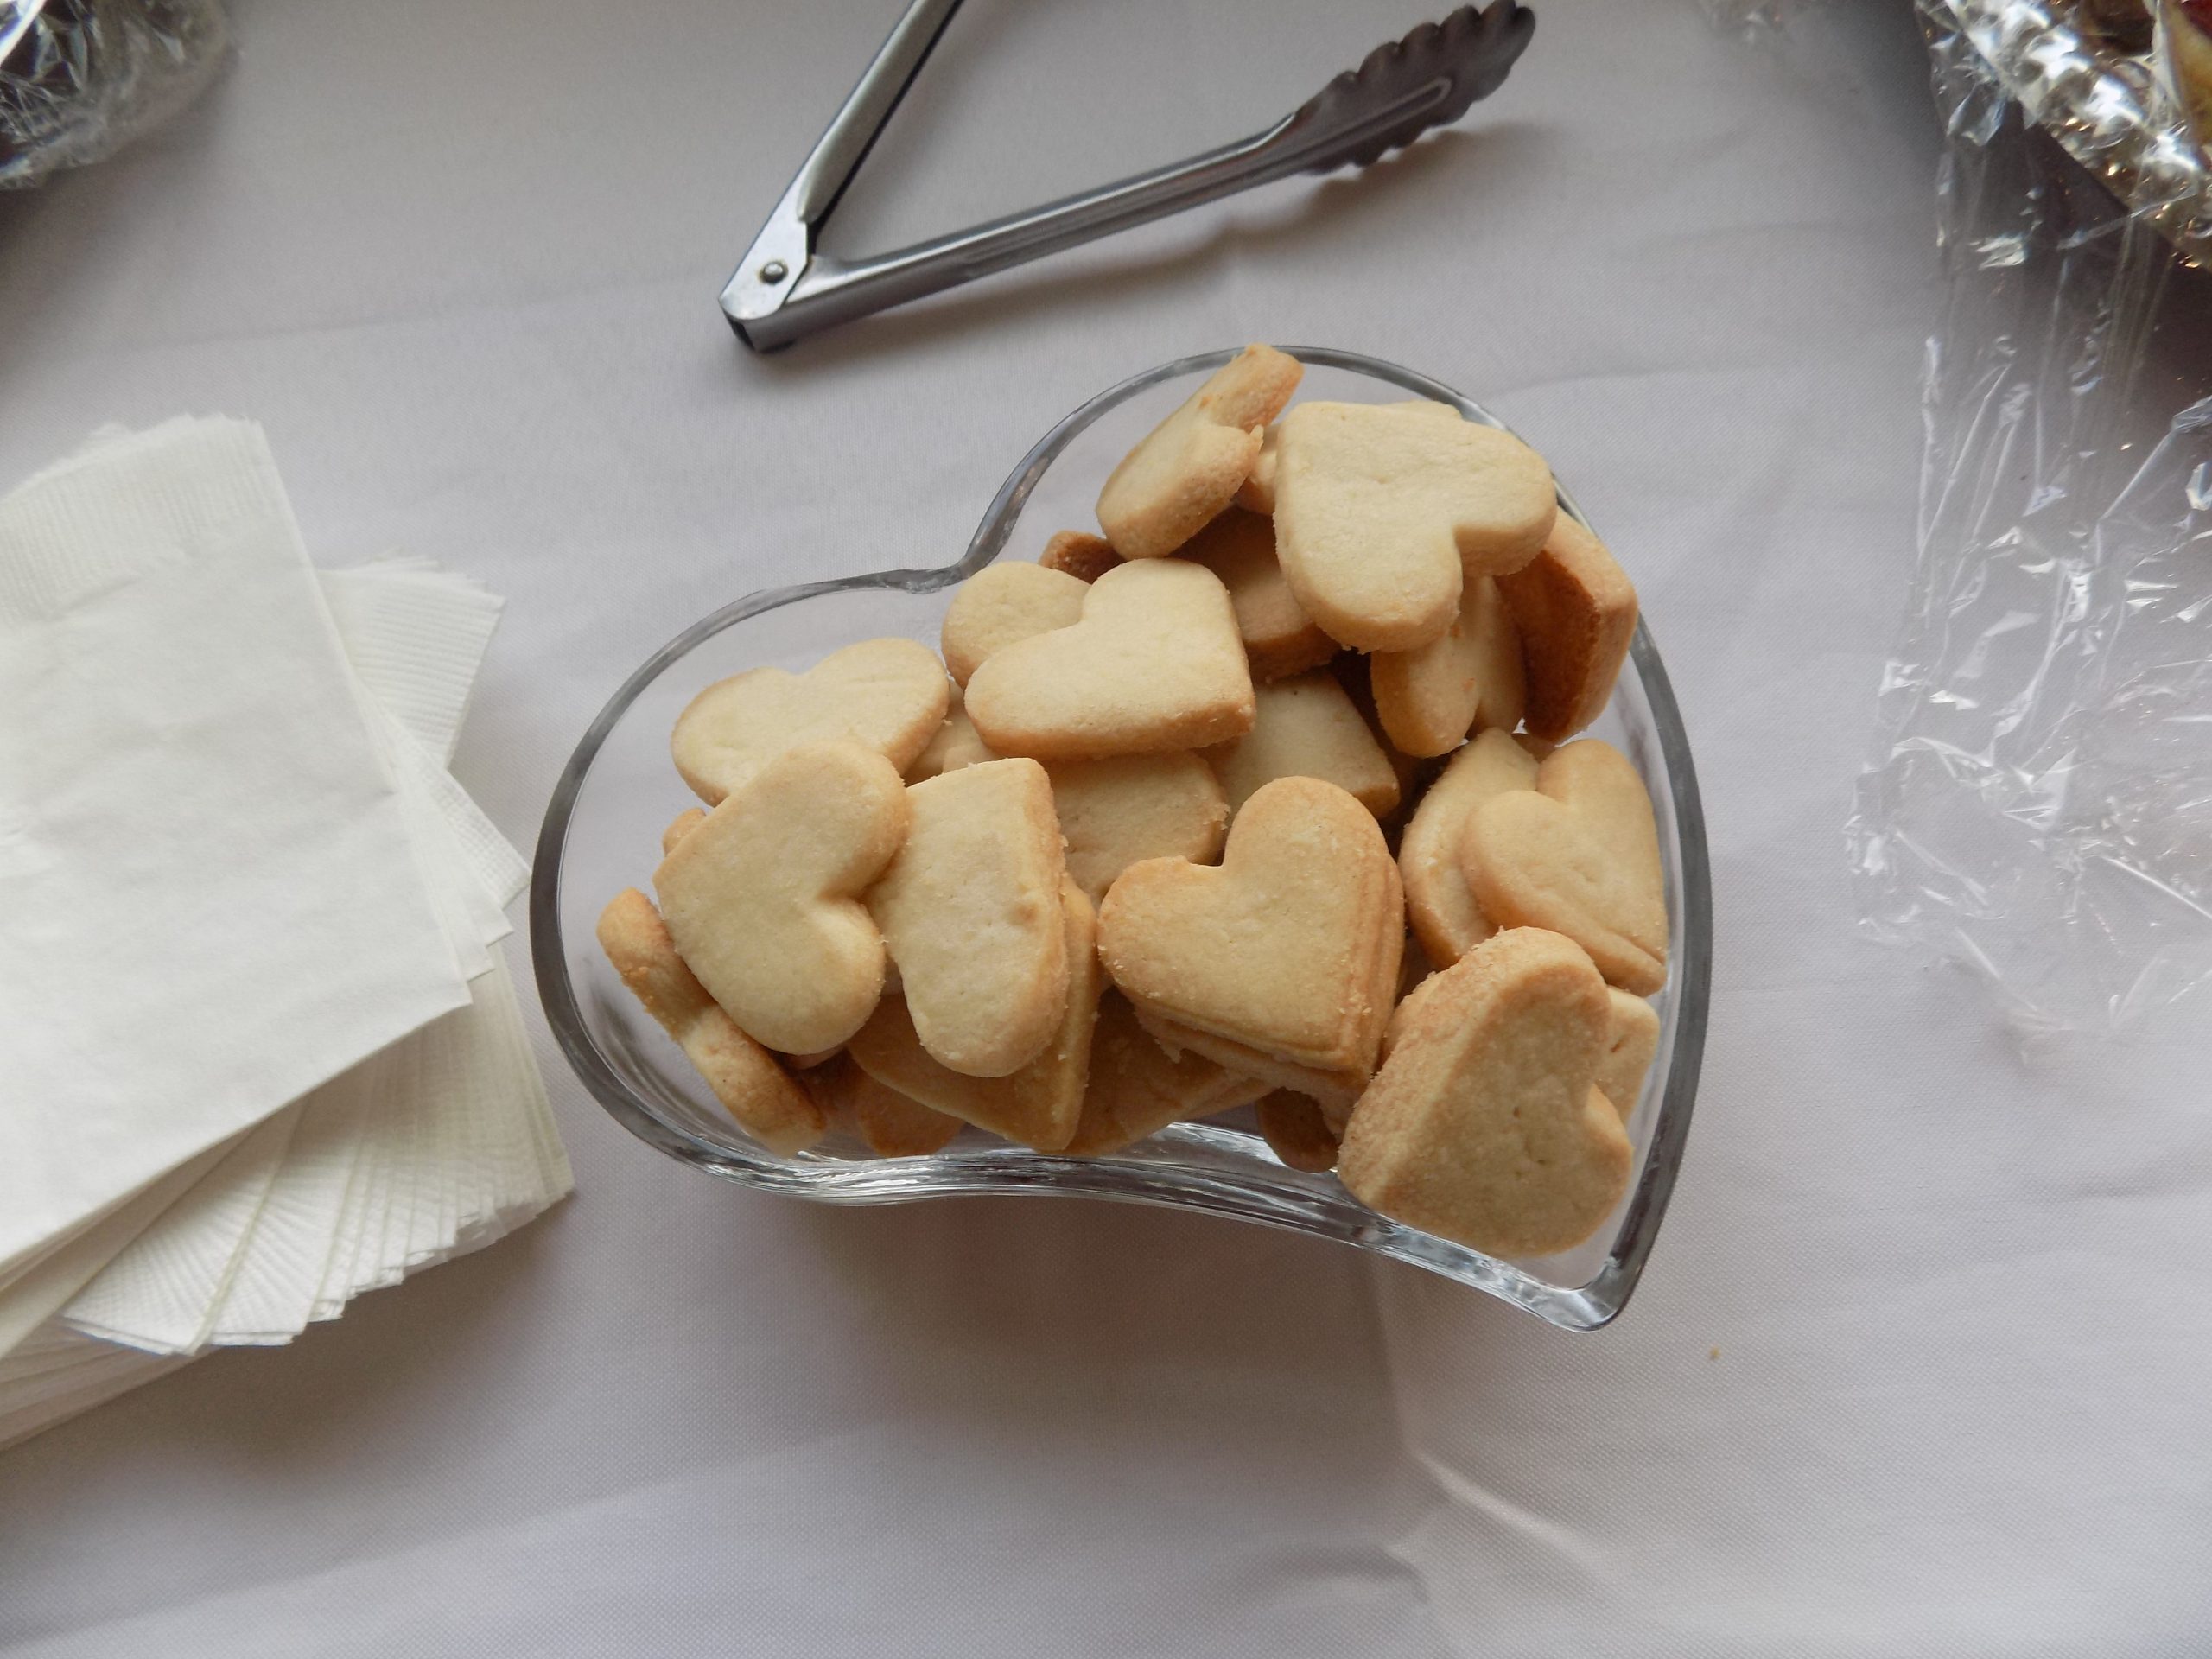
Ok, I’m going to mess with your perceived ideas about Scottish shortbread a wee bit. We all know how wonderful traditional shortbread is with its crunchy, buttery goodness. But what if you added a bit more powdered sugar and coarse kosher salt to the mix? Well, you’d get this cookie, that’s what would happen! And I have to say, for a new way of enjoying plain shortbread, this is so very tasty. The extra sweetness combined with the tiny bits of coarse salt, is a fun new taste sensation. Especially since no one’s taste buds are expecting the cookies to be as sweet or as salty. (And isn’t that fun!)
So, I guess the only thing left to say is – next time you want to prepare a simple shortbread cookie that will be a hit with your family and friends, give this recipe a try.
And if you are wondering why I chose to make tiny heart shape shortbread cookies, well, they were for a very special event. The marriage of my son Sven to Jill, a truly wonderful woman and just the perfect fit for my son. Both being intelligent, athletic, successful, delightful and caring people, and devoted parents. I could not be happier for either of them. (Or for me, if truth be known.)
As always, have fun in your kitchen and always keep thinking positive thoughts. Things do have a way of working out, even if it appears to the contrary as you wait for some type of resolution. So, practice patience. Not easy, I’ll grant you that. But if you continue to have hope, most often, time will take care of whatever situation has held you in its grip.
And again – congratulations to Sven and Jill. And to the many family members on both sides who attended the wedding – thank you for being a part of this special celebration. I love you, one and all.
Peace and love to all.
1 c. (2 sticks) unsalted butter
1 c. powdered sugar
1 tsp. vanilla
½ tsp. kosher salt
¼ tsp. baking powder
2 c. unbleached all-purpose flour, fluffed
Cream the butter, powdered sugar, and vanilla together until light and creamy. Whisk the salt, baking powder, and flour together in a separate bowl. Add to the butter mixture just until well combined. Form dough into a ball.
Place on a lightly floured surface and roll to approximately ⅓-inch thick. Cut into your favorite shapes.
Place on an ungreased cookie sheet and bake in a pre-heated 350-degree oven for 17-18 minutes or until the bottom of the cookies are a nice golden brown. Don’t under-bake. (Please note: the cookies will not expand very much, so they can be placed quite close together on your baking sheet.)
Remove from oven and cool completely on a wire rack. Store in an airtight container.
When we were camping in May with Andy’s sister Katie and her husband Rick, each couple took turn cooking dinner. One night it would be Mr. C. and me slaving away in our trailer preparing dinner for four, and the next evening it would be Rick and Katie’s turn to do the honor. This is what is called, in the vernacular, a win/win situation. Each couple got a night off from cooking (and doing dishes) with the sure knowledge that dinner would be delicious. And in Katie’s case particularly – healthy and inventive. She even went so far as to bring her spiralizer along for the ride. How cool is that! And of course, after seeing how much fun it was to operate the gizmo and how nice the veggies were cut, I made myself a mental note to purchase one when I returned home.
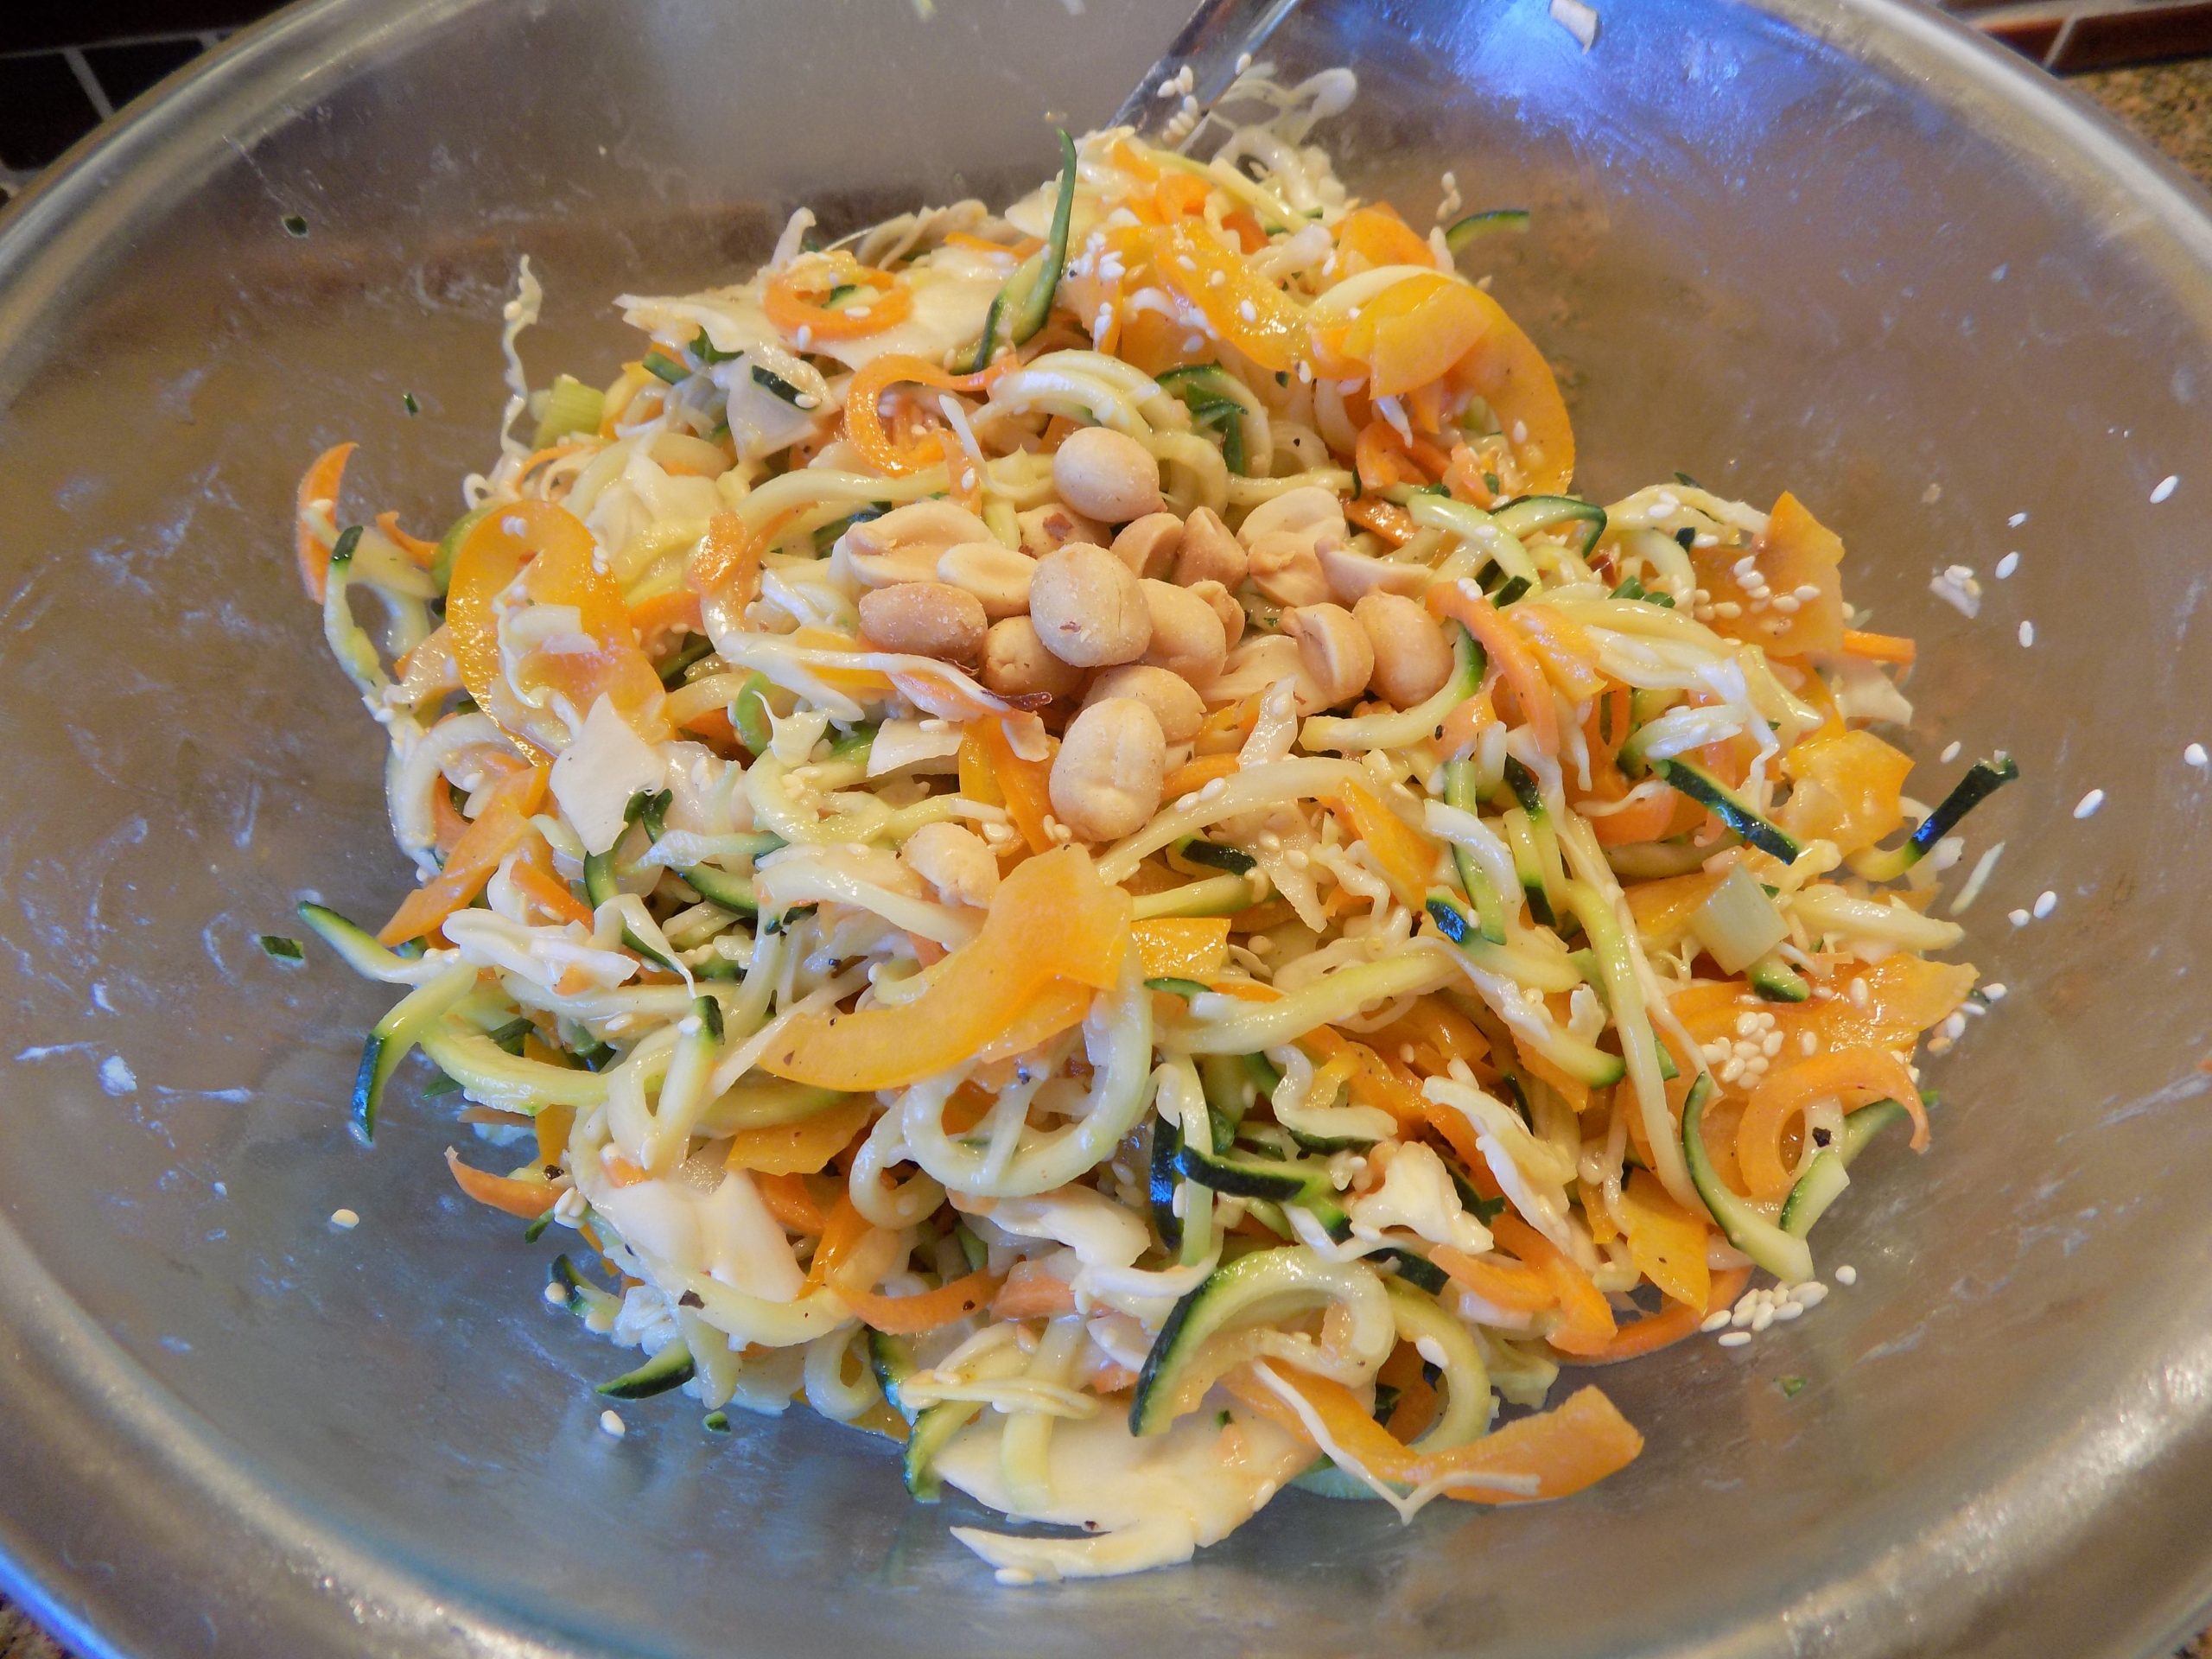
Well, apparently my mental notes aren’t as reliable as they used to be. So, when the mental note finally found its way out of the abyss formerly known as my memory 6 weeks later, I got right on it. I ordered a Brieftons 5-blade spiralizer from Amazon. And frankly, I was amazed at how inexpensive it was. $24 (well really only $23.99) but we all know that’s $24 to anyone with half a brain! But I digress……. And the other evening, for the first time, I took the plastic wonder out of its box, gave it a quick wash, and set it up on my counter. Then with the help of the directions (and yes, I read directions because I’m not mechanically inclined enough to intuit how something works), I spiralized the zucchini, cabbage, carrot, and orange bell pepper for this salad. It was so much fun! And the machine was so easy to clean after I was all done playing with the veggies.
And the salad was delicious. I especially loved the “zoodles”. (That’s zucchini noodles to the unenlightened.) And now I can hardly wait to serve zoodles instead of spaghetti next time I get a hankering for Old Fashioned Meatballs and Spaghetti. Of course, I’ll have to rename the dish. Meatballs and Zoodles. Or Oodles of Zoodles and Meatballs, or a name equally as catchy.
So, in the final analysis, I think I made a wise choice purchasing this new kitchen tool. The price was right, and now the only problem is where to store the darn thing. My pantry is already filled to the brim. But I will make it work. Somehow.
As always, have fun making delicious and healthy food for your family. And thanks again Katie for turning me on to this new way to get more veggies into our diet. Yet again, I am in your debt. Hugs to you and Rick.
And peace and love to all.
Oh, and just so you know, I included 3 salad dressing recipes that can be used with the veggies in this recipe. All 3 are Asian inspired.
Dressing #1 has a bolder flavor than Salad dressings #2 & #3
Dressing #2 would be a better choice if you want the flavor focus to be on the veggies. Dressing #1 takes the focus off the veggies and places it more on the flavor of the dressing.
Dressing #3 is the same dressing you would find on a standard Chinese chicken salad or my version – Asian Slaw.
Salad Dressing #1
2 T. vegetable oil
1 tsp. toasted sesame oil
⅓ c. rice vinegar
3 T. hoisin sauce, or more to taste
5 tsp. soy sauce, or more to taste
1-2 T. peanut butter (creamy or crunchy), or more to taste
1 clove garlic, finely minced
2 tsp. finely minced fresh ginger
pinch crushed red pepper flakes
Whisk the veggie oil, toasted sesame oil, rice vinegar, hoisin sauce, soy sauce, peanut butter, garlic, ginger, and crushed red pepper flakes together. Let sit at room temperature at least 30 minutes before dressing your salad. Store unused dressing in the refrigerator.
Salad Dressing #2
3 T. rice vinegar
1 T. peanut butter
1 tsp. soy sauce
1 tsp. toasted sesame oil
1 clove garlic, finely minced
1 tsp. granulated sugar
freshly ground black pepper
pinch crushed red pepper flakes
Whisk the rice vinegar, peanut butter, soy sauce, toasted sesame oil, garlic, sugar, pepper, and crushed red pepper flakes together. Store in refrigerator.
Salad Dressing #3
¼ c. vegetable oil
2 T. sesame oil
4 tsp. white vinegar (the regular old fashioned distilled kind)
1 tsp. lemon juice (the kind that comes from a real lemon)
1 tsp. sugar
1 tsp. kosher salt
freshly ground black pepper
Whisk all ingredients together. Store in refrigerator.
Put it all together:
2 zucchini (about ¾ lb.) spiralized (zoodles)
¼ tsp. kosher salt
1 c. spiralized green or red cabbage
1 lg. carrot, spiralized
1 red, yellow, or orange bell pepper, spiralized
2 green onions, thinly sliced on the diagonal
2 T. toasted sesame seeds
salted peanuts, for garnish, opt. (or slivered almonds would be perfect if you chose to use dressing #3)
Place the spiralized zucchini in a colander either in a bowl or in the sink. Toss with the salt. Let the zoodles drain a bit of their excess moisture while you prep the other vegetables. Before building the salad, cut the spiralized zucchini with a pair of scissors to make them easier to toss (and eat). (You might want to do the same with the other veggies too.)
In a large mixing bowl, combine the zucchini noodles (unwashed) with the cabbage, carrot, bell pepper, and green onions.
Pour enough dressing (your choice) over the vegetables to coat them, but not drown them. Toss, taste, and adjust seasoning. Refrigerate the salad if made ahead.
Just before serving, toss in the toasted sesame seeds. Garnish with salted peanuts (or almonds). Serve immediately.
And in case you were wondering, of course you can use any old veggie you want in this salad. Actually, the more and different the veggies, the better!
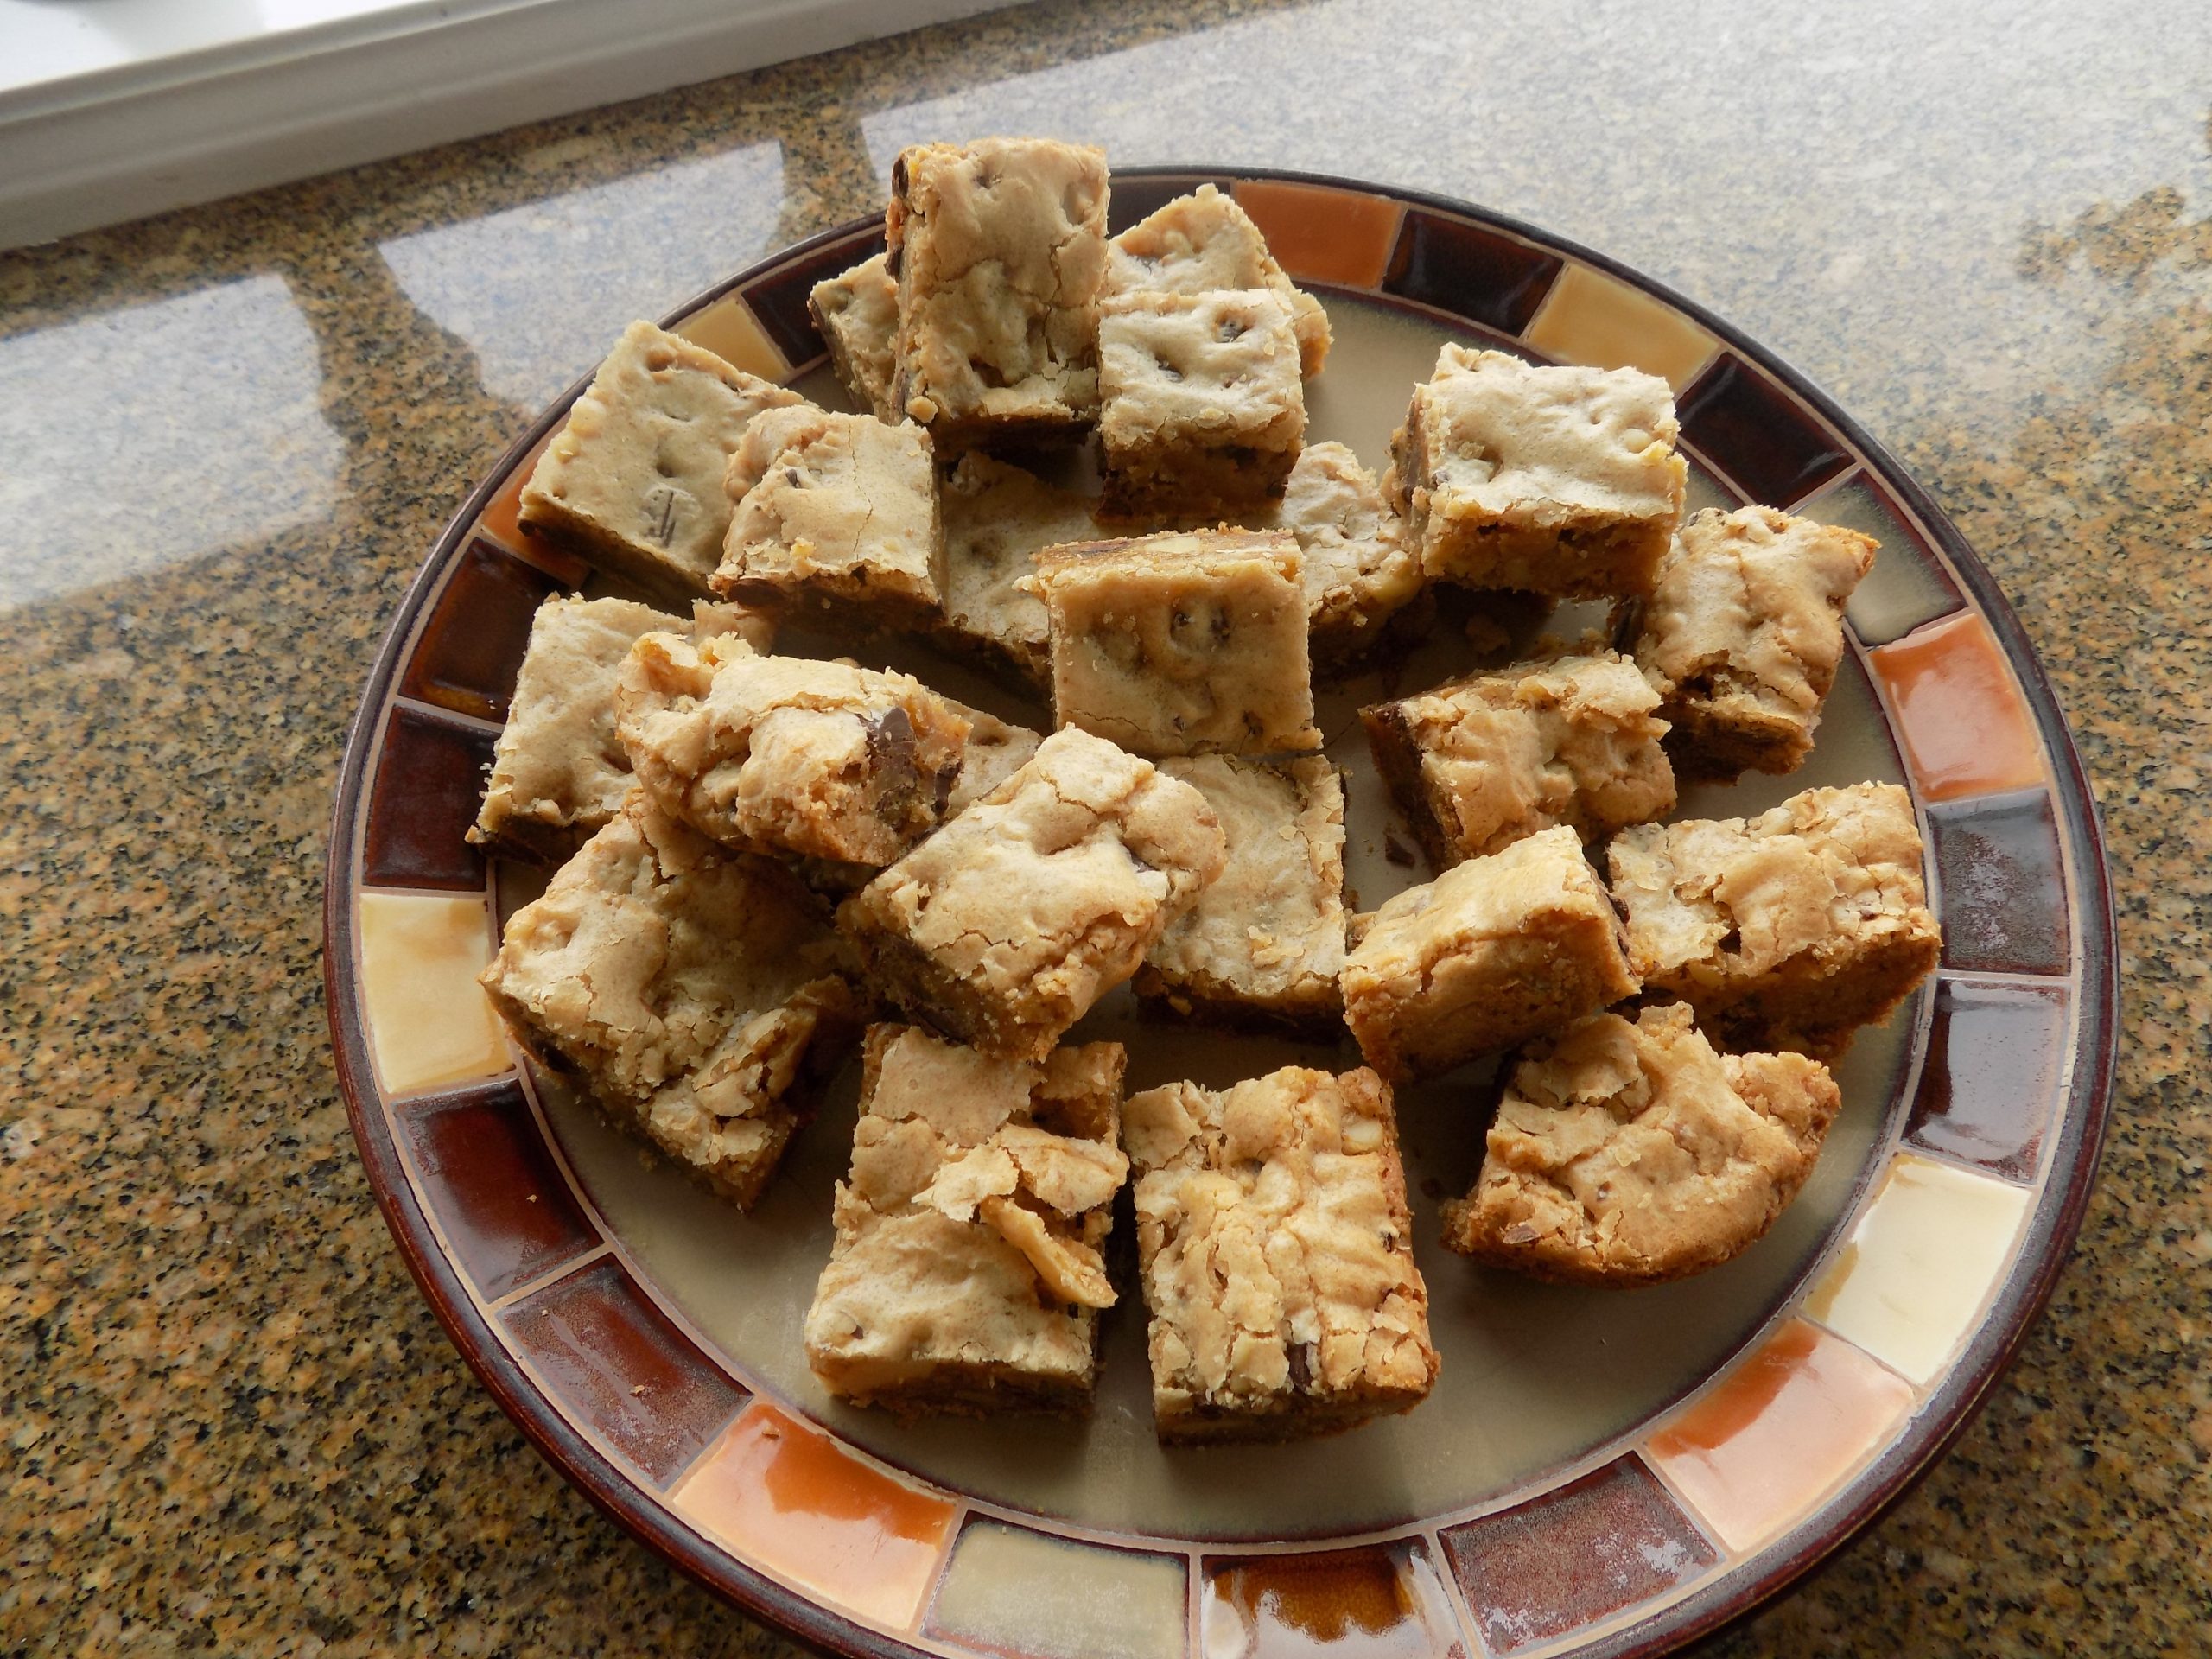
Sometimes I’m almost embarrassed to post a recipe as simple as this one. But maybe, just maybe, you never thought of putting chocolate chips in your blondies either. I say either, because I never thought to do so until our good friend Keith made some to sell at his wife Sheila’s choir fund raiser. One taste told me that I had been missing out on a really good thing. And as some of you well know, I’m getting quite lazy in my golden years. So, a butterscotch flavored chewy bar cookie that is very simple to build, (no mixer required), chocolaty, and crunchy is excellent in every regard! (Including the short amount of time this cookie takes to prepare.)
Absolutely perfect to feed hungry children and starving musicians. (I don’t have kidlets in the house any longer, but sometimes jazz musicians can be found huddled around the baby grand in our living room. And of course, they must be fed frequently to ensure that they keep up their strength. And for whatever reason, cookies and strong coffee are their preferred method of securing sustenance. Imagine that!)
Anyway, these bar cookies are terrific. And like I mentioned above, very easy to make. And I promise not to be offended, in any way, if you already have a favorite blondie recipe you would prefer to use. Just add some chips (chocolate, mint chocolate, peanut butter, white chocolate, M&Ms, etc.) and whatever nut you happen to have around (or not), and you have a whole new bar cookie with which to thrill and delight your family and friends. Drum roll please!
So, as always – have fun in your kitchen. Make some cookies. Because cookies are the only food group that everyone, of every age enjoys. And I know cookies aren’t the healthiest thing to feed your children. But as an occasional treat, there is nothing finer.
Peace and love to all.
½ c. (1 stick) unsalted butter, melted
2 c. brown sugar, packed
2 lg. eggs
2 tsp. vanilla extract
2 tsp. baking powder
1 tsp. kosher salt
2 c. unbleached all-purpose flour, fluffed
1½ c. semisweet chocolate chips
1 c. chopped walnuts, lightly toasted pecans, hazelnuts, etc.
Stir the melted butter, brown sugar, eggs, vanilla, baking powder, and salt together using a whisk. Using a rubber spatula, stir in the flour just until combined. Stir in the chocolate chips and walnuts.
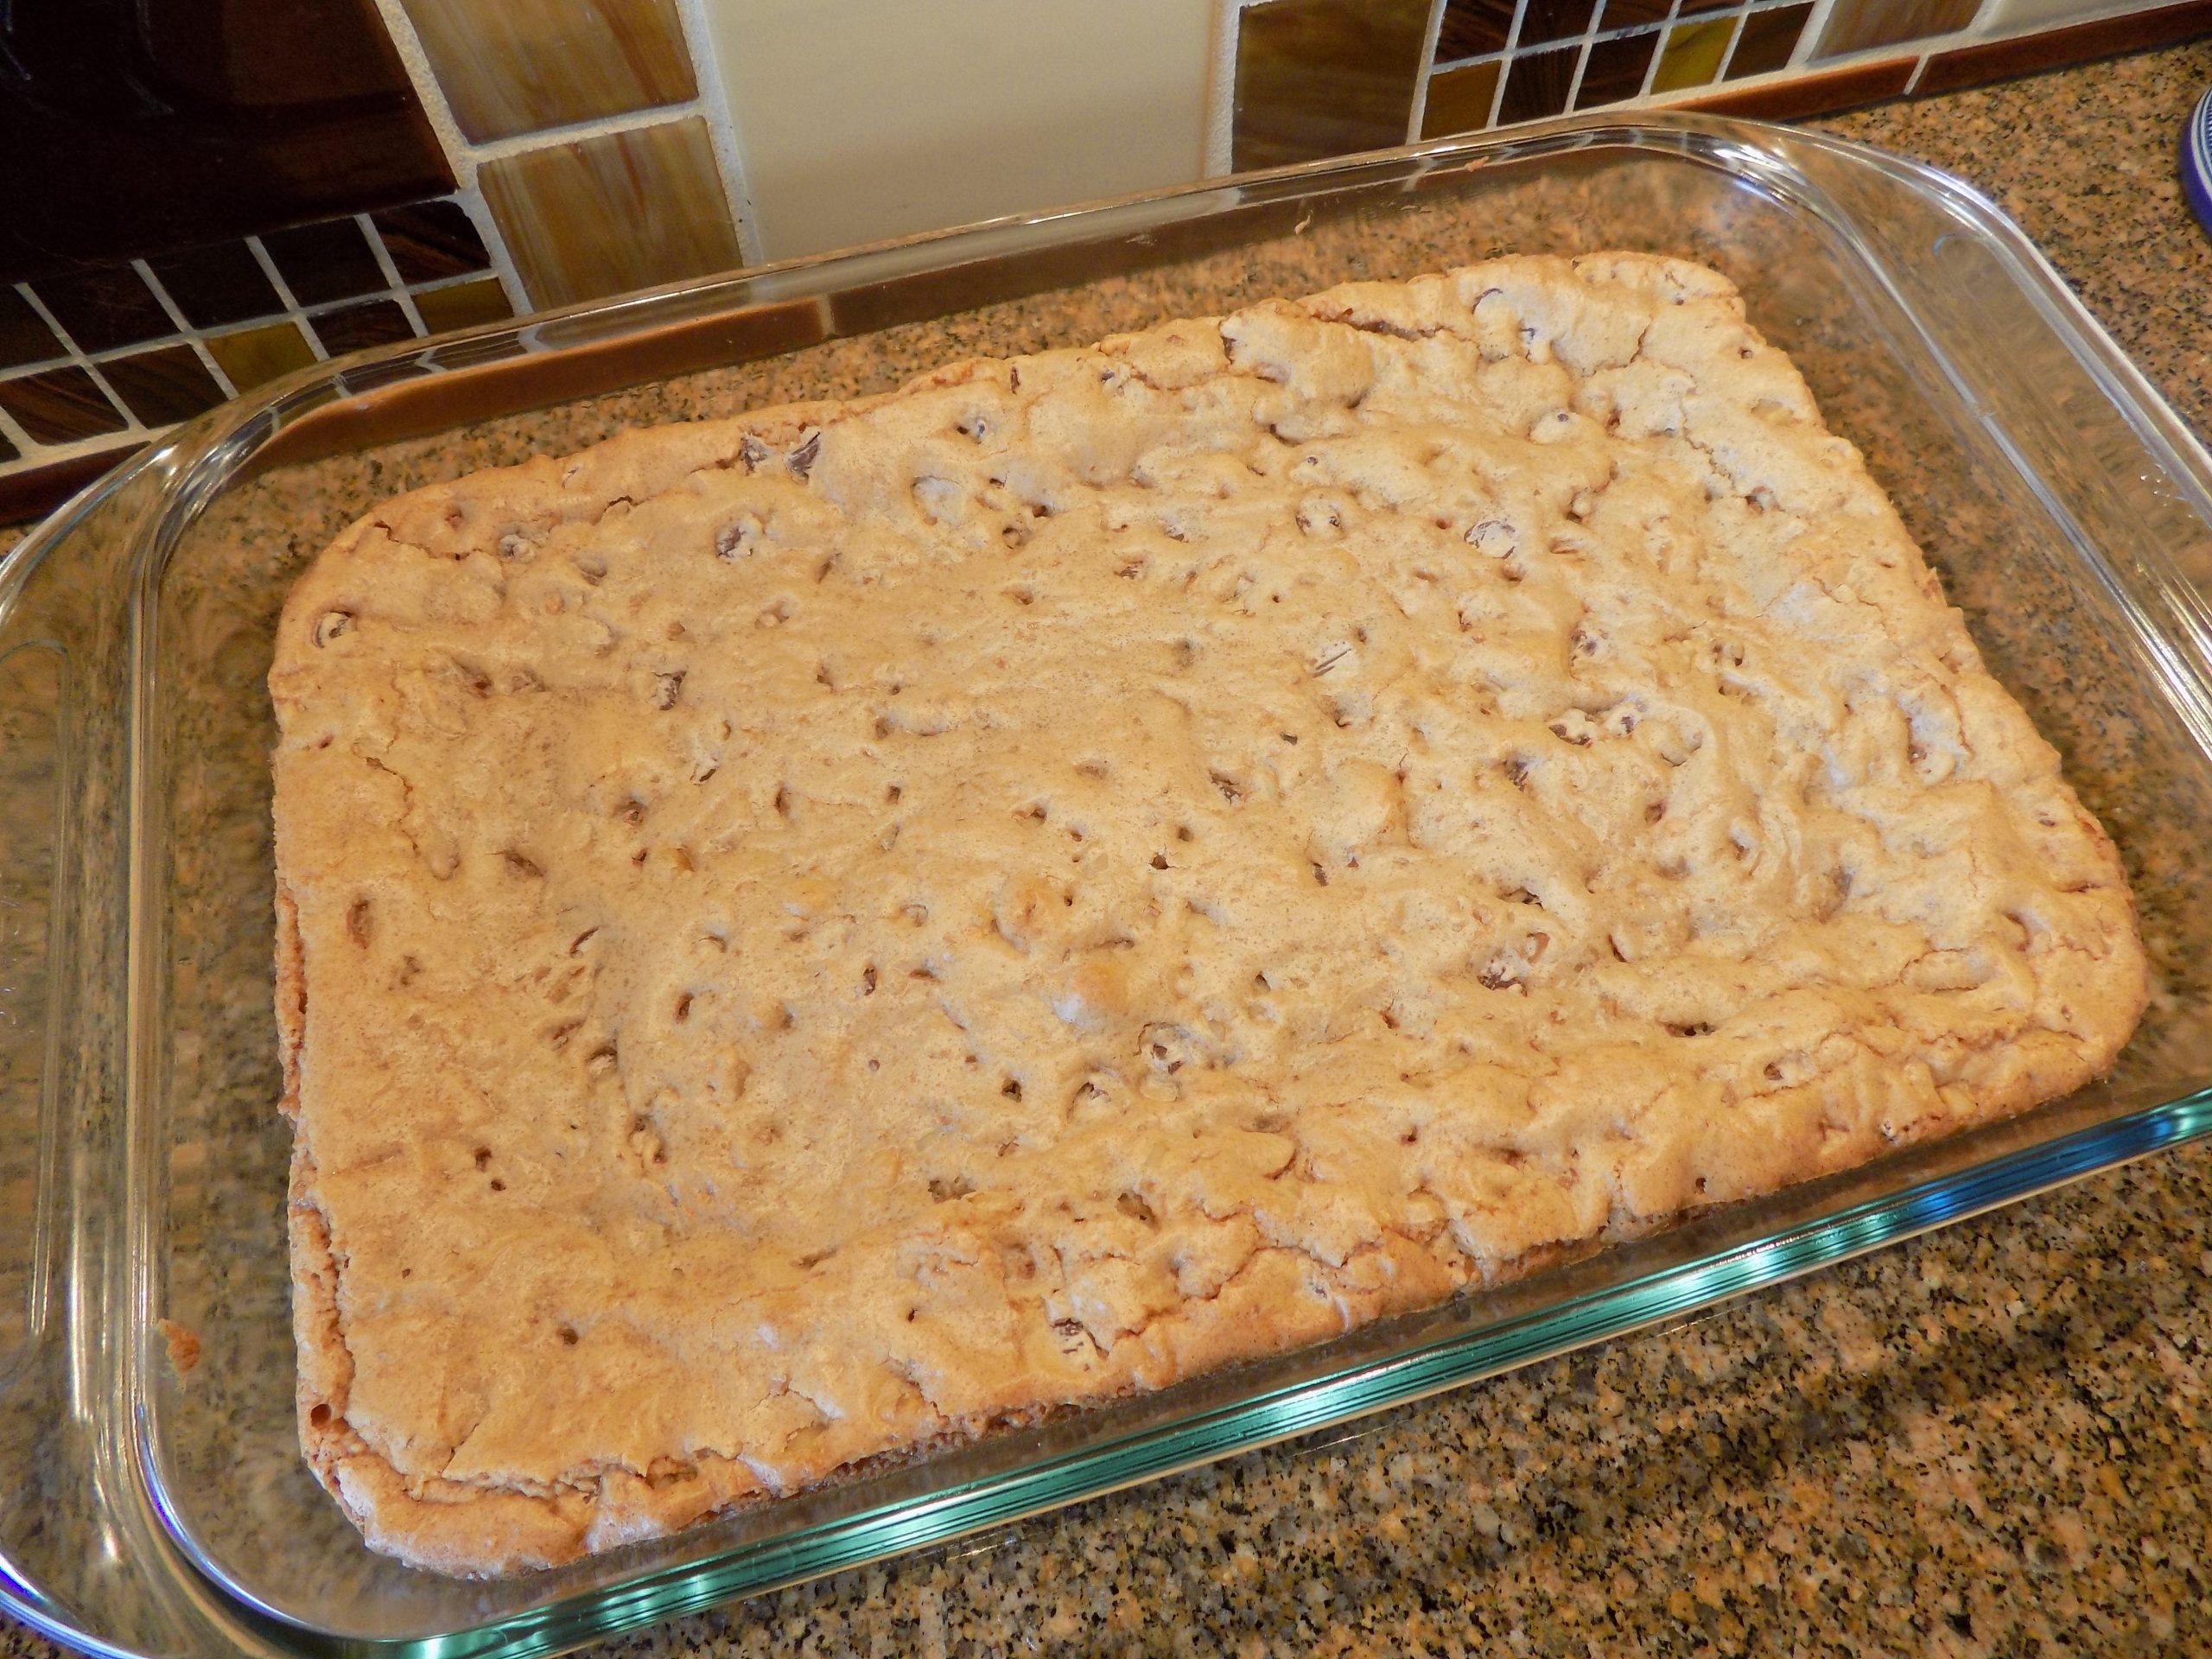
Spread the dough out evenly in a lightly buttered 9×13-inch pan (glass is best). Bake in a pre-heated 325-degree oven (350-degrees if you are using a metal pan) for 30-35 minutes or until a toothpick inserted in the center comes out clean or with just a few fudgy crumbs and the top looks set. Resist overbaking.
Remove from oven and cool on a wire rack. Cut into whatever size pieces you want. Store in an airtight container at room temperature or freeze for longer storage.
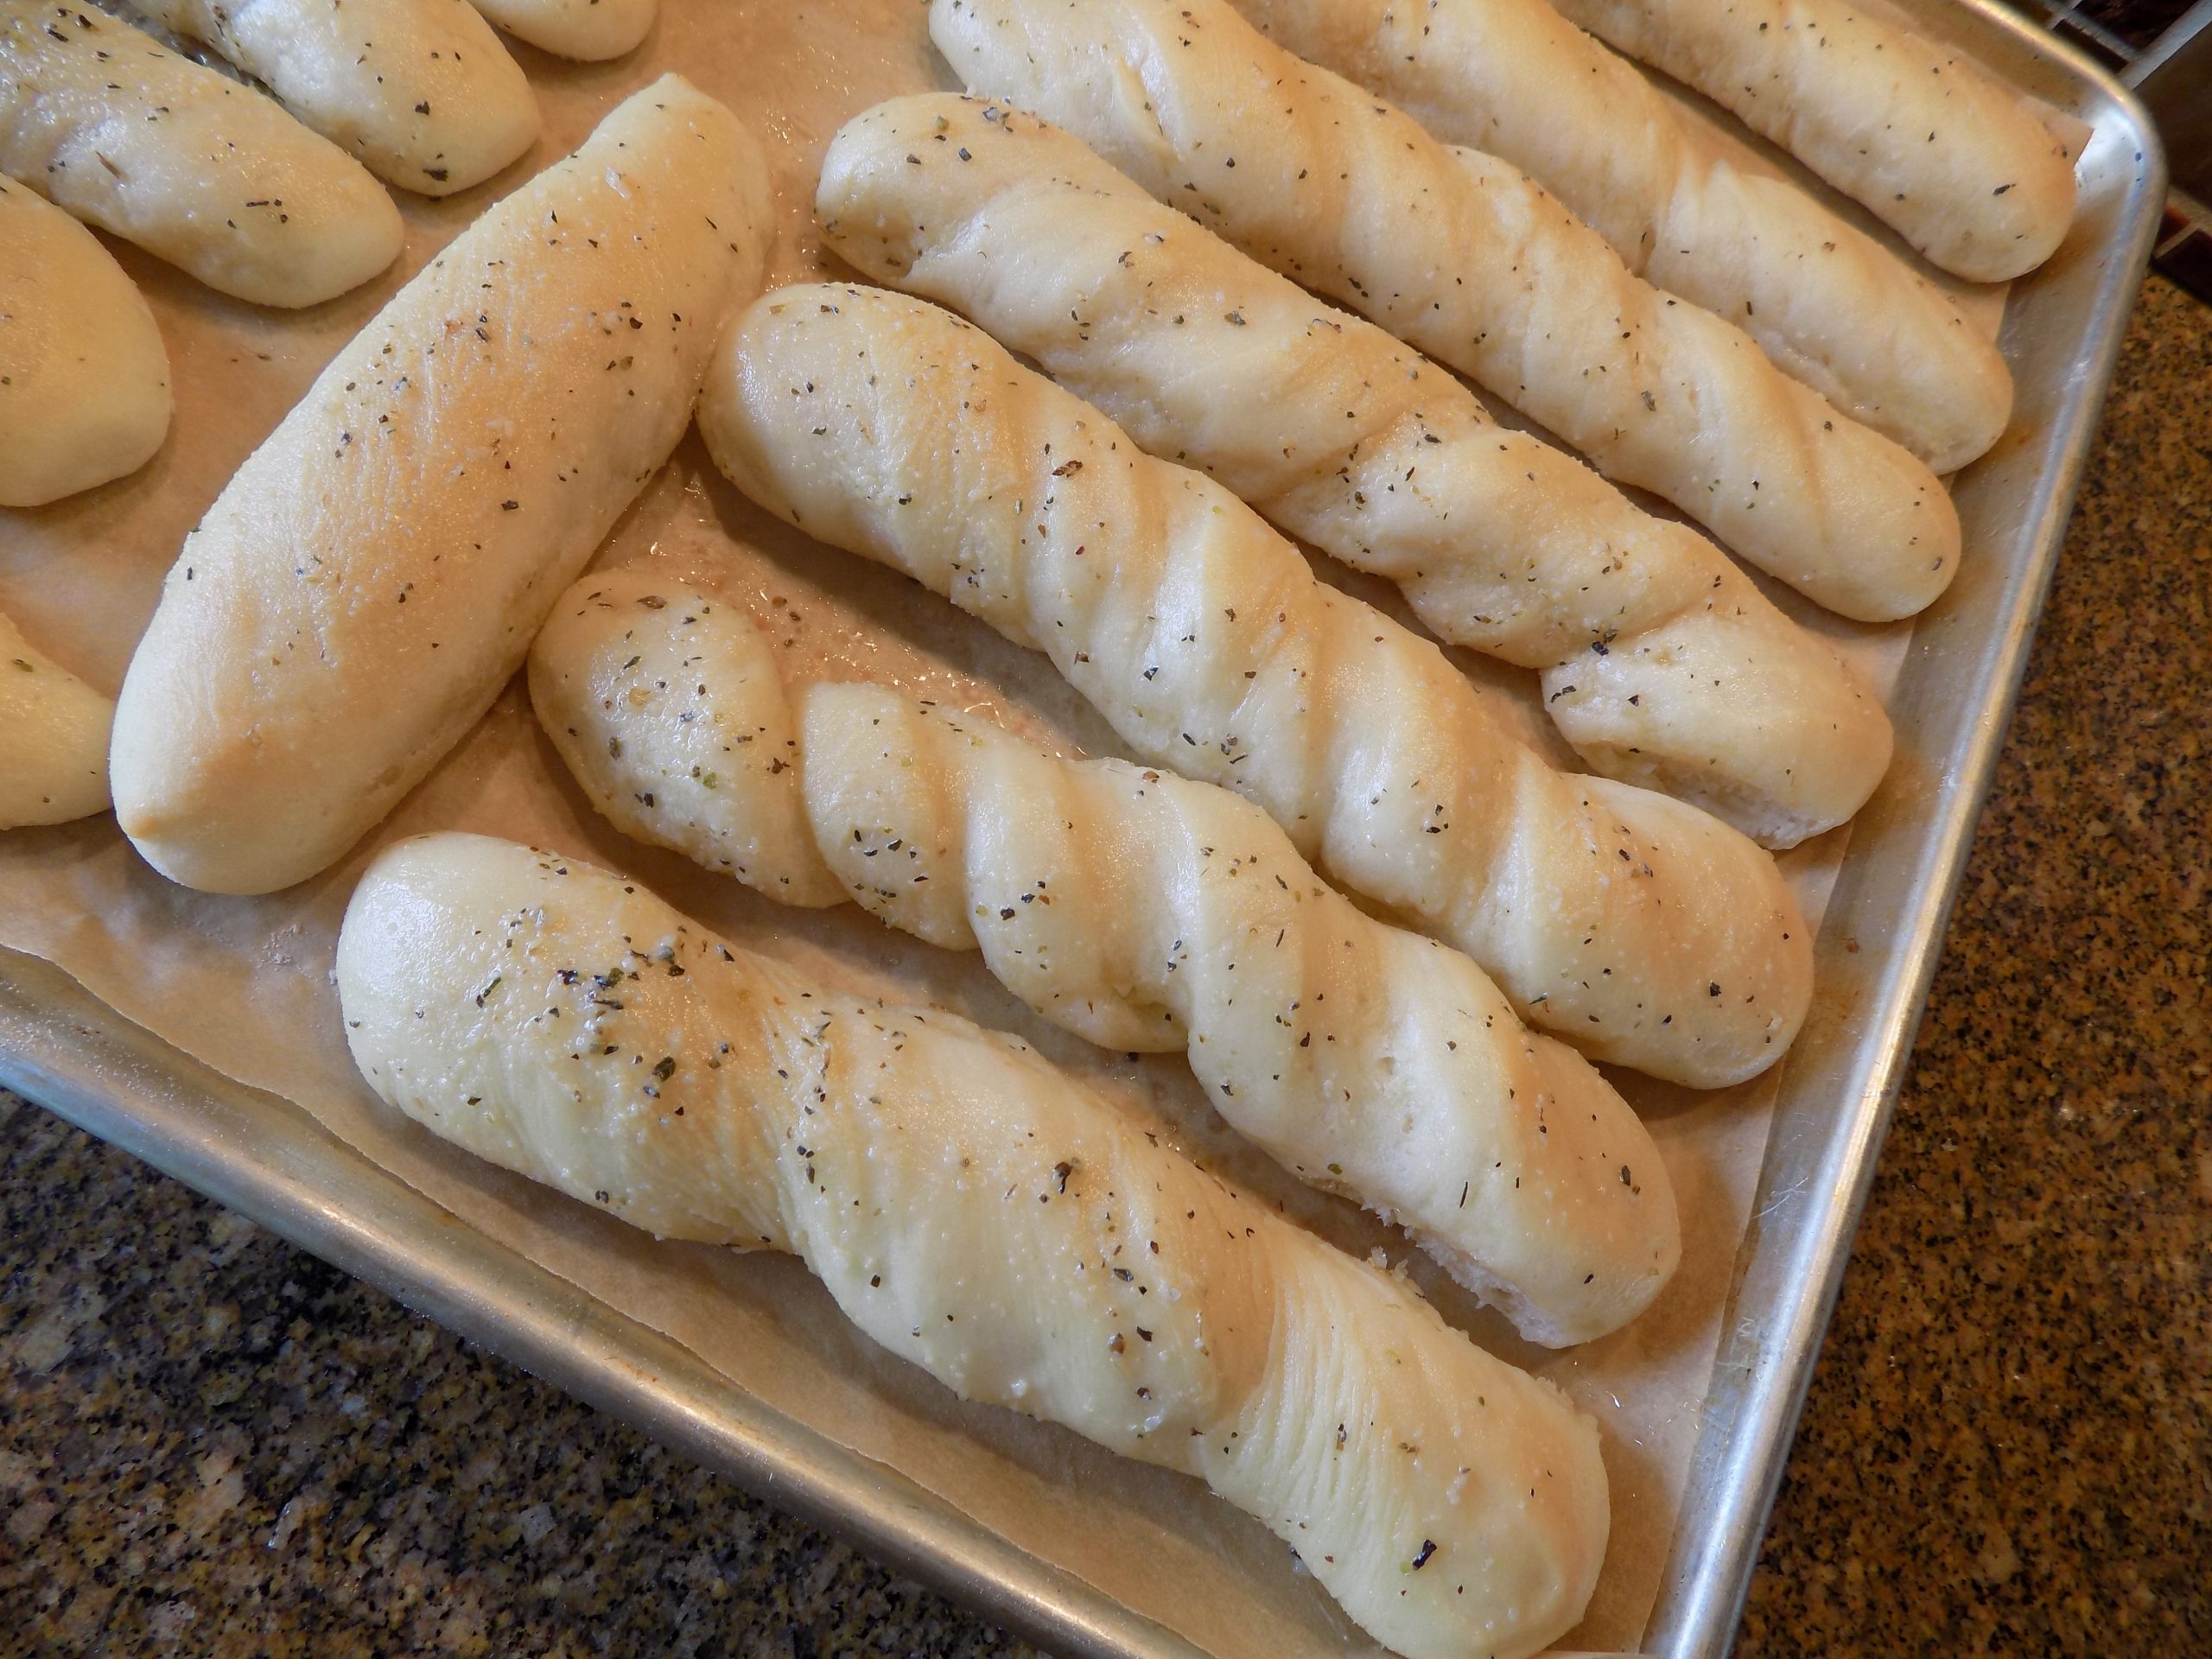
It isn’t often that I get to make a bread that’s as much fun to fix as it is to eat. But for me, breadsticks fit that statement perfectly. But breadsticks do have their limitations. They are not a utilitarian bread product. For example, you can’t put breadsticks in a toaster and serve them for breakfast. You can’t use them to make French toast or French dip sandwiches or any kind of sandwich for that matter. So, as a bread for all occasions, they are a bit lacking.
But when a piece of bread is needed to dip, dunk, or mop – soft breadsticks are unparalleled! First of all, they are the perfect shape. And if they are soft like these breadsticks, anything you dunk them in or slather on them is going to stick. And isn’t that a beautiful thing?!
And in the case of these breadsticks, you make the dough one day and bake it off the next day or the day after. (My favorite type of dough to make.) And just so you know, this is a very self-confident dough. It enjoys being alone in a cold and dark place. In fact, it absolutely insists on some time alone to contemplate whatever it is that bread dough considers worth its time to ponder. And if you forget about it for a day or two, it could care less. It knows full well that sooner or later it will be baked into perfect soft and tasty breadsticks. (We should all be blessed with this amount of confidence!)
So, the only thing left to say, is that these breadsticks are supremely easy to build, truly delicious, and go with all kinds of different dishes. And like every other type of bread we build in our own kitchens, an inexpensive alternative to the exorbitant or should I say extortionary price we are forced to pay for artisanal bread in a bakery or market. Just sayin’!
As always, play with your food and be creative. When you decide it’s time to spend some quality time in your home with your family, make it quality time spent in the kitchen. Believe me, your grown children will not remember that their childhood home was a bit dusty, or the garage was often cluttered. But they will remember the meals your family shared around the dinner table and the times you made cookies together. Let the dusting wait.
Peace and love to all.
1 c. warm water
½ c. whole milk
½ c. sourdough starter discard
2 tsp. instant yeast
1½ tsp. granulated sugar
2 tsp. kosher salt
3 T. olive oil, plus more for greasing the mixing bowl
4 c. unbleached all-purpose flour, more or less
4 T. (½ stick) unsalted butter, melted
½ tsp. kosher salt
¼ rounded tsp. granulated garlic
¼ rounded tsp. Italian seasoning
Combine the warm water, milk, sourdough starter discard, instant yeast, sugar, salt, and 3 tablespoons olive oil in the bowl of your stand mixer. Using the bread hook, add as much flour as necessary to make a soft dough. When the dough has been kneaded for several minutes, and there is still a bit of dough clinging to the bottom of the bowl, the dough is ready for the next step.
Pour a bit of olive oil around the edge of the mixing bowl. Using your fingers and a stiff rubber spatula, form the dough into a nicely greased ball. Cover with plastic wrap and place in your refrigerator overnight or up to three days. When ready to use, remove the dough from fridge and let sit on your counter for an hour.
On a nicely floured surface, shape the dough into a rectangle about 16×7-inches. (I use a rolling pin but patting out the dough with your fingers works too.) Cut the dough into 16 1-inch strips with a pizza cutter. Twist each piece gently and place on a parchment paper lined baking sheet. (They can be fairly close together.)
Cover with a tea towel or piece of plastic wrap sprayed with non- stick spray. Allow to rise until doubled (approximately an hour).
Bake in preheated 350-degree oven for 22-25 minutes or until a very light golden brown. The internal temperature should measure at least 200-degrees.
While the breadsticks are baking, combine the melted butter, kosher salt, granulated garlic, and Italian seasoning. Remove breadsticks from oven and immediately brush with butter mixture.
Serve warm or at room temperature. Great dunked in olive oil, soup, marinara sauce, or used to clean one’s plate or bowl. Or, if you are feeling really unorthodox, you can serve the breadsticks in place of dinner rolls. But, people will talk!
Store any leftovers in an airtight container at room temperature.
In my never-ending quest to make my life less complicated, I have had to make many concessions over the years. One such concession is to not fight battles over which I have absolutely no control. For example – turning Mr. C. into a potato lover. And God knows I’ve tried my darndest to win him over. Because I happen to love potatoes and could happily eat them a couple times a week. And yes, I know. Potatoes are a starchy carbohydrate with little protein to call their own. And according to Harvard, the carbs in potatoes are the kind that the body digests rapidly and have a high glycemic load (or glycemic index). That is, they cause blood sugar and insulin to surge and then dip. But in their defense, they are fat free. And they contain fiber, potassium, vitamin C, vitamin B6, and manganese.
So, what have I learned regarding serving potatoes over the course of 3 decades with Mr. C? Well, I’ve learned to curb my desire for potatoes to about twice a month. And even then, when I serve them, they must be buried in flavor, or gravy, or sour cream, bacon, cheddar cheese, and freshly chopped chives. And before you ask, French fries don’t count. French fries are simply a subset that happen to have hardly any relationship to the actual vegetable itself. They are merely a way of getting ranch dressing into your mouth when eating fried fish or hamburgers.
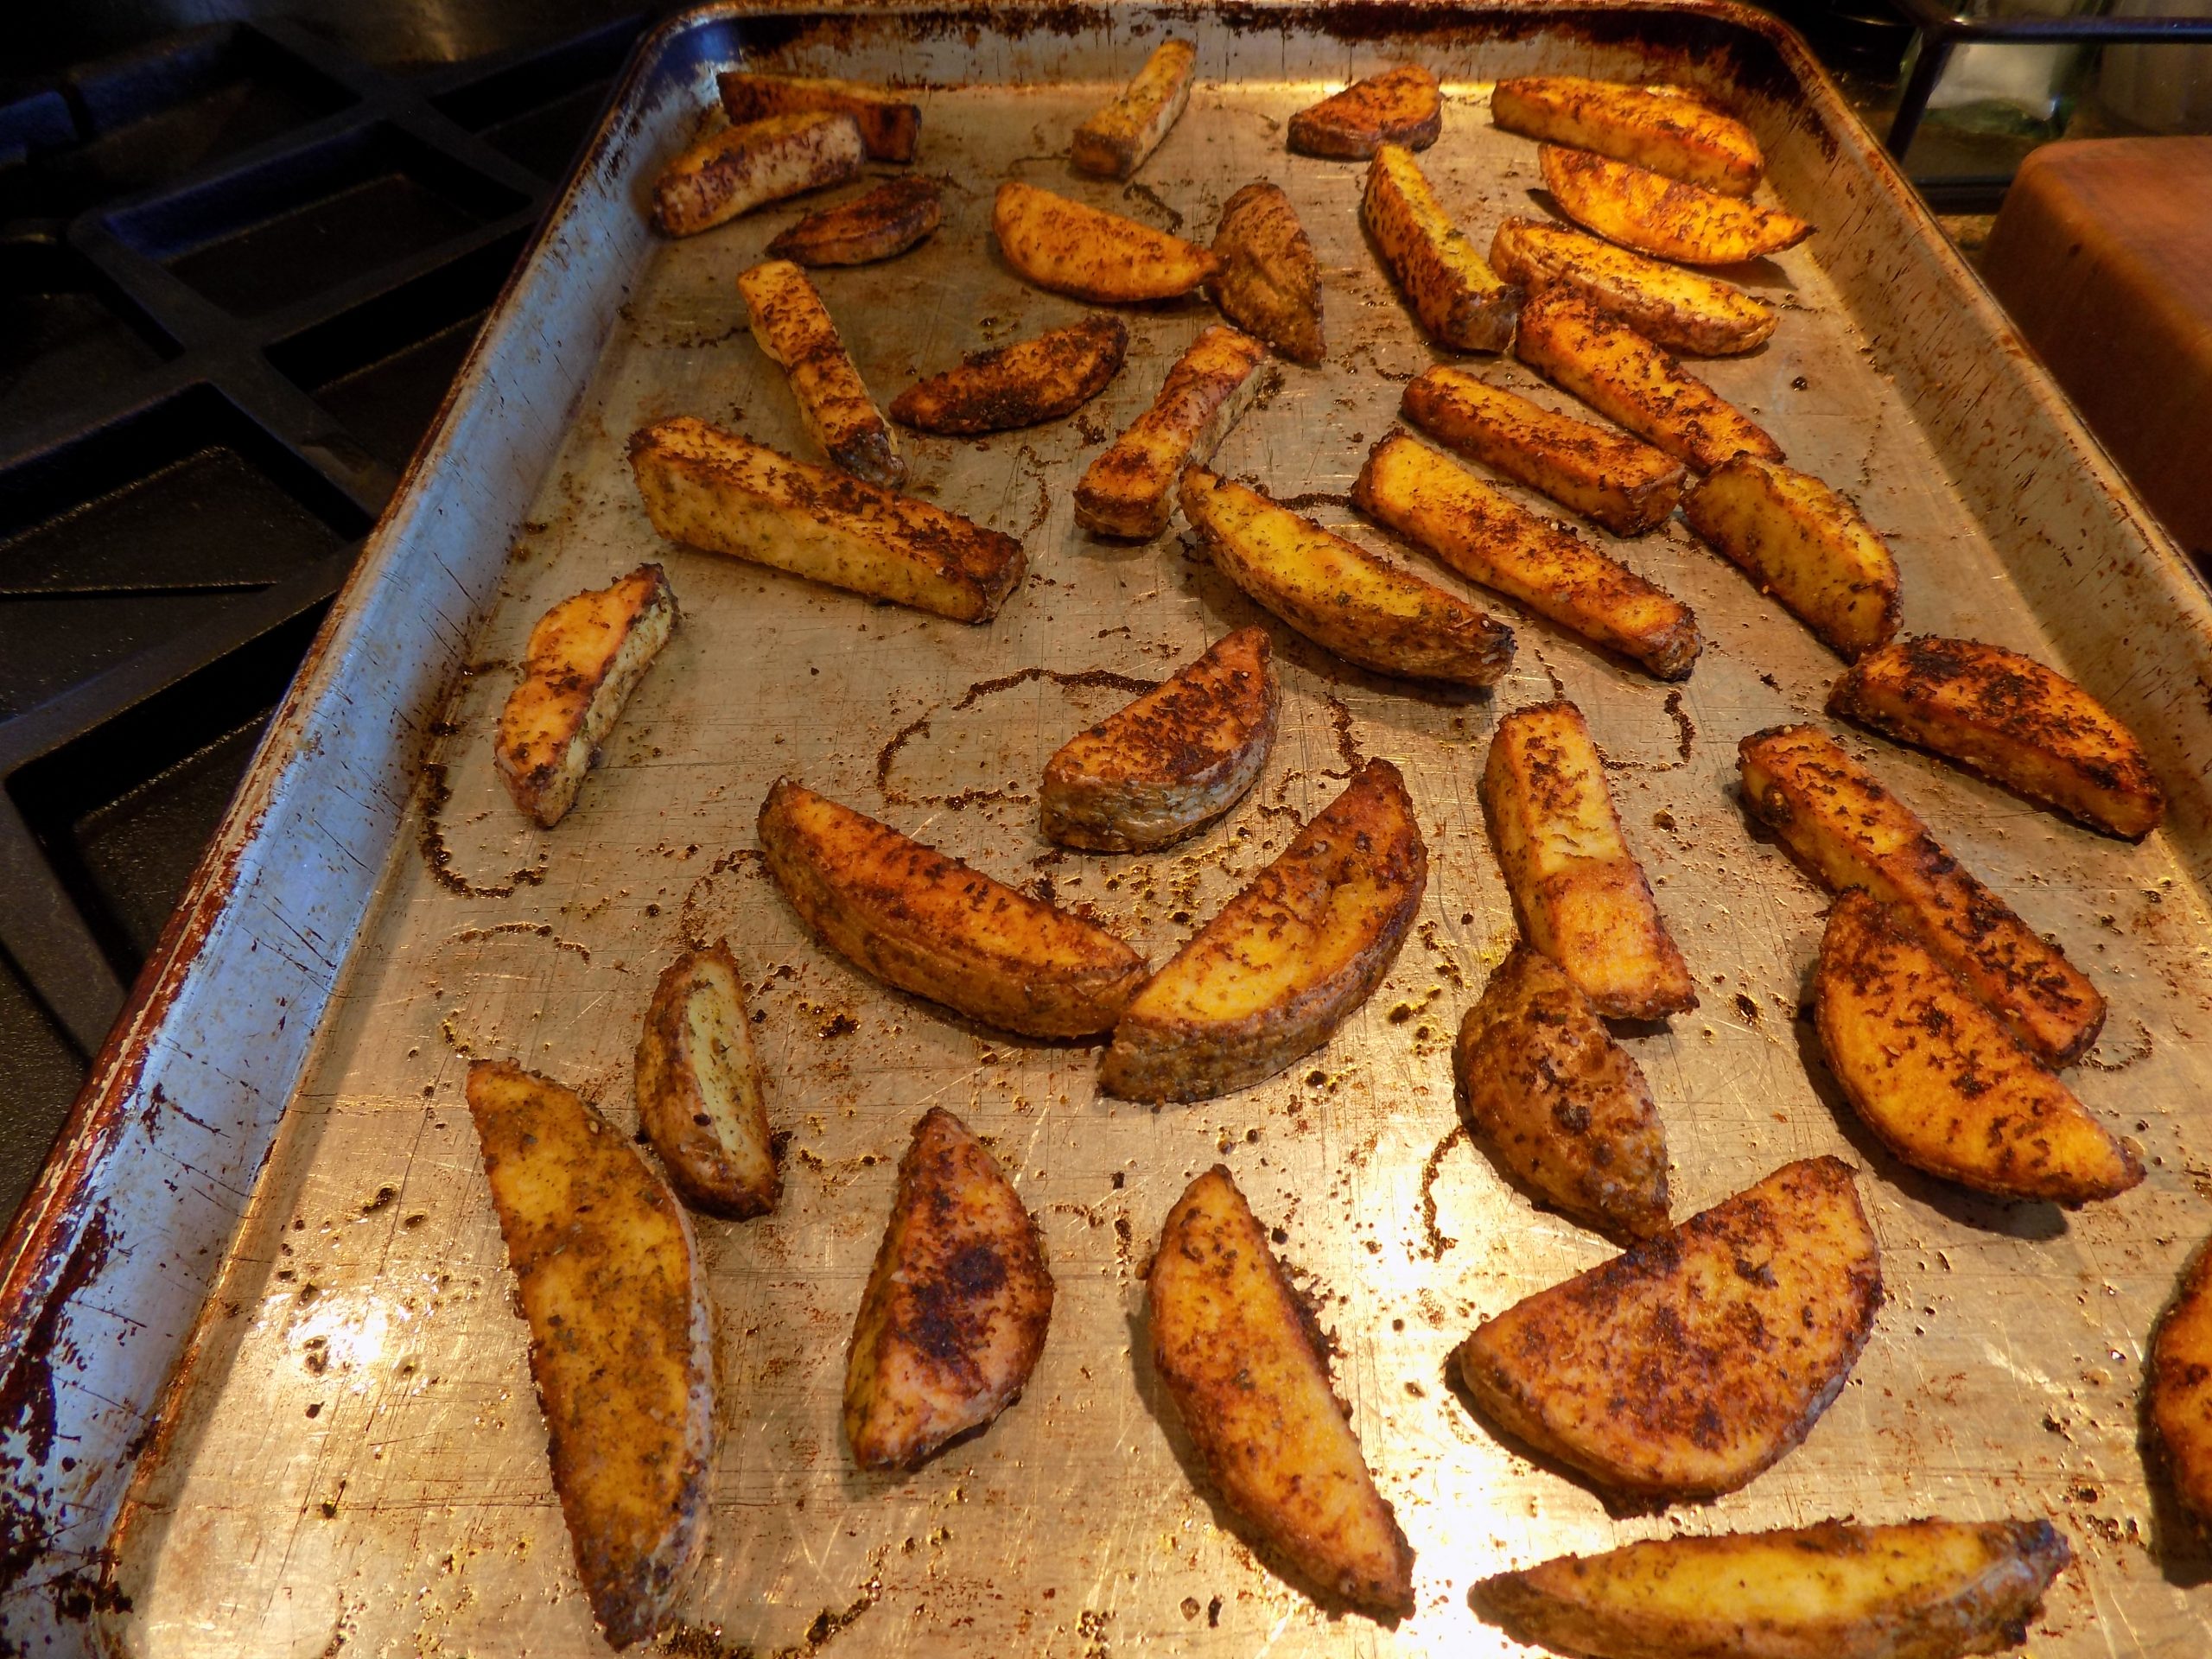
So, what’s a potato lovin’ gal like me to do? Well, this recipe for a baked and low-fat version of a French fry, is an easy way to ensure that we are both going to enjoy our dinner. Because these babies are loaded with flavor. And very easy to prepare. No hacking or slashing. Just some dried herbs and veggies, a bit of olive oil, a few minutes in a hot oven, and dinner is served.
As always, think of new and exciting ways to get your family to eat their veggies. And yes, even with all the bad press, botanically speaking, potatoes are still a vegetable. And as much as I kid about Mr. C., he is a still the most wonderful sport when it comes to trying out all the different dishes I come up with. He never complains, in fact, he generally applauds my efforts. Even when a dish falls into the “ghastly” category, he never throws it in the garbage and calls for pizza delivery. Even though he has Pappa Murphy’s number on speed dial. And who could ask for more loyalty and love than that? So, on that happy note, give these easy and delicious “fries” a try. Your family will be glad you did. Your cardiologist too.
Peace and love to all.
1 tsp. dried parsley
½ tsp. kosher salt
½ tsp. granulated onion
½ tsp. granulated garlic
¼ tsp. dried oregano
¼ tsp. dried thyme
¼ tsp. dried basil
¼ tsp. paprika
freshly ground black pepper
2-3 peeled or unpeeled Yukon Gold potatoes cut lengthwise into ½ inch-thick sticks.
1 T. extra virgin olive oil
Pre-heat the oven to 450-degrees.
Grind the dried parsley, salt, granulated onion, granulated garlic, oregano, thyme, basil, paprika, and black pepper together. (I use my small mortar and pestle.)
Spray rimmed baking sheet with nonstick spray.
Rinse the cut potatoes under cold water, then thoroughly dry them with a tea towel or paper towels.
Toss potatoes with olive oil and spice mix. Transfer to prepared sheet, spreading in a single layer. Place in top third of oven.
Bake in pre-heated oven turning after 20 minutes. Continue to bake for an additional 20-minutes, or until the potatoes are tender on the inside and brown on the outside.
Remove from oven and serve immediately. (No ranch dressing required.)
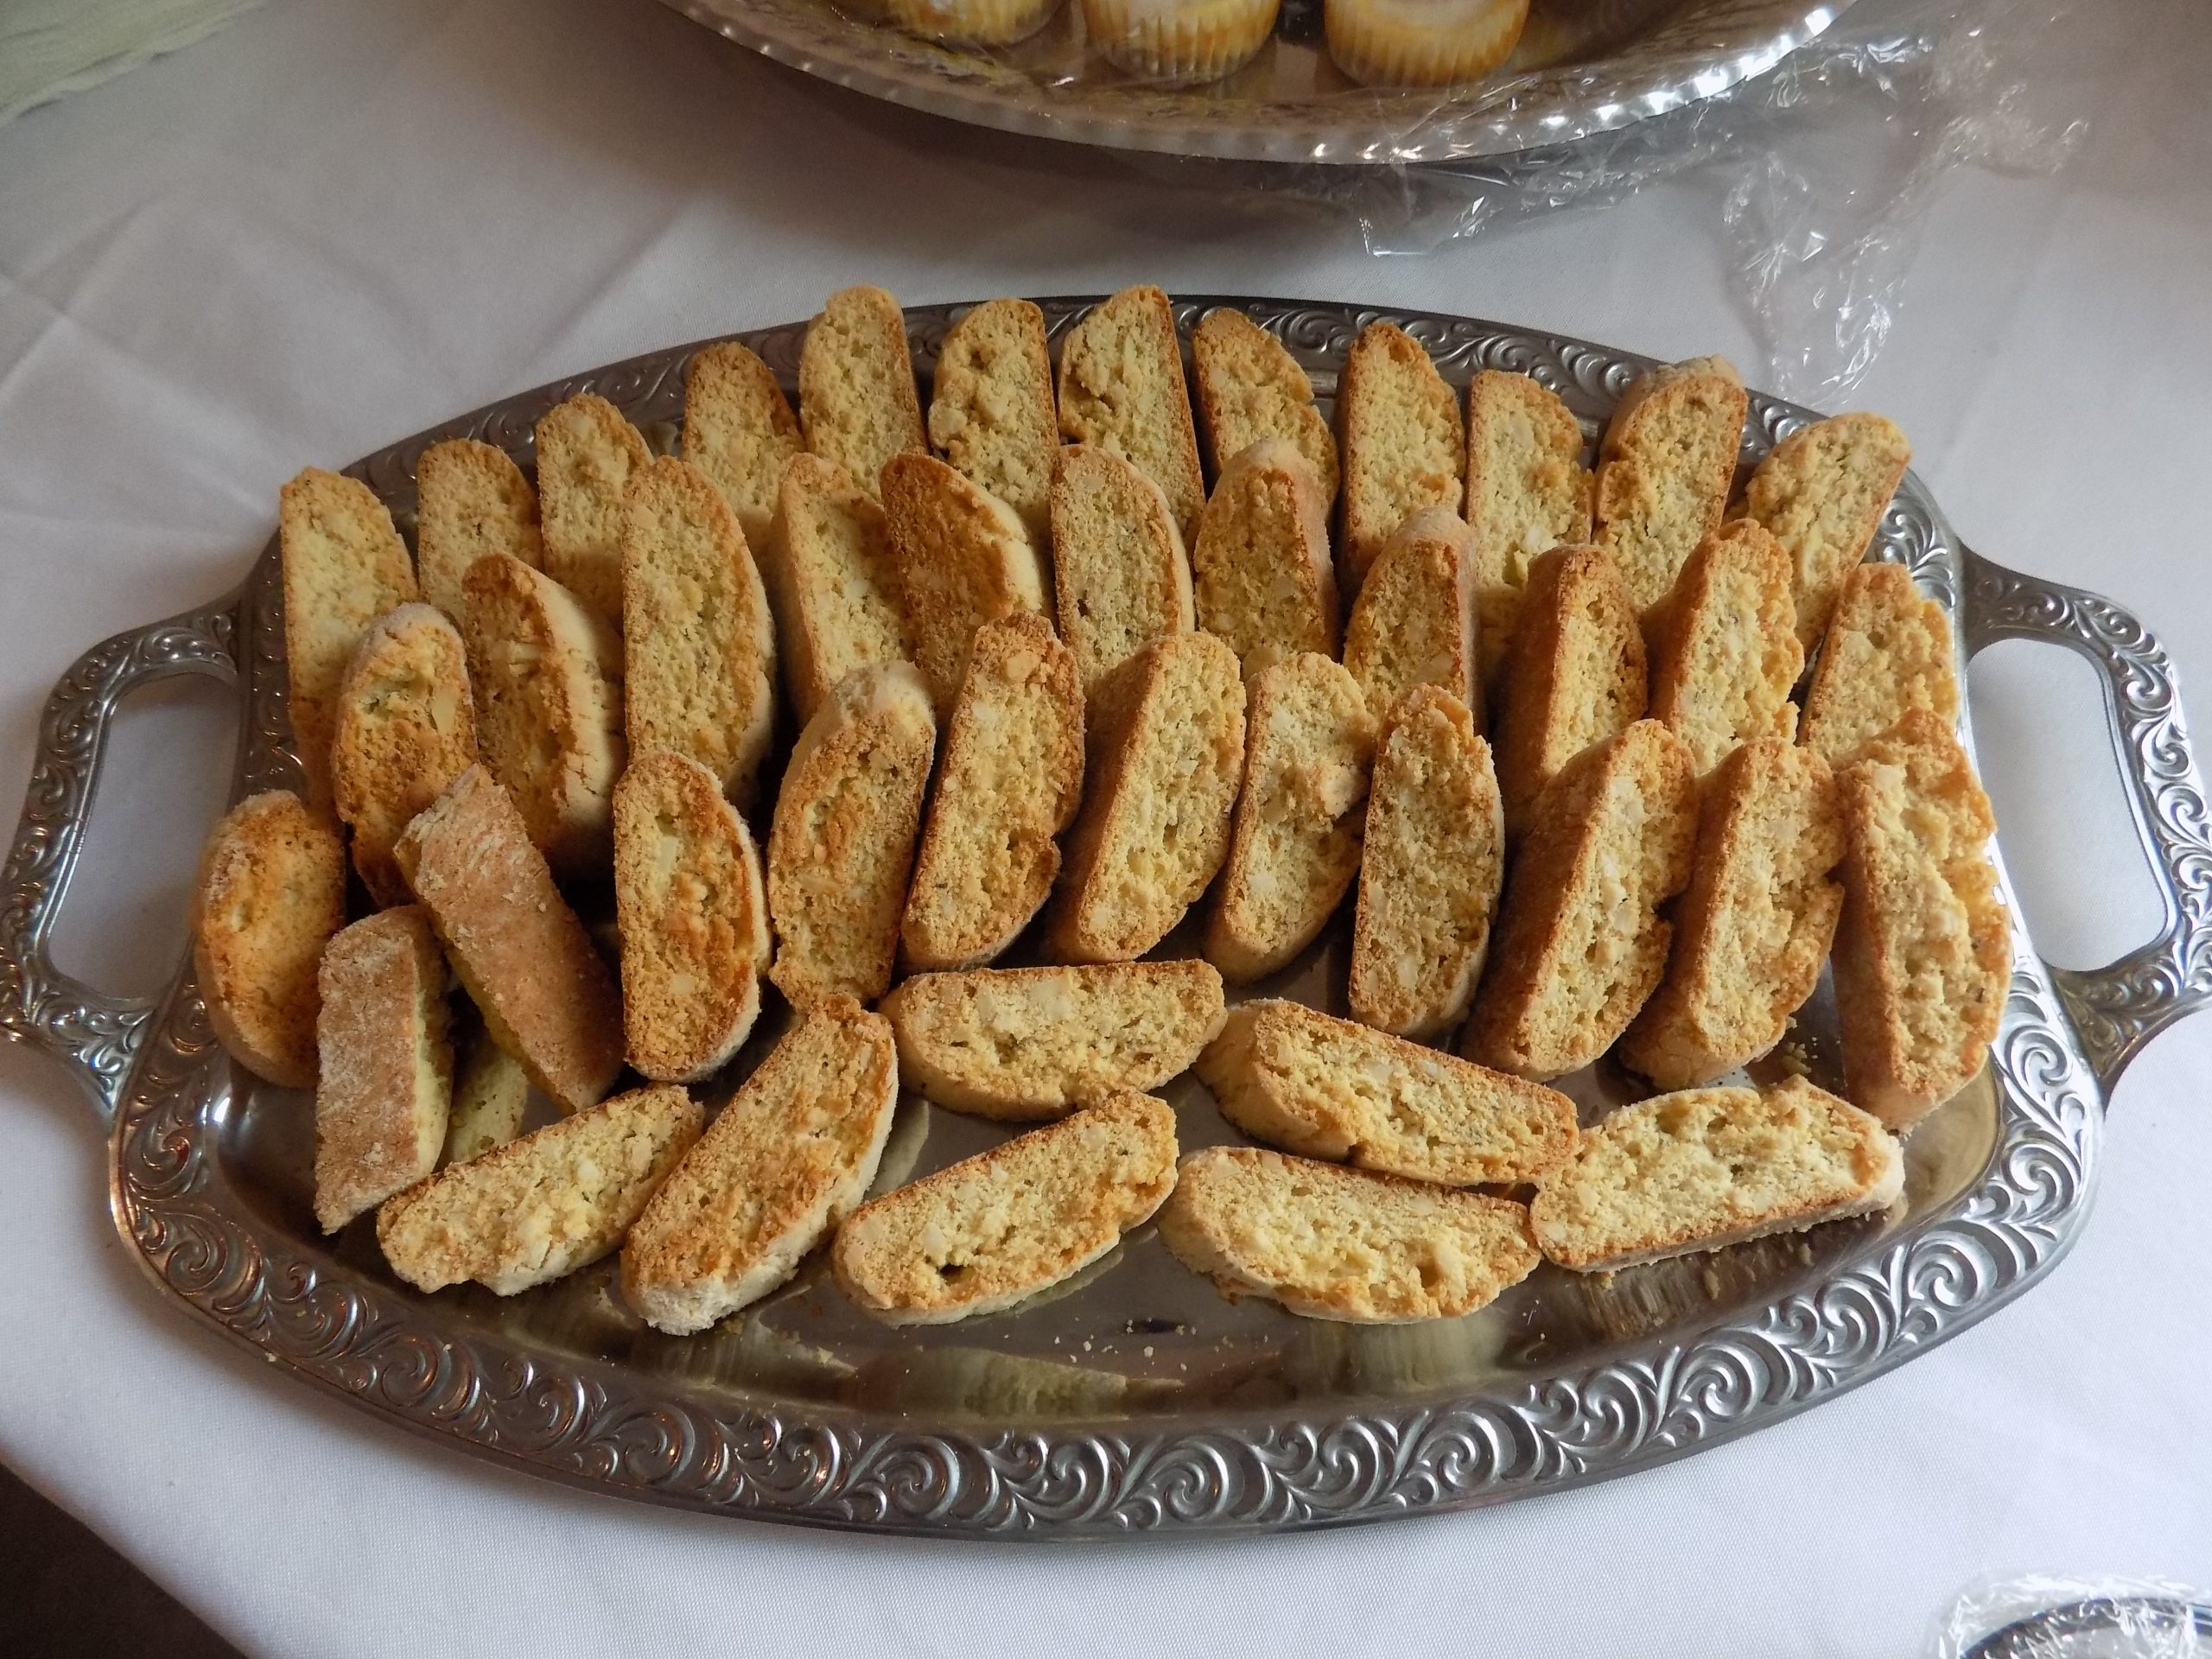
I wish I could say I first tasted biscotti on one of my trips to Italy. But alas, that is not the case. In fact, I don’t believe I ever saw biscotti offered on a menu. Of course, it probably was available, and my eyes just skipped over it because there were so many other choices that I knew I wouldn’t find when I returned home. Like a licorice flavored gelato or bomboloni (a traditional Italian pastry similar to a doughnut and filled with a rich vanilla cream). All I know is that I never actually enjoyed a biscotto (the singular of biscotti) while traveling. But that’s OK, because I so love making these little darlings and filling our very own biscotti jar with one type or another of these beloved biscuits.
Our very own biscotti jar brought home from Italy in our luggage many years ago.
When and by whom I was first introduced to biscotti, I have absolutely no recollection. All I know is that I have been making biscotti for many years. Decades, actually!
I think one of the main reasons I enjoy baking this very traditional Italian delight is because they are just so stinkin’ easy to build. Plus, this double baked cookie stays fresh much longer than most cookies. And biscotti is dunkable. (And who isn’t into dunking their food?!) In fact, biscotti is designed to be dunked in your favorite beverage. Absolutely perfect dunked in coffee or Vin Santo*, or as Mr. C. recently discovered, a wee dram of really great Scotch. (Our good friend Jim will back Mr. C. up on the joys of dunking biscotti in Scotch!) But if you are the one in a billion who doesn’t like to dunk your food, you can always just gnaw away on a biscotto until only tiny crumbs remain. Your cookie, your choice!
As always, take delight in the food you concoct for yourself and others. Be open to new ingredients and new dishes, but don’t forget about those foods that you and your family love. For most of us, we live to eat. We don’t just eat to live. So, continue to make healthy and nutritious food, but don’t forget about those special once in a while treats either. Now, if you will excuse me, I’m off to build a new comfort food from a recipe I threw together yesterday. Baked Egg Noodles in a Creamy Garlic, Spinach, and Cheese Sauce. Wish me luck!
Peace and love to all.
2 c. all-purpose flour, fluffed
1½ tsp. baking powder
½ tsp. kosher salt
½ c. (1 stick) unsalted butter, room temperature
¾ c. granulated sugar
zest of 1 lg. orange
1 tsp. vanilla
2 lg. eggs, room temperature
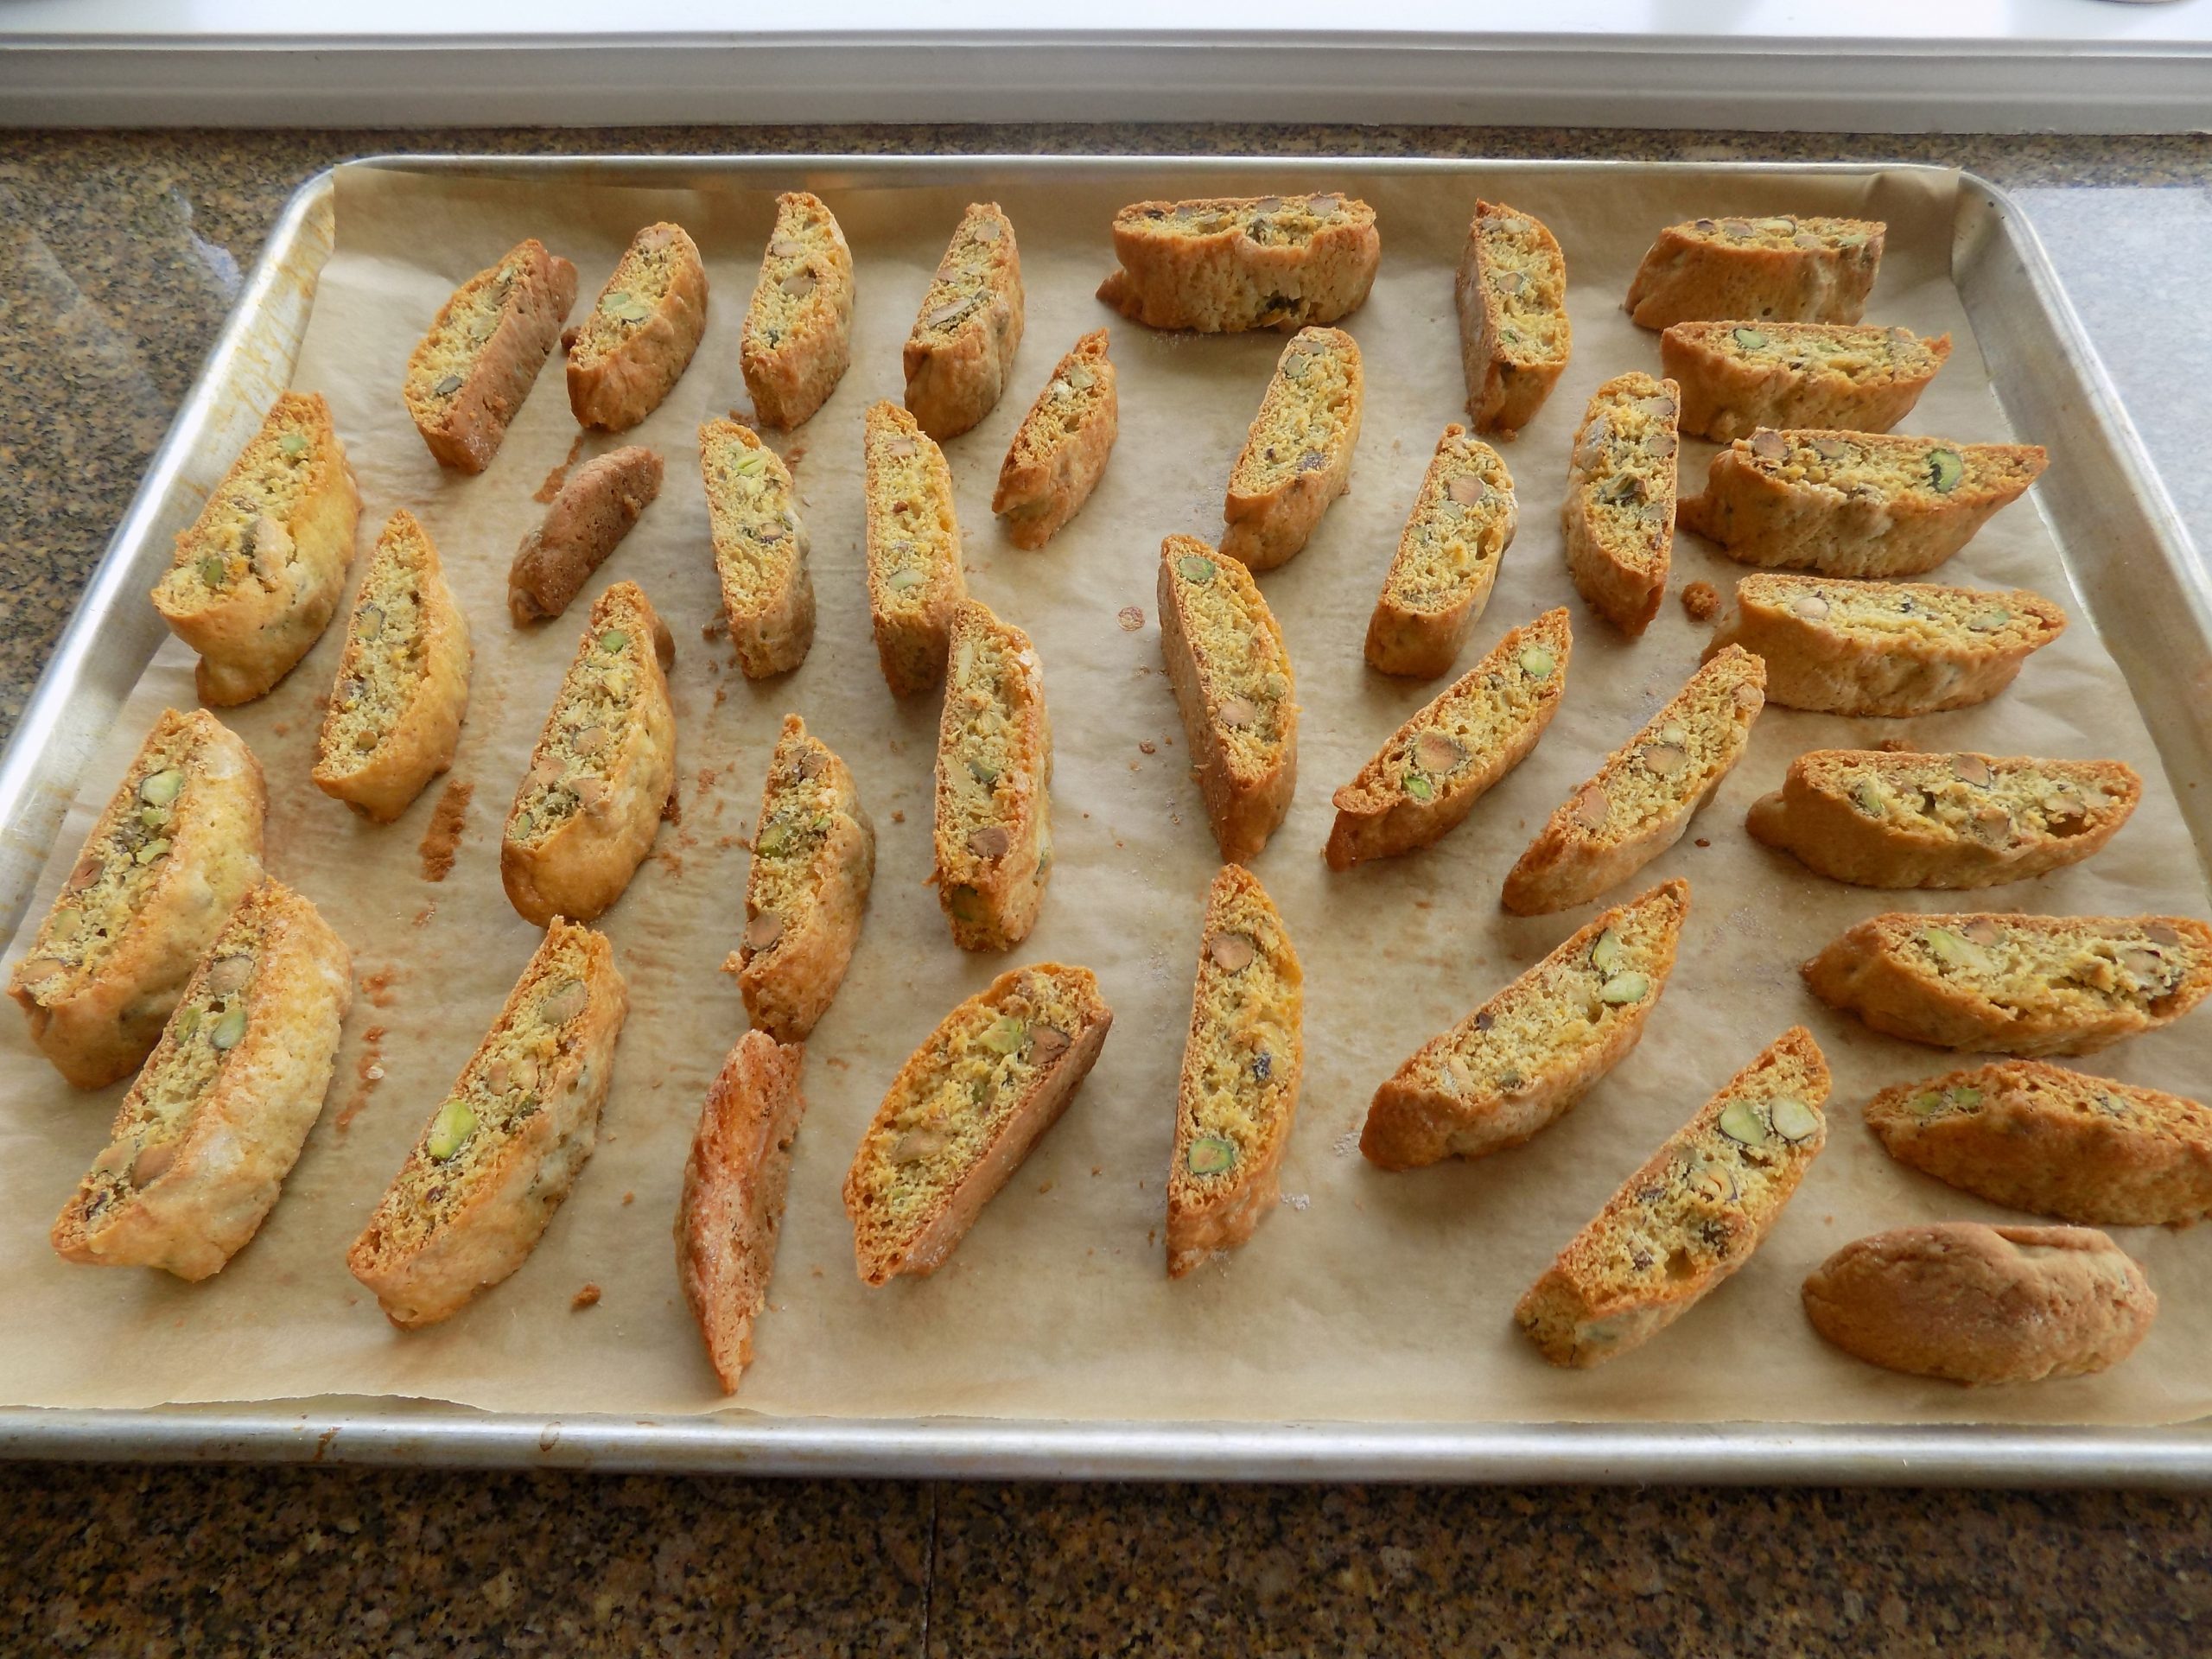
1 c. raw unsalted pistachios, lightly toasted and coarsely chopped
coarse decorating sugar, opt.
Whisk the flour, baking powder, and salt together in a small mixing bowl.
Using an electric mixer, beat the butter, granulated sugar, orange zest, and vanilla until light and fluffy. Beat in the eggs, 1 at a time, beating well after each addition. Add the flour mixture in 3 batches with the mixer on low speed. Beat just until blended. Stir in the pistachios. Cover the bowl and refrigerate for 60-90 minutes.
On a well-floured surface, using your hands (also well-floured if you know what’s good for you), divide the dough into 4 pieces. Roll each piece into a log 1-inch in diameter. Place at least 3-inches apart on a parchment paper lined baking sheet. Lightly sprinkle with coarse sugar.
Bake in a pre-heated 350-degree oven until light golden, about 20-25 minutes. Remove from oven and allow to cool for 20 minutes. (Keep the oven on go.)
Place the logs on a cutting board. Using a sharp knife (I use my big old butcher knife, but a serrated knife works well too), cut the logs on a slight diagonal into ¾-inch thick slices. Arrange cut side down back on the baking sheet. Bake until a nice golden brown, about 20 minutes.
Remove from oven and allow to cool right on the baking sheet. Store in an airtight container at room temperature for up to 2 weeks.
*Vin Santo is a late-harvest Italian dessert wine generally produced in Tuscany from white grapes, namely Trebbiano or Malvasia. After picking, the grapes are semi-dried before being pressed and fermented. Then the wines are stored in small barrels for up to 10 years, usually in attics which turn hot and cold with the seasons. There is a wide diversity in Vin Santo styles, from sweet dessert to dry, Sherry-like versions.
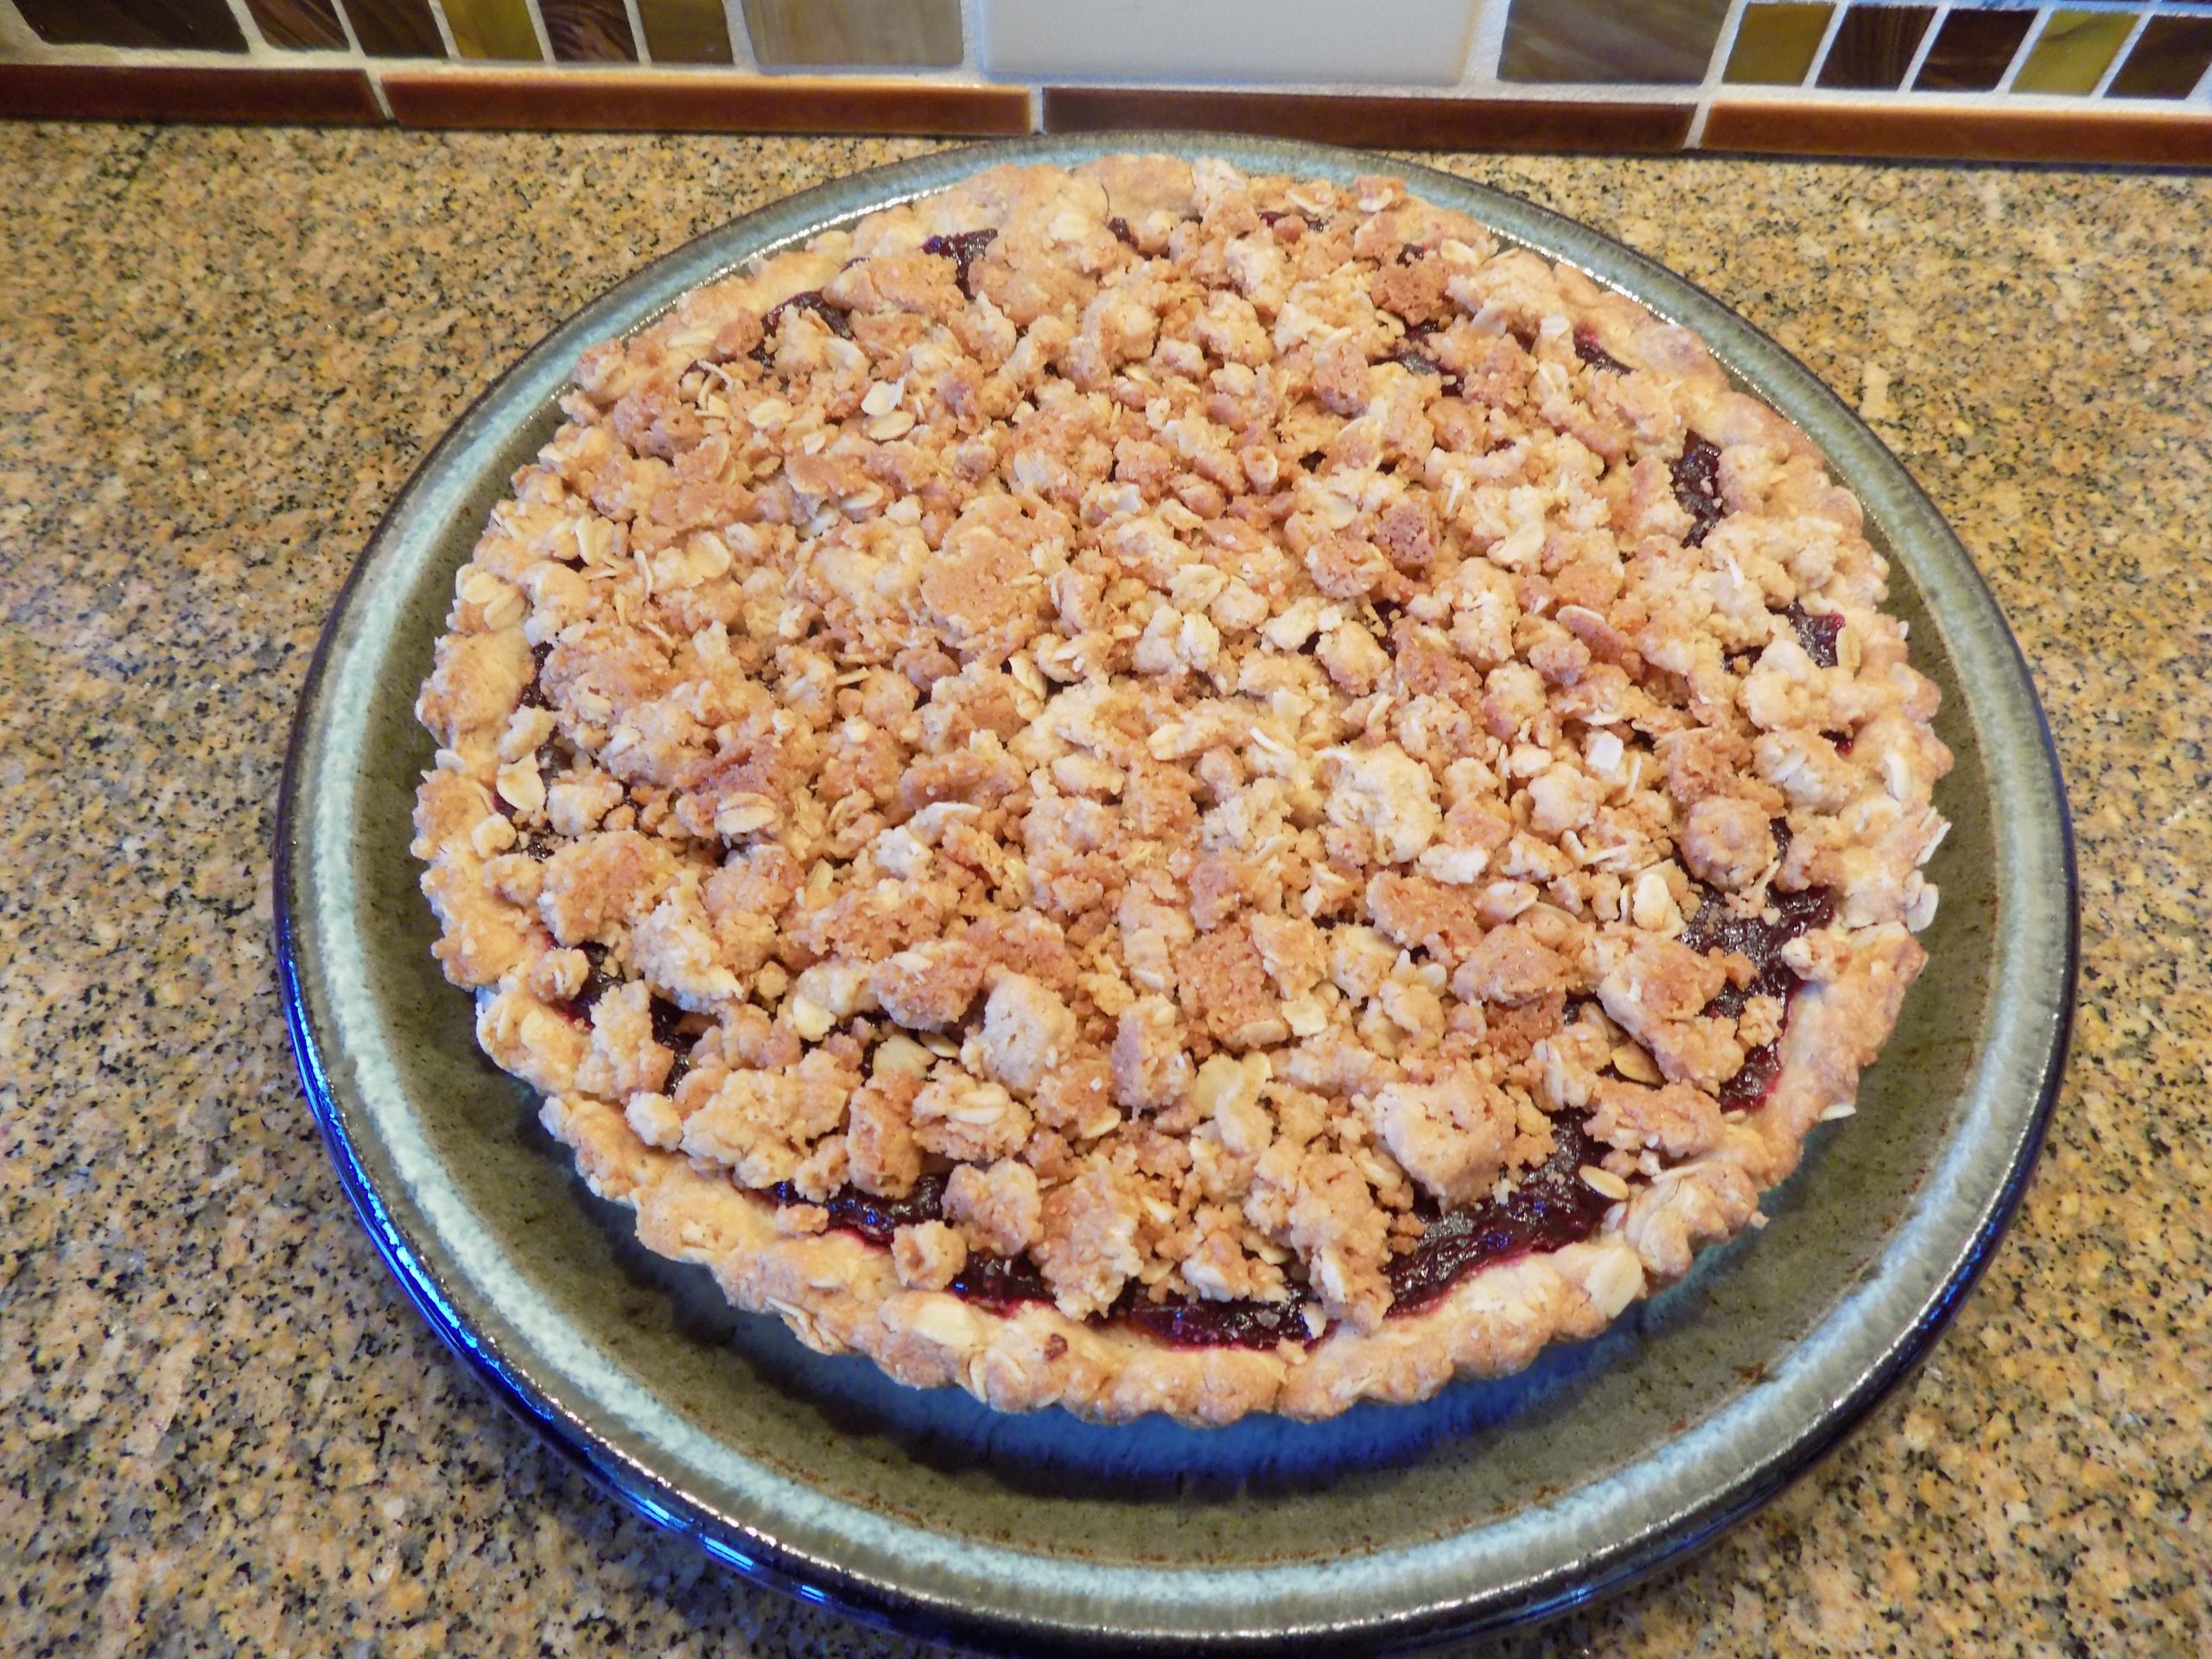
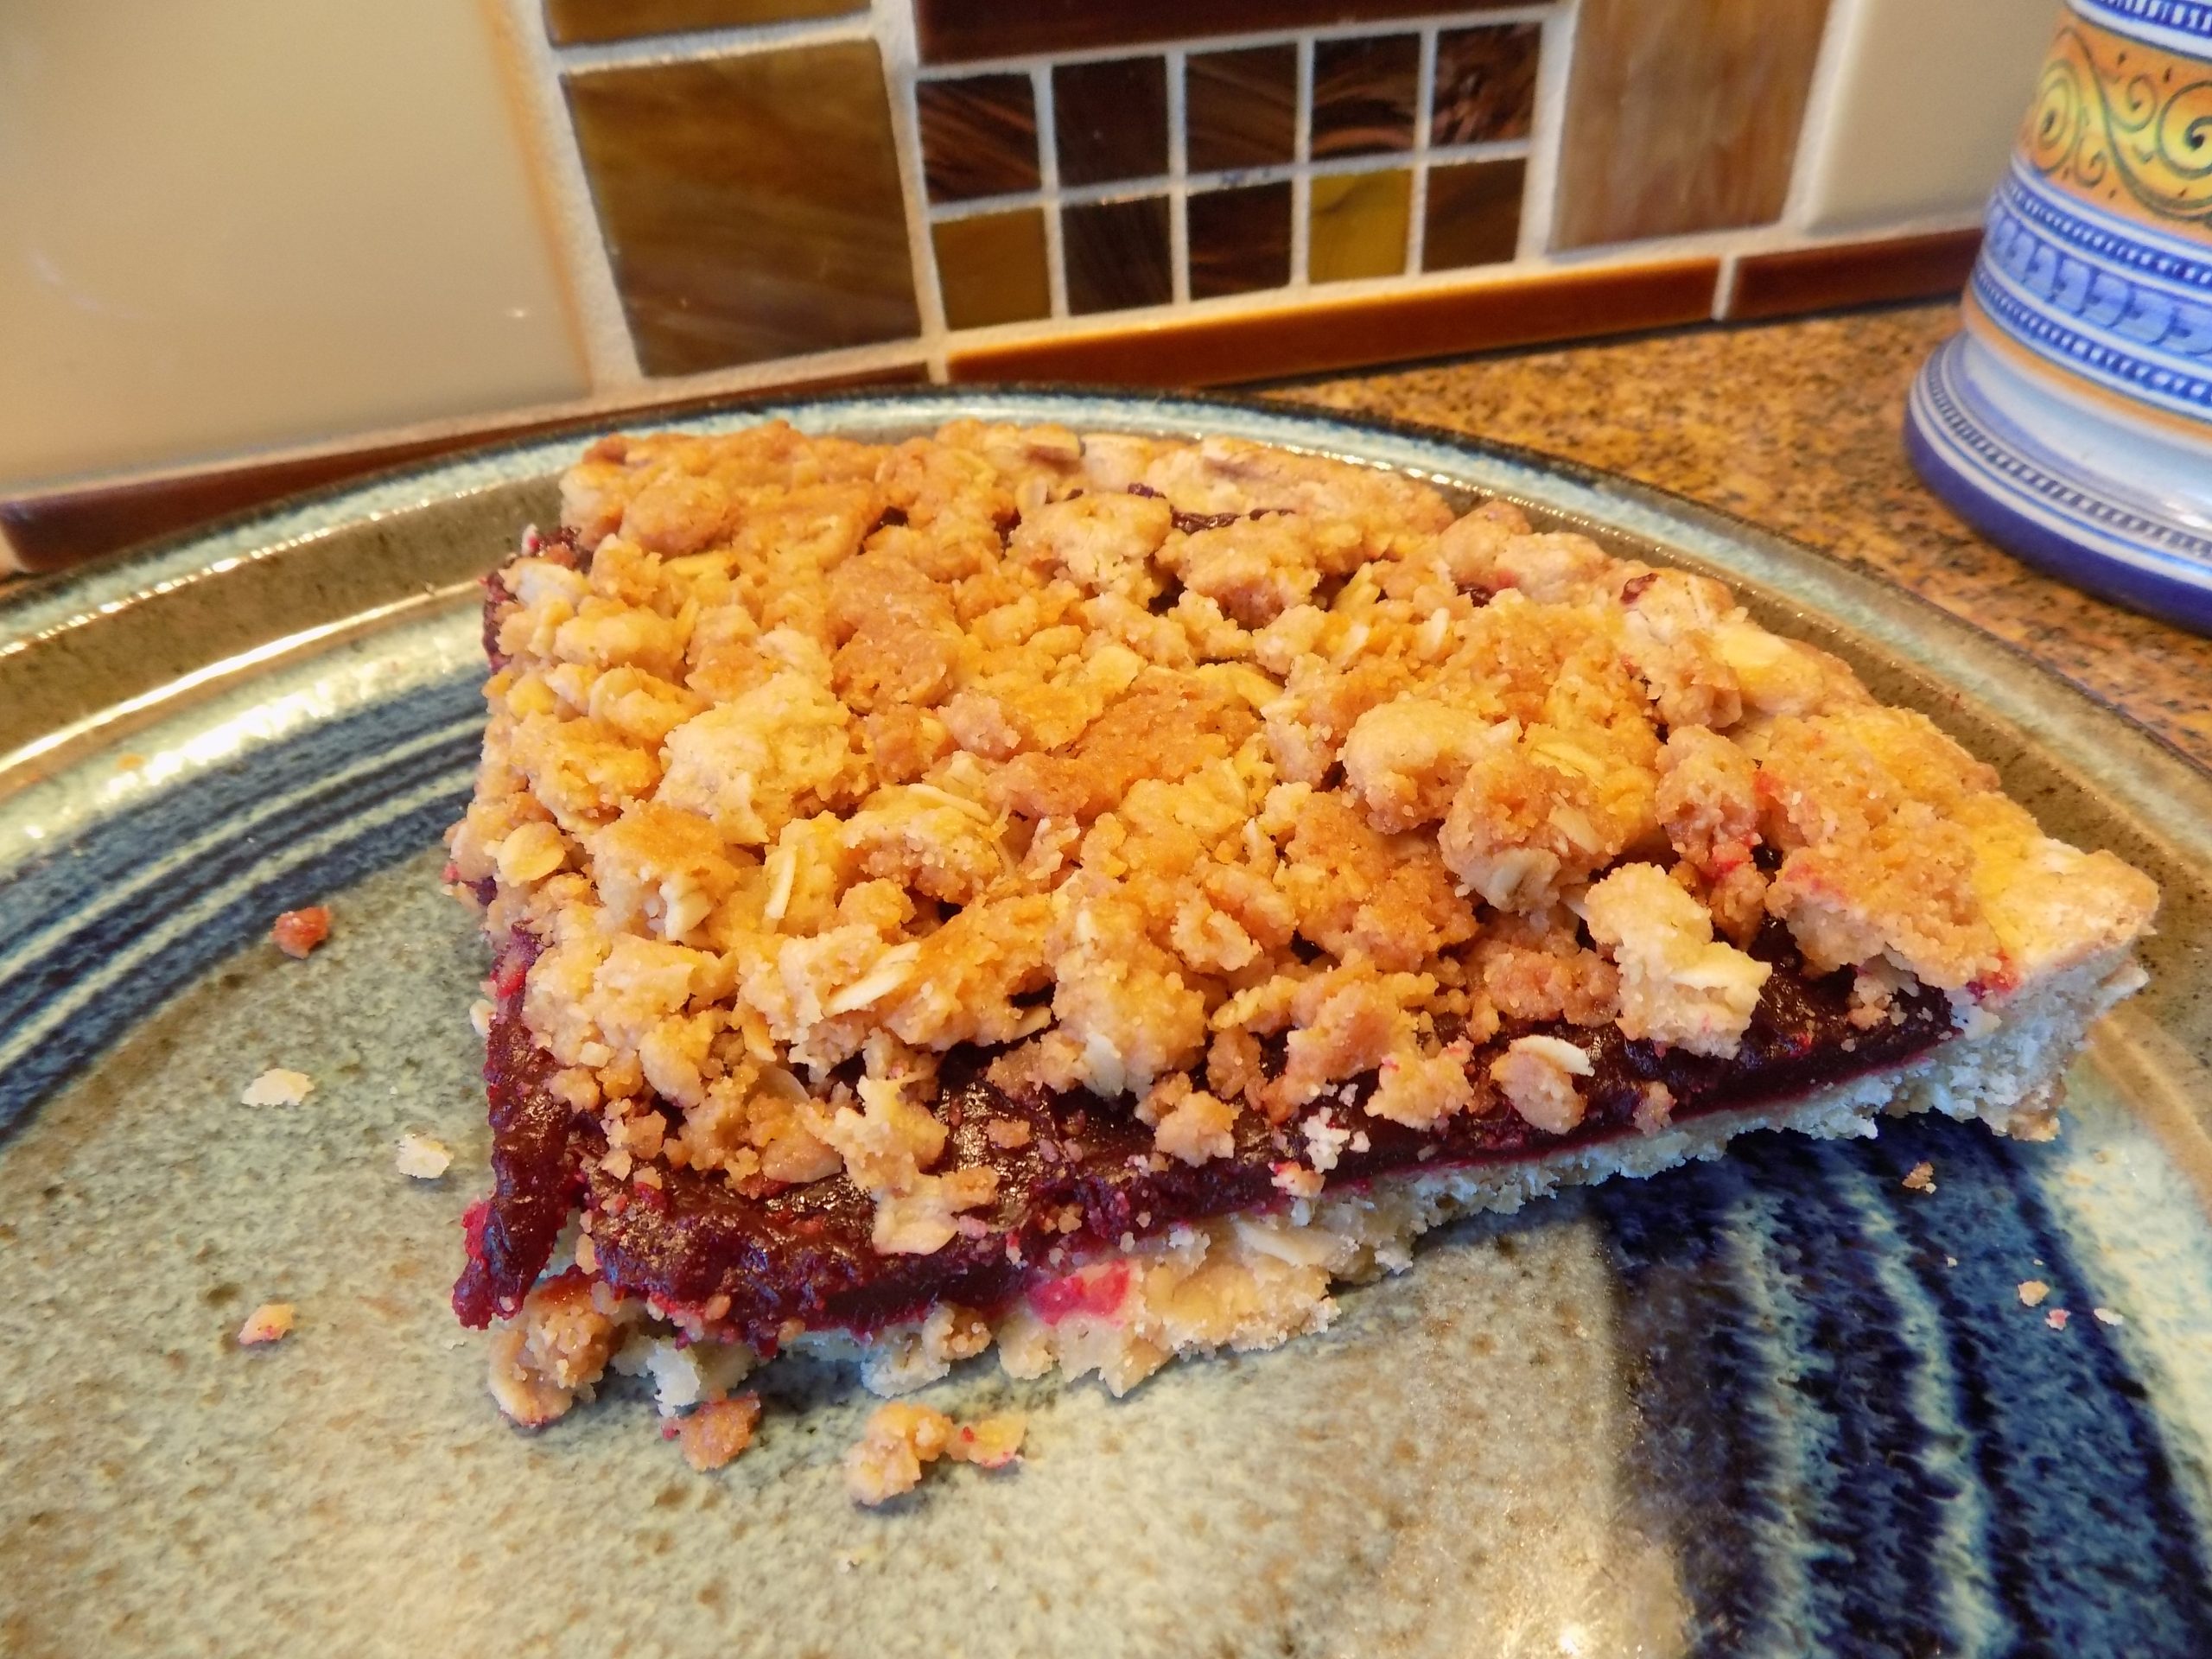
Now, a couple things you should know before I expand on the glories of this recipe. This is not a fancy-schmancy dessert. So, if you are entertaining the queen, your boss, or Helen Mirren, choose something else to serve. But if you are feeding your family and/or friends, this is a simple dessert that looks beautiful and tastes really, really good.
The second thing I should reveal, is that making the raspberry preserve for this tart is a real pain in the patootie. (And yes, patootie is a real word.) But the good news is – you can replace the raspberry preserve with any kind of jam, jelly, preserve, compote, fruit butter, or curd that suits your fancy. Cool, huh?!
So, now that I have been perfectly frank with you about this dessert’s limitations, let’s get on to why you should make one of these tarts at your earliest convenience.
As I stated above, this tart is mighty tasty. And if you use an already prepared filling, like most rational and intelligent people would choose to do, this dessert comes together with very little effort.
But if you are as passionate as I am about preparing most of the food you eat, and truly believe that everything homemade is intrinsically of higher quality, then I hope you will make the raspberry preserve too. Because with the tartness and intense flavor the preserve brings to the mix, it provides a perfect counterbalance to the sweetness of the crust and crumble. But regardless of my pleading and high handed rhetoric regarding preparing the raspberry preserve filling from scratch, just make the damn tart. And make it any old way you want.
So, as always, have a blast in your kitchen. Keep trying new dishes. Keep striving for excellence. And above all, keep enjoying your life.
I know we all get hung up on the bad that is happening around the world. But please don’t forget to embrace the good that is happening too. Look around you. Most people are decent human beings. They care and they make sacrifices, just like you do. So, do what’s right. Lift them up in any way you can. Even if its’ just by offering up one of your beautiful smiles. You never know how much just that simple gesture can mean to someone in need.
Peace and love to all.
Raspberry Preserve Filling:
4 c. fresh or frozen raspberries
¾ c. granulated sugar
2 tsp. lemon zest
1 T. fresh lemon juice
½ c. water, divided
¼ c. cornstarch
Place the raspberries, granulated sugar, lemon zest, lemon juice, and ¼ cup of the water in a heavy saucepan. Heat over medium high heat. Stir the mixture until it begins to boil. Lower the heat to medium-low and allow the filling to simmer for 10-15 minutes.
Remove from heat and pour the filling into a metal strainer suspended over a medium sized bowl. Using a spatula and a decent amount of pressure, push the liquid through the sieve. You should be left with a little over ½ cup of seedy pulp. Discard the pulp. Pour the strained liquid back into the pan.
In a separate small bowl, whisk the remaining ¼ cup of water with the cornstarch together until the cornstarch has fully dissolved in the water. Add to the strained raspberry filling; stir until well combined.
Over medium heat, stir the filling constantly to prevent burning. Cook until the mixture begins to boil, then reduce the heat to low. Continue cooking for about 1 minute. Remove from heat and set aside while you prepare the other parts of this recipe.
Please Note: If you want to make the preserve ahead of time, remove from heat and pour into a bowl to cool. Cover with plastic wrap and place in the fridge.
Oatmeal Crust (and ingredients for crumble)
1 c. rolled oats, divided
1¾ c. unbleached all-purpose flour, divided
1/8 tsp. kosher salt
½ c. brown sugar, packed, divided
¾ c. (1½ sticks) unsalted butter, divided
1 T. water
1 tsp. vanilla
Mix ¾ cup of the oats, 1¼ cups of the flour, salt, and ¼ cup of the brown sugar together. Melt ½ cup (1 stick) of the unsalted butter, then stir in the water and vanilla. Add to the oat mixture until well combined.
Press the mixture into a 9-inch tart pan with a removable bottom. Make sure there is about a ¼-inch rim around the edge.
Bake in a pre-heated 375-degree oven for 12 minutes or until a light golden brown. Remove from oven and allow to cool for about 15 minutes.
Spread the raspberry preserve over the bottom crust making sure there’s complete coverage. The filling should be about ¼-inch thick. Bake at 375-degrees for about 30-35 minutes. The outside crust should be a nice golden brown when the tart is ready to come out of the oven.
Remove from oven and sprinkle with the baked oatmeal crumble. (See recipe below.) Press the baked crumble gently into the hot filling so it will have a better chance of actually sticking to the surface of the tart.
Allow tart to cool before serving with Chambord Whipped Cream (see recipe below) or vanilla ice cream and fresh raspberries for decoration.
Oatmeal Crumble
While the tart is baking, mix the remaining ¼ cup rolled oats, remaining ½ cup flour, remaining ¼ cup brown sugar together. Using your fingers, cut the remaining ¼ cup (½ stick) butter into the oat mixture until the mixture resembles coarse crumbs. Squeeze the crumbs together to form larger clumps before placing on a small, ungreased baking sheet.
Bake at 375-degrees for 12 minutes. Then using a spatula, beak up the crumble and allow to bake for 3 more minutes. Remove from oven and allow to cool. Use as directed above.
Chambord Whipped Cream
1 c. heavy whipping cream
2 T. powdered sugar
2 tsp. Chambord (black raspberry liqueur), opt.
Whip the cream to stiff peaks. Add the powdered sugar and Chambord and whip until well combined. Refrigerate until ready to serve the tart.
Additional Note: If you should choose to use a different filling (jam, jelly, curd, etc.), you will need between 1½ and 2 cups.