HAM HOCK AND NAVY BEAN SOUP WITH FENNEL 

And yes, I make soup frequently. Because – I love soup. It’s easy to prepare, most of the time includes lots of veggie action, and it tastes good. And during the fall and winter months, soup is a comfort. For me it’s a reminder of how lucky I am to be warm and cozy in my own home. And to my mind, soup should be the poster child for comfort food. And you know how I feel about comfort food! Thus – I make soup all the time. Luckily Mr. C. loves soup as much as I do. Otherwise, he’d be on his own for dinner because I’d be serving soup anyway! Of course, you know that’s not true. But it makes for a good story. And it serves as an affirmation of how much I really do love a big old bowl of really good soup. And there in lies the heart of this harangue. I only like soup when it is delicious. And usually that means – homemade. (Or made in a fine restaurant.) And I know. I’m picky. But I’m sorry folks, a bowl of soup that comes from a can, just doesn’t make it for me.

First of all, canned soup is usually too salty. Then, for what you get, it’s expensive. If there is any meat, in a soup that calls itself chicken noodle soup for example, any of us would be hard pressed to find more than just a smidgen of chicken. So, what would we be paying for? I rest my case. (And yes, I know, convenience is worth something.)

Actually, I really shouldn’t be preaching to the choir in the defense of homemade soup. Because if you weren’t into homemade soup in the first place, you wouldn’t even be reading this diatribe!   

Anyway, all blather aside, I truly believe you would find this soup easy to prepare and ever so delicious. Absolutely perfect for a grey, Pacific Northwest dinner. (Or anywhere else for that matter!)

Peace and love to all.

1 T. extra virgin olive oil,

½ lg. onion, chopped

2 carrots, chopped

4 celery ribs plus leaves, thinly sliced

1 lg. fennel bulb, diced

4 lg. cloves garlic, finely minced

½ c. dry white wine

6 c. chicken broth (or 6 c. water and 2 T. chicken base)

1 (8-oz.) can tomato sauce

½ tsp. seasoned salt

freshly ground black pepper

2 tsp. fennel seeds

¼ tsp. dried thyme leaves

4-6 crushed red pepper flakes

1 bay leaf

1 smoked ham hock

1⅓ c. small navy beans, rinsed

2 c. thinly sliced baby spinach

Heat olive oil in a large, covered soup pan or Dutch oven. Add the onion, carrots, celery, and fennel bulb. Sauté only until onion starts to soften. Add the garlic and cook for 1 minute.

Add the wine and cook until any liquid has evaporated.

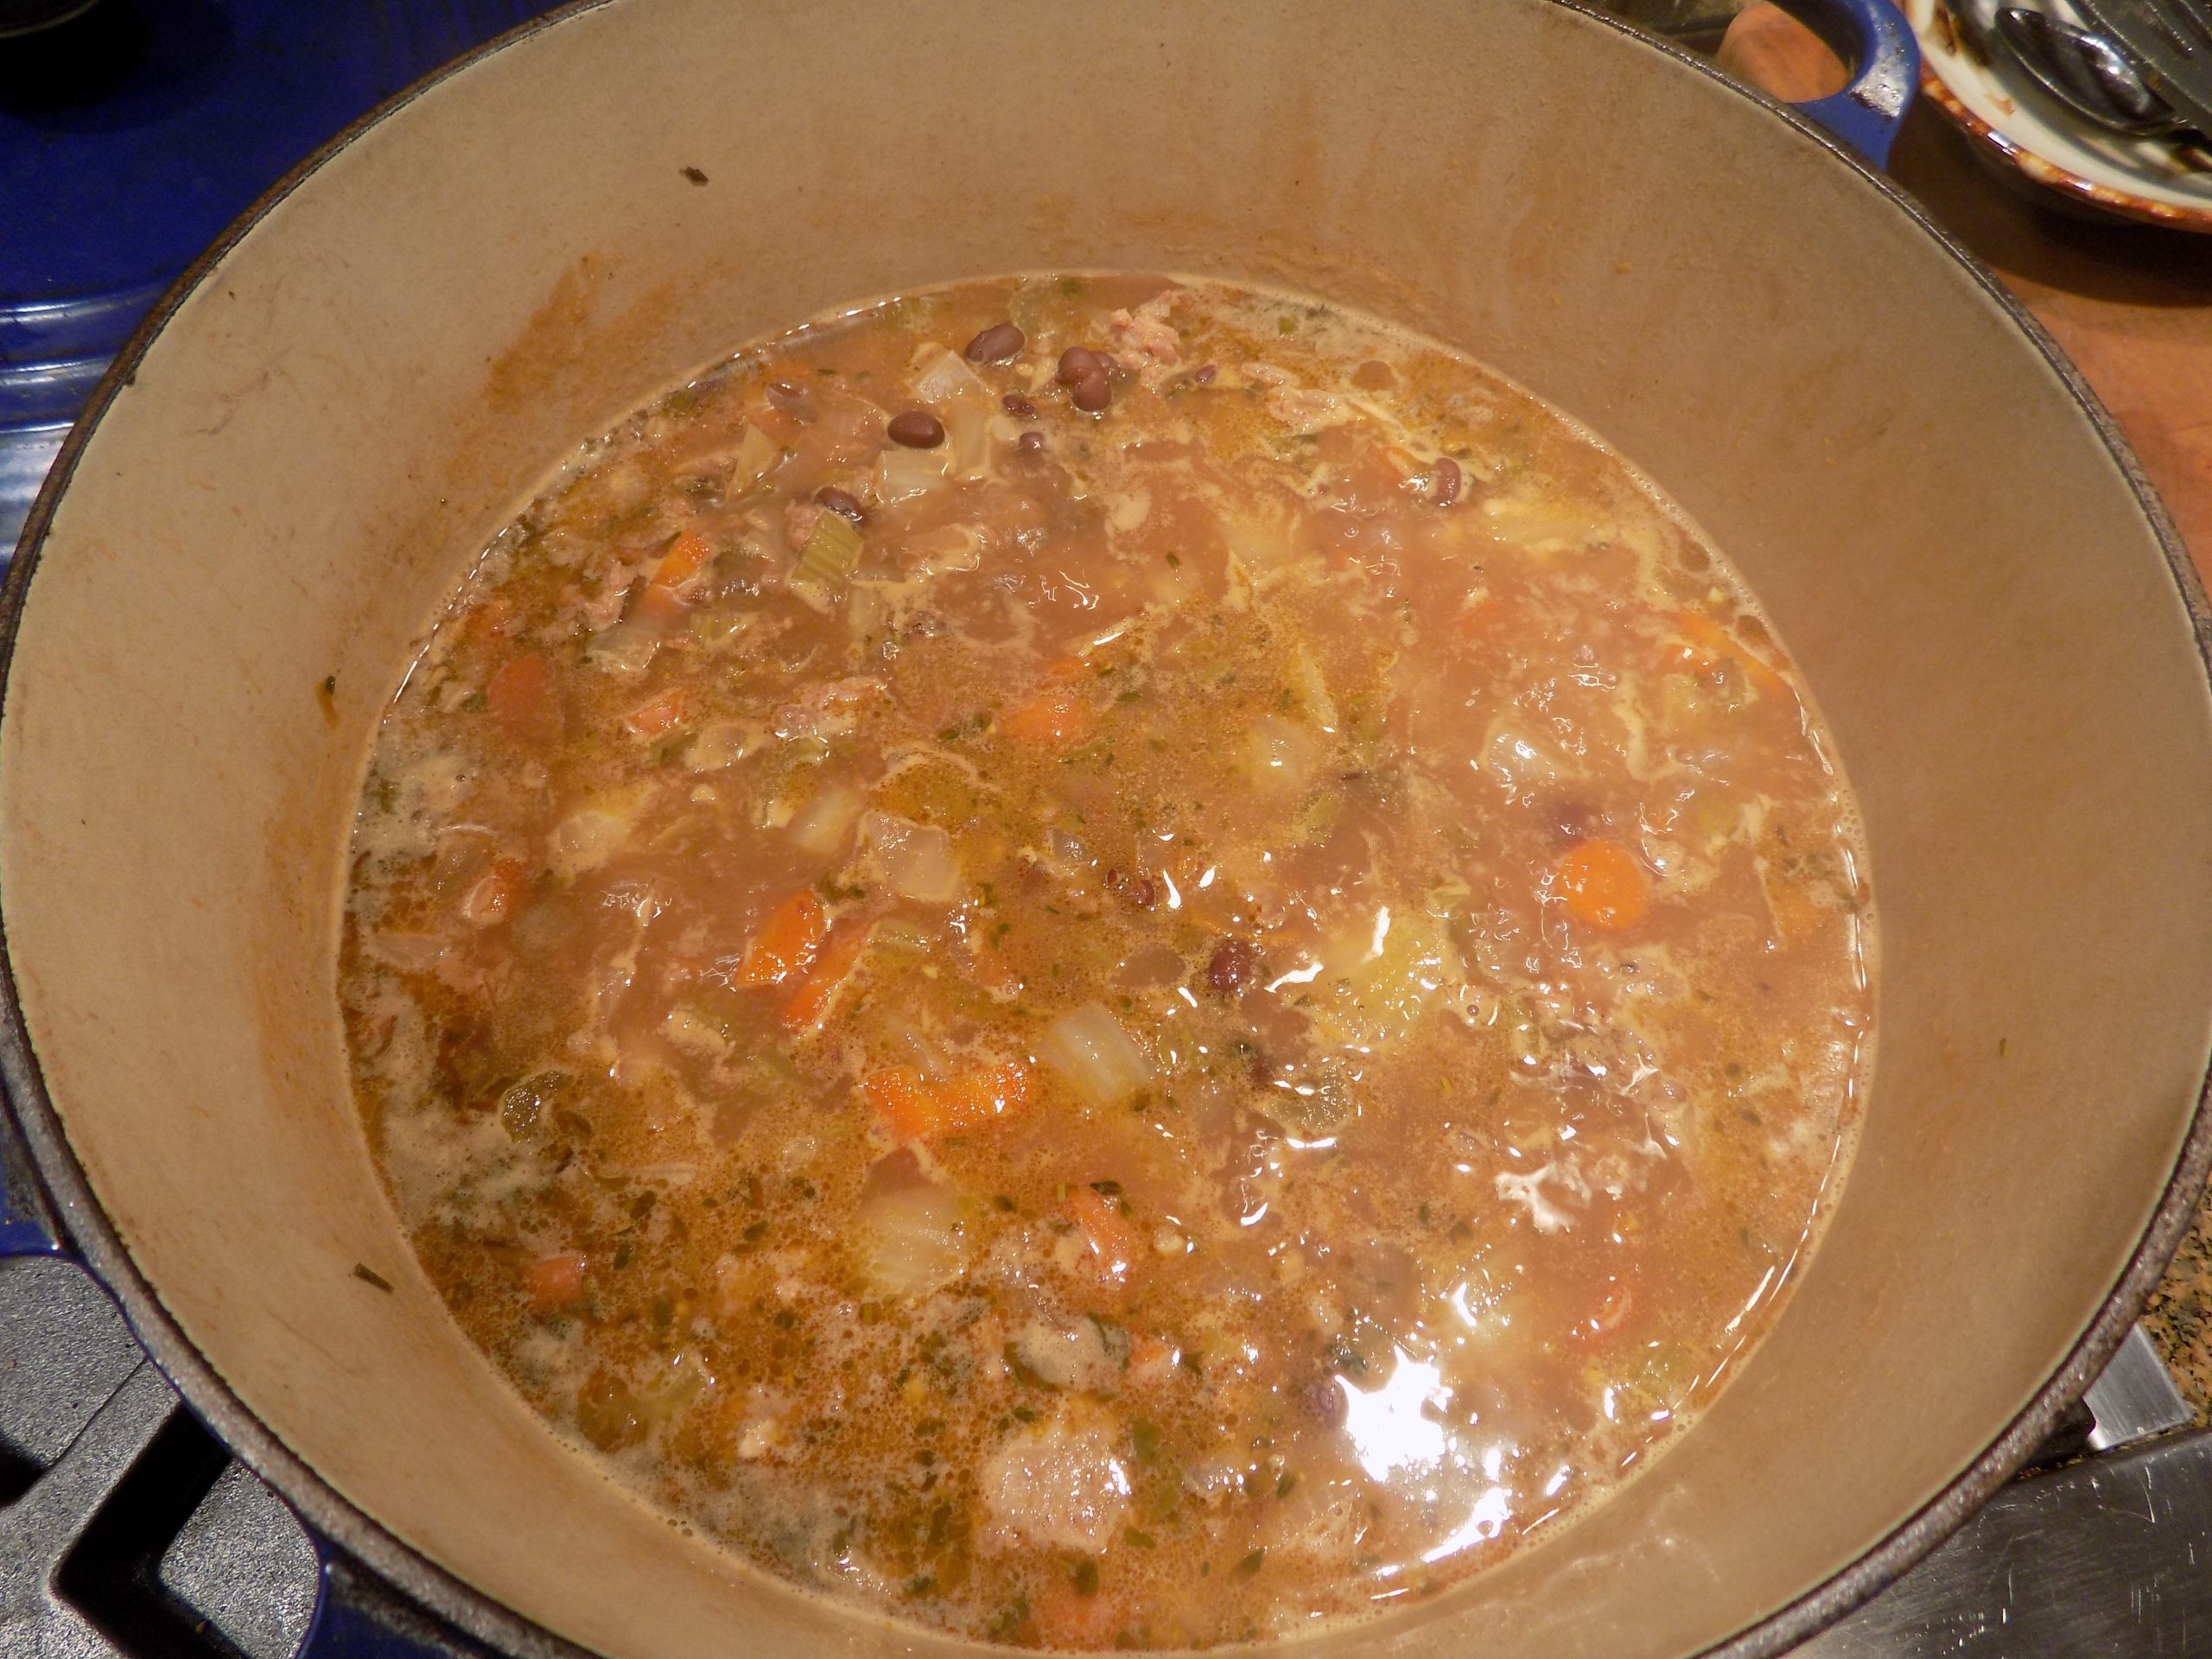
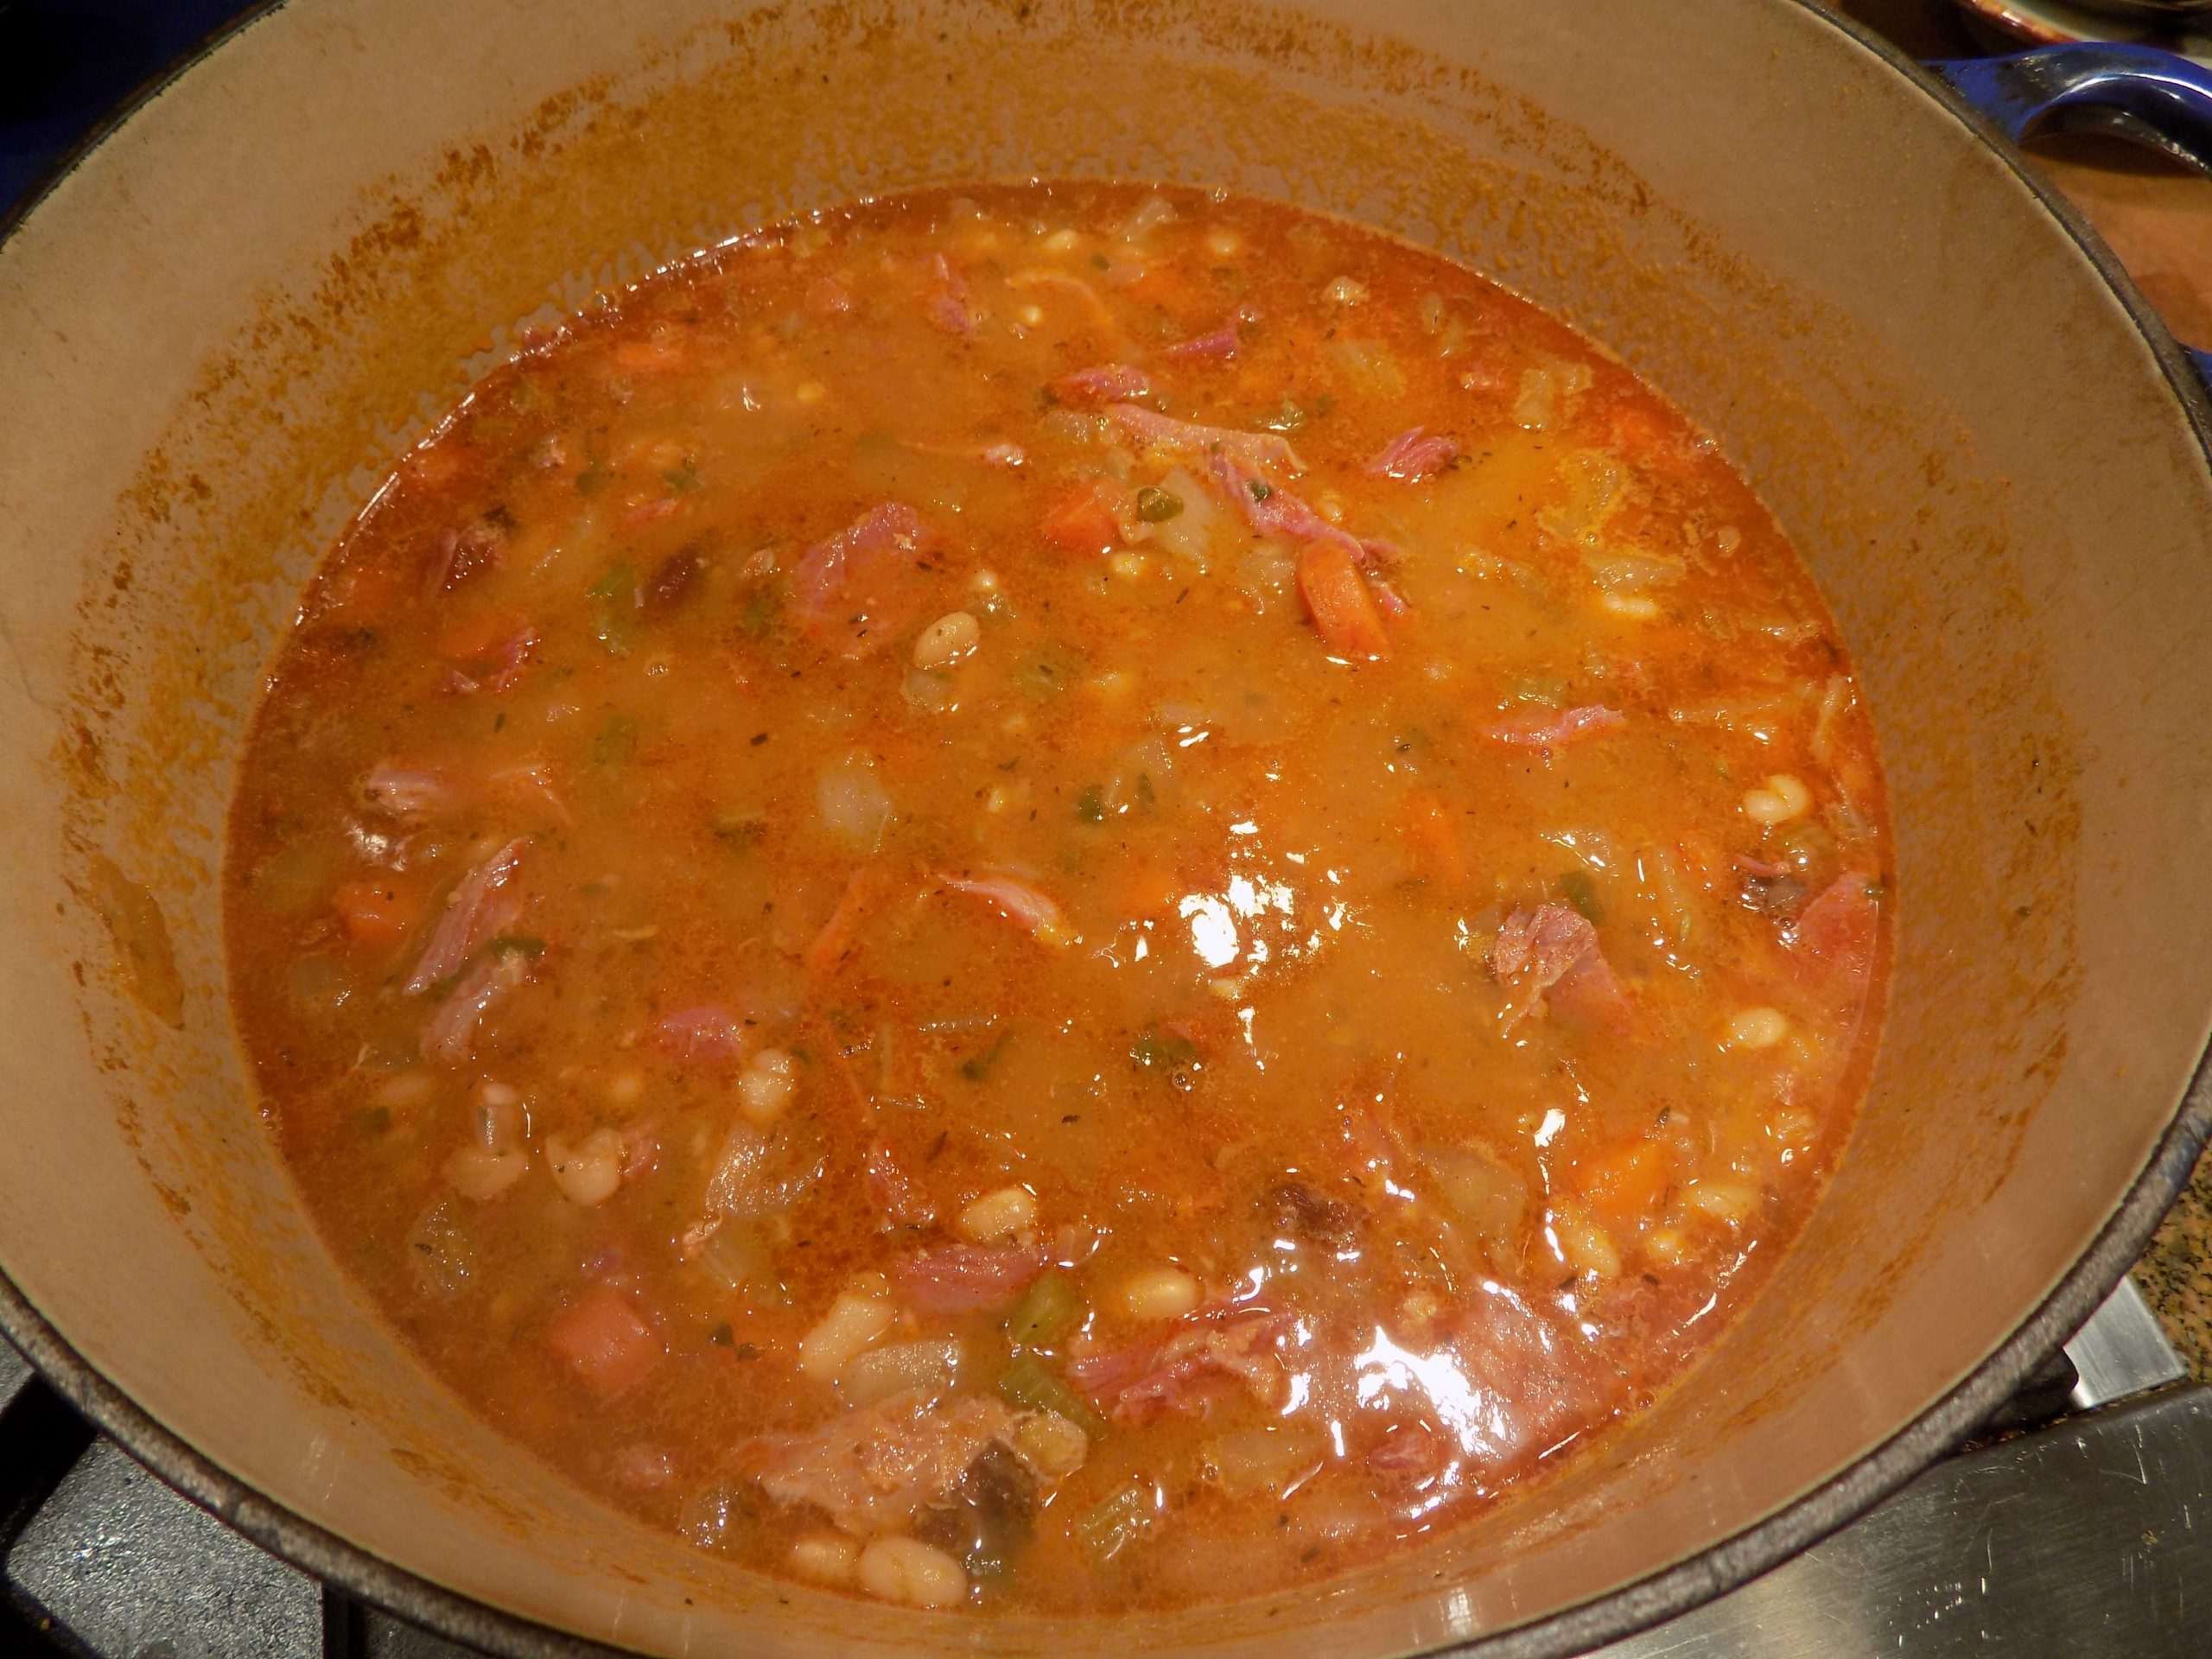
Add the chicken broth, tomato sauce, seasoned salt, pepper, fennel seeds, thyme, crushed red pepper flakes, bay leaf, ham hock, and navy beans. Bring to a boil, reduce heat, cover, and gently simmer until the beans are soft, about 2 hours. After about 90 minutes, remove the ham hock, let cool, and separate the meat from the bone and fatty tissue. Chop or shred the meat and add it back to the pot.

When the beans are tender, add the spinach. Remove from heat. Taste and adjust seasoning. Discard bay leaf before serving.

Great accompanied by crusty baguette slices or Crostini. See recipe below.  

Please note: For this recipe, beans do not need to be pre-soaked.

CROSTINI

baguette or similar chewy long loaf of bread

extra-virgin olive oil

flaky or coarse sea salt

Pre-heat your oven to 450-degrees. Line a rimmed baking sheet with parchment paper for easy clean-up. 

Slice the bread on the diagonal into pieces no wider than ½-inch. Lightly brush both sides of each slice with olive oil.

Place the slices in a single layer on your prepared baking sheet and bake them on the middle rack for about 9 minutes, until they are crisp and nicely golden on top. Remove from oven and sprinkle lightly with salt. Serve immediately.

CHICKEN ENCHILADA CASSEROLE  

Oh, the siren call of a truly delicious casserole. And yes, I know that part of the definition of “siren call” includes “potentially harmful and dangerous”. And the kind of casseroles I am always drawn to, can be just that for me. Because I am always tempted to eat more casserole (like this one) than is healthy or required by my body to stave off starvation. And let’s face it. My aged body doesn’t need very much nourishment to keep it alive and healthy. But my mouth, has obviously decided to ignore the memo from my brain. Because my mouth keeps wanting more, more, more! So, my common sense is often driven to intercede in my brain’s defense. Which is quite a difficult thing for it to do, as some of you might attest. But, whenever possible, I allow my common sense to prevail. And it absolutely must take over when I am sitting at dinner with a big old pan of this kind of casserole beckoning me to have seconds a mere 6 feet from where I am dining. It isn’t fair, but then, what in life is?!

So, I guess what I am trying to relate, is that this is a very tasty casserole. And quite easy to prepare. And the kind of casserole that everyone in your family will enjoy. And I know that some people have an aversion to casseroles. What’s with that? It’s got to be a holdover from when they were children and forced to eat a dry tuna casserole. (Like the one my mother used to make.) To these people I say – GET OVER IT! Times change, recipes change, and when made correctly, casseroles can be fantastic. And this is a good one to prove that point!

So, even if you have a family member who is casserole resistant, make one anyway. This person will soon learn that a good casserole is a joy and a delight! I’ve got broad shoulders. Tell them, Patti made you do it.

Peace and love to all.

3 T. unsalted butter, divided

2 boneless, skinless chicken breasts, cut into small bite sized pieces

½ c. finely diced onion

2 T. unbleached all-purpose flour

2½ c. water

4-5 tsp. chicken base (I use Better Than Bouillon Chicken base)

12 regular size corn tortillas  

½ c. sour cream (Mexican sour cream is best)

¼ tsp. seasoned salt

freshly ground black pepper

1½ tsp. chili powder

1/8 tsp. cayenne

1 tsp. granulated garlic

⅓ c. diced roasted red peppers

4 oz. can diced green chilies (I use Hatch chilies)

2 c. grated sharp cheddar cheese

1 c. grated Monterey Jack or mozzarella cheese

Melt 2 tablespoons of the butter in a good-sized frying pan. Cook the chicken until still a bit of pink remains. Add the onion and cook for about 3 minutes. Using a slotted spoon, remove the chicken and onion to a small bowl.

Add the remaining 1 tablespoon butter to the pan. Add the flour and whisk together for about 3 minutes. Add the water and chicken base. (And of course, you can skip the water and chicken base and use chicken broth.) Bring to a boil, reduce heat, and let burble for a couple of minutes as the mixture thickens. Before adding the other ingredients, remove a half cup of the mixture and spread on the bottom of a lightly greased 9×13-inch casserole or Pyrex baking dish.

Then stir in the sour cream, seasoned salt, pepper, chili powder, cayenne, granulated garlic, roasted red peppers, green chilies, and chicken and onion mixture plus any residual juice.    

Next add 6 tortillas evenly distributed to the baking dish. Then spread the tortillas with half of the chicken mixture, and half of both kinds of grated cheese.

Repeat with the remaining 6 tortillas, remaining chicken mixture, and top with the remaining grated cheese.

Bake uncovered in a pre-heated 350-degree oven for 35-40 minutes or until bubbly.   

CHEDDAR AND CHIVE CORNMEAL BISCUITS

And yes, that little unshaped biscuit is from the last bit of dough. And it matters not that it is misshapen. It’s mine, all mine!

Sometimes all I want is a really good biscuit. Biscuits are so easy to build, and are such a wonderful accompaniment to soups, stews, chili, and chowders. They simply make the meal. But my personal favorite is when I get to have a biscuit with breakfast. And I must say, these biscuits are absolutely perfect along with a bit of breakfast meat and an easy over egg. No jam, jelly, honey, etc. required. Just a bit of unsalted butter melted on each half. Fabulous.

But of course, these biscuits are wonderful anytime a bit of bread would make a meal complete. And I have to admit, for me, bread makes any meal better. I don’t allow myself bread with every meal because, well, it wouldn’t be good for health reasons. But that doesn’t mean I don’t miss it!

Even when we go out to dinner, I always hope that a basket of bread will be the first offering to be placed on our table. Well, that is, after my martini, of course! But when no bread appears, I always feel a bit cheated. Over the years I have learned to hold back any tears that might come unbidden from my disappointment. But if I were the one who paid the check, the tip would, I’m sure, always be a little less if no bread was delivered. (And yes, I know, it’s not the waiter’s fault that no bread is included with the meal. But to my thinking, these waiters should have thought of that before they chose to work in an establishment that doesn’t know or understand the needs of their clientele!) Luckily for these waiters, I rarely pay the check. And Mr. C. is far too kind to punish anyone for another’s transgressions!)  

I guess what I am trying to say, is that these biscuits are really, really yummy. I found the recipe on the bostongirlbakes.com site. And believe it or not, I didn’t change a thing. Just as written on Heather’s blog. So, thank you Heather for this amazing recipe.

So, to all of you who are true bread lovers, please give this recipe a try. The biscuits are easy to prepare, contain no fancy ingredients, and possess a delightful flavor and texture. And just the right size to alleviate guilt, but not feel stinted either.

As always, be happy. Those of us with a roof over our heads, enough food to feed our family, and friends who care about us even if at times our inner 2-year-old screams to be set free, are truly lucky. And of course, you do realize that I would never take my aggression out on a waiter. However, there are times when it’s a good thing the cook doesn’t come out of the kitchen to ask patrons how we enjoyed our meal? There are just too many times when that person would get more than he or she bargained for if I were asked that question!

Peace and love to all.  

2 c. unbleached all-purpose flour

1 c. yellow cornmeal (fine grind cornmeal is best)

5 tsp. baking powder

½ tsp. baking soda

½ tsp. kosher salt

½ c. (1 stick) cold unsalted butter, cut into cubes

1 c. cold buttermilk

1 c. grated sharp cheddar cheese

3-4 T. chopped fresh chives or 2 T. dried chives

melted butter

Line a baking sheet with parchment paper. Set aside.   

Place the flour, cornmeal, baking powder, baking soda, and salt together in your food processor. Pulse a couple of times to mix the ingredients. Add the butter and pulse until the mixture looks granular.  

Add the cheese and chives. Pulse until the ingredients are evenly combined.

Pour in cold buttermilk and pulse a few times until a shaggy dough forms. The dough will be sticky at this point.

Scrape the dough onto a lightly floured surface. Bring the dough together gently. Knead the dough by pressing the dough down into about a ½-inch thickness, then fold in thirds (fold the right side over, then left side over the dough). Repeat 3 times to create flaky layers.

Pat the dough into a 1 inch-thick circle. Cut the biscuits into rounds using a 2½-inch biscuit cutter. (Remember, when cutting biscuits, press straight down on the biscuit cutter. Do not twist as you press down.)

Press the scraps together and cut out remaining biscuits. Place on prepared pan about 1½-inches apart.

Bake in a pre-heated 450-degree oven for about 15 minutes on the middle rack of your oven. When done, the internal temperature should be between 205 and 210-degrees and the biscuits should be a nice golden brown.

Remove from oven and allow to cool on pan for 5 minutes before removing to a cooling rack to continue to cool. Brush tops with melted butter.

Store the biscuits in an airtight container in the refrigerator. These biscuits are best when re-heated before serving.  


BAKED RACK OF LAMB WITH A SAVORY TOPPING 

This is a simple variation on my Rack of Lamb with Kalamata-Rosemary Crust recipe. (My favorite rack of lamb recipe BTW.) But some days I don’t want to mess around in the kitchen as much as other days when I can hardly wait to start dinner. And I know, for those of you for whom cooking is the antithesis of a pleasurable way to spend your time, you must think I am bat (fill in the blank) crazy! But it’s true. There are days when I truly look forward to my time in the kitchen. But then there are the days I still want to serve up a delicious meal, but putting in the effort to do so, just doesn’t appeal at all! And the evening I served this recipe for rack of lamb just happened to be one of those times.

In truth, I had already prepared Mediterranean Quinoa Salad, which BTW is not only delicious but very easy to prepare.  But my flagging stamina that day had already been taxed. The last thing I wanted was to spend more than 20 minutes more in food prep. Being the rather resourceful person that I am, I brought out my standard recipe, the one mentioned above, and paired it down to the recipe you find below. And to my great delight, the meat was juicy and very well-seasoned. Which along with the salad made for a mighty fine meal.

So, if you too have those days when you would rather do almost anything besides cook, this is the perfect recipe for you. Quick, easy, and delicious.

And lest you think that I am losing my love of all things culinary, fear not. I still love my kitchen and producing different dishes at a prodigious rate. I’m just getting older, and what used to take me an hour, can now take me two or even three hours. But I’m still in the game. Fearless, searching for new and different recipes with which to thrill and delight you, and always up for a challenge. It’s just that now I am no longer the hare, I’m the tortoise!  

Peace and love to all.  

1 garlic clove, finely minced

1 tsp. Dijon mustard  

½ tsp. finely chopped fresh rosemary leaves

2 tsp. finely chopped shallot

¼ tsp. kosher salt

freshly ground black pepper

2 tsp. extra virgin olive oil

4 pitted kalamata olive, minced 

1 (8-rib) frenched rack of lamb, silver skin removed

lemon wedges, for serving

Mix the garlic, Dijon mustard, rosemary, shallot, salt, pepper, olive oil, and kalamata olives together. 

Place the rack of lamb, meaty side up on a small, rimmed aluminum foil covered baking sheet. Coat the top of the meat with the garlic mixture and let sit at room temperature for 1 hour.

Roast the lamb in a pre-heated 450-degree oven for 20 minutes for medium-rare, or until a thermometer inserted in the center reads 120 to 125-degrees. 

Remove from oven, tent with foil, and let rest at least 10 minutes before carving into chops.

Serve with lemon wedges.


GROUND TURKEY AND MEXICAN CHORIZO FILLED GREEN PEPPERS, BURRITOS, AND TACOS  

Stuffed Green Peppers

As promised, here is another recipe featuring Mexican chorizo. This recipe comes straight from our dear friend Jim. Who, BTW, is an amazing cook. And for anyone who has had the pleasure of dining at Jim and Margo’s home, you know of what I speak. You too are blessed. But enough pontificating. I don’t want Jim to get a swollen head. I just want you to know that I am not responsible for this marvelous recipe. I wish I were, but my mother always told me that honesty is the best policy. (Apparently, a lot of politicians never got that same directive from their mothers, but that’s a story for another time!)

Anyway, this versatile filling recipe is absolutely delicious and super easy to prepare. At first glance it looks like the recipe makes a big batch of filling. And guess what? It does! All’s the better as far as I’m concerned. Because this filling freezes beautifully. Besides, what kind of recipe calls for half a pound of ground meat? Ground meat doesn’t come in half pound packages. At least not in the grocery stores I frequent!

Anyway, just make this fabulous filling. Make stuffed peppers, or use it for terrific burritos or tacos, or any other dish that would profit from a spicy, meaty infusion of southwestern flavor. And lest I forget, this is a fairly healthy filling. Lots of veggie action happening and no starchy ingredients.  

So, again, thank you Jim for this terrific recipe. I made Stuffed Green Peppers last night for dinner, and this morning I made Breakfast Burritos. Absolute culinary bliss my friends.

As always, keep smiling. We aren’t out of the woods yet with covid. But we are moving towards the edge of the woods where the trees are further apart, the sun is breaking through, and that just might be a meadow further down the path.

Peace and love to all.

Ground Turkey and Mexican Chorizo Filling:

2 tsp. extra virgin olive oil

1 lb. ground turkey (part white and dark meat, if possible)

1 lb. bulk Mexican chorizo

1 onion, diced

3-4 celery ribs, diced

1 green pepper, diced

1 red pepper, diced

5-6 garlic cloves, minced

1 (28-oz,) can diced tomatoes (Italian are best)

3-4 T. chili powder

3-4 T. taco seasoning

freshly ground black pepper

¾-1 c. chopped fresh cilantro or 2-3 T. dried cilantro*

Heat the olive oil in a large skillet over medium-high heat. Add the ground turkey and chorizo. Fry the meat until cooked through and browned.

Add the onion, celery, green pepper, and red pepper. Cook until the veggies are softened, about 8 minutes. Stir in the garlic and cook for 1 minute.

Add the diced tomatoes, chili powder, taco seasoning, and black pepper. Cook, uncovered, for about 30 minutes to blend flavors and reduce the liquid. Remove from heat and add the cilantro. Taste and adjust seasoning.

*Dried cilantro doesn’t taste like fresh cilantro. Fresh cilantro has a strong lemony and slightly peppery flavor, which some people (like me) find to taste kind of soapy. In other words, fresh cilantro is not my favorite ingredient. I much prefer dried cilantro which has a weak cilantro flavor and is perfect in soups, stews, or any recipe that requires a bit of cooking time to blend flavors.

STUFFED GREEN PEPPERS

4 green peppers (or however many you need)

Ground Turkey and Mexican Chorizo filling

grated cheese (I use sharp cheddar or mozzarella)

Slice the green peppers in half, top to bottom. Carefully cut out the stem, then remove the membranes and seeds.   

Lightly grease a baking pan. Place the half peppers, cut side up in the pan and fill with the meat mixture. You will have extra filling. I suggest freezing it for tacos or burritos. (See recipes below.)   

Bake the peppers in a pre-heated 375-degree oven for 75-90 minutes or until the pepper are soft and starting to brown. (If the filling gets too brown during the baking process, cover with aluminum foil.) About 5 minutes before removing the peppers from the oven, liberally cover the tops with grated cheese.

Remove from oven and serve immediately.

BURRITOS*

tortillas (whole wheat or regular)

Ground Turkey and Mexican Chorizo filling

grated cheese

refried or whole pinto beans, opt.

shredded lettuce

finely diced tomato

sour cream

diced avocado

Stuff lightly warmed tortillas with filling, grated cheese, and a tiny bit of refried beans. Wrap and heat on high for 1 minute in your microwave. Serve lettuce, diced tomato, sour cream, and diced avocado on the side.

Note: I warm the tortillas just before wrapping because warming them makes them more pliable.

BREAKFAST BURRITOS*

tortillas (whole wheat or regular)

Ground Turkey and Mexican Chorizo filling

scrambled eggs

grated sharp cheddar cheese

chopped green onions

Stuff lightly warmed tortillas with filling, scrambled eggs, grated cheese, and chopped green onion. Wrap and heat on high for 1 minute in your microwave. Serve sprinkled with a bit more grated cheese and sour cream on the side.

Note: I warm the tortillas just before wrapping because warming them makes them more pliable.

TACOS*

taco shells

Ground Turkey and Mexican Chorizo filling

refried or whole pinto beans, opt.

grated cheese

shredded lettuce

finely diced tomato

diced avocado

sour cream

Place hot filling in shells. Serve with a variety of additives including refried beans, grated cheese, shredded lettuce, diced tomatoes, diced avocados, and sour cream.

*In my opinion, there is no need for salsa with these dishes. The salsa would just get in the way of the lovely flavor of the Ground Turkey and Mexican Chorizo filling.


MEDITERRANEAN QUINOA SALAD

I love salad. And when salads like this one contain grain (quinoa is technically a seed though usually classified as a whole grain), I feel super proud of myself when the dish turns out not only delicious but very, very healthy. If you aren’t already familiar with quinoa, be advised that it is a good source of plant protein and fiber. One cup of cooked quinoa provides about 8 grams of protein and 5 grams of fiber. Quinoa is also naturally gluten-free and can be eaten safely if one has gluten intolerance such as celiac disease.

Quinoa is also a good choice for diabetics. Foods high on the glycemic index are associated with causing blood sugar spikes. So, people with diabetes should choose foods rated at medium to low on the glycemic index. A glycemic index of 55 or below is considered low. Quinoa has a glycemic index of around 53, meaning it won’t cause as dramatic a spike in blood sugar because it contains fiber and protein, both of which slow the digestion process.

Now, what I haven’t mentioned so far, is that quinoa is like a sponge. It absorbs the flavors of whatever dressing or sauce you are using. In this case, the simple olive oil and lemon dressing seems to just melt into the quinoa. So, along with all the other lovely ingredients, this makes for one tasty salad. And a perfect side dish for almost any fairly simple meat preparation.

I served this salad last evening with Baked Rack of Lamb with a Savory Topping. (Recipe to follow in the next couple of days.) And since the salad contained both a grain and lots of veggies, a third dish was not required. Which I always appreciate, because you know how lazy I’m getting in my golden years. And of course, it didn’t hurt that the salad had been very easy to prepare.

So, I hope you make this salad soon. It truly is yummy. (And super healthy!)

As always, have a grand time in your kitchen. Play with your food. And endeavor to make mealtime as pleasant as possible. And remember, good food doesn’t have to be fancy. And this salad proves that point perfectly. It’s not a bit fancy. Perfect for the likes of Mr. C. and me!   

Peace and love to all.

½ c. uncooked quinoa (I used Bob’s Red Mill Tri-Color Quinoa for this salad)

1 c. water

2 T. fresh lemon juice

2 T. extra virgin olive oil

½ tsp. kosher salt

freshly ground black pepper

½ tsp. dried oregano

1 T. chopped fresh parsley

tiny pinch crushed red pepper flakes (like 5-6 flakes)

1 c. chopped baby spinach

1 tomato, chopped and seeded

¾ c. chopped English cucumber

⅓ c. diced red or white onion

½ c. sliced kalamata olives

½ c. crumbled feta cheese

Rinse and drain the quinoa even though the package might state that the quinoa has been pre-rinsed. (Pre-rinsed could mean it was given a very light spray of water insufficient to remove all the saponins.)

Place rinsed quinoa and water in a saucepan and bring to a boil. Reduce heat, cover, and simmer gently for 15 minutes. Remove from heat., remove lid, fluff with a fork, and let cool for at least 20 minutes. 

Meanwhile whisk or shake the lemon juice, olive oil, salt, pepper, oregano, and crushed red pepper flakes together.

In a medium bowl, stir the chopped spinach, tomato, cucumber, onion, and kalamata olives together.   

When the cooked quinoa is cool, add to the bowl, and gently stir in the dressing and crumbled feta. 

Serve immediately or let the salad chill in the fridge a couple hours before serving.


MEXICAN CHORIZO SOUP WITH VEGETABLES AND BLACK BEANS

I don’t know if all grocery stores carry bulk chorizo sausage, but our local IGA does, house made, and really tasty. But I must confess. I am brand new at using chorizo as an ingredient. And for the life of me, after making this soup, I have no idea what I was waiting for. An engraved invitation from the chorizo growers of America? Or divine inspiration from heaven? Whatever!! But I’m darn sure you will be seeing more recipes in the near future containing chorizo. And it all started with Mr. C.  

Since the beginning of the covid scare, Mr. C. has been doing 99% of our provisioning. And some time ago, apparently, he came home with a package of bulk chorizo sausage. Since he is also the member of our family who does most of the retrieving from our freezer, I never even knew this package of chorizo existed. (Well, maybe he mentioned it to me. But I have as much of a selected hearing problem as the next person.) So, when he recently asked me when I planned to use the chorizo, I gave him one of my “deer in the headlights” look. He immediately understood that I had no idea what in the heck he was talking about. So, after a bit of discussion, it was decided that I would figure out a way to use this ingredient in the near future. So, based on a chorizo and white bean soup recipe I found on the Curtis Stone site, please allow me to introduce you to a really great use for chorizo.

This soup is easy to prepare and absolutely delicious. With lots of vegetable action happening. And isn’t that great. Veggies are so darn good for us. Which reminds me.

The other day as I was chopping up carrot, onion, and celery (mirepoix), I thought about how often I use this vegetative trio. In truth, at least twice a week. Especially during fall and winter. And I end up chopping fresh garlic at least 4 times a week. At least! But that’s just fine with me. Because these ingredients make such a great flavor base for so many tasty dishes. So, hats off to onions, carrots, celery, and garlic.

Well, that’s it for today. I believe I have always told you that I am one lucky lady. And today is another proof positive. The guys from Seabreeze are rehearsing in our living room. Live jazz. Right here. In my very own living room. Life just doesn’t get much finer than listening to great music performed in your own home.

Peace and love to all.

2 T. extra virgin olive oil, plus more for drizzling

1 lb. Mexican* chorizo sausage 

1 onion, finely chopped

2 carrots, cut in half, then into thin slices   

2 celery ribs, cut into ¼-inch-thick slices

2 sm. or 1 lg. fennel bulb, trimmed and cut into small pieces  

4 garlic cloves, finely minced

2 tsp. finely chopped fresh thyme

1 tsp. finely chopped fresh rosemary

1 tsp. smoked paprika

½ tsp. ground cumin

¾ c. dry white wine

6 c. chicken broth

freshly ground black pepper

1 (15 to 19-oz.) can black beans, drained and rinsed (I use Cento brand black beans)

Heat a large, heavy, covered soup pot over medium heat. Add the olive oil, then add the chorizo and cook, stirring occasionally until the meat is nicely browned. Using a slotted spoon, remove the chorizo to a small bowl. Set aside.

Add the onion, carrots, celery, and fennel; cook, stirring occasionally, for about 5 minutes, or until the vegetables begin to soften. Add the garlic, thyme, rosemary, smoked paprika, and cumin and cook for 1 minute.

Add the wine and cook until the liquid has evaporated. Add the broth and pepper. Bring to a boil, then reduce the heat to medium-low, and simmer, covered, for about 20 minutes, or until the vegetables are tender.

Stir in the beans and cooked chorizo. Taste and adjust seasoning. Simmer gently for about 10 minutes to blend flavors.

Ladle the soup into soup bowls. Drizzle with extra-virgin olive oil.

Great served with crostini. (See recipe below.)

CROSTINI

crusty French or Italian bread

extra-virgin olive oil

flaky or fine sea salt, to taste

Pre-heat your oven to 450-degrees. Line a rimmed baking sheet with parchment paper.  

Slice the baguette on the diagonal into pieces no wider than ½-inch. Lightly brush both sides of each slice with olive oil.

Place the slices in a single layer on your prepared baking sheet. Bake them on the middle rack for 6 to 9 minutes, or until they are crisp and nicely golden on top. Remove from oven and sprinkle lightly with salt. Serve immediately.

*The difference between Mexican and Spanish chorizo

Chorizo is a highly seasoned chopped or ground pork sausage used in Spanish and Mexican cuisine. Mexican chorizo is made with fresh (raw, uncooked) pork (and needs to be cooked), while the Spanish version is usually smoked. (Can be eaten like any other salami or sausage.)

According to The Spruce Eats “Spanish chorizo is a cured, or hard, sausage made from coarsely chopped pork. The red color of Spanish chorizo is due to the heavy amounts of paprika in the spice mix. Depending on the type of paprika used, Spanish chorizo can be either spicy or sweet. The paprika used in Spanish chorizo is almost always smoked, which gives the sausage a deep, smoky flavor. Other ingredients are herbs, garlic, and white wine, and the links can range from short to very long.

Because the sausage has been cured, meaning it has been aged for several weeks, it can be eaten without cooking and is often served sliced as part of a meat tray or tapas assortment. Spanish chorizo is also used to add flavor to cooked dishes like stews or paella, and even for special occasions. In general, fattier Spanish chorizos are used for cooking, whereas leaner chorizos are sliced and eaten without cooking. For both, the casings are edible.

Mexican chorizo is quite different from Spanish chorizo. The meat is usually ground, rather than chopped, and the sausage is fresh rather than cured. The red color of Mexican chorizo usually comes from spicy red pepper rather than the smoked paprika you find in Spanish chorizo. Pork fat is often added to the meat mixture, along with other spices and vinegar. The links are short, and air dried for one day to a week.

Mexican chorizo is sold raw and must be cooked prior to eating. It can be cooked either in its casings or removed from the casing and cooked like ground meat. Mexican chorizo is a popular grill item but is also used in place of ground beef in tacos, burritos, chili, burgers, soups, and even egg dishes.”

Mr. C. at piano
Grant on drums, Walt on bass, and Jerry on flugelhorn
And last but not least, the amazing Mr. Dave K. on trombone

PEANUT BUTTER CHOCOLATE CHIP OATMEAL COOKIES    

Well, if I’m lucky, I learn something new that ups my baking game every month or so. It doesn’t always happen that often. Mores the pity. But every once in a while, a new baking revelation smacks me in the face. And not only do I feel blessed by my new bit of knowledge, more often than not, I also feel frustrated. Because it’s usually a very simple tip that I should have been made aware of years ago. Either I simply don’t pay close enough attention when I peruse recipes or cookbooks, or I think I know it all, and have all the answers. And I truly don’t want to be that much of a doofus!

But up to now, I thought I had it about covered when it came to baking cookies. Wrong! Because I just learned there is a simple technique for producing a better cookie. But now that I am blessed with this knowledge, I am ever so excited to pass it on to you. So, pay attention. (This is one of those do as I say, not as I do moments!) (And if you already were aware of this trick, I don’t want to know about it! I feel stupid enough thank you very much!)

Anyway, the 2 secret ingredients required for making a better cookie are cold and time. Yup, a bit of quality time in your refrigerator can turn a good cookie into a fabulous cookie. (Read all about why that is at the bottom of this post.) So, the only thing left to say is that you should bake a batch of these cookies at your earliest convenience.

I came up with the idea of adding peanut butter to an oatmeal cookie a few days ago when Mr. C. was planning a band rehearsal to be held at our home. I always try to come up with some kind of sweet to keep the musician’s energy level in the red zone. So, I went on-line and found this recipe for the cookie I envisioned, on the bakingmischief.com site. I messed with Tracy’s recipe a tiny bit, but that’s what I almost always do. That’s why I get the big bucks! Yah, that’s it!

Anyway, you really do need to make these cookies. They are really, really delicious. And ever so easy to prepare.

As always, have fun in your kitchen. Keep learning, and never, ever think you know it all. That can only lead to a great big old fall on your face. And no one deserves that!

Peace and love to all.

1 c. (2 sticks) unsalted butter, room temperature

1 c. creamy peanut butter (not natural peanut butter)

1 c. brown sugar, packed

¾ c. granulated sugar

2 lg. eggs

1 tsp. vanilla extract

1½ c. unbleached all-purpose flour, fluffed

2 tsp. baking soda

½ tsp. fine sea salt

1½ c. old fashioned, rolled oats

2 c. semi-sweet chocolate chips (12-oz. package)

Line a large baking sheet with waxed paper. (The baking sheet will be going into you’re your refrigerator, so make sure it’s not too large. If so, use a second sheet.) Also, line a couple of large baking sheets with parchment paper. Set aside.

In a large bowl or the bowl of your stand mixer, beat butter, peanut butter, brown sugar, and granulated sugar until smooth and fluffy. Add eggs and vanilla. Beat until completely mixed.

Whisk the flour, baking soda, and salt together in a medium sized bowl. Stir in the oats. Add to the butter mixture and beat just until well blended. Stir in the chocolate chips.   

Using a #40 (1½-inch diameter) ice cream scoop, plop balls of dough right next to each other on the smaller baking sheet(s) lined with waxed paper. If you don’t have an ice cream scoop, roll the dough into balls roughly the size of a golf ball. Place the pan(s) in your refrigerator and walk away for at least 2 hours or longer*.

After two hours, transfer the cold dough balls onto the prepared baking pan(s) at least 3-inches apart. (They will spread as they bake.)     

Bake in a pre-heated 350-degree oven for 12 to 13 minutes, or just until cookies are browned around the edges and the tops look mostly set. (They will still feel squishy if you tough them. That’s what you want.) Do not overbake! (They will finish baking on the baking sheets as they cool.) Allow cookies to cool on the baking pans for at least 15 minutes before transferring to a wire rack to cool completely. Store in an airtight container.

*Why you need to chill your cookie dough

According to Camille Berry on the Taste of Home cooking site “For starters, chilling prevents cookies from spreading out too quickly once they’re in the oven. If you use a higher fat butter (like Kerrygold) chilling your dough is absolutely essential. Popping your dough in the fridge allows the fats to cool. As a result, the cookies will expand more slowly, holding onto their texture. If you skip the chilling step, you’re more likely to wind up with flat, sad disks instead of lovely, chewy cookies.

Cookies made from chilled dough are also much more flavorful. This is thanks to a few different factors. The dough becomes hydrated as the dry ingredients soak up moisture from the wet ingredients. This subtle hydration makes the dough less wet, concentrating the flavors. The result is cookies with a nice even bake and lovely golden-brown color. 

While this hydration is taking place, the flour also breaks down into sugar, making the dough taste sweeter. After as little as half an hour, your dough transforms into a bowl of goodness with an additional kiss of sweetness. Is it worth the wait? You bet.

According to an in-depth video by TikTok user @bromabakery, how long and whether you chill your cookie dough can have a significant effect on your final product. As she says, not chilling the cookie and baking at 350-degrees can result in a more-crackly cookie, since the dough hasn’t had enough time to absorb the flour. Chilling it for half an hour, however, gives you thicker, chewier dough. Chilling for 2 hours, however, resulted in the best cookie—giving it a deep flavor, crispy edge, and the optimal amount of spread.”

My thoughts. In some of the better cookie recipes I have tried, I always wondered why the instructions usually called for some time for the dough to chill. But there was never a reason given. (Either that, or I failed to read that part.) And the recipes asked the reader to chill the dough before forming it into balls or whatever the shape was meant to be. But with my arthritic old hands, I find it much easier to shape the dough and then do the chilling. If, of course, you aren’t making 400 gingerbread men, for example. If that’s what you are making, chill the dough in one big ball. And God’s speed!   

CROSTINI

OK, this is going to be the easiest recipe I ever shared with you. But this may be one of the best recipes I ever shared with you. And why is that you might ask? Well, for several reasons. Not only is crostini easy to prepare and delicious, it’s crunchy. And who doesn’t love crunchy! Crostini (meaning “little crusts” in Italian; singular crostino (but who could ever eat just one) are simply that much needed crunch so often missing in a meal of soup or stew and bread. And we all know how wonderful soup and stew are when served with a nice soft roll or baguette slices. But with crostini, you have the lovely bread, but also the delightful crunch.

So, what types of bread make the best crostini? Glad you asked. Rustic peasant bread, ciabatta, and different types of baguettes all work great. If you are into baking your own bread, I would recommend Chewy Sourdough Baguettes, Thin Sourdough Baguettes, Overnight Sourdough Baguettes, Soft French Baguettes, or Classic Italian Baguettes. All found on this site.

And then guess what else is great about crostini? You can top the little darlings with any old thing you want. For example – Kalamata Olive Spread, Creamy Feta Cheese Dip, Mushroom Pâté, Herbed Cream Cheese with Black Pepper Spread, and of course bruschetta. (See recipe below.) Or provide a variety of different toppings for family and friends to smear on crostini all by themselves. (Sounds like a party to me.)

Speaking of parties, I’ve had the pleasure of listening to the Whistle Lake Jazz Quartet rehearse in our living room. Furniture scattered to the four winds. Beer glasses everywhere, and happy, wonderful guys truly enjoying themselves making beautiful music. I feel like I’m in heaven. Just sitting in our den, writing up this recipe, it feels like magic happening all around me. There is simply nothing better than live music. And when it’s in your own living room – well, nothing compares. For pictures of the quartet practicing, see the bottom of the post.

So, as always, bring a little magic into your life. Be it listening to beautiful music, looking at fabulous art, reading good books, playing with your children, making someone else’s life a little bit better, or whatever feeds your soul. If it makes you smile, then it’s worth the effort.

Peace and love to all.

baguette

extra-virgin olive oil

flaky or fine sea salt, to taste

Pre-heat your oven to 450-degrees. Line a rimmed baking sheet with parchment paper for easy clean-up. 

Slice the baguette on the diagonal into pieces no wider than ½-inch. Lightly brush both sides of each slice with olive oil.

Place the slices in a single layer on your prepared baking sheet and bake them on the middle rack for about 9 minutes, until they are crisp and nicely golden on top. Remove from oven and sprinkle lightly with salt. Serve immediately.

Bruschetta

crostini – just out of the oven

1 garlic clove

extra virgin olive oil

chopped fresh basil

chopped tomato

freshly ground black pepper

Scrape the warm crostini with a garlic clove. Drizzle on a bit of olive oil, then top with diced tomato, chopped fresh basil, kosher salt, and freshly ground black pepper. Serve to only those who deserve the best.

Mr. C. on piano

Mr. C. and Todd on drums
Tim on bass and Jamie on guitar
All together now, all together now……..


OVERNIGHT SOURDOUGH DISCARD BÂTARD (added yeast)  

Bread made into crostini

For those of you for whom French is not your first, second, or even third language, a “bâtard” is essentially just an oval shaped loaf of bread. It just sounds so much more sophisticated to call it a bâtard rather than referring to it as just an oval loaf of bread. And you know, I am nothing if not the very essence of sophistication. Yah right?!?!

But when it comes to bread, I can get quite high on my horse about it. Especially good homemade bread. Because, frankly, there is nothing more delicious. And this bread is a perfect example of really good bread. Absolutely perfect for toast in the morning and especially fabulous when served as crostini. (See recipe below.)

It is however, a bit of a pain in the patootie to make. And probably not a good bread for a beginner to tackle. Unless of course, you are one of those people who overachieves at everything you have ever tried. On the first try! Then go for it. For the rest of us, I would say a bit of bread baking experience would be wise.

I found this recipe, much changed by me, on the King Arthur baking site. The instructions from the good folks at King Arthur would have me start the process with “fed” sourdough starter. For me, that would make it a three-day process. I simply don’t think that far in advance. As it is, even with my changes, it takes two-days to produce this lovely loaf. That much I can handle. And totally worth the effort.

But my way does require the addition of a small amount of active dry yeast. And even though not called for in the original recipe, I managed to slip in a bit of olive oil action too. (I love olive oil with this type of bread.)

So, in conclusion, if you have the time, discipline, and fortitude, please give this bread recipe a try.

As with everything, you will never achieve if you don’t first try. It always amazes me when people can’t believe I made the bread they are enjoying. When actually, homemade bread is one of the easiest and most forgiving baked good you can produce. But then, if you don’t try, you don’t know. So, try things folks. We are only on this planet for a very short time. Who knows, you might find that collecting the elusive chanterelle mushroom from its hiding place under a Douglas fir to be the best and most rewarding fun you ever had. Or learning to play the ukulele or the joys of down hill skiing in your mid 40’s. There are an infinite number of possibilities. But each require that first step. And with first steps, as in first steps taken by babies, you might fall on your face. Pick yourself up, dust yourself off, and start all over again. It’s called life. And life is meant to be lived! And cherished. Baby steps, successes, failures, and everything in between!

Peace and love to all.

1 c. sourdough starter discard, room temperature

1½ c. lukewarm water

½ tsp. active dry yeast

2½ tsp. kosher salt

5 c. unbleached all-purpose flour, plus more if needed

extra virgin olive oil

In the bowl of your stand mixer, stir together the starter, water, yeast, and 3 cups of the flour. Beat vigorously for 1 minute. (I use my paddle attachment for this rather than my dough hook.)

Cover and let rest at room temperature for 3 hours. Refrigerate overnight, or for at least 12 hours. (The dough will expand some during it’s time in your refrigerator.)  

The next day, add the salt and enough flour to form, with your bread hook, a smooth firm dough. For me, this took the full 5 cups of flour, and then some. Just be sure to touch the dough. Because, when I first started adding additional flour, 5 cups looked like too much. But when I actually touched the dough after 4½ cups, I quickly realized that the look of this dough is deceiving. It looked like it had enough flour, pulled away from the bottom of the mixer bowl like it had enough flour, but when I poked the dough and actually felt its density, in no way would it have held its shape. Simply not enough flour. So, I added enough more flour to create the dough required to hold a shape.   

When your dough is nicely kneaded and ready for the next rise, pour a bit of olive oil in the bowl, and using your hands and a stiff rubber spatula, work the dough into a ball entirely coated with the oil.

Cover the bowl with plastic wrap and allow the dough to rise until it’s light and airy, with visible gas bubbles. Depending on the starter you use and the temperature of your kitchen, this may take 4 to 5 hours. (Mine took 4 hours.) For best results, gently deflate the dough once an hour.   

Cover a large baking sheet with parchment paper. Then pour a bit of olive oil in a small container and lightly grease your hands. (Take your rings off first. Don’t forget where you left them!) Gently pat the dough to deflate it slightly and remove any large bubbles. Divide the dough in half, right in the bowl. Form each half into a loose ball, then gently stretch the dough while tucking the dough under itself as you form an oval. (I know there are fancy ways to shape a Bâtard, but frankly, I don’t have time or the inclination for fancy-schmancy loaves of bread. I just shape the loaves as best I can in my hands, then plop the darn things on the prepared pan! If they look a little misshapen, I mess with them a bit more on the baking sheet.) (If you have any leftover olive oil gently smear it on the loaves.)    

Cover and let rise until very puffy, about 2 hours. Don’t worry if the loaves spread more than they rise; they’ll pick up once they hit the oven’s heat. Toward the end of the rising time, preheat the oven to 425-degrees. While the oven heats, place a pan of water on the bottom rack. I use a 9-inch cake pan half full of water.

Spray the bâtards with lukewarm water; this will help them rise in the oven by initially keeping their crusts soft and pliable. 

Slash the bâtards. Try one slash down the length of the loaf, two diagonal slashes, or another symmetrical pattern of your choice. Make the slashes fairly deep; a serrated bread knife or lame, wielded firmly, works very well. 

Bake the bâtards for 25 to 30 minutes or until they are a nice golden brown and  the internal temperature reaches 208-degrees. Remove from oven and cool on a rack before slicing. 

Store bâtards, loosely wrapped, for several days at room temperature. Freeze for longer storage.

This bread makes great crostini. (See recipe below.)

CROSTINI

crusty bâtard (like this one) or a French baguette

extra-virgin olive oil

flaky or fine sea salt

Pre-heat oven to 450-degrees. Line a rimmed baking sheet with parchment paper.  

Slice the bread on the diagonal into pieces no wider than ½-inch. Lightly brush both sides of each slice with olive oil.

Place the slices in a single layer on your prepared baking sheet and bake them on the middle rack for about 9-11 minutes, or until they are crisp and nicely golden on top. Remove from oven and sprinkle lightly with salt. Serve immediately.