CHEWY CARAMEL PECAN SQUARES

Before I write anything about this recipe, I need to apologize for not posting a recipe since December 5th. But I have some very good reasons. My grown children’s goodie packages take precedence over any other use of my time once the calendar reflects that December has once again rolled around. And the older I get, the more Christmas seems to take me by surprise. And really, I have been cognizant of Christmas since I was about 3 years old. By 78 years old, you would think that there should be no shocker value associated with the fact that Christmas is about to descend on us, with what seems to me, at an ever-increasing rate of speed. But every darn year, I am unprepared for the fact of Christmas, even though there have been Christmas decorations in stores since before Halloween! And BTW, what’s with that? Can’t stores just finish one holiday before they start touting products for two holidays hence?

Anyway, the bottom line is that I have been madly wearing my Mrs. Santa hat, and basically loving every minute of it. Nothing makes me happier than making cookies and candy for my kidlets, other family members, and close friends. And of course, figuring out what gift would be most appreciated by my kids and other family members and friends. (Thank God for Amazon prime is all I have to say!) But back to the real reason for this post.

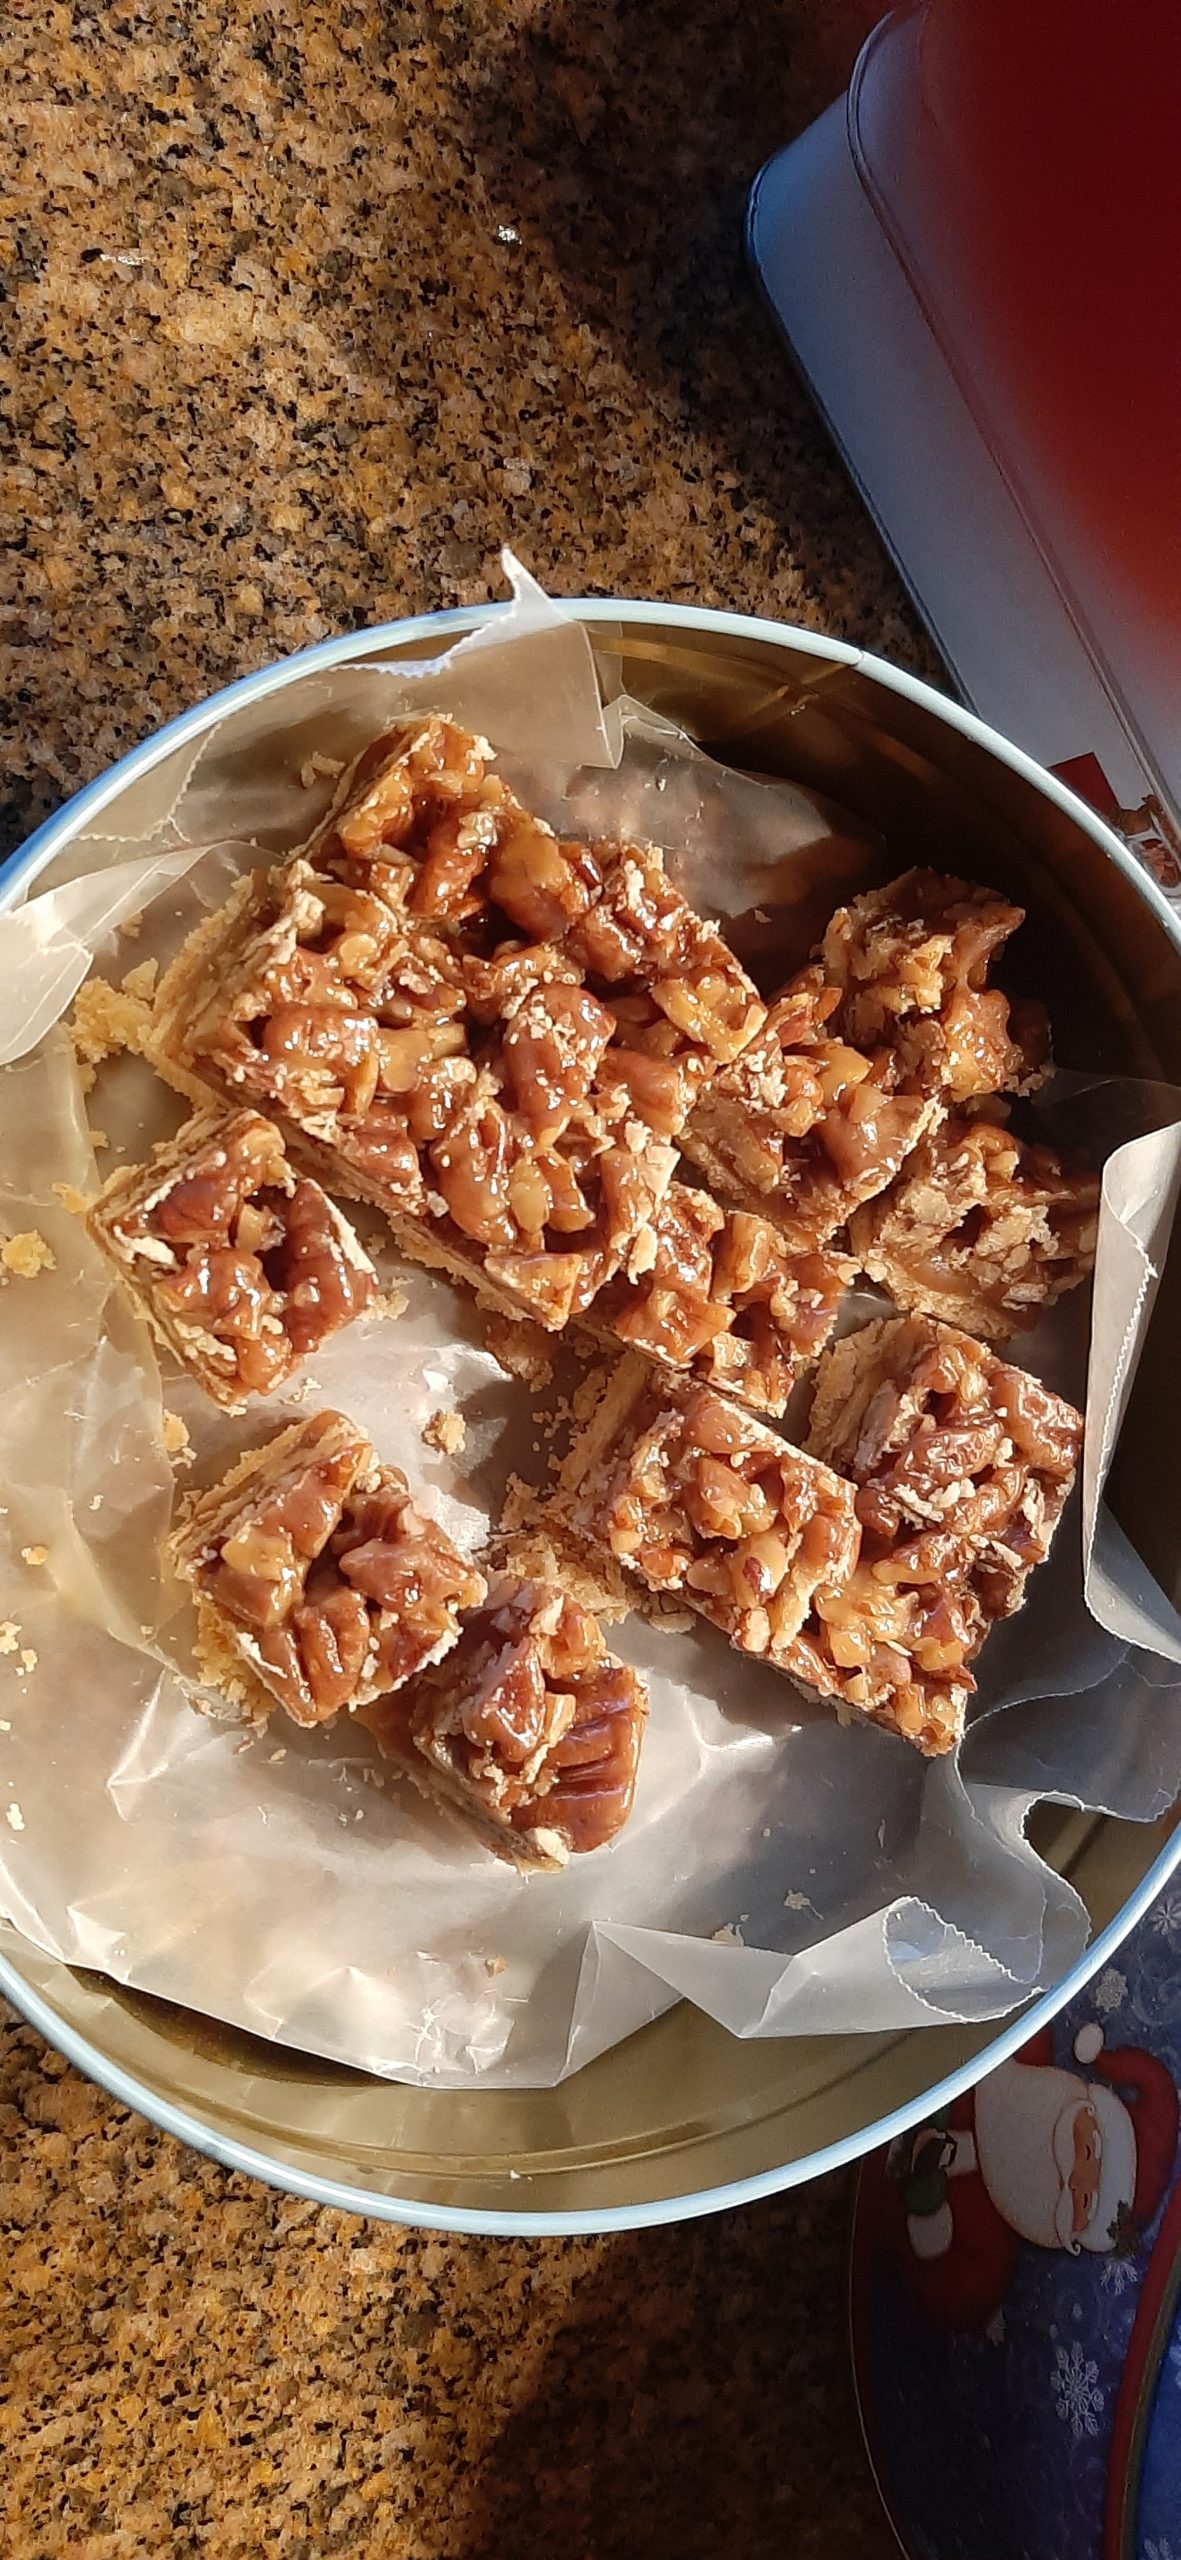
Every year, our dear neighbor Joanna leaves a Christmas tin full of cookies and peanut brittle on our front porch. And every year she includes these incredible bar cookies in the mix. I always know that it’s time for me to get going with my baking when our Christmas tin from Joanna arrives. So, this year I decided my kids needed some of these delicious bar cookies in their goodie package too. And since you all have been so good this year (Santa told me so), I am going to pass along this wonderful recipe via epicurious.com and Joanna.

I plan to serve these bars in lieu of pecan pie this year because after eating all the other offerings on the Christmas dinner table, most people only need a small bite or two of dessert. So, I am also making apple pie bars instead of apple pie, for just that very reason.

May you too have a full to the brim Christmas and a great 2023. We have all had a rough time the past 3 years, but to my eyes, things appear to be looking up a bit. I continue to have hope that the earth’s citizens can all pull through the various messes we have gotten ourselves into. And can learn from our mistakes.

In the meantime, let your holidays and years to come be full of laughter, love, family, friendship, and joy.

And as always, peace and love to all.

Crust:

1¾ c. unbleached all-purpose flour, fluffed

⅓ c. powdered sugar

¼ c. cornstarch

½ tsp. kosher salt

¾ c. (1½ sticks) cold unsalted butter, cut into ½-inch pieces

Line a 13×9-inch baking pan with parchment paper, leaving 1 inch overhang on all sides. Lightly butter the parchment paper. (Glass pan is best for this recipe.)  

Blend flour, powdered sugar, cornstarch, and salt in food processor. Add butter and process until mixture begins to clump together. Press dough evenly onto bottom of prepared pan.

Bake crust in a pre-heated 350-degree oven until set and light golden, about 25 minutes. Remove from oven. Let stand while preparing topping. Reduce oven temperature to 325-degrees.

Topping:

1¼ c. brown sugar (packed)

½ c. light corn syrup

¼ c. (½ stick) unsalted butter

4 c. coarsely chopped pecans  

½ c. heavy cream

2 tsp. vanilla extract

Stir brown sugar, corn syrup, and butter together in a heavy medium sized saucepan over medium-high heat until sugar dissolves and mixture boils; boil 1 minute. Add pecans and cream; boil until mixture thickens slightly, about 3 minutes. Stir in vanilla. Pour hot topping over warm crust.

Bake nut-topped crust until caramel is slightly darker and bubbles thickly, about 20 minutes. Transfer pan to rack. Cool completely in pan (topping will harden).

Lift parchment paper out of pan onto cutting board. Using a heavy sharp knife, cut cookies into 1-inch squares. (These cookies are very rich.) Store between sheets of waxed paper in an airtight container at room temperature.

THE WHOLE ENCHILADA (a card game)

OK, this is not a recipe for food. It’s a recipe for fun! And although I mainly post recipes for food, I have found that munching away on your favorite snacks and playing this game with family or friends is a smashing combination. (A drink on the side doesn’t hurt either!) And all the better if you are spending time with family or friends at one of your favorite campgrounds. (Of course, sitting in front of a fire after skiing all day would also be wonderful. But alas, for us, skiing vacations with family and friends are regrettably far behind us. (Sigh) But back to this game.

The first thing that is great about this game is that it is played with a single deck of cards. No fancy bits to keep track of and no problem finding storage space in your recreational vehicle or tenting equipment containers.

The next thing that makes this game especially appreciated by me is that it is easy to learn. And as with many simple and fun games, if you win it’s basically the luck of the draw. Of course, there is some skill involved. But really, you can become adroit after a round or two. (Seriously, if I can learn this game quickly, anyone can! Because truthfully, I don’t have a lot of experience playing card games.)

So, if you too want to add an easy and fun game to your “what to do on vacation” repertoire, I recommend this easy to learn game. This game was introduced to us by our new friend Phyliss while we were camping together in Entiat, Washington. We had such a fun time getting to know Phyllis and her husband Tim and spending time with them and our dear friends Margo and Jim. Good friends and good food equal good times. May you too be blessed with good friends. As for the food part, I trust you have that covered.  

And as always, peace and love to all.

THE WHOLE ENCHILADA (a card game)

a very fun and easy to learn card game for 3 to 5 players

The person with the lowest score wins!

This game uses a regular 52 card deck. No jokers allowed!

Each person gets dealt the same number of cards.

3 people playing, set aside 1 of the 2’s and deal out all the rest of the cards 

4 people playing, use the full deck and deal out all the rest of the cards   

5 people playing, set aside 2 of the 2’s and deal out all the rest of the cards 

You play the game by taking tricks.

Highest card in suit that is led takes the trick.

Each player must follow suit if possible.

The player who takes a trick, then puts down the first card for the next trick.

Aces are high.

The person to the left of the dealer leads the first trick.

After each hand, the deal passes to the left for the next hand.

The game is played in 6 rounds (6 hands)

Hand #1 – every trick you take awards you 10 POINTS

Hand #2 – every heart – 10 POINTS

Hand #3 – queens – 25 POINTS

Hand #4 – king of spades – 100 POINTS

Hand #5 – last trick – 100 POINTS

Hand #6THE WHOLE ENCHILADA – all of the point values from previous hands

So, for example, on hand number 6 if you took 3 tricks (30 points), 1 heart (10 points), 2 queens (50 points), the king of spades (100 points), and the last trick (100 points). That’s a total of 290 points. You have probably just lost the game!

LEMON AND GARLIC BAKED HALIBUT  

We would truly enjoy eating fresh seafood on a weekly basis. Not only for the health benefits* seafood supplies, but also because we both love the taste of almost any critter which spent its entire life in either fresh or salt water. But regrettably, dining on fresh seafood weekly just doesn’t quite happen for us. For one thing, I don’t trust the “fresh” fish selection offered by our local grocery store. (Name withheld to protect the innocent.) Second, we don’t go to Costco weekly although I love Costco’s fresh seafood selection, and finally, because fresh seafood is bloody expensive!

And granted, if push came to shove, we could afford to eat seafood on a more frequent basis. But it still doesn’t happen. So, when we do get an opportunity to feed on fish, I try my darndest to prepare it in a way that will emphasize its most admirable qualities.

So, please allow me to elucidate on the qualities of fresh halibut since that’s what this recipe is all about.  

Halibut is a very lean fish, with almost sweet tasting flesh. And when cooked properly, the firm but tender texture of the fish flakes into large segments that literally melt in your mouth. (So, no pressure involved with preparing a lovely halibut fillet to avoid rendering it dry and tasteless! Right? Wrong! Unfortunately, over cooking seafood is the easiest thing in the culinary world to achieve!)

If I have learned anything in all my years of cooking seafood, it’s to err on the side of underdone. Because you can always cook it longer if necessary. But, unless you are not of this world or have some voodoo knowledge of which I am unaware, you can’t undo overdone. My solution – an instant read thermometer. And I recommend you adopt this simple solution to overcooked seafood anytime you also prepare fish.  Actually, when you prepare any meat for that matter. (OK, not the meat in stew for example. You can be sure stew meat is perfectly cooked when it falls apart when you bite into it. But for rare steak, perfectly cooked pork, chicken, or slightly rare lamb, an instant read thermometer is indispensable.)

Now, about this recipe. I wanted to prepare a baked halibut dish that featured a bit of a savory topping that I hoped would complement the flavor of the fish, not disguise it. And be very easy to prepare. And with this recipe I believe I achieved my goal.

So, if you too love halibut, or any firm white fish, and want to give it a bit of a special fixing, I invite you to try this recipe. All I can say is that halibut fixed this way made for mighty fine dining for us the other evening. (If I say so myself!)

Well, that’s all I have to say on the subject of fish today. Happy cooking, happy eating, and try to stay healthy. There is a miserable cold like “something” going around our area. And I have heard it’s no darn fun. So, take especially good care of yourself as we go into the cold and flu season.

And as always, peace and love to all.

1 lb. halibut fillet

2 T. melted unsalted butter

2 tsp. fresh lemon juice

1 sm. garlic clove, finely minced

1/8 tsp. dried parsley

¼ tsp. paprika

½ tsp. kosher salt

freshly ground black pepper

Place halibut in a lightly greased baking dish.

In a small bowl, combine the melted butter, lemon juice, minced garlic, dried parsley, paprika, salt, and black pepper. Pour this mixture over halibut.

Bake in a pre-heated 400-degree oven for 12 to 15 minutes or until the fish is no longer transparent. The internal temperature should reach between 137 and 140-degrees and the fish should flake easily when tested with a fork.   

Remove from oven and serve immediately.

* Seafood is known to be an excellent source of lean, high quality, easily digested protein. A 3.5-oz. serving provides almost half of an adult’s daily protein needs for only 100 to 200 calories. Seafood is also low in saturated fat and sodium and is a rich source of many essential vitamins and minerals.


OLIVE OIL DROP BISCUITS

As many of you know, I am a bread lover. Matters not whether it’s rye bread, sourdough, biscuits, bagels, quick bread, cornbread – you name it. If it smacks of bread, I am all over it. So, the other evening having just received my latest A1C blood test results and learning that I am no longer classified as a diabetic, I celebrated. I fixed these delicious rolls to go along with Duck Sausage and Bean Soup. (Recipe already on site.) And the combination of these biscuits and the soup turned out to be perfect! And thank you Pam from 101milekitchen.com for this great recipe.

And the best part. (Well, almost the best part, was how easy the biscuits had been to make.) (The actual best part was how wonderful these biscuits tasted. And how delicious they still were the second and third day!) One bowl and hardly any prep time. In fact, the oven took longer to come to temperature than it took for me to mix and shape the biscuits. How cool is that!

And cleanup was a snap. So, all in all, a recipe destined to be prepared and served over and over at Chez Carr. And each time I plan to make them a bit different. As examples, next time I make these biscuits, I’m going to use grated sharp cheddar cheese and a pinch of chili powder. Or crumbled blue cheese, granulated garlic, and a pinch of dried thyme. The possible variations are truly endless.

So, if you too like soft, flavorful, and easy to prepare biscuits, this is the recipe for you.

Well, the weather Goddess doesn’t seem to be able to decide what to do regarding precipitation around here. Mixed rain and snow are being threatened by the weather forecasters. But looking out the den windows, the mountains are in the sun’s spotlight. All the new snow that has fallen over the past week has turned even the low foothills into a snowy wonderland. Grey clouds are high in the sky, but the mountains themselves look Christmas card worthy. Truly beautiful to behold.

Speaking of Christmas, how did it come around again so soon? I sincerely hope you were paying more attention than I was, because so far, I haven’t given Christmas gifts and goodies even the slightest thought. Perhaps I should work on Christmas this weekend. But first there are World Cup matches to watch. And I do have my priorities after all! Christmas will just have to get sorted out between games. Besides, after all the Christmas’s I have withstood, I know everything will work out just fine in the end. It always does!

May you too adopt a more cavalier attitude towards the holidays this year. We are all so blessed and have so much to be thankful for. If all the cookies don’t get baked as planned, or a tree doesn’t get decorated this year, or you decide to go away for the holidays, so be it. Just be joyful and thankful for what was accomplished. If you are like me, you sometimes set the bar too high. Lowering the expectations you set for yourself could be the best way to truly enjoy this wonderful time of the year.

Peace and love to all.

1¾ c. unbleached all-purpose flour, fluffed

1 T. baking powder

½ tsp. kosher salt

freshly ground black pepper (just a smidge)

⅓ c. finely grated Parmesan cheese or grated cheese of choice

½ tsp. Italian seasoning or favorite combination of dried or fresh herbs

1 c. whole milk or half whole milk and half buttermilk

6 T. extra virgin olive oil  

Line a baking sheet with parchment paper or a silicone baking mat.

In a medium mixing bowl whisk the flour, baking powder, salt, Parmesan cheese, and Italian seasoning together. Pour the milk and olive oil over the dry ingredients. Stir just until the dry ingredients are incorporated. Don’t overmix.

Using a #24 (3 tablespoons) ice cream scoop, drop the biscuits onto the prepared pan. Bake in a pre-heated 425-degree oven for 14-16 minutes or until the bottom side of the biscuits are a nice golden brown. Remove from oven and serve immediately or allow to cool and warm just before serving.


DUCK SAUSAGE AND BEAN SOUP

OK, not everyone has a neighbor that gifts them with a package of duck sausages just for the fun of it. But I do! (Vicki, my dear friend next door.) But then, what the heck to do with the sausages? So, bottom line, the poor sausages languished in our freezer for several months before I had the courage to use them in a dish. That, and Mr. C., who happens to have taken on the dubious task of “keeper of the freezer”, had grown weary of asking me when I planned to do something with the sausage. (Somebody has to make sure the freezer is always well stocked, and I am not that person. I am great at keeping the fridge and pantry in good supply. But I am terrible when it comes to the freezer. It lives in our garage, so out of sight, out of mind as the old saying goes!  You know how it is!)

Anyway, I finally decided that the sausage would be perfect in soup. And where better to look for a recipe than on the site that sells all things duck – D’Artagnan. (Great site BTW!)

So, this is my version of D’Artagnan’s White Bean & Duck Sausage Soup. (Why do I always think of the Marx Brothers when I say duck soup?)

Anyway, the soup turned out to be quite delicious, and very easy to build. There is one difficult step however, but that step happens almost every time I make soup. It’s the waiting time while the soup burbles away to yummy perfection. Because all the time soup is cooking, great smells emanate from the kitchen. And this soup was no exception when it came to smelling delightful as it cooked.  

So, if you too just happen to have some duck sausage laying around, make this soup. It is ever so nourishing and makes your mouth happy while filling your tummy. A perfect winter treat! If you don’t have any duck sausage on hand, then consider ordering some online. It is very rich and delicious. And an 8.5-oz. package goes a long way.

Well, that’s all for today. It’s very cold outside. And mother nature can’t decide whether to cover us with snow or torture us with the fact that the clouds could dump on us at any old time. So, we wait. And watch. And change a couple of appointments just in case. Never a dull moment. But then, that’s OK too!

Peace and love to all.

1 c. dry cannellini beans

2 T.  extra virgin olive oil, divided

1 (8.5-oz.)  pkg. Duck and Armagnac Sausage, removed from casings and cut into small dice (duck sausage available at D’Artagnan – on line)

1 lg. shallot, chopped

½ c. chopped onion

1 lg. carrot, chopped

1 rib of celery plus leaves, chopped

4 cloves garlic, finely minced

2 tsp. tomato paste

4 c. chicken stock  

1 lg. bay leaf

¼ tsp. dried thyme

¼ tsp. kosher salt

freshly ground black pepper

½ tsp. Aleppo pepper or half Spanish paprika and cayenne or Piment d’Espelette   

2 c. arugula, Swiss chard, kale, or baby spinach, finely chopped

2 tsp. cognac, opt.

The night before you plan to build the soup, rinse beans under cool running water then place in a large non-reactive container and cover with 2-inches of cool water. Let beans soak at room temperature overnight. Or, rinse the beans, cover with 3-inches of water, bring to a boil, remove from heat, cover, and let sit for 2-3 hours. 

Heat 1 tablespoon of the olive oil in a covered large pot or Dutch oven over medium-high heat. Thoroughly brown the sausage then remove it to a small bowl. Set aside to cool then place in your refrigerator until called for.

Add the second tablespoon of olive oil to the pan along with the shallot, onion, carrot, and celery. Season with salt and pepper. Sauté vegetables until shallots are translucent and carrots start to soften slightly, about 7 minutes. Add the garlic and cook for 1 minute.

Stir in the tomato paste and cook for about 3 minutes. Add the chicken stock, stirring up any browned bits at the bottom of the pan. Add the bay leaf and thyme. Bring the mixture to a boil, then turn down the heat to medium-low, drain beans, rinse, then add to the pot. Cover the pot and simmer the mixture for about 2½ hours, or until beans are cooked through. Remove bay leaf.

When the beans are tender, stir in the sausage, arugula, and Aleppo pepper. Continue to cook over medium heat for 20 minutes. Adjust seasoning and add the cognac. Serve hot.

Olive Oil Drop Biscuits are great with this soup. Look for recipe on this site in the very near future.  

CARAMEL CAKE WITH SALTED CARAMEL BUTTERCREAM FROSTING

This is the extract I used. Very strong, so go lightly.

Mr. C. and I had the very great pleasure of spending Thanksgiving with his 2 sisters (Nancy and Katie), their spouses (Paul and Rick), and Paul and Nancy’s two daughters Erin and Dana and their husbands (Gideon and Jason) and Gideon and Erin’s delightful daughter Clara (almost 8). The event was held in Pullman, Washington at Dana and Jason’s home. Both Jason and Dana are on the WSU faculty.

Dana, with Veterinary Microbiology & Pathology, is a PhD scientist with cross disciplinary training in microbiology, immunology, and entomology. While Jason is a PhD research assistant professor in the College of Veterinary Medicine, investigating Anaplasma – a pathogen spread by ticks that infects humans and large mammals. As Jason so aptly put it “Dana and I will tell a brick wall about our research if it stands still for 15 minutes, and we are definitely each other’s constant advisors and critics. Our shared interests in microbiology was definitely something we connected over and continues to be a part of our shared life.”

So, as you can imagine, we had a wonderful time. And, we didn’t even have to pet any ticks! What we did get to do was converse, cook and eat together, laugh a great deal, and do all the normal things that families who get along very well do to entertain themselves. So, a most pleasant 5 day get-away for us. Of course, the first day’s travel over Snoqualmie pass was not at all enjoyable. But I won’t go into that because I am still a bit terrorized by the whole ordeal!

In preparation for leaving to spend Thanksgiving away from home, I decided to make this cake, and a couple other food items to take along. Especially for the first evening since I wouldn’t be around during the day to contribute to any of the meal preparation. I figured bringing some goodies was the least I could do. So, along with this cake I took along some breakfast bread, candied ginger shortbread cookies, and 2 appetizer spreads. But I must say, this cake was my star contribution.

I started with my favorite yellow cake recipe, swapped out a bit of granulated sugar with brown sugar, and added a wee bit of caramel extract. Then I prepared a simple buttercream frosting containing some of Mr. Cs caramel sauce that he always has on hand for caramel lattes to give the frosting a light caramel flavor. Yum! It worked. And the cake had been very easy to make, and the frosting was a piece of cake. You know what I mean! The frosting was also easy to build. And the best part. The cake did not have to be refrigerated. Which is a darn good thing since there was absolutely no refrigerator space available by the time we arrived on the scene. (Can you ever really have enough refrigerator space? I don’t think so either!)

Well, that’s it for today. Sorry I haven’t posted for a few days, but I have a very good excuse. I was having way too much fun! May you too be blessed with having way too much fun with family and friends during this holiday season.

Peace and love to all.  

For the cake:

1 c. (2 sticks) unsalted butter, room temperature  

⅓ c. vegetable oil

2 c. granulated sugar

½ c. light brown sugar, packed

6 lg. eggs, room temperature

2 lg. egg yolks, room temperature

5 tsp. pure vanilla extract

¼ tsp. caramel extract, opt. (I use Watkins brand)

3 c. fluffed or sifted cake flour

1 tsp. baking powder

½ tsp. salt

1 c. sour cream

In the bowl of your stand mixer, cream the butter, oil, and sugars on high until light and fluffy, about 5-6 minutes. (Do not skip this step. Very important.)

Add eggs and egg yolks one at a time until well incorporated. Scrape the bowl as needed. Add in the vanilla and caramel extracts and mix until well combined.

In a medium sized bowl whisk the cake flour, baking powder, and salt together.   

At low speed, alternate adding in the flour mixture and sour cream just until combined. Do not over mix.

Grease and flour 1 9×13-inch cake pan (glass is best) and 1 8-inch round cake pan or 3 8 or 9-inch round cake pans. (If you plan to remove the cakes from the pans before frosting them, then grease and flour the pans as directed above and line the pans with parchment paper sprayed very lightly with cooking spray.)

Scoop the batter evenly into the prepared pans. Even off the batter with an offset spatula. (See directions for frosting a three-layer cake below.)

Bake the 9×13-inch pan in a pre-heated 350-degree oven for 33-35 minutes or until a toothpick stuck into the middle of the pan comes out clean. Do not overbake.

Bake the 8 or 9-inch round pan or pans for 28-30 minutes or until a toothpick stuck into the middle of the pan comes out clean. Again, do not over bake.   

Allow cakes that you plan to remove from the baking pan or pans to cool for 10 minutes on a wire rack before gently removing the cake from the pan. If using parchment paper, gently peel it off and allow the cake to cool completely on a pretty cake plate before frosting.

For the 9×13-inch cake, just remove from oven and allow to cool completely on a rack before frosting. After frosting, keep covered at room temperature.

For the frosting:

1 c. unsalted butter, room temperature

1 tsp. vanilla extract

⅓ c. + 3 T. caramel topping, plus more to drizzle over cakes

pinch of kosher salt

4 c. powdered sugar

whole milk or heavy cream, if needed

flaky sea salt, for garnish

Beat the room temperature butter using a hand mixer or stand mixer with paddle attachment until soft and fluffy. Add the vanilla, caramel topping, and kosher salt, mixing until thoroughly combined.

Add the powdered sugar on low speed. Add milk or cream a few drops at a time until the frosting is light and fluffy and to your desired consistency.

Frost the cakes. When the frosted cake looks perfect to you, drizzle on as much caramel topping as you want. (If the caramel topping doesn’t drizzle easily, warm it up a bit in your microwave.) After the drizzle is in place, lightly sprinkle on a bit of flaky salt.

How to create a beautiful 3-layer cake:

Remove pans from oven and place on cooling racks for 10 minutes. Then gently remove cakes from pans and allow the cake to cool completely before icing.  

Place one of the cakes upside down on your cake plate. Spread frosting over layer. (Not too much.) Place the second layer on the first layer and spread frosting. (Again, not too much. Add the top layer and frost the top and if you would like, the sides of the cake too. Then drizzle on some caramel sauce and sprinkle with flaky salt.

Please note: if your cakes are rounded at the top, slice off a bit of the cake to make the top flat before frosting. If the cake layers start sliding around, stick a couple of long picks through the layers to keep the cake together. Store at room temperature.

CREAMY PARMESAN AND GARLIC PASTA WITH HAM AND PEAS  

I never quite know what to do with leftover ham. OK, I can always build soup, or use it in a quiche, or just fry it up for breakfast. But sometimes I am in the mood for pasta. (Sometimes! Now that’s an understatement if I ever made one! Because I am ALWAYS in the mood for pasta!) Anyway, the other evening I had a pasta craving, but was totally aware that in our refrigerator, a hunk of ham was languishing and really needed to be eaten. And not just any ham, but a small chunk of Black Forest ham. My favorite.

So, with a little angel on one shoulder lecturing me to not be wasteful, and a red, demon-like character with small horns protruding from his head, an arrowhead pointed tail, and a pitchfork in his hand yammering in my other ear that I should ignore my conscience, I went online for inspiration. And I found this recipe on the damndelicious.net site. And that’s what this dish turned out to be. Damned Delicious! And, ever so easy and quick to prepare. So, many thanks to Chungah for this great recipe.

Not only did I use up the ham, I got my pasta fix too. A win/win situation. And, I now have a perfect way to serve leftover ham. Because as we all know – the holidays are on their way. And I don’t know about you, but after working several days setting a menu, doing the grocery shopping, preparing the dishes, serving the food, and then doing the cleanup after hosting an event, I’m one pooped gal. And not for just that one day. I’m bushed for a couple days thereafter. But somehow, we still need to eat during my recuperative period. And frankly, this dish is so easy to make that I’m already planning to use the leftover ham from either Christmas dinner or another meal I plan to serve sometime around that time for just this dish.

So, if you too plan to serve ham during the holidays, don’t forget this recipe. Because the KISS principal is always in vogue. Keep It Simple Sister (or Sir). And truly, I don’t have any doubts that you will find this recipe a snap to prepare. And that everyone in your family will enjoy eating this dish. The flavor is fairly mild, so even the youngest at table should have no problem gobbling it down.  

Peace and love to all.

2 T. unsalted butter

2 cloves garlic, minced

2 T. unbleached all-purpose flour

1 c. chicken broth

½ tsp. dried thyme

¼ tsp. dried basil

pinch seasoned salt

freshly ground black pepper

¼ c. half and half

¼ c. freshly grated Parmesan

½ c. frozen petite peas

1 c. diced ham

4 oz. spaghetti broken in thirds, cooked al dente (save some of the cooking water)

Melt the butter in a skillet over medium heat. Add the garlic and cook for 1 minute. Whisk in the flour until it and the garlic are both a light golden brown, about 2 minutes.

Gradually whisk in the chicken broth, dried thyme, dried basil, seasoned salt, and pepper. Cook, whisking constantly, until well blended, about 1-2 minutes.

Stir in the half and half and Parmesan and cook until slightly thickened, about 1-2 minutes. If the mixture is too thick, add some of the pasta cooking water until desired thickness is obtained. Taste and adjust seasoning.

Stir in the peas and cook for 1 minute. Then add the ham and al dente spaghetti. Toss to combine. Serve immediately.


1950s THEMED COCKTAIL PARTY MENU

Clockwise from just left of the candles – Pastrami Roll Ups, Deviled Eggs, Smoked Salmon Canapés, Layered Salad, Creamy Curry Dip with Crudité (barely visible), Cheddar Pecan Crackers (top of triple tray), Savory Cream Cheese and Minced Olive Ball, Onion Dip, and Southern Pimento Cheese Stuffed Celery

Mr. C. and I recently hosted a 70th birthday celebration for our dear friend Mark. I knew I wanted it to be a cocktail party, but I also knew that appetizers alone have a tendency to become a bit cloying after a while. So, I decided to offer a plain soup for those who needed a break from all the richness that is inherent with most hors d’oeuvres, spreads, dips, and canapés. And having the soup available was absolutely the right call. I’d even go so far as to say it was brilliant. (But that would be way too conceited for me to actually brag about. So, just suffice it to say, it was an excellent choice!)  

My quandary from the beginning was to figure out a theme. Then it struck me. Mark had been born in the 50s along with my husband and several other people who would be attending the party. And since I had been helping my mother make party food in the 50s, I already had an idea about the kind of food that was popular then, so, why not celebrate not only Mark, but the whole darn decade!

And I must say, it was such a fun party to plan. And even more fun to execute. Plus, most of the items I decided to serve were recipes already posted on this site. Better and better.

So, what you find below is the menu. Every item in bold print is a recipe already on this site. If not in bold print, it’s a recipe that you will find at the bottom of this post or the item was provided by Vicki, Mark’s wife.

I served the regular appetizers and Vicki’s layered salad on the dining room table. The soup, meatballs, and stuffed mushrooms I served in the kitchen.  (Sorry no picture.) The soup I kept warm in my crockpot. The stuffed mushrooms and Swedish meatballs stayed warm on my warming tray.

And having the food in two different locations worked really well. If nothing else, it got people moving around. And since not everyone knew each other, it was a great way for people to find themselves in a different area of the house with a new group of interesting folks with which to get into interesting conversations.

You know, the secret to a good party is not the food. Or the booze. It’s the people. And if you are blessed with great people in your life, then throwing a party is easy. Just invite them. They will come. And they will bring along their experiences, insights, interests, and a myriad of fantastic qualities that have led them to who they are today. And in this complex world that seems to many of us completely out of control, it is just wonderful to surround yourself with captivating people. I felt blessed just to have these amazing guests in my home. Plus, now I have another good memory. For how long, well that’s completely out of my hands. But for now, the remembrance is still with me, and I am savoring every blinking moment of it. May you too make memories that cause you to smile.

Again – happy birthday Mark. And cheers for many more birthdays to come.

And as always, peace and love to all.

1950s Cocktail Party Menu:

Bacon & Parmesan Stuffed Mushrooms

Cheddar Pecan Crackers  

Creamy Curry Dip with Crudité  

Deviled Eggs  

Layered Salad (Mark’s wife Vicki made the salad)

Onion Dip w/Tim’s thick potato chips  

Pastrami Roll-Ups (see recipe below)  

Savory Cream Cheese and Minced Olives Ball w/Ritz crackers  

Savory Ham and Dried Whole Pea Soup  

Smoked Salmon Spread Canapés

Southern Pimento Cheese Stuffed Celery  

Swedish Meatballs  

Birthday Cake – Chocolate Raspberry (Vicki’s masterpiece)

PASTRAMI ROLL UPS

1 (8-oz.) pkg. cream cheese, room temp

1 tsp. cream style horseradish, or more to taste

½ lb. deli pastrami, very thinly sliced

dill pickles, cut into very thin julienne strips, and blotted dry with a paper towel

Combine cream cheese and horseradish. Lay the pastrami out on a cutting board or clean countertop. (Depending on the thickness of the meat, use 1 or 2 slices.)

Spread a medium amount of the cream cheese mixture on pastrami.

Lay a strip of pickle along the bottom, then roll the meat into a tight pinwheel or log.

Wrap in plastic wrap and refrigerate.

When ready to serve, cut into ¾-inch pieces, secure with a wooden pick, and serve on a pretty plate or platter.

SAVORY CREAM CHEESE AND MINCED OLIVES BALL

There are just certain foods that bring back pleasant memories. And this is one of those special foods.

Somewhere along the line years and years ago, I was introduced to this mixture of softened cream cheese and olives used as a filling for sandwiches. Where and when that was is (I’m sure) firmly nestled in the archive’s region of my brain and therefore only able to be accessed at certain times. And my brain’s archive visitor hours appear to be getting shorter and further apart as I continue to pile on the years. So, unfortunately, today does not seem to be one of the times when my brain archive access is available! (Much to my displeasure!)

Anyway, suffice it to say I have been making this spread for decades. And why I am only getting around to sharing this treasure with you now is anyone’s guess. Although, hosting a 1950’s themed birthday party for our dear friend Mark was the impetus for digging up recipes from that era. And cream cheese balls seemed to have been all the rage at the time. And frankly, they still should be all the rage, because they are fabulous. At least this one is!

Now, I hope you understand that I didn’t actually attend cocktail parties in the 50’s. Even I’m not THAT old! (Mark didn’t attend in the 50’s either. He just happened to be born in the 50’s.) But I did start making several of the appetizers that were popular in the 50’s when I was hosting cocktail parties in the 60’s and 70’s. So, it was fairly easy to come up with a menu for the party. So, my next post will be entitled – 1950’s COCKTAIL PARTY RECIPES. (In case you too get a wild hair to throw a 1950’s theme party. This could save you a bunch of time.) But, back to this recipe.

Not only is this spread delicious; it is also very easy to prepare. Simple, everyday ingredients, and a creamy texture that is irresistible.

Well, that’s it for today. It’s sunny and bright outside and Mt. Baker and several other of the peaks along the Cascade Crest are showing off their new snow. It’s just a glorious day to be alive.

Peace and love to all.

Mt. Baker
Various peaks across from our home

And sorry about no picture of the spread. I have a picture on my camera, but for some reason I can’t transfer it to my computer. User error, I’m sure. But if and when I can make the transfer work, I will edit this post to include the work of art. (Don’t hold your breath!)

1 (8-oz.) pkg. cream cheese, room temp.

1 T. sour cream

½ tsp. Worcestershire sauce

1/8 tsp. granulated garlic

scant 1/8 tsp. granulated onion

freshly ground black pepper (not too much)

1 (4.25 oz.) can chopped black olives

¼ c. minced pimento stuffed green olives, plus a few slices for garnish

Using a fork, combine the cream cheese and sour cream in a mixing bowl until no lumps remain. Then stir in the W sauce, granulated garlic, granulated onion, black pepper, chopped black olives, and minced green olives. Form mixture into a mound on a pretty plate. Decorate with a few slices of stuffed green olives. Cover loosely, and refrigerate for at least 3 hours, or until firm, but better overnight.

Bring to room temperature before serving with crackers or stuffing into celery. Or spread liberally on toasted bagels. Now that’s a tasty treat!  


SIDECAR COCKTAIL

And yes, it has been a while since I posted a new adult beverage recipe. But in one of my internet searches, I came across this recipe. And I printed the recipe out for Mr. C. This was quite a long time ago, so I haven’t a clue where I stumbled upon this amazing mixture of ingredients. But if you know me at all, for me to qualify a drink by stating that it is amazing, you know it must be just that! Because I am a martini girl with an occasional foray into margarita world. And even then, it must be one of Mr. C’s margaritas. Because all the rest are just not going to hold up to any kind of scrutiny! (And yes, I am very, very spoiled!)

But the other evening, Mr. C. told me I really should take a sip of this new to us cocktail. If I hadn’t had a martini already in hand, I would have stolen, yes stolen, the drink from him. It was that good!

Now of course, there is a caveat regarding this drink. You need to use really good booze. And no bottled lemon juice. You need the real thing for this drink. Period! (Actually, you should be using the real thing ALL THE TIME.) But you already know that! Right?!

The moon is shining in on me as I write. The mid-term elections are over. And I have decided to accept whatever outcome is declared. I will continue to believe in the goodness of most people. And the ability for intelligent people to understand that not all people are created equal. Which BTW, was very hard for me to understand when I was younger. Because I am no Einstein! I thought if people just worked harder, they too could achieve their goals. What I didn’t understand is that not everyone has goals. Or has the time, money, intelligence, or inclination to set goals. Some people are just too busy putting food on the table and cloths on their children’s back. Their only “goal” is to survive.

And now, at my ripe old age, I care more about the welfare of these people then I ever expected to feel. How can any person working 2-3 jobs at minimum wage set lofty goals for themselves? They just need to make ends meet. And why is that so hard for some who were blessed with intelligence, decent values ingrained from childhood, and a standard of living 98% of the world envies, not care about others who are not as blessed. It boggles my mind.

But I can’t change the world. But I can help people think by the words I write and the opinions I express. If I help only one person stop and think about someone less fortunate than themselves, showing pity rather than disdain, I will consider myself a success!

Peace and love to all.

2 oz. Armagnac or VSOP Cognac

1 oz. Cointreau

¾ oz. fresh lemon juice

superfine or granulated sugar, to coat the rim of the cocktail glass, opt.

lemon twist, for garnish, opt.  

Prepare cocktail glass by making a slit in a lemon wedge and running the cut edge around the rim of the glass. Then dip the rim in a saucer of sugar to create a thin crust. Chill the glass until needed.

Combine Armagnac, Cointreau, and lemon juice in a cocktail shaker filled with ice. Shake well until chilled, about 10 seconds. Strain into prepared glass and garnish with a twist of lemon peel. Add ice if you like your cocktail cold.