CREAMY LEMON PASTA WITH PROSCIUTTO AND PEAS

Please note: I would have posted this recipe yesterday, but my site was still causing me some problems. And frankly, I’m too lazy to re-write this preface. But since I’m sure you would want to know, Mr. C. never made it home after his afternoon rehearsal in Seattle because of a 4-hour traffic delay in Everett. So, he went straight to rehearsal in Mt. Vernon, missing dinner of course, but enjoyed a big old bowl of avgolemono when he got home around 10:00 pm. And yes, the poor guy was totally pooped after his ordeal. But very glad to be home where he was greeted by Miles, Max, and his adoring wife. (Miles and Max are our cats.)

The older I get, the less time I want to spend in the kitchen. I know that sounds just plain wrong coming from someone who has always enjoyed cooking and sharing her recipes. But I’m not as young as I used to be. Well, none of us are, but you know what I mean. But, and here’s the real killer, I still love to eat and share great food with Mr. C. and others. And I still look forward to posting recipes. So, that leaves me trying new recipes that have fewer ingredients and take just a reasonable amount of time to prepare.

So, the other evening I had a package of prosciutto that really needed to be eaten and a couple of lemons that had seen better days. And over the years I have made plenty of quick and easy pasta recipes, because frankly, pasta of any kind is just about my favorite food. Well, that and any bread product you care to mention.

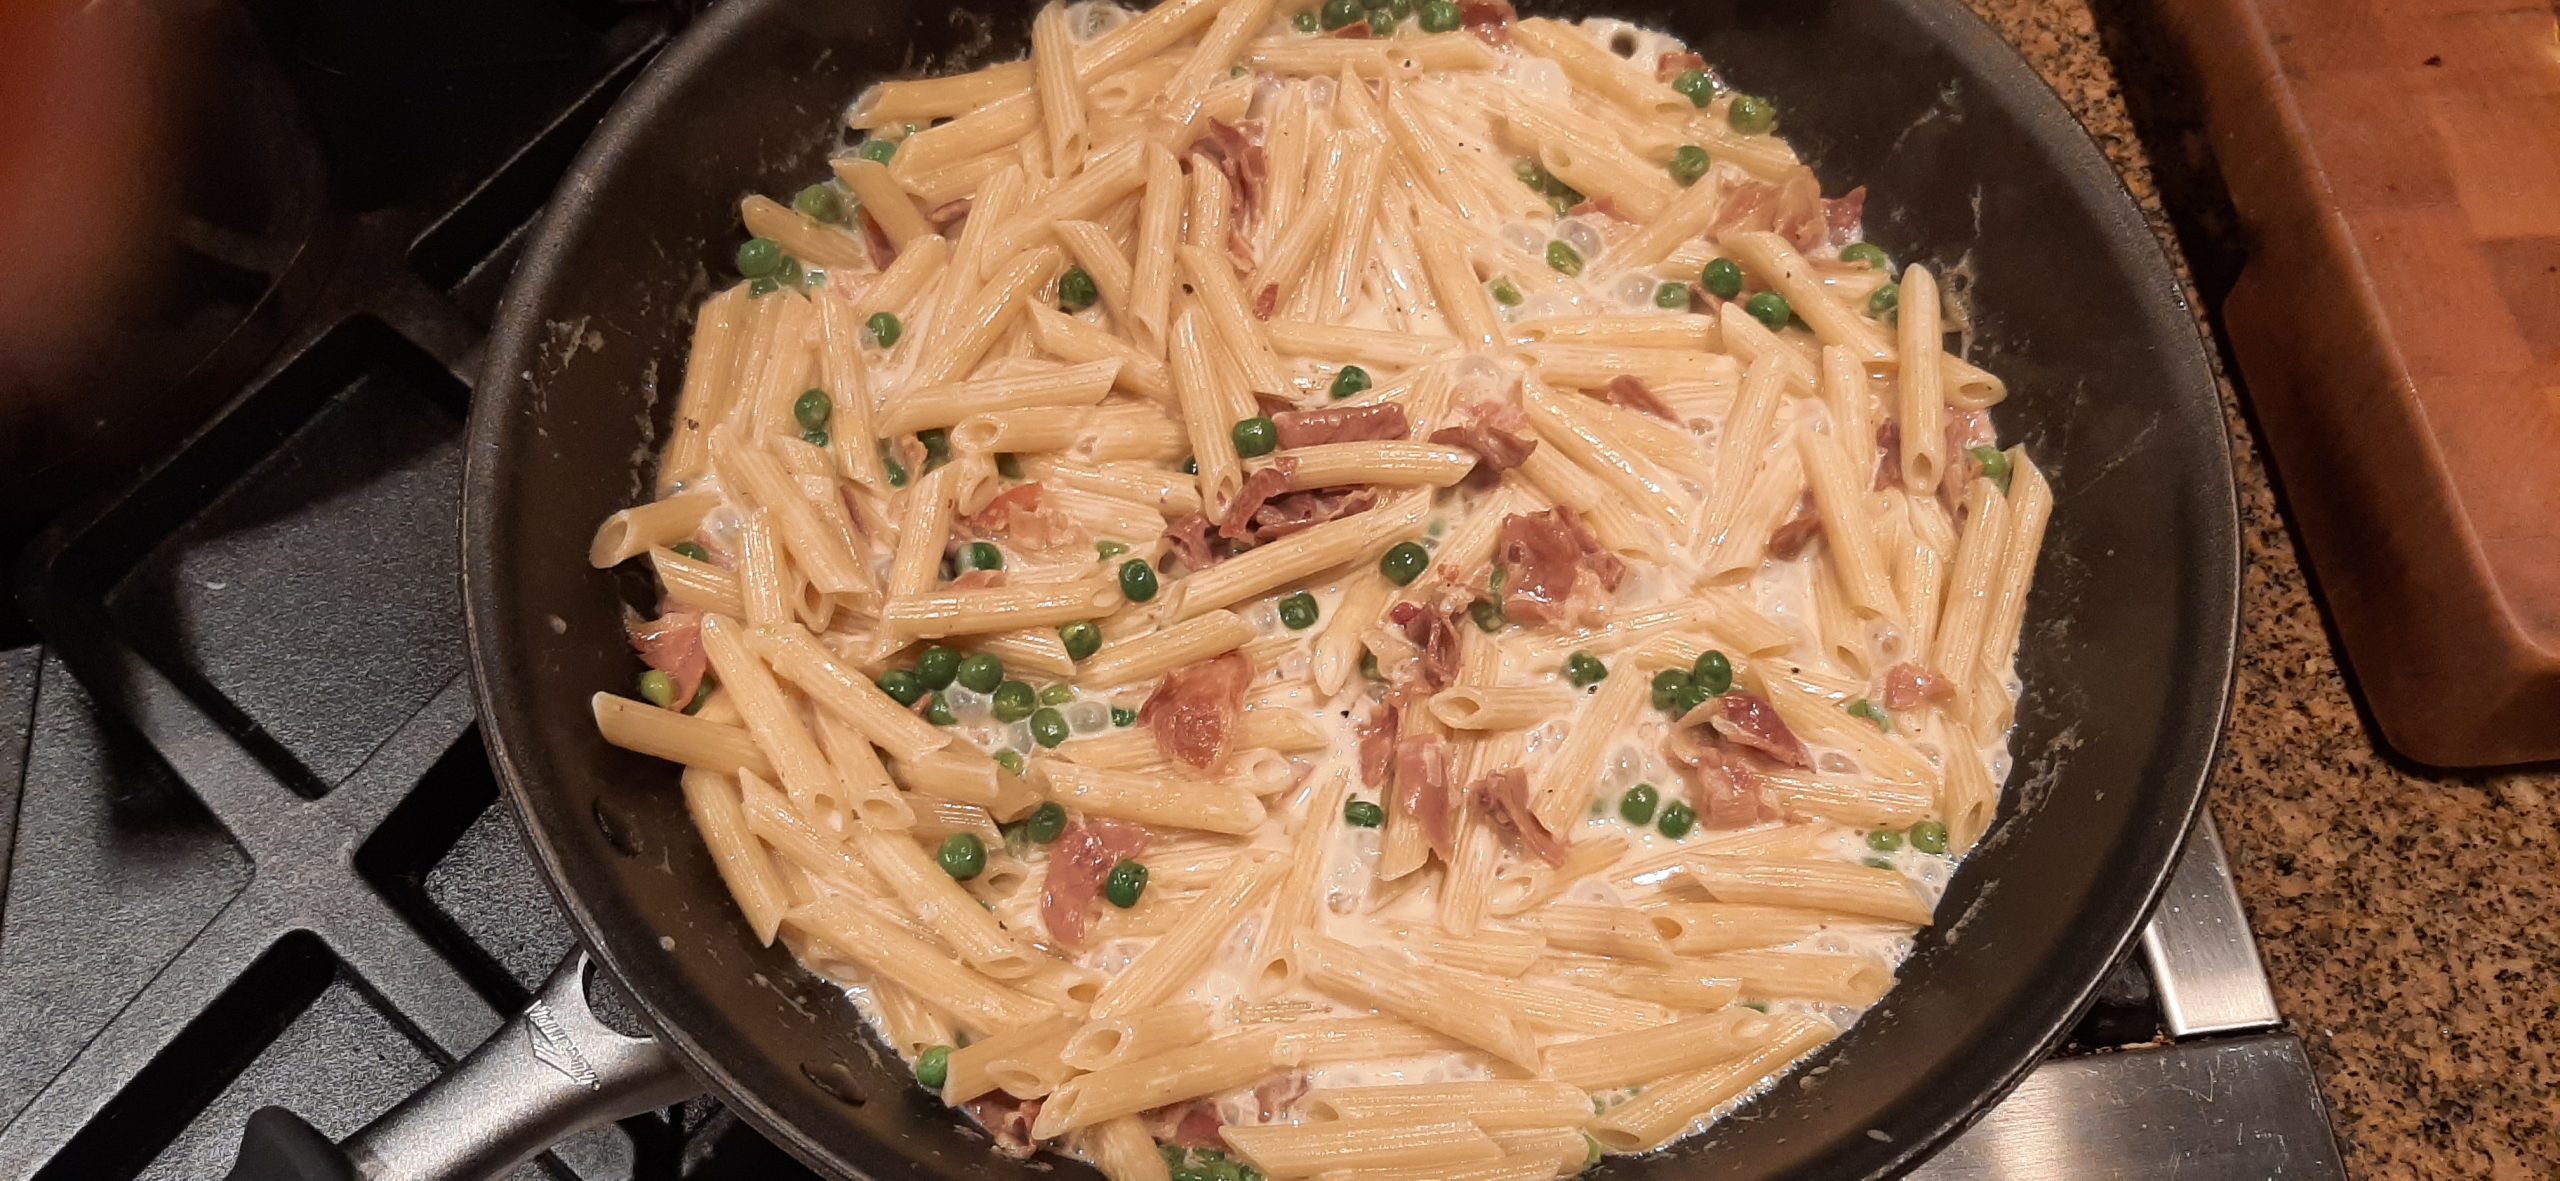
So, using what I had on hand, I formulated this recipe. And it made for one heck of a good entree. We both absolutely loved this pasta dish. And it was simple and fast to prepare. Yeah! I served the pasta with a simple green salad, which was the perfect accompaniment.

So, if you too love a tasty pasta dish, but do not want to spend a great deal of time in its preparation, this is the recipe for you. And it is a recipe that could easily be adapted. You could use small cubes of pancetta instead of prosciutto, regular onion in lieu of shallots, whole milk in place of heavy cream, and whatever style of pasta you prefer. The only thing I will haunt you about is if you use some kind of bottled lemon juice in place of the real thing. Unacceptable. On oh so many levels.

Well, it’s dismal outside today. But it’s warm and cozy inside our home. Our cat Miles is nestled into the kitty bed on Andy’s desk. His brother is napping on our bed. Mr. C. is down in Seattle taking a piano lesson, then rehearsing with our dear friend Vivianna for one of her upcoming recitals for her PhD in music. This evening Andy has a rehearsal in Mt. Vernon. He is one very busy guy. But I love that he is getting to play music as much as he does. And I go with him to as many of his gigs as I can. I just love being married to such a talented musician. And a fabulous person to boot!

So, with his very tight schedule in mind, I am going to make one of his favorite soups for dinner. Avgolemono. Which in case you don’t know is a Greek lemon rice soup. And you can bet your bottom dollar I will be using fresh lemon juice. Because Mr. C. deserves the best! As do each of you.

Peace and love to all.  

1 tsp. extra virgin olive oil

1 (3-oz.) pkg. prosciutto, chopped into small pieces

2 T. unsalted butter

3 T. finely chopped shallots

¾ c. chicken broth

¾ c. heavy cream

zest from ½ lemon

1 T. fresh lemon juice

¼ tsp. kosher salt

freshly ground black pepper

1 c. frozen peas

10 oz. penne rigate, cooked al dente (save some of the water)

grated Parmigiano-Reggiano, for serving

Heat the olive oil in a small skillet. Add the prosciutto and brown for 4-5 minutes or until crisp. Remove from heat and set aside.

Melt the butter in a large nonstick skillet over medium heat. Add the shallots and sauté until soft, about 4 minutes.

Add the broth and simmer over medium high heat until mixture is somewhat reduced, about 2 minutes.

Add the cream, lemon zest, lemon juice, salt, and pepper. Simmer until sauce thickens slightly, about 3 minutes.

Add the frozen peas and then simmer just until the peas are heated through. (You really do not need to cook them. They just need to be warm.) Add the al dente pasta and browned prosciutto. Toss pasta with sauce until coated. If sauce is too thick, add a bit of pasta water. Taste and adjust seasoning.

Serve immediately. Pass the Parmigiano-Reggiano.

SAVORY BLACK BEAN CHILI

I made this chili the other evening using only the experience of making chili for roughly 58 years. So, did I need a recipe to follow? No, I did not. So, why am I giving you this recipe? You probably already have the perfect chili recipe. But in case you don’t or haven’t been cooking all that long, you might just need a great recipe for chili. Because a great chili recipe is something every cook should have at their disposal. Chili is simply one of those dishes that is loved by people of all ages. And really, is there anything better to eat when it’s cold, dark, and dreary outside? Of course not! Add a chunk of cornbread spread with lots of soft butter and honey to accompany the chili, and you have a meal fit for a king.

So, what’s so special about this chili you might ask? Actually, there is nothing exceptional or unique about this dish, except it’s darned delicious. And easy to prepare. And warms up beautifully. And is the perfect comfort food.

So, if you live in a temperate environment where the sun shines every day, the temperature never goes under 70-degrees, and you don’t even own a heavy jacket, you absolutely do not need this recipe in your life. But for the rest of us who can and usually do complain about cold and rainy weather especially in winter, if not this recipe, you should have at least one good chili recipe at hand.

Well, that’s it for today. I am having trouble with my site. I keep getting an error message that says I’m using an outdated version of PHP. (Whatever the heck that means.) Anyway, I’m trying to get it fixed, but for someone like myself who can barely remember to plug in my cellphone daily, having technical problems on my site is tantamount to asking me to replace the engine in our Prius! But keep trying I must. (Any good thoughts sent my way very much appreciated.)

If you have favorite recipes on this site, I advise you to print them out ASAP. Who knows when I might just blow up the whole site!

Peace and love to all.  

1 T. extra virgin olive oil

1 lb. lean ground beef

1 onion, chopped

1 c. chopped celery

3 lg. garlic cloves, finely minced

¼ c. chopped fresh parsley

1 (28-oz.) can diced tomatoes (preferably Italian)

1 (15-oz.) can/box tomato sauce (preferably Italian)

1 (15 to 20-oz.) can black beans (rinsed and drained) (I use Cento brand)

1 can black olives, drained and sliced

1 (4-oz.) can diced green chilies (I prefer Hatch diced chilies)

3 T. chili powder

1 T. oregano (I like Mexican oregano)

1 tsp. paprika

dash ground cloves

½ tsp. seasoned salt

freshly ground black pepper

Warm the olive oil in a large heavy covered pan or Dutch oven. Add the ground beef, onion, and celery. Cook until the ground beef is nicely browned. Add the garlic and fresh parsley and cook for 1 minute.

Add the diced tomatoes, tomato sauce, black beans, black olives, diced green chilies, chili powder, oregano, paprika, ground cloves, seasoned salt, and pepper.

Bring to a boil, reduce heat, cover, and simmer for an hour. Taste and adjust seasoning just before serving.

Great topped with grated sharp cheddar cheese and sour cream. (Corn bread on the side is nice too.)

GLAZED EGGNOG FLAVORED BISCOTTI    

Since eggnog is a favorite of my husbands, and for him Christmas just isn’t the same without a bottle of the stuff in our refrigerator starting around Thanksgiving, I thought an eggnog flavored biscotti might just be a perfect treat for him. So, I went online to find a recipe. What I found were recipes that contained eggnog as an ingredient. And I thought to myself, what a waste of good eggnog when all the flavors of eggnog can so easily be duplicated by ingredients I always have on hand. Plus, then if he wanted eggnog biscotti in July for example, I wouldn’t have to build some homemade eggnog just for this recipe. I could basically make these delightful biscotti any old time I chose. (Or Mr. C. ever so nicely requested.)

So, the recipe below is what I came up with. And if I do say so myself, the biscotti were (they’re all gone now) delicious. And quite different from all the other biscotti I make. And yes, we love biscotti, so you will find several recipes on this site. They are all fabulous, and very easy to make.

Well, that’s all for today. Mr. C. has a rehearsal this evening, so dinner needs to be on the table by 5:30, which is much earlier than when he doesn’t have a rehearsal or gig. Usually, we get around to eating dinner around 7:00 pm. Then it’s reading time for me and reading and/or practicing the piano for Andy. In other words, very sedentary after dinner pursuits, which are not only consistent with our ages but also our inclinations. And doesn’t that make us lucky people.

May you also be able to follow your inclinations and enjoy some quality down time each and every day.

And as always, peace and love to all.  

For the biscotti:

½ c. (1 stick) unsalted butter, room temp.

1 c. granulated sugar

2 eggs

½ c. whole milk

1 tsp. dark rum

1 tsp. cognac

1 tsp. vanilla paste or extract

3½ c. unbleached all-purpose flour, fluffed

2 tsp. baking powder

2 tsp. ground nutmeg

½ tsp. ground cinnamon

½ tsp. kosher salt

Line a large baking sheet with parchment paper.

In the bowl of your stand mixer, combine butter, sugar, and eggs until well blended. Mix in milk, rum, cognac, and vanilla bean paste.   

In a separate bowl, whisk the flour, baking powder, nutmeg, cinnamon, and salt together. Mix the flour mixture into the butter mixture until well blended.

Roughly divide dough in half. Using buttered hands, shape each dough half into a long roll, approximately 14″ long. Carefully place rolls on prepared baking sheet, about 3-inches apart. With your fingers, lightly flatten each roll so that they are approximately ¾-inch thick.

Bake in a pre-heated 350-degree oven for 25 minutes or until golden brown. Remove from oven and place pan on wire rack for about 15 minutes. Carefully move the logs to a cutting board and cut diagonal slices (approximately ¾-inch thick).

Place slices, cut side down, back on original baking sheet. Bake for 10 minutes. Turn slices over and return to oven to bake for another 10 minutes or until firm to the touch and lightly browned. Remove from oven and transfer to wire racks to cool completely before glazing.

For the glaze:

1 c. powdered sugar

1 tsp. rum

tiny pinch cinnamon

tiny pinch nutmeg  

2–3 T. whole milk

In a small bowl, whisk the powdered sugar, rum, cinnamon, nutmeg, and 2 tablespoons milk together. If needed, add more milk to achieve desired consistency.  

Place completely cooled biscotti pieces, top side up, about a half inch apart on your large baking sheet. Drizzle the glaze over the biscotti. (You may not use it all. That’s OK.) Allow glaze to harden before storing biscotti in an airtight container.  


SIMPLE VEGETARIAN FRIED BROWN BASMATI RICE

I have yet to make the right amount of rice. And it’s never on the side of not being enough. I am simply a cooked rice overachiever. (Mashed potatoes and poultry dressing also if truth be known.) Anyway, the other evening I wanted to serve a side dish that would be quick and easy to fix, while at the same time taste delicious and different. Then I remembered that I had left over cooked brown basmati rice in the fridge. But, what to do with this cooked rice? I could always just serve it again plain, but what fun is that? So, I decided to just wing it and see what I could come up with.

Possessing an innate desire to start any savory dish with a mirepoix (onion, carrot, and celery slowly sautéed in oil), that was my starting move. Then I added some chopped fresh ginger, and the rest as they say is history. The dish turned out to be ever so easy to build and a very tasty addition to our meal.

So, if you find yourself with extra cooked rice, I recommend giving this recipe a try. Simple to prepare, satisfying, delicious, and reasonably healthy. What more could you require?

Well, it’s Sunday. The weather is gloomy, but I am happily sitting at my desk writing this post. Mr. C. is playing a lovely Bach piece on the piano. Miles is inhabiting the kitty bed on Andy’s desk (adjacent to my desk) and Max is napping on our bed. The entire Carr clan is happily enjoying a lazy day.

My wish is that every person could have a day like this. Free to do as they wish without worry about where their next meal was coming from. Or if they were going to be able to keep their home, or at least have a place to lay their head that night. Or whether their lives were about to be shattered by a Russian bomb. Having never experienced any of these types of situations, the fear and uncertainty felt by these folks is inconceivable to me. For that and the many other blessings I have received in my lifetime, I am truly thankful.

Peace and love to all.

1 T. veggie oil

1 sm. onion, chopped

⅓ c. shredded carrot

1 celery stalk, diced

1-2 tsp. chopped fresh ginger

2 eggs

2 T. toasted sesame oil

3 c. cooked brown basmati rice (see recipe below) or cooked rice of choice

2-3 T. soy sauce, or to taste

1 c. frozen peas

2-3 green onions, chopped

2 T. toasted sliced or slivered almonds

Preheat a large skillet or wok to medium heat. Add the veggie oil and cook the onion, carrot, and celery. Cook until the onion is tender. Add the ginger and cook for 1 minute.

Slide the veggies to the side and break the eggs onto the other side. Using a spatula, scramble the eggs. Once cooked, mix the eggs with the vegetable mix. Add the sesame oil, rice, and soy sauce to the veggie and egg mixture. Stir and fry the rice and veggie mixture until heated through and combined. Add the peas and cook just until they are hot. Taste and adjust seasoning. Then stir in the green onions and toasted almonds. Serve immediately.  

BROWN BASMATI RICE

1 c. brown basmati rice

2½ c. water

2 tsp. Better Than Bouillon Vegetable base

Cook per package instructions or in your rice cooker using the “brown rice” setting.


QUICK AND EASY PARTY MIX

For those of us who are trying to eat less sugar and reduce the amount of salt in our diet, finding the right snack food can be a bit daunting. I mean really, who doesn’t get a bit of a craving for Cheetos, Fritos, Cheez-its, etc. periodically. Or yearn for a couple of homemade cookies while reading a great book late at night. We are after all, only human. And humans crave sugar and salt.

So, I decided to come up with a snack that was not only satisfying and delicious, but also contained no added sugar (besides what’s already built into the cereals), and less salt than in my favorite snacks. (Cheetos, etc.)

Of course, along with the wonderful savory flavor in this party mix and ease of preparation comes the temptation to nibble on it every chance you get. So, you need to know that it’s quite easy to justify eating just another tiny little bowl while you go about your business. So, do not be fooled. Less sugar and salt for sure. With its fabulous savory flavor plus delicious crunch, this snack might very easily turn into an addiction. Because, basically, there is a high quotient of self-indulgence that is inherent with this party mix. It is just that good.

I used my Not Your Mama’s Chex Party Mix recipe for the base of this recipe. I didn’t change that much, but enough to lighten the mix up a bit. But both recipes are wonderful.

So, if you too want a snack that is better for you than some that are on the market, may I suggest you give this recipe a try.

And as always, peace and love to all.

4 c. Corn Chex® cereal

4 c. Rice Chex® cereal

4 c. Wheat Chex® cereal

10 T. (1¼ sticks) unsalted butter

3 T. Worcestershire sauce

½ tsp. hot sauce (recommend Frank’s RedHot)

1½ tsp. granulated garlic

½ tsp. granulated onion  

1½ tsp. seasoned salt

1½ c. mixed nuts

1½ c. peanuts

In a very large bowl, combine the Chex (any combination of corn, rice, and wheat* is perfect). Melt the butter in a saucepan; stir in the Worcestershire sauce, hot sauce, granulated garlic, granulated onion, and seasoned salt

Gently stir the buttery mixture into the cereal mix until the dry mix is evenly coated. Stir in the nuts.

Spread on large baking sheets and bake for 1 hour in a pre-heated 250-degree oven, turning every 15 minutes. Remove from oven and allow to cool completely before storing in an airtight container.

*To make gluten free party mix, don’t use the Wheat Chex. Substitute with additional Rice Chex, Corn Chex, or nuts.  


DOUBLE CHOCOLATE ESPRESSO BISCOTTI

I had so much fun this past December making biscotti to give to relatives and friends for Christmas. And if truth be known, biscotti is so darned easy to make, I felt a bit guilty not spending more time on these edible gifts. I quickly got over any remorse. Because dunking a biscotti in your morning coffee or tea or softening one of these Italian cookies in Vin Santo* as an after dinner or late evening treat, is just about as close to actually being in Italy as you can get. And isn’t even a temporary reminder of the joy associated with visiting Italy one of the greatest feelings on earth. At least it is for us.

So, being able to share these twice baked treasures with our friends and family helped make the holidays extra special for me.

Now, something you should know. These are very flavorful cookies. Nothing bland or quiet about their flavor. And probably a cookie your children would not appreciate. But for a chocolate lover, these are perfect.

So, next time you need an easy to prepare cookie that will make you shout yum, this is the recipe for you. I found the recipe on the cooking.nytimes.com site. I did make a couple of changes, but the inspiration was all on the Union Square Café’s Chocolate Biscotti via Alex Witchel.

Well, it’s rainy here in NW Washington. But we really have nothing to complain about. California is being hit with horrendous weather, as are other parts of the country. So, a bit of inconvenient rain is just an accepted consequence of living in this natural paradise. I can still see Barnum Point (here on the island), Port Susan Bay, and the low foothills as I write. But the snowcapped mountains are hidden under low hanging clouds. Hopefully the cloud covering is dumping snow all over the Cascades. Our state can use all the water reserves we can get.

As always, peace and love to all.

2 c. unbleached all-purpose flour, fluffed

¾ c. plus 2 T. good cocoa powder

1 tsp. fine sea salt

1 tsp. baking soda

1 tsp. espresso powder (I use Medaglia D’oro instant espresso)

4 T. (½ stick) unsalted butter, room temperature

1¾ c. lightly packed brown sugar

⅓ c. granulated sugar

1 T. vanilla extract

4 lg. eggs, divided

1 rounded c. mini chocolate chips

1 T. water, for egg wash

2 T. raw sugar

Line a large baking sheet with parchment paper.

In a mixing bowl, whisk the flour, cocoa powder, salt, baking soda, and espresso powder together; set aside.

Using a heavy-duty electric mixer, cream the butter, brown sugar, and granulated sugar together for 3 to 5 minutes at medium speed. Add the vanilla extract. Mix for 10 seconds. Add 3 of the eggs, one at a time, mixing well after each addition. Add the flour mixture and mix at low speed until dough comes together, 1 to 2 minutes. Add the mini chocolate chips and mix just until chips are evenly incorporated.

Using buttered hands, shape half of the dough into a log roughly 1½ to 2 inches wide. Place log on prepared baking sheet and flatten slightly. Form the second half of the dough the same way and place on the baking sheet about 3-inches away from the first log. Brush tops of logs with egg wash made from whisking the remaining egg with the water. Then, sprinkle each log with 1 tablespoon raw sugar.

Bake in a pre-heated 350-degree oven until the biscotti have spread and bounce back slightly when pressed with fingertips, about 30 minutes. Remove from oven and let cool completely, about 1½ hours.

Preheat oven to 325-degrees. Using a sharp serrated knife, cut logs into ½-inch diagonal slices. Place each slice, cut side down on the same parchment paper lined baking sheet. Bake until firm, crisp and slightly dry, about 15 minutes.

Remove from oven and allow to cool completely before storing in an airtight container at room temperature or in your freezer for up to three months.

*According to winefolly.com “Vin Santo (or Vino Santo) is a viscous, typically sweet dessert wine made in Italy, predominantly in Tuscany. The wine is loved for its intense flavors of hazelnut and caramel. When paired with biscotti, Vin Santo becomes “Cantucci e Vin Santo” which is inarguably Italy’s most famous welcoming tradition. What makes Vin Santo truly special is the natural winemaking process which gives it a unique taste.”

RUSSIAN TEA CAKES

The tea cakes on the left have yet to receive their sprinkle of powdered sugar.

My daughter Paula called me before Christmas because a fellow worker wanted my recipe for Russian Tea Cakes. Paula was at work so didn’t have her recipe at hand, so she went to her momma’s site but couldn’t find the recipe. And no wonder! My favorite cookie recipe and the one that always appears at the top of my list for “goodies that simply must be made at Christmas” had never been published. What! Wait! How could this be right? But sure enough, this fabulous recipe had never left my fingertips and as if by magic, landed on this site. The only reason I can think of to justify this omission, is that I practically have this recipe memorized. (Or I used to have it memorized when I still had my full set of faculties. Now I have to read, re-read, and then check off ingredients as I place them in the mixer. (Getting older can be a bit trying at times. Hopefully none of you can relate. But if you can, I sympathize.)

Anyway, here is my recipe for Russian Tea Cakes. (And I know. Most of you already have a great recipe for these fabulous and easy to make cookies. But for those who don’t, I felt compelled to share the recipe with you.)

Well, that’s it for today. I’m totally burned out from making reservations for our upcoming trailer trips, so I think I’ll keep this short and treat myself to an afternoon helping the protagonist in the book I’m reading figure out who done it. (I’m very good at being an armchair detective.)

Have a great new year. Stay healthy. Stay positive, and don’t forget to laugh. Laughter is so good for us, and although laughter can be contagious, it’s not infectious. And isn’t that refreshing!    

Peace and love to all.

1 c. (2 sticks) unsalted butter, room temperature

½ c. powdered sugar, plus more for sprinkling

1 tsp. vanilla

2¼ c. unbleached all-purpose flour, fluffed

¼ tsp. salt

¾ c. finely chopped walnuts

Cream the butter, ½ cup of powdered sugar, and vanilla together. Add the flour, salt, and finely chopped walnuts.

Use a small ice cream scoop or roll the dough by hand into 1-inch balls. Place on a parchment paper lined cookie sheet.

Bake in a pre-heated 400-degree oven for about 10-12 minutes. Cookies should be a very light golden brown when they are done. DO NOT OVERBAKE.

Remove from oven and allow to cool completely on a wire rack.

When cool, sprinkle* with powdered sugar. Store in an airtight container.

*The best (and least messy) way to coat the top of the cookies with powdered sugar is to place the cooled cookies back on your baking pan, then scoop a bit of powdered sugar into a small, fine sieve (strainer) and shake over the cookies. (You don’t have to coat the bottom of the cookies.) Let sit for about 30 minutes before storing.

MOCHA HOT COCOA MIX

These are the star ingredients I used for this mocha coffee mix. Unfortunately, I failed to take a picture of the mix itself. (Christmas is a crazy time at our house. That’s my only defense!)

Well, Christmas is past, the New Year is here and the only thing that remains unpleasant from 2022 for us personally are the lingering coughs from whatever possessed us the last couple of weeks of December. Flu, RSV, who knows! But whatever it was, I truly encourage you not to get it! It wasn’t the worse flu or cold we’ve ever experienced, but it just went on and on and on. And just when we thought we were getting rid of the darn thing, it sprang to life again. That is simply not fair! So, no Christmas eve with our dear friends Jim and Margo and no Christmas day with our extended family. What saved the whole Christmas holiday was getting to spend the 26th with daughter Paula. She braved our germy house and came to visit regardless of our lingering ailments. So far, she is still well. Thank goodness!

And, New Year’s Eve we were able to enjoy being wined and dined at Margo and Jim’s home. New Year’s Day, we spent a glorious few hours at Tim and Suzie’s home. While the guys (Whistle Lake Jazz Quartet) were practicing for an upcoming gig, we wives (plus our dear friend Diane) spent some quality time reflecting on our careers and how the role of women in business has changed through the decades. In many ways for the better. But in some cases, there is still a prejudice against “grey-haired middle-aged women”. Well, learning that this attitude was still alive and well, and in one case perpetuated by a younger woman executive, it was a good thing we were firmly ensconced in Suzie’s living room and this young lady who had made the comment wasn’t living and working in the vicinity. It could have gotten quite ugly for her. To say we were steamed, would be putting it mildly. But for me, it was almost cathartic to share our stories. To be reminded that I was not alone. Things in my years at the bank that had caused me pain, were also being experienced by other women in far different professions. And yet, we had or were still surviving, and mostly stronger for having been exposed to and confronted these difficult situations. And as we talked, I felt so blessed to not only know these amazing women, but to be able to call them friends. I have always had close woman friends. And I realized once again, how lucky that makes me feel. But enough about me and on to this mocha mix.

This Christmas was the year of the biscotti. For the Whistle Lake gang, I gave each couple a trio of my favorite Italian cookies, a couple of red mugs, and some of this mocha cocoa mix. It was so much fun to make different kinds of biscotti. (New recipes to be posted in the near future.) And even more fun to prepare this cocoa mix.

Now, if you have never made biscotti, you can’t possibly know how easy these delicious twice baked cookies are to build. And if you have never eaten a biscotti, well, you have no idea what you have been missing. Biscotti is just one of the yummiest things you will ever put in your mouth. In my estimation, biscotti should actually be its own food group!

Anyway, along with the biscotti, I wanted something that our friends could dunk their biscotti into, and I found this recipe on theyummylife.com site. I changed things up a bit, but then, that’s just what I do!

So, I hope you enjoy this recipe. But remember, this hot drink is always best served with a biscotti. And life is simply too short to continue depriving yourself of this wonderful combination. And it’s going to be winter for several more months. Need I say more? Except, Happy New Year.

And as always, peace and love to all.  

1 c. instant coffee (I use Mount Hagen Organic Fairtrade Coffee (instant decaffeinated) (Amazon prime)

1 c. cocoa powder (I use Valrhona Cocoa Powder (Amazon prime)  

3½ c. instant dry milk powder

2/3 c. powdered sugar

1 c. vanilla powder (see recipe below)

2 tsp. corn starch

¼ tsp. fine sea salt

Pulse all ingredients in food processor until well combined. Store in airtight container. Makes approximately 5 cups of mix.

To prepare mix: Add 3-4 tablespoons of mix to 8-oz. boiling water. Stir and top with whipped cream if desired. (Chocolate sprinkles are nice too.)  

Homemade vanilla powder:

1 c. granulated sugar

2 T. vanilla paste or extract (I use Rodelle all natural Vanilla Paste*) (Amazon)

Combine the sugar and vanilla paste in a small bowl. Stir to form a thick, uniform, coarse paste. Line baking sheet with parchment paper. Transfer sugar/vanilla mixture to baking sheet and spread into thin, even layer. Allow to set out until completely dry, 6-8 hours. Stir once during drying time to promote faster drying. It’s normal for there to be small, dried clumps.
Transfer dried mixture to food processor and pulse until all clumps are gone and texture is a fine powder. Store in an airtight container.
*Vanilla paste has a thicker consistency than vanilla extract because it includes specks of vanilla bean seeds. Whereas vanilla extract contains no specks from vanilla beans. With the inclusion of ground vanilla bean powder, vanilla paste has a slightly more intense flavor than vanilla extract.


WHITE CHOCOLATE DRIZZLED GINGERBREAD BISCOTTI    

I thought covid and all its social restrictions was a bummer. And it was a bummer for a myriad of reasons. But at least we could still get together with dear friends and relatives at Christmas. Even if it was only for a short time in someone’s garage, responsibly spaced around a portable propane camping fire. (And yes, we actually did enjoy a bit of Christmas together exactly as described!)

But this Christmas was the pits. Both Andy and I were ill. We think we had RSV. But it could have been the flu. (And yes, we had this year’s flu vaccination!)  But hey, we could have had both of these darling infirmities at the same time! Now wouldn’t that be special! Because we had symptoms from both at various times during our illnesses. And we still aren’t 100%! Almost 3 weeks for Andy and about 10 days for me. Humbug! (That’s what we’ve chosen to call what we had/have. The 2022 HUMBUG!)

So, we missed Christmas Eve with our dear friends Jim and Margo and Christmas day with relatives and close friends because of what’s “going around”.

But you know, while I was sitting in my favorite reading chair on Christmas day feeling ever so sorry for myself, I realized how exceedingly lucky I was to have Andy to spend the day with. And how blessed we both were to have close friends and family that were able to be together. Even if this Christmas we couldn’t be there with them. I realized all of us were the lucky ones. We had a home. We weren’t being bombed by some power-hungry Russian maniac. We weren’t out in the cold with no way to get warm, stay warm, or feed either our loved ones or ourselves. We were lucky. Just plain lucky!

So what if Mr. C. and I couldn’t spend Christmas as planned. We had fresh running water. A nice cozy bed to climb into when we felt chilled. Food to eat when we got hungry. We had everything we needed to get healthy. We were safe. Whereas so many of the world’s population could not say those three little words. I am safe. And I realized how horrible that must feel to not be safe. I couldn’t even begin to imagine what that would mean.

So, did I have a great Christmas? Yes, I did. I was given the opportunity to realize how truly blessed I am. Sometimes it takes something like a brief illness to remind us of our blessings and to put our wonderful lives in perspective. Thankfully I was able to learn a valuable lesson as I was recovering. And thankfully, I had been able to finish most of my baking before my body was invaded by germs. (I’ll take my luck wherever I can find it!)

And one of the best cookies I made this year was this recipe for gingerbread biscotti. I found the recipe on theoliveblogger.com site. Delicious. I made a small change, of course I did, but the main recipe is all Melissa. So, if you too love gingerbread and biscotti, then this is the recipe for you.

As we all approach the new year, I hope we can keep the spirit of Christmas alive throughout 2023. Wouldn’t it be refreshing to find ourselves wishing each other a merry “whatever” every time we met. I’ll start. Merry 2023.

And as always, peace and love to all.

⅓ c. unsalted butter, room temp.   

1¼ c. brown sugar, lightly packed

2 lg. eggs 

2 T. molasses

1 tsp. vanilla   

2¼ c. unbleached all-purpose flour, fluffed 

2 tsp. ground ginger

1 tsp. ground cinnamon  

½ tsp. ground cloves

¼ tsp. ground allspice

¼ tsp. ground nutmeg

2 tsp. baking powder

½ tsp. baking soda   

scant ½ tsp. fine sea salt

½ c. finely chopped candied ginger

white chocolate, for drizzle

Line a large baking sheet with parchment paper.

In the bowl of your stand mixer, mix the butter and brown sugar together until creamy. Add the egg, molasses, and vanilla and mix until well combined.

In a medium bowl, whisk the flour, ginger, cinnamon, cloves, allspice, nutmeg, baking powder, baking soda, and salt together. Stir in the candied ginger making sure each tiny piece is coated with flour.  

Slowly add the dry ingredients to the butter mixture, just until well combined. (The dough will be very thick).

Using your hands liberally greased with butter, divide the dough in half. On the parchment paper lined baking sheet, pat each half into a 10×2-inch rectangle.

Bake in a pre-heated 350-degree oven for 20 to 23 minutes, or until a light golden brown and slightly firm to the touch but NOT hard. Remove from oven.

Cool for 10 minutes. Leave the oven on. After 10 minutes, cut each log diagonally into 1-inch-thick slices.

Turn cut side down on the baking sheet and bake for 14-16 minutes. (They should be slightly golden on both sides.)

Remove from oven and place on a wire rack to cool completely before drizzling with melted white chocolate. Allow white chocolate to harden before storing the biscotti in an airtight container.  


DRIED CRANBERRY AND BRANDY TOPPING FOR BAKED BRIE

This time of year, it is always nice to have an easy appetizer recipe ready for any unforeseen eventuality. Like when you are invited spur of the moment to someone’s home for dinner and you offer to bring an appetizer, and they say yes. Yikes! Now what do you do?

Well, I’ll tell you what you can do. You can make this delicious topping for baked brie. (You can pick up the brie from your local grocery store on your way over to your friend’s home if you don’t already have some on hand. Crackers too.)

Anyway, this topping takes only minutes to prepare. And it tastes like you slaved over a hot stove for a great deal longer than 5 minutes!

So, during this busy holiday season, I suggest you at least have the ingredients on hand to make this delicious appetizer. And even if you don’t wind up taking this delightful dish with you, you can always make it for yourself. And I am here to tell you, you will not feel bad at all if you have to eat the whole thing by yourself. (Or decide to be magnanimous and share it with your spouse or partner.) You will earn points. That is a true fact.

Well, both Mr. C. and I have come down with whatever this nasty respiratory “thing” is that is going around. We don’t feel bad. We just keep coughing and hacking and keeping each other awake all night long. Hopefully whatever has got us will depart our bodies before Christmas eve, Christmas day, and the 26th. Because we have plans to spend the holiday with our family and extended family friends. And it just so happens that we really like these people. So, it would be a real bummer if we couldn’t participate in the revelries. (Not to mention the great food we would be missing!)

But like with everyone, it is completely out of our control. We are vaccinated against all most anything you can name, wear our masks when it seems prudent, and try our darndest not to pick up germs from, or leave germs with anyone with whom we come in contact. But as experience has shown, somewhere along the line we are all vulnerable.

In the grand scheme of things, we remain well and truly blessed. May you too be happy and thankful for the many blessings that have found their way into your lives.

Peace and love to all.

1 c. dried cranberries

½ c. brown sugar

¼ c. orange juice

pinch ground cinnamon

a few grains of coarse kosher salt

2 T. brandy

1 (8-oz.) round or wedge of brie

½ c. walnuts, opt.

Combine the dried cranberries, brown sugar, orange juice, cinnamon, and salt in a small heavy pan. Bring to boil, reduce heat, and simmer for about 2 minutes. Remove from heat and stir in the brandy. Allow to cool, then store in your refrigerator until ready to use.

When ready to serve, place the brie in an oven-proof container and bake in a pre-heated 350-degree oven for about 15 minutes or until the cheese is softened. (Or nuke the brie until soft. Either way works.)

While the brie is in the oven, re-heat the topping. When the brie is soft, remove from oven and slather the topping all over the cheese. Then sprinkle on the nuts. Serve with crackers or Crostini (See how to make crostini on this site.)