Category Archives: MAIN DISH RECIPES

THE BREAKFAST SCRAMBLE

OLYMPUS DIGITAL CAMERA

So what I really need to ask myself is – why am I writing up a recipe, a version of which half the population already prepares on a regular basis? Well, that’s an easy question to answer, even for me! If only half the population knows about scrambles; that leaves the other half that doesn’t have a clue. And believe me, I was part of the clueless masses ‘til a couple of years ago when my sister-in-law Katie fixed a wonderful and quick vegetarian scramble for us one morning.

I had just made an appearance and was sitting at the counter drinking my first cup of coffee, when she started the unbelievably quick process that led to absolutely delicious scrambled eggs. So here I am, half awake (have I mentioned before that I am NOT a morning person) watching Katie prepare this masterpiece. What, she wasn’t setting the sautéed vegetables aside while she washed the pan? She wasn’t then adding more butter and carefully cooking the egg mixture to a certain point, then tenderly placing the cooked veggies and a smidge of cheese on half of the eggs, folding the other half ever so gently over the veggies and cheese, then placing the pan in a pre-heated oven to finish cooking? What had just happened here? She had created a mock omelet without the time involved and bother necessary to create the “real thing”. I was not only dumbfounded; I was hooked!

So of course, the first morning we were home, I fixed us a wonderful scramble and have been dishing up scrambles ever since. FYI: scrambles take about a quarter of the time to prepare as an omelet, but still include all the same ingredients and flavor. Now granted, scrambles aren’t as pretty or as showy as an omelet, but its breakfast y’all. Who the heck cares if the eggs are beautiful? Scrambles are both delicious and nutritious, on the table in no time flat, and they aren’t cold cereal!

And just so you don’t think I’m a complete culinary moron, I had previously added cooked ham or bacon to my scrambled eggs, but never thought to add veggies such as spinach, mushrooms, or basil. And yes, I had been going through all the steps of making the perfect omelet as referenced above, but I must admit, not very often. A wonderful omelet is a joy and a delight, but it takes time to prepare. And frankly, more time then I normally want to spend fixing food to break our fast.

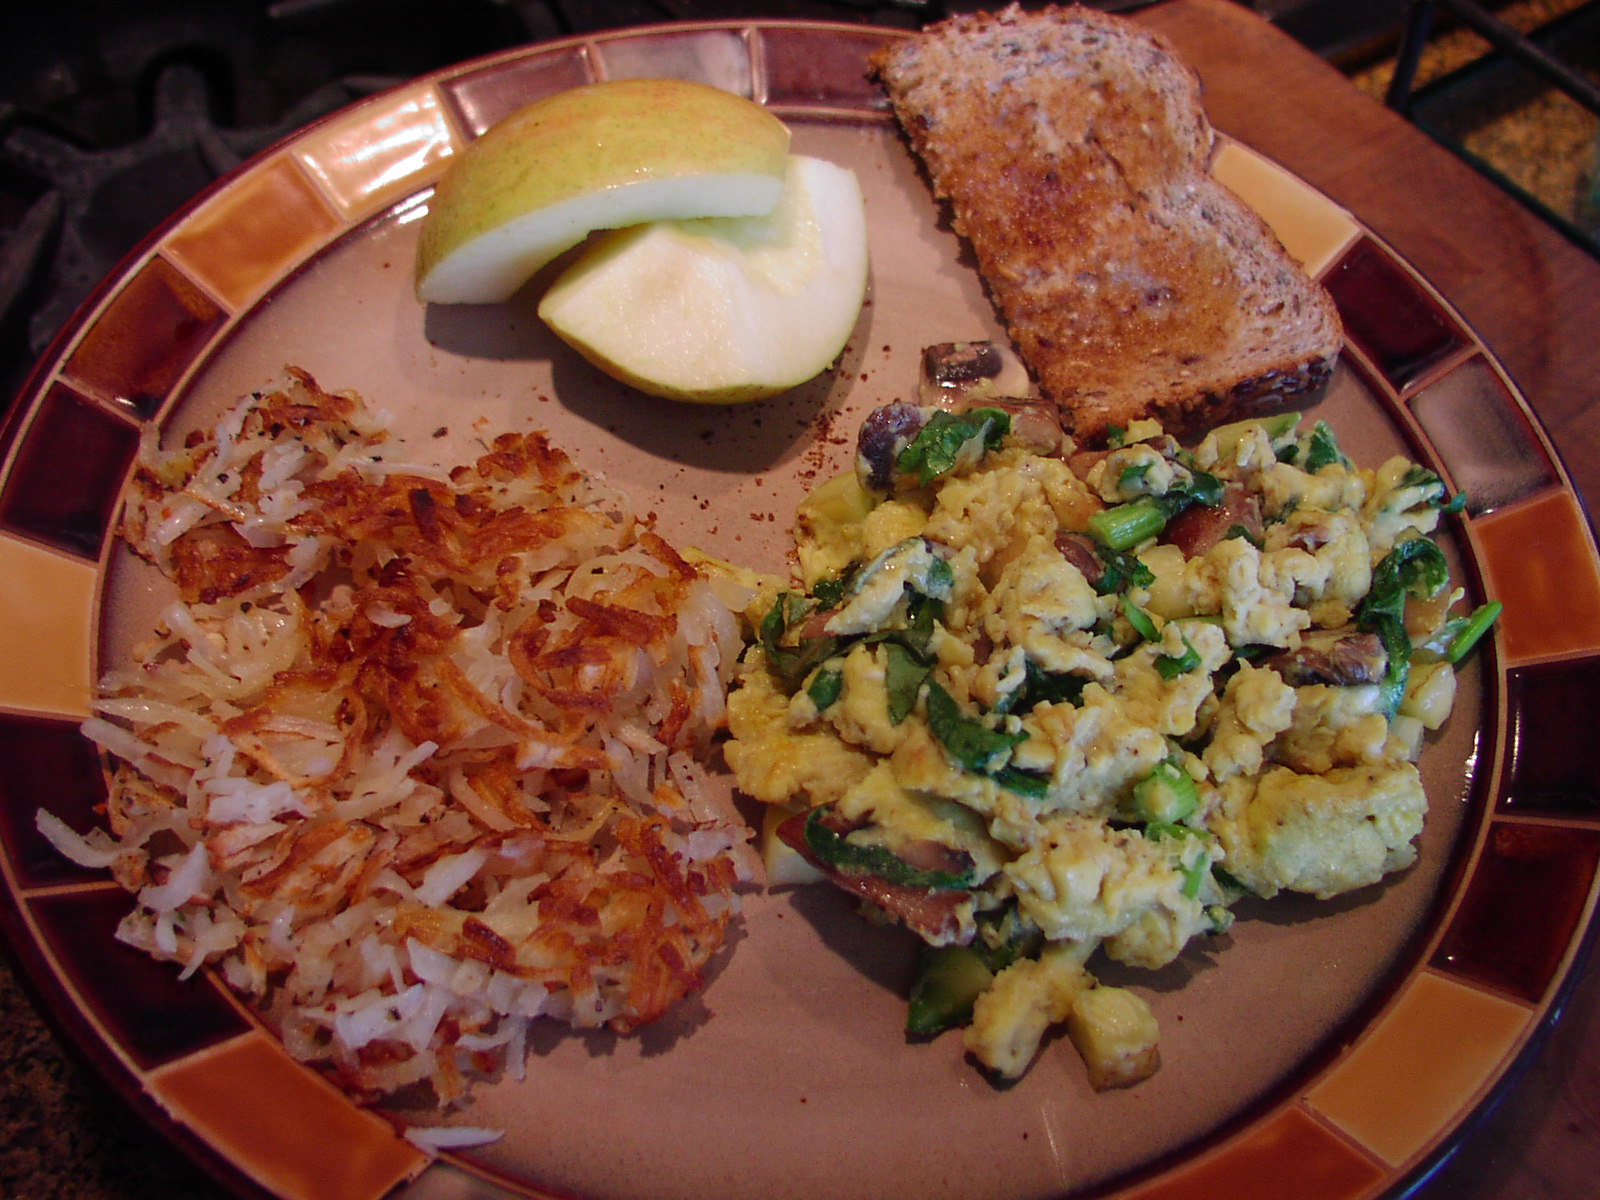
Below is the recipe for the scramble I prepared yesterday morning. The eggs, milk, salt, and pepper mixture is simply the base for many, many variations you can make using ingredients that your family loves and/or you happen to have on hand. Feel free to sauté bacon or sausage, or add veggies such as onion or red bell pepper, greens such as baby kale, herbs such as fresh thyme or parsley, or your favorite cheese. Almost any combination will work beautifully. And frankly, my scrambles are never the same twice. However, the one I made yesterday morning was particularly delicious, and all the better because it was meatless. So, I may even look up this recipe next time I scramble to get breakfast on the table. Good morning! Breakfast’s ready!

  • 4 eggs
  • 2 T. milk or half & half
  • ¼ tsp. seasoned salt
  • freshly ground black pepper
  • 1 T. butter
  • 4 mushrooms, halved then thinly sliced
  • 3 slices zucchini or other summer squash, chopped
  • 3 sliced green onions
  • 1/3 c. chopped fresh spinach
  • ¼ c. grated sharp cheddar cheese
  • 7-8 fresh basil leaves, thinly sliced (chiffonade)

Whisk together the eggs, milk, salt, and pepper. (The start to any scramble.) Set aside. Melt the butter in a small non-stick frying pan. Add the mushrooms and fry until browned. Add the zucchini, cook for about a minute and add the green onions and spinach. Stir fry until the spinach starts to wilt. Reduce heat to low. (Never cook eggs over high heat!) Add the egg mixture and cook until the eggs are almost set, lifting the cooked egg mixture from the bottom of the pan to the top. This step allows the uncooked egg to gravitate to the bottom of the pan and also get cooked. (If there is any sign of brown, your heat is too high.) Stir in the cheese and basil. Finish cooking and serve immediately.


COQ AU VIN

OLYMPUS DIGITAL CAMERA

Coq au Vin (literally rooster with wine) is traditionally made with a capon (a castrated domestic cock fattened for eating). Now, I don’t know about your local grocery store, but I can tell you for certain that the meat department manager at our local store would laugh hysterically if I asked him to please cut up a capon for me. After he got his laughter under control, he’d probably ask me if I’d also like a slice of Pâté de Foie Gras. And then he’d undoubtedly have another good laugh at my expense!

And truly, who’s to blame him. Grocery stores only carry what they know their customers want. (I learned that in Economics 101!) So if there is no demand for a product like capons, the store isn’t going to carry them. Simple as that!

Allow me to tell you a true story involving our local market and kale.

We were unable to locate kale on one of our first trips to the local IGA after we moved into our new home on Camano Island. Finally I asked a young man who worked in produce if they were out of kale or were we just blind? He looked at us as if we had just inquired about the locally grown pineapples we had heard about. He then politely asked us “what is this thing called kale”? (Obviously the kid was a jazz lover!) We told him and he assured us that the store did not carry any such product. We went on our merry way, a little flabbergasted, but aware that we weren’t in Bellevue any more. (I knew then how Dorothy felt when she realized she was no longer in Kansas.) A few minutes later, still in the store but several isles away from produce, the young man came running up to us carrying a nice looking head of kale. I said to him, oh, you do carry kale after all. He said, well no not really. It’s only used to go under platters in the deli case! I looked at Mr. C, he looked at me, and we both said at the same time, but can’t you sell us a bunch? He said he’d be right back, and headed back to the produce manager. We followed him and we got our kale. And ever since, kale has been available to one and all.

So the moral of this story is – if there is a product you need that your market doesn’t carry, talk to them about it. Several items over the years that I have inquired about have mysteriously appeared on the shelves next thing I knew. The other moral of this story – unless you live near an upscale market that carries capons, make this dish with plain old chicken. You’re the only one that need know that the dish rightly should then be called “Poulet au Vin”.

(And no, I’m not going to mention capons to our meat department manager. He’s already frustrated with me because I couldn’t understand why the store didn’t carry French garlic sausages or salt pork needed for a cassoulet I was about to prepare.) Oh well, I need to pick my battles carefully. And capons are not worth fighting over. Duck breasts, on the other hand, are worth going to the mat over. Wish me duck, I mean wish me luck on that one!

Stay tuned for my cassoulet recipe.

  • ¼ c. extra virgin olive oil
  • 1 (3-4) lb. whole chicken*
  • kosher salt
  • freshly ground black pepper
  • 1/3 c. flour
  • 4 oz. thick meaty bacon, cut into 1/3rd-inch pieces
  • 2 stalks celery, diced
  • 1 medium sized onion, diced
  • 2 carrots, chopped
  • 2 cloves garlic, minced
  • 1 lb. cremini or button mushrooms, quartered (actually half and half is great)
  • ¼ c. Cognac or brandy
  • 2 T. tomato paste
  • 1½ c. Gamay Beaujolais or Pinot Noir (from the Bourgogne (Burgundy) wine region in France)
  • 2 c. chicken stock or more as needed
  • 2 small bay leaves
  • 2 tsp. chopped fresh thyme
  • 4 oz. pearl onions (I use frozen)
  • 1 T. butter, room temperature, if needed
  • 1 T. flour, if needed
  • 2 T. chopped fresh parsley

*or 8 chicken pieces of your choice

Cut up the chicken. For this recipe use the legs, thighs, and breasts, each cut in half. Remove the skin and any excess fat. Reserve the back and wings for soup stock.

Pour the olive oil into a large, covered Dutch oven and bring to a medium-high heat. Pat the chicken pieces dry and sprinkle generously with salt and pepper. Place the flour in a zip lock bag, add the chicken, and shake until every piece is nicely floured. Carefully place the chicken in the hot oil. When the first side is a light golden brown, carefully flip and fry until it too is golden brown. Transfer the chicken pieces to a bowl and set aside.

Reduce the heat to medium and add the bacon. Fry the bacon until it is brown and crispy. Add the celery, onions, and carrots; cook until the veggies are starting to caramelize, about 10 minutes. Add the garlic and cook for 1 minute. Add the mushrooms and cook for 4 to 5 minutes. Remove the pot from the stove, add the Cognac, return pot to heat and stir until the Cognac has all but disappeared. Add the tomato paste, wine, chicken stock, bay leaves, and thyme; stir to combine. Adjust seasonings. Bring the mixture to a high simmer; reduce heat slightly and let burble uncovered for 10 minutes.

Add the legs and thighs; partially cover the pan; simmer for 20 minutes. After the legs and thighs have simmered for about 20 minutes, turn the pieces over and add the 4 breast pieces, plus any juices that have accumulated in the bowl. Check the level of liquid and add more chicken stock if the sauce appears dry. Partially cover the pan and simmer for another 15 minutes or until all the chicken pieces are thoroughly cooked.

Remove the chicken from the pan and discard the bay leaves. If the sauce is on the thin side, mash 1 tablespoon room temperature butter and 1 tablespoon flour together and gently stir into the sauce. Let burble at least 5 minutes. When the sauce is the perfect consistency, add the chicken pieces and pearl onions to the pot. Let simmer for 3-4 minutes. Adjust seasoning again and add parsley just before serving. Serve with egg noodles or mashed potatoes.

OLYMPUS DIGITAL CAMERA


ROSEMARY, LEMON, AND GARLIC ROASTED CORNISH GAME HENS

OLYMPUS DIGITAL CAMERA

In my humble opinion, the pairing* of lemon, rosemary, and garlic is one of the best smelling combinations when cooked together. If they don’t evoke the smell of the Mediterranean and send your olfactory organs to their happy place, I can’t imagine what would! (OK, maybe onions and bacon cooking together, or chocolate chip cookies baking; but you know what I mean. There are just some aromas that make you glad to be alive.)

And when you use this dynamic trio together with tasty, tender little game hens (or henlets as they are lovingly referred to at Chez Carr), you are bound to end up as happy and very contented diners.

So last evening I served these little darlings for the first time. I had been looking for a new way to bake “henlets” when I came across the gist of this recipe on the Allrecipes.com website. I of course changed a few things, but the main theme of the recipe remains the same.

So if you too need a new and delicious way to serve game hens, please give this recipe a try. Or if you happen to be a real estate agent, bake these in the oven at your next open house. There’s not a person alive that wouldn’t buy the house right there on the spot just for the wonderful smells alone!

*and yes I know that 3 items do not a pairing make. But the word “pairings” is just such the rage right now, I chose to use it anyway. So all you English teachers out there, save your key strokes. I really do know better. Honest!

  • 2 Cornish game hens, washed and thoroughly dried
  • kosher salt
  • freshly ground black pepper
  • 2 lemons, each cut into 4 wedges
  • 4 (6-inch) sprigs fresh rosemary, divided
  • 2 tablespoons olive oil, divided
  • 12 garlic cloves, peeled
  • 2/3 c. white wine, divided
  • 2/3 c. chicken broth, divided
  • 1-2 T. flour, opt.

Preheat oven to 450 degrees.

Liberally sprinkle the inside of each hen with salt and pepper. Squeeze 2 lemon wedges into each cavity; then add the squeezed lemon pieces, 1 sprig of rosemary bent in half, and 1 garlic clove. Rub the outside of the hens with 1 tablespoon of the olive oil and sprinkle with salt and pepper.

Arrange the hens in a roasting pan, (I use an old 9×13 metal baking pan) and place the remaining garlic cloves, lemon wedges, and rosemary sprigs around the hens. Add 1/3 cup of the white wine, and 1/3 cup of the chicken broth.

OLYMPUS DIGITAL CAMERA

Roast in the preheated 450 degree oven for 35 minutes. (Check after about 20 minutes to make sure there is still liquid in the bottom of the pan. If not, add about half of the liquid mixture referenced in the next paragraph.)

Meanwhile whisk together the remaining 1/3 cup wine, 1/3 cup chicken broth, and 1 tablespoon of oil. After the 35 minute baking time at 450 degrees, reduce the oven temperature to 350 degrees, remove the hens from the oven and bathe them with the wine/broth mixture. Place back in the oven and continue roasting for about 30-40 minutes longer, or until the hens are golden brown and the juices run clear. Baste with pan juices every 15 minutes.

When the hens are finished baking transfer them to a platter. Pour any cavity juices into the roasting pan. Tent hens with aluminum foil to keep warm.

Meanwhile pour the pan juices into a sauté pan, remove the lemon wedges and rosemary twigs, mash the roasted garlic cloves, and bring to a boil. Reduce heat and simmer until the liquid is reduced to a sauce consistency. (If the sauce appears greasy, whisk in the flour and about a half cup water to bring the sauce to desired consistency.) Adjust seasonings. Serve as a delicious drizzle over mashed or oven roasted potatoes.

OLYMPUS DIGITAL CAMERA


PEPPER STEAKS WITH BOURBON SAUCE

OLYMPUS DIGITAL CAMERA

So, I guess you have been wondering where I have been and why I haven’t posted a recipe for over a month. Well, Mr. C and I were kidnapped by our truck and trailer and taken down the Oregon and California coasts and over to Goodyear (near Phoenix) to visit good friends and then home again.

OLYMPUS DIGITAL CAMERA

(A picture of the culprits!)

Apparently the trailer was really tired of being out in the cold weather and talked the truck into a little nefarious yet harmless prank at our expense. All things considered, I think it was a grand plan. We had a wonderful time and if was so nice to sit outside in February and early March  without wondering when the chilblains were going to appear. (The picture below was taken somewhere on the California coast when we stopped to enjoy a picnic lunch.)

OLYMPUS DIGITAL CAMERA

Anyway, we had a marvelous time and we sincerely hope the trailer develops a case of Cold Weather Fatigue Syndrome (CWFS) again next year. (BTW – don’t bother Googleing CWFS. The name itself is so self explanatory that it has never been necessary to write a single word about this winter ailment.)

So what has all this to do with pepper steaks? Not a darn thing. I simply wanted to explain why I mysteriously disappeared from blogging for a month. (I thought you might be worried, you see.) Anyway, I’m back. And after I get finished preparing food for this next Sunday’s JazzVox concert, I will be back to my usual schedule of several postings a week. In the mean time, back to pepper steaks.

Covered with peppercorns and drizzled with a lovely sauce is Mr. Cs favorite way to eat a steak. And this recipe, which is ever so easy to prepare, tastes better than most peppercorn steaks you can find in even upper end restaurants. All it takes is a trip to your local meat market and a few additional ingredients. Then get out your heaviest pan and fry yourself up a winner. I hope you enjoy this once in awhile treat as much as we do.

  • 2 room temperature thick steaks (your choice) trimmed of all visible fat
  • 2 tsp. kosher salt
  • 2 T. cracked black peppercorns
  • 2 tsp. extra virgin olive oil
  • 2 T. bourbon
  • ¼ c. dry red wine
  • ¼ c. beef stock
  • 1 T. unsalted butter

Cover the room temperature steaks with salt and cracked pepper. Press the peppercorns into the meat as well as possible. Pour the olive oil into a heavy skillet and heat to almost smoking before adding the steaks. Reduce the heat to medium high and cook the steaks for about 3 minutes on the first side and 2 minutes on the second side for medium rare. Remove the steaks to plates. Tent the steaks with aluminum foil to keep warm.

Remove the pan from heat and drain any excess fat. Add the bourbon, return the pan to low heat and reduce the bourbon until the pan is nearly dry. Add the red wine, raise the heat to medium, and reduce the wine by half. Add the beef stock, bring to a boil, reduce heat and cook until reduced again by half. Whisk the butter into the sauce and pour over the plated steaks.

OLYMPUS DIGITAL CAMERA

The steaks are great served with a big old baked potato and a green veggie or salad. Oh, and a lovely bottle of red wine, of course!


PASTA WITH BUTTON MUSHROOM SAUCE

OLYMPUS DIGITAL CAMERA

I know I have told you before, but sometimes a food item, particularly a veggie, can get kind of forgotten in my refrigerator. I think it’s because I am always trying new recipes and I focus on the new ingredients to the shameful neglect of what came before. And that’s exactly what happened when I recently discovered 4 very large button mushrooms lurking at the bottom of my vegetable bin. Poor things; they looked absolutely pathetic just lying there, stem side up in their very own blue polystyrene container from Costco. So what to do with these mushrooms? The frugal cook in me just could not throw them to the Gods of yard-waste. They simply did not deserve that fate! And although I know that mushrooms lose their potency over time, they weren’t slimy, so I considered that good enough.

But then, what to do with them? Well, the same thing I almost always do with an ingredient that needs to be surrounded by compatible flavors to make it more enjoyable. I make a pasta dish.

So that’s exactly what I did, and the recipe below is the result. And all hubris aside, this recipe is very, very good. Easy too! And vegetarian, if you use vegetable stock, which is my first choice for this pasta. (The dish actually tastes a lot like a meatless beef stroganoff.)

So if you need an easy recipe for a weeknight pasta dish your entire family will enjoy, pick yourself up some button mushrooms and put some pasta water on to boil. But remember: don’t cook your pasta ahead of time. If need be, make the sauce wait for your freshly cooked al dente pasta.

You know, now that I mention cooked pasta, I should provide you with my own guidelines for what I consider to be perfectly cooked pasta.

So for those of you who were not born knowing the fine nuances surrounding perfection in pasta cooking, I have listed the steps below. For those of you who already know how to cook perfect pasta, or were born with the knowledge, (like that could ever happen), just ignore my well thought out, well written, and helpful instructions!

  • 1 T. extra virgin olive oil
  • 1 small shallot, minced
  • 1 clove garlic, minced
  • kosher Salt
  • freshly ground black pepper
  • 8 lg. or 4 very lg. button mushrooms, cut in half and thinly sliced
  • ¼ c. dry white wine
  • ¼ c. vegetable, beef, or chicken stock
  • ½ c. sour cream
  • ¼ c. grated Parmesan cheese
  • 4 oz. pasta, cooked al dente

Heat the oil in a large skillet over medium heat. Add the shallot, season with salt and pepper and cook until soft. Add the garlic and cook for one minute. Add the mushrooms and cook until the mushrooms are tender and starting to brown, stirring occasionally, about 5 to 7 minutes. Add the wine and cook until all the liquid evaporates. Add the stock and simmer for one minute. Remove the pan from the heat. Whisk in the sour cream. Drain the pasta, reserving about 1 cup of the pasta water, and add the drained pasta to the sauce. Add the Parmesan. Adjust seasoning. (If the pasta seems too dry, add a small amount of the reserved pasta water.) Serve immediately.

Note: This is the perfect amount for 2 hungry adults. The recipe can be doubled or tripled as needed.

Perfect Pasta:

1)      Use pasta which contains at least some semolina flour

2)      Use a large cooking pot

3)      Add cold water (1 lb. pasta = 5-6 quarts of water) to the pot

4)      Cover the pot and bring the water to a rolling boil.

5)      Add kosher salt (about 1-2 tablespoons per pound of pasta)

6)      Add the pasta all at once

7)      Stir immediately with a wooden spoon to prevent the pasta from sticking together and to the bottom of the pan

8)      Bring the water back to a boil as quickly as possible. Then reduce the heat only enough to prevent the water from boiling over on to your stove top. Do not cover the pan.

9)      Continue to periodically stir the pasta so that it cooks evenly

10)   DO NOT RELY ON THE PACKAGE INSTRUCTIONS FOR ACCURATE COOKING TIME. Taste testing is the only way to know when the pasta is al dente. (Al dente means “to the tooth” in Italian and refers to the fact that the pasta has a slight resistance when you bite into it. The pasta doesn’t have a hard center, nor is it soft.)

11)   If you are using the pasta for a hot dish with a sauce (like this recipe), save about a cup of the cooking water, drain the pasta (don’t rinse) and add it to the sauce and serve immediately. (Or you can place the hot pasta on a plate or in a serving bowl or platter and immediately cover with sauce.)

12)   If you are using the pasta for a cold dish (like my recipe for Shrimp and Macaroni Salad or Tuna Macaroni Salad), drain the pasta and immediately rinse with cold water. (Rinsing the pasta serves to both stop the cooking process and remove the thin coating of starch that can cause it to be sticky when cold. This method also works well for lasagna noodles.)


CHICKEN OR SALMON CAESAR SALAD

OLYMPUS DIGITAL CAMERA

Caesar salad is a classic for one very good reason. It is flat out delicious. And when you make it at home using fresh ingredients, it is especially delightful. And I know Caesar salad appears on just about every menu in America. So why (you ask yourself) should anyone bother making it at home, when it can so easily be ordered in a restaurant. Well my dear friends, the answer to that question is easy; because you can make it even better and healthier at home.

When you build your own Caesar salad you control the amount of salt in the dressing, the ratio of dressing to romaine, how much Parmesan to add, and the amount, if any, of croutons you want to use. Of course you won’t be ingesting any of the preservatives and unpronounceable ingredients from the bottled dressing and purchased croutons a restaurant uses, but I’m betting that’s not going to worry you too much!

Now for some people who want to just eat a big old salad for lunch or dinner, but would like to add some protein, the addition of chicken or salmon is the perfect solution. Most of the time when Caesar salad is offered in a restaurant, the chicken is grilled or the salmon is blackened. Both of these preparations are wonderful. But instead of the more traditional way of cooking the chicken or salmon, I like to bake it. I find that the meat is routinely moist when I bake it in a hot oven. Then just before serving, I slice or dice (the chicken) or place the whole salmon fillet right on top of the mixed salad. Serve with a lemon wedge or two, and as they say in jolly old England – Bob’s your uncle!

BTW: I provided my two favorite recipes for Caesar salad dressing below. Both are truly wonderful. I simply prepare one or the other depending on the ingredients I have on hand and whichever dressing appeals to my capricious taste buds at the time. However you dress this salad, you are in for a taste treat.

Also, every part of this salad can be prepared ahead of time. The lettuce can be cleaned and kept in the refrigerator a couple days before it is needed. The dressing can be prepared up to 4 days ahead. Grate the Parmesan at your leisure and just pull it out of the refrigerator when needed. The croutons can be made a week ahead as long as they are completely cool when you place them in an airtight container. And even the chicken or salmon can be prepared ahead of time. Just make sure it is room temperature before it is served.

  • romaine lettuce, cut, washed and spun dry (you really want to start with dry lettuce so that the dressing adheres to each leaf)
  • Caesar dressing (just enough to coat the leaves, but not so much that the salad appears and tastes “wet”)
  • grated Parmesan cheese (I have found that using less than you think you need is probably just about right. Too much Parmesan overpowers the other flavors and makes the salad too rich.)
  • croutons (as few or as many as you like)
  • sliced or cubed chicken or a small fillet of salmon
  • 1 lemon, cut in wedges

CAESAR DRESSING

  • 1 lg. garlic clove, finely minced
  • 6 anchovy fillets or 1-2 tsp. anchovy paste
  • 2 T. fresh lemon juice
  • ¼ tsp. Worcestershire sauce
  • 1 tsp. Dijon mustard
  • 3 T. sour cream
  • ¼ tsp. seasoned salt
  • freshly ground black pepper
  • ¼ c. extra virgin olive oil

Combine garlic and anchovy fillets or paste in a small bowl. Mush them together with a fork. Add remaining ingredients and whisk to blend thoroughly. Use immediately or refrigerate. Bring to room temperature before mixing salad.

CREAMY CAESAR SALAD DRESSING

  • 1 T. mayonnaise
  • 1 tsp. Dijon mustard
  • 1 small garlic clove, chopped
  • ½ tsp. anchovy paste, or to taste
  • ¼ tsp. Worcestershire sauce
  • 1 T. fresh squeezed lemon juice
  • ¼ tsp. kosher salt
  • freshly ground black pepper
  • scant ½ c. vegetable oil
  • ¼ c. grated Parmesan cheese

Place mayonnaise, mustard, chopped garlic, anchovy paste, Worcestershire sauce, lemon juice, salt, and pepper in the bowl of an electric food processor. Process until smooth and well blended. While the food processor is still on, very slowly pour in the vegetable oil. Blend until thick and creamy. Add Parmesan cheese and pulse 5 or 6 times.

GARLIC CROUTONS

Chop up some small bite sized pieces of a chewy, artisan baguette. Place in a frying pan with butter or olive oil (or a combination) and sauté until each crouton is dry and crunchy. (This takes about 45 minutes because you need to go low (heat) and slow.) Add more butter or oil as needed. When desired crunchiness is attained, sprinkle with granulated garlic. Allow to cool completely before placing in an airtight container.

SAVORY BAKED CHICKEN OR SALMON – based on an Ina Garten recipe

  • 2 T. extra virgin olive oil, plus more for basting
  • 4 garlic cloves, finely minced
  • 3 T. dry white wine
  • zest and juice of 1 regular sized lemon
  • pinch dried oregano
  • pinch dried thyme leaves
  • kosher salt
  • freshly ground black pepper
  • 2 boneless skinless chicken breasts or 2 salmon fillets

Warm the olive oil in a small saucepan over medium-low heat, add the garlic, and cook for about 1 minute. Remove from heat and add the white wine, lemon zest, lemon juice, oregano, thyme, ½ teaspoon salt, and just a small amount of black pepper. Pour into a 9×9-inch baking dish.

Pat the chicken breasts or salmon fillets dry and place them over the sauce. (If you are using a piece of salmon that has skin on one side, place the fish skin side up in the sauce.) Brush with a small amount of olive oil and sprinkle liberally with salt and pepper.

Bake in a pre-heated 400 degree oven for 20-25 minutes, depending on the size of the chicken breasts or fillets. Do not over-cook. (Remember, salmon cooks faster than chicken, so set your timer accordingly.) Remove the cooked meat from the oven and cover the pan tightly with aluminum foil; allow to rest for 8-10 minutes before slicing, dicing or serving whole over the prepared salad. (Remember to take the skin off the salmon before serving.) For the final touch, I like to drizzle a little bit of the baking sauce over the meat. Yum


ROTOLO AL FORNO (MEAT AND CHEESE ROLLED SANDWICH)

OLYMPUS DIGITAL CAMERA

(The Rotolo al Forno is in the foreground, just to the left of the deviled eggs.)

This is one of those recipes that is easy to prepare and sure to please. It is simply a wonderful combination of soft white bread, tangy mustard, tasty deli meat, and 2 kinds of cheese. Sounds just like a sandwich, right? Well it should, because that’s exactly what it is. Except for the fact that it’s kind of fancy and looks divine on a table, Rotolo al Forno is just your basic meat and cheese sandwich presented in a gussied up form. (Love that word – “gussied”.) Anyway, it’s lovely to behold and even lovelier to consume.

I first had this appetizer/sandwich/main dish many years ago when my friend Julie made it for a dinner gathering she and her husband Joe were hosting. At the time, most of our friends had small children, good jobs or were starting new businesses, but no what you would call “disposable income”. We were all just able to pay our mortgages, feed and clothe our children (if we had them), go camping in the summer, and afford box wine or Coors beer for occasions with our buddies. (This was the 70s folks, so cut us some slack on the box wine and Coors beer!) Where was I? Oh yes – so for all of us, this much meat and cheese in one dish was considered if not gourmet, pretty swell and elegant.

And that was Julies’ forte. She loved to try new recipes and the more labor intensive the better. So those of us who were her friends got to experience all kinds of new and amazing taste adventures. She was a true gourmet and taught me a lot about fine cuisine. Julie and Joe are now both deceased, but their friendship lingers on in our memories of fun get-togethers, fabulous New Year’s Eve parties and new and exciting dishes. This may not be an exciting dish, but it is never-the-less delicious. Try it the next time you have guests coming for lunch or you need a hearty appetizer. Just don’t forget to lift a glass to Julie. I’m sure from heaven she will lift a glass right back at you. Cheers everyone.

  • 1 loaf frozen white bread dough
  • Dijon mustard
  • ¼ lb. thinly sliced deli salami
  • ¼ lb. deli pastrami, thinly sliced
  • ¼ lb. deli ham, thinly sliced
  • 1/3 lb. thinly sliced Swiss cheese
  • 1/3 lb. thinly sliced Provolone cheese
  • 1 beaten egg yolk

Thaw bread and let rise one hour. Punch down and roll out to approximately a 12×16-inch rectangle. Using a pastry brush, spread a very thin layer of Dijon mustard over the bread dough. Layer with meat and cheese and roll up like a jelly roll. Pinch the seam together and place, seam side down, on a lightly greased cookie sheet. Brush with egg yolk. Let sit uncovered for 30 minutes. Bake the bread in a pre-heated 375 degree oven for about 25 minutes or until the top is a dark golden brown.

Remove from oven and let sit for about 25 minutes before cutting into 1-inch slices. Serve warm or at room temperature.

Note: If you are going to bake the roll ahead of time, let the bread cool completely before you cover with plastic wrap and place in the refrigerator. When you are ready to serve, slice, plate, and warm for a few seconds in microwave.


GARAM MASALA BAKED CHICKEN

OLYMPUS DIGITAL CAMERA

We love East Indian food. And I know the main reason is because of the spices. And the spice mix – garam masala is one of our favorite spice combinations. So yesterday when I found myself with a couple of small packages of chicken in the freezer that really needed to be used, I thought of making a tandoori chicken or butter chicken for dinner. I went on line and found a couple of great recipes for said dishes. But of course, there always seem to be obstacles to my best laid plans, and this time was no different. Tandoori chicken requires a 24 hour marinating time, and butter chicken requires bite sized pieces of meat, neither of which I had available. So, never being one to let a little problem like time or ingredient get in my way when I am in the mood for a certain type of food, I decided to search under one of the ingredients that was common to both tandoori and butter chicken. (Besides the chicken itself, of course!) And that ingredient was “garam masala”.

After much research and nail biting, I stumbled upon Aida Mollenkamp’s recipe for Garam Masala Chicken with Roasted Vegetables and adjusted it to fit my needs.

So here ladies and gentlemen is my rendition (oops, that’s a musical term) – my take on Aida’s lovely recipe. It is easy to prepare and tastes like a million dollars. And best of all, Mr. C. absolutely loved this chicken at first bite. Love it when a plan comes together!

Recipes for Tandoori Chicken and Murgh Makhani (Butter Chicken) to follow within the next few weeks.

  • ¼ c. canola oil
  • 4 tsp. garam masala spice mix
  • 1 (2-inch) piece ginger, minced
  • 6 medium garlic cloves, minced
  • 2 tsp. kosher salt
  • freshly ground black pepper
  • 8 skinless, bone in pieces of chicken
  • ¼ c. plain yogurt or sour cream

In a medium sized bowl, mix together the canola oil, garam masala, ginger, garlic, salt, and pepper. Add the chicken, stir making sure every piece is thoroughly coated with the marinade. Refrigerate from 1-2 hours. Place the chicken in a 9 x 13-inch baking dish. (Save any marinade that remains in the bowl.) Bake in a pre-heated 400 degree oven for 30 minutes. Meanwhile add the yogurt to the remaining marinade. Set aside. Remove the chicken from the oven and lightly brush each piece with half of the yogurt/marinade mixture. Turn the chicken, and brush with remaining mixture. Bake an additional 15 minutes or until the chicken registers 165 degrees on an instant-read thermometer. (If you have a convection option on your oven, use convection heat for the last 15 minutes of baking time.) Let chicken rest at least 5 minutes before serving.


SPAGHETTI WITH TURKEY OR CHICKEN MEATBALLS IN MARINARA SAUCE (AKA HEALTHY SPAGHETTI AND MEATBALLS)

OLYMPUS DIGITAL CAMERA

You know, there are actually times when I just want to cook healthy. I know that shocks many of you because of my predisposition to use butter with alarming regularity. But never-the-less, it’s true! I can actually be as health conscious as the next gal. So when my “good conscience angel” wins over my “bad conscience devil”, I make a meal featuring a recipe like this one.

Now granted, there is nothing wrong with this recipe. In fact, I love both the meatballs and the marinara sauce. And truly, I am not going to feel cheated in the least when I eat this dish. It’s just that when I look at the recipe, I have trouble seeing beyond the fact that it just plain looks good for us and therefore is inherently going to taste like sawdust! (You know, it really is hard to teach old dogs new tricks. And this old dog is no exception!)

But you just have to trust me on this one. The sauce is truly delicious and the meatballs are tender and flavorful.

So next time your “angel” wins, build a batch of these meatballs and stir up a pot of this sauce. You are going to feel absolutely elated serving your family such a healthy dish. And maybe, just because you have shown yourself to be such an exemplary contributor to your families good health, your “angel” will forgive you a second glass of wine! Could happen!

  • ¼ c. finely ground uncooked oats or dried bread-crumbs (I prefer ground oats)
  • ¼ c. finely grated Parmesan cheese + plus more to pass at the table
  • 2 T. chopped fresh parsley, divided
  • 2 garlic cloves, minced
  • ¾ tsp. kosher salt
  • freshly ground black pepper
  • 1 egg
  • 2 T. milk
  • 16 to 20 oz. ground turkey or chicken meat
  • 2 tsp. extra virgin olive oil
  • 8-10 mushrooms, chopped
  • marinara sauce (see recipe below)
  • 6-8 oz. thin spaghetti, cooked al dente

Combine breadcrumbs, Parmesan, parsley, garlic, salt, pepper, egg, and milk in a medium large mixing bowl. Gently stir in ground turkey. (Mix only until combined. Do not over mix.) Form into 1-inch meatballs (I use a small ice cream scoop) and place on a lightly greased rimmed baking sheet. Bake meatballs in a pre-heated 350 degree oven for approximately 20 minutes or until meat is no longer pink.

Meanwhile pour olive oil into a medium sized sauce pan. Sauté mushrooms until tender. Add the marinara sauce and the meatballs. Serve over al dente spaghetti. Offer Parmesan at the table.

Marinara Sauce:

  • 2 T. extra-virgin olive oil
  • ½ c. chopped onion
  • 2 cloves garlic, chopped
  • 1 (28-oz.) can chopped or diced tomatoes (Italian tomatoes preferably)
  • 1 bay leaf
  • pinch crushed red pepper flakes
  • 1 tsp. dried oregano ( I use Mexican oregano)
  • ½ tsp. kosher salt
  • freshly ground black pepper
  • 3 T. chopped fresh basil leaves
  • 1-2 T. butter, optional

In a large covered sauce pan, heat the oil over medium high heat. Add the onion and sauté until soft and translucent, about 6 minutes. Stir in the garlic and cook for an additional minute. Add the tomatoes, bay leaf, red pepper flakes, oregano, salt, and pepper. Stir to combine ingredients. Bring to a boil, reduce heat, cover, and simmer for about 30 minutes. (Take the lid off part way if the sauce is too thin or allow to gently burble away until the sauce reaches your desired thickness.) Remove from heat, discard bay leaf, add the basil, and adjust seasoning. If the sauce tastes acidic, add butter 1 tablespoon at a time to round out the flavor.

Note: this is a very basic marinara sauce that can be used in a myriad of recipes. Leftover sauce freezes beautifully.

SHRIMP GUMBO

OLYMPUS DIGITAL CAMERA

I think many people shy away from Creole and Cajun food because they think it’s going to be too spicy. They hear words like gumbo filé and Creole seasoning and they automatically shy away. And it’s true, some Creole and Cajun dishes can be very spicy, but they don’t have to be. And this recipe, based on a recipe from Marcela’s Creole Cookery in Seattle, contains a bit of heat but only enough to compliment the other ingredients. And that’s good. The last thing you want is a sauce that is so spicy hot that the wonderful taste of your expensive shrimp is completely obliterated. (Along with your taste buds, I might add!)

So figuratively speaking, this sauce is the perfect foil for shrimp. Then all you need is a big old ball or two of cooked rice, and you have a simple and delicious one course meal.

Now like any other stew like dish, there are about as many recipes for gumbo as there are Louisiana residents. And many of them are fabulous. (The stews that is; I don’t know about all the residents!) But we especially like this gumbo recipe because it is fairly mild. (Did I mention that both Mr. C and I are both kind of wusses when it comes to really spicy food?)

So if you are a person unfamiliar with Creole or Cajun food, but consider yourself in possession of a sophisticated and educated uraniscus (palate), step on out of your comfort zone and travel “culinarily speaking” down to the land of Marti Gras, hush puppies, and bread pudding. Make yourself up a batch of this gumbo honey and there will be no turning back.

  • ¼ c. canola oil
  • ¼ c. flour
  • 4 c. chicken stock, heated to almost boiling
  • ½ small onion, chopped
  • 4 chopped green onions
  • 2 lg. stalks celery, chopped
  • 3-4 cloves garlic, minced
  • 1½ tsp. dried thyme
  • 1 tsp. gumbo filé powder
  • 3 bay leaves
  • freshly ground black pepper
  • pinch cayenne pepper
  • ½ tsp. commercial Creole seasoning or see recipe for homemade Creole Seasoning below
  • 1 lb. uncooked large shrimp
  • cooked rice

In a large covered saucepan, cook the oil and flour over medium heat until it is chocolate colored, about 25 minutes, stirring continuously. (If it burns, throw it away and start over!) Carefully whisk in the hot chicken stock, reduce heat, and simmer uncovered for 15 minutes.

Add the onion, green onions, celery, garlic, thyme, gumbo filé powder, bay leaves, pepper, cayenne, and Creole seasoning. Cover the pan and gently simmer for 1½ hours, stirring occasionally. (Add additional chicken stock if needed.) Adjust seasoning (probably will need salt), remove bay leaves, add the shrimp, and simmer until the shrimp are just cooked through.

OLYMPUS DIGITAL CAMERA

Serve with cooked rice.

Creole Seasoning:

  • 1/3 c. paprika
  • 3 T. dried oregano
  • 3 T. freshly ground black pepper
  • 2 T. dried basil
  • 2 T. kosher salt
  • 1 T. cayenne pepper
  • 1 T. onion powder
  • 4 tsp. dried thyme
  • 4 tsp. granulated garlic

Combine all ingredients and store in an airtight container. Makes about 1 cup.