Category Archives: MAIN DISH RECIPES

CREAMY PASTA WITH PANCETTA AND PEAS

OLYMPUS DIGITAL CAMERA

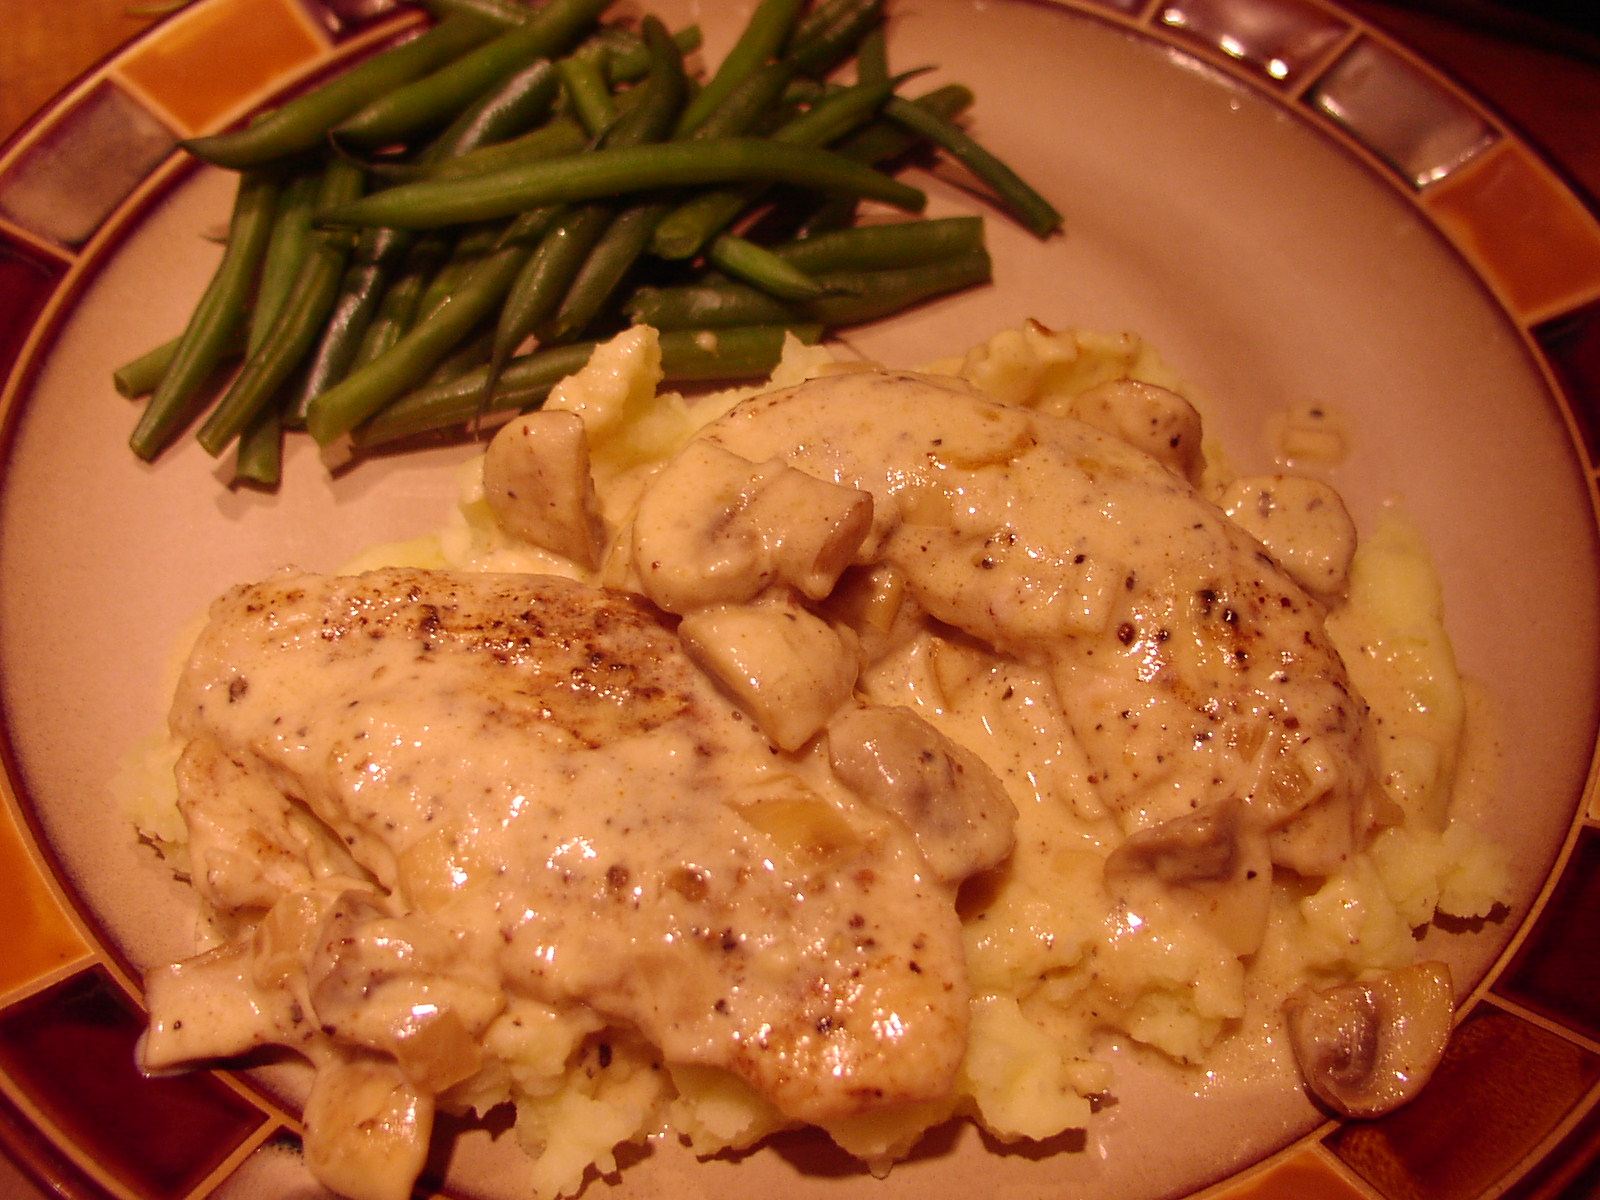
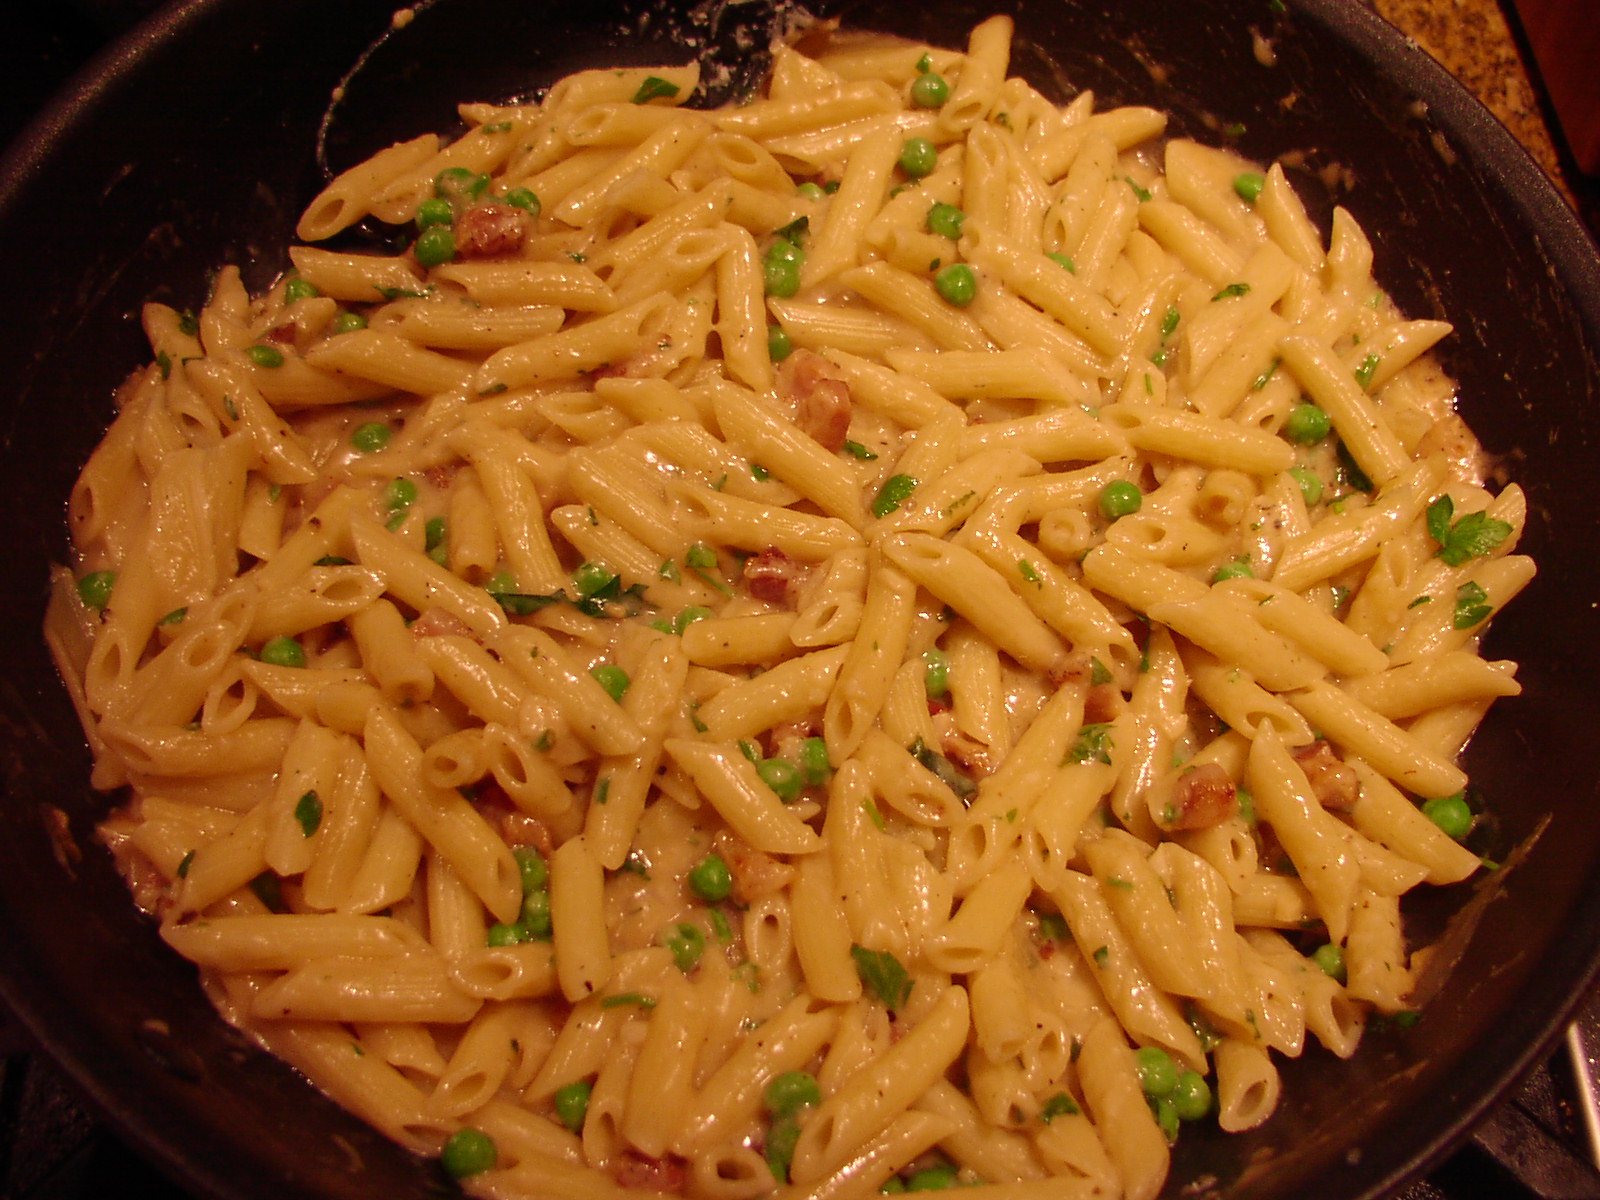
Usually when I make a creamy sauce, I use cream. Sounds reasonable, right? But in an effort to reduce the number of calories and amount of fat in the dishes I prepare, I decided to use chicken stock and 2% milk instead of cream when I prepared this dish last evening. (OK, I did use 2 tablespoons of butter, but that’s just a fraction of the amount I normally would use!) So of course the resulting product was not as rich as a regular Alfredo sauce. (How could it be without a half cup of butter and 2 cups of heavy cream?) But regardless, it was still quite delicious. And without all the fat, it just had a fresher taste to it. Perhaps it was because the other ingredients were forced to shine on their own without relying on the cream to carry the day.

Whatever the reason, we were very happy to chomp away on this pasta sans the guilty feeling we usually experience when we are eating a creamy pasta dish. Not to say, we won’t ever eat a true Alfredo again. But I think I will be adapting my other standard Alfredo type dishes too, so that we can enjoy them more often without our cholesterol numbers shooting into the stratosphere!

And the first one I am going to adapt is one of our favorite pasta recipes – Chicken and Broccoli Fettuccine. So look for this recipe in the near future. And for those of you who have no cholesterol worries or don’t ever have to concern yourself with putting on weight, I will also post the “real” recipe. Which just happens to be Derek and Rebecca’s (two of my grandchildren) favorite food. (Poor kids. They unfortunately inherited their grandmother’s love of sauces.)

So if you too love pasta with a creamy sauce, give this dish a try. It takes no time to whip up. And I’m sure your whole family will love it. And miss all those calories in a traditional Alfredo sauce? I think not!

  • 2 T. unsalted butter, divided
  • ½ c. diced pancetta
  • 3 garlic cloves, finely minced
  • 2 T. dry white wine
  • 2 T. flour
  • ¼ tsp. kosher salt
  • freshly ground black pepper
  • pinch crushed red pepper flakes
  • pinch ground nutmeg
  • ¾ c. chicken broth
  • ¾ c. milk (I use 2%)
  • 8-oz. penne pasta, cooked al dente (keep some of the cooking water*)
  • ½ c. uncooked frozen petite peas, thawed
  • ½ c. finely grated parmesan cheese + more for passing (or use part Parmesan and part Pecorino Romano)
  • 2 tsp. chopped fresh parsley

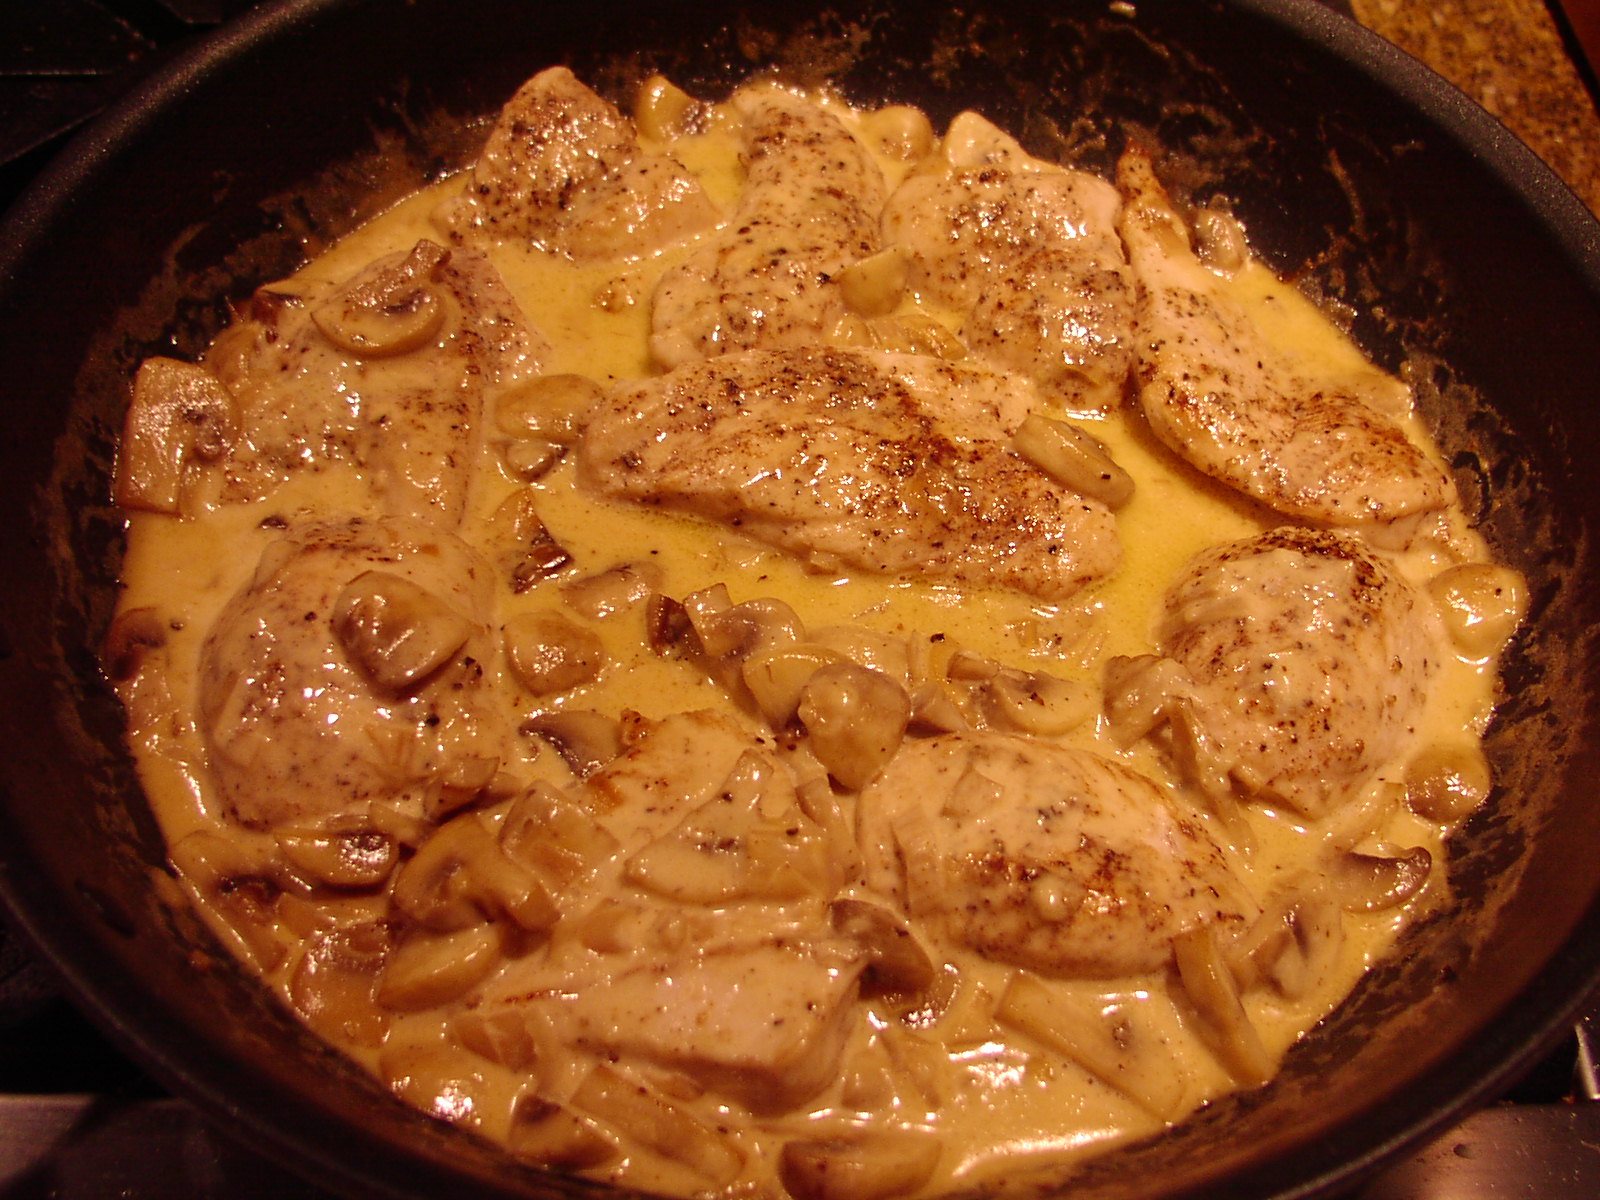
Melt 1 tablespoon of the butter in a large fry pan. Add the pancetta and fry until crisp. Remove the pancetta from pan with a slotted spoon and set aside. Add the garlic to the pan. Cook for 1 minute. Add the wine and cook until no liquid remains. Add the remaining 1 tablespoon butter and the flour. Whisk together and cook for about 2 minutes.  Add the salt, pepper, crushed red pepper flakes, nutmeg, chicken broth, and milk; stirring until the sauce boils and thickens. Remove from heat and add the cooked pasta, peas, cooked pancetta, ½ cup Parmesan, and parsley. Add some of the pasta cooking water if the sauce seems too thick. Adjust seasoning and serve immediately with additional Parmesan cheese.

Please note: If doubling the recipe, use only 3 tablespoons of flour, but double all the remaining ingredients.

*Something I had thought for a long time just came out as being accurate. You really don’t need to use seemingly gallons of water when you cook pasta. In fact, you only need to use enough so that the pasta has room to expand and not stick together. This not only saves water and energy, but the resulting cooking water has a higher percentage of residual starch, which makes it perfect for adding to the sauce if more liquid and/or thickening is required. For more information, search Serious Eats; The Food Lab; A new way to cook pasta?


VEGETARIAN MUSHROOM STROGANOFF

(Sorry, no picture. I lost it when my computer and my camera were not speaking. They have resolved their differences now, but the picture is still missing in action. Will add a picture in the near future.)

Of course you know what most savvy people are saying about vegetarians or people who eat at least one or more meatless meals a week. And yes you are right there with me if you too believe the word is “smart”. But another word immediately jumps into my brain also. And that word is “yummy”. Because there are just an abundance of wonderful recipes out there that don’t contain as much as a quarter cup of meat broth or a tablespoon of bacon fat to make them both delicious and nutritious.

So when I hear someone say they hate vegetarian food, I almost always look at them as if they just stepped out of a brand spanking new Studebaker. And just for your information, the last Studebaker was manufactured in 1967!

Because in my opinion, what these folks have done is limit themselves to food choices that are often expensive, include more protein than is necessary for continued good health, and lack the vegetables, herbs, spices, and whole grains needed to supply our bodies with the necessary vitamins and minerals to support good health. (And no, I don’t believe taking a daily multi-vitamin replaces the lack of fresh vegetables, herbs, spices, and fruits in our diet!) And don’t even get me started on fiber!

So when I decided the other evening to serve “Beef Stroganoff”, I thought about my pledge to serve more meatless dishes. And I concluded that the meat in a stroganoff was not the part I cherished the most. What I loved were the mushrooms, noodles, and the savory sour cream gravy. So I basically made my standard recipe without the meat. And truly, I didn’t miss the meat one little bit.

So in essence you might say that this new spin on my old recipe was “fashioned by an impulsive epicure”.

(Sorry Leah Worth for changing out the words “for” and “ingénue” with “by” and “epicure” from the Bobby Troup classic song “The Meaning of the Blues”.) But it really was Mr. Cs idea to change the lyric. He changed the word “ingénue” to “epicure” while we were listening to the song and talking about food. (Nothing new, believe me!) And I loved the new words, because like Mr. C, I too feel that the word epicure has fallen into disuse. So while I was writing up this recipe, our conversation while listening to Janis Mann’s version of this beautiful blues song came to mind. And I totally felt that Mr. Cs new lyric applied to what I had just done to my original Beef Stroganoff recipe. Hence the musical reference.

(For those of you haven’t the foggiest idea what I’m talking about, I have included the words to one of the loveliest and saddest songs ever written. I’m sure after reading the lyrics you will perfectly understand how the entire chain of events came about. Or not!) But regardless, give this recipe a try. I truly believe the epicure in you won’t miss the meat in the least.

The Meaning of the Blues

Blue was just the color of the sea,

Til my lover left me;

Blue was just a bluebird in a tree,

Til he said “Forget me.”

Blue always made me think of summer,

Cloudless summer skies so fresh and warm;

But now the blue I see is more like winter

Winter skies with clouds about to storm.

Blue was just the color of his eyes

Til he said “Goodbye, love.”

Blue was just a ribbon for first prize

Til he said, “Don’t cry, love.”

And blues were only torch songs

Fashioned for impulsive ingénues;

But now I know, too well I know,

Too well I know the meaning of the blues.

(To hear this song performed, search on “Julie London meaning of the blues”.)

  • 1 T. extra virgin olive oil
  • 2 T. butter, divided
  • 1 lb. cremini mushrooms, sliced (or any combination of fresh mushrooms)
  • scant ½ c. chopped onion
  • 2 garlic cloves, minced
  • ¼ c. dry white wine
  • 2 tsp. fresh thyme leaves or ¾ tsp. dried thyme leaves
  • 2 tsp. paprika
  • ½ tsp. kosher salt
  • freshly ground black pepper
  • 2 T. flour
  • 1½ c. vegetable or mushroom broth
  • 1 c. sour cream
  • 8-oz. wide egg noodles, cooked al dente
  • 2 T. chopped Italian parsley

Heat the olive oil and 1 tablespoon of the butter in a large skillet over medium-high heat. Add the mushrooms and onion; cook until the onion is translucent and the mushrooms slices are starting to brown. Stir in garlic and cook for one minute. Deglaze the pan with the white wine. When the wine is all but evaporated, add the thyme, paprika, salt, and pepper. Cook, stirring occasionally for 3 minutes. Stir in the flour and remaining 1 tablespoon of butter, and cook, stirring constantly for 2 minutes.

Whisk in broth, bring to a boil, reduce heat, and cook for 5 minutes. Remove from heat and stir in the sour cream and noodles. Sprinkle with fresh parsley and serve immediately.

Tip: Never cook noodles ahead of time and let them sit until you’re ready for them. If any part of the dish needs to wait, it should be the sauce. And no, I don’t care what any given recipe says. If it instructs you to cook the noodles and just keep them warm, just say no! You know better!


GRILLADES (CAJUN MEAT STEW) AND CHEESE GRITS

OLYMPUS DIGITAL CAMERA

Until I read the latest issue of Southern Living, I had never heard of Grillades. (Remember, I live in the Northwest corner of the US, so dishes like Grillades are not indigenous to our area.) But through the years I have learned to absolutely adore many of the dishes that have their roots in the South. (Thus my subscription to Southern Living!) So when I read the ingredients in the Grillades recipe, I was hooked immediately.

Grillades (pronounced ɡree-yahds) is a kind of meat stew typical of French regional and Cajun cooking. And at least in Cajun country, Grillades is most often served with grits. And since I am a true believer in the merits of grits, you can bet your best Squirrel Perlo recipe that if grits are even mentioned in conjunction with any given dish, I will be fixing them too!

So yesterday I decided it was the perfect day to tackle Grillades. But as some of you know, I almost never try a recipe until I have researched other recipes for the same dish. Especially if the dish is one that I have not previously tasted. I simply like to read what other cooks have included or excluded in their recipes so that I can better judge what might work best for our tastes. As a result, I didn’t change a thing in the Southern Living seasoning mix recipe. (Well that’s not entirely true. I did reduce the amount of cayenne from 1½ teaspoons to ½ teaspoon because I thought the original amount might be just too spicy for me. And I’m glad I did. The amount of cayenne I used was perfect for both of us.)

I did however change a couple of amounts and cooking methods from the magazine recipe based on other recipes I perused. For example, I changed thinly sliced pork to pork cubes. (Much easier to deal with.) But all in all, the recipe is basically as reported in the September 2015 edition of Southern Living.

Now comes the best part. When we sat down to dinner last evening, and each of us took our first bite, almost simultaneously we looked at each other and uttered the same three little words. OMG! We both exclaimed that this dish was one of the best things we had ever tasted.

So if you too are fans of Cajun cuisine, you have simply got to try this recipe. It is an all time winner at Chez Carr.

  • 7 tsp. Creole Seasoning Mix for Grillades, divided (see recipe below)
  • 2 lbs. boneless pork roast, cut into 1-inch pieces
  • 1 c. unbleached all-purpose flour, divided
  • 7 T. vegetable oil
  • 1 med. yellow onion, chopped
  • 1 c. chopped celery
  • 1 lg. green bell pepper, chopped
  • 2 lg. garlic cloves, finely minced
  • 4 bay leaves
  • 3 c. beef or chicken broth
  • ½ c. dry red wine
  • 1 (14.5-oz.) can diced tomatoes
  • 1 T. Worcestershire sauce
  • 1 tsp. dried thyme
  • 1 tsp. kosher salt
  • hot cooked Cheese Grits (see recipe below)

Sprinkle about 2 teaspoons of the seasoning mix on all sides of the pork cubes in a large bowl. In a gallon size freezer bag combine ½ cup of the flour and another 1 teaspoon of the seasoning mix together. Add pork to bag (don’t wash the bowl) and shake until all the cubes are coated.

Heat oil in a large heavy covered Dutch oven over medium-high heat. Add the pork, and fry for about 4 minutes on each side or until golden brown. (You will probably need to fry the pork in 2 batches.) Using a pair of tongs, transfer the browned pork back to the bowl where you coated the meat originally and reserve the drippings in the Dutch oven.

Sprinkle remaining ½ cup flour over drippings. Cook over high heat, whisking constantly, about 4 minutes or until mixture is medium brown. Immediately add the onion, celery, bell pepper, and garlic, and stir with a wooden spoon until well blended. Add bay leaves and the remaining 4 teaspoons of seasoning mix. Reduce heat slightly and continue cooking, stirring constantly, about 2 minutes.

Add the broth to vegetable mixture, stirring until well incorporated. Add wine, diced tomatoes, Worcestershire sauce, thyme, salt, and browned pork; bring to a boil over high heat. Reduce heat to low, cover, and cook, stirring often, about 90 minutes or until the meat is tender. Midway through, taste to check seasoning. Add additional salt and/or seasoning mix to taste. (I had to add more salt to mine.) Just before serving, remove bay leaves.

OLYMPUS DIGITAL CAMERA

To serve, ladle a large serving of Grillades into a shallow bowl. Add a heaping spoonful of Cheese Grits on top and to the side. Serve immediately. (At our home, this is a meal unto itself. Nothing else to eat required. Of course a nice glass of wine to go with the Grillades is always welcome. Mr. C. recommends a hearty Cabernet-Sauvignon.)

CREOLE SEASONING MIX FOR GRILLADES

  • 1½ tsp. onion powder
  • 1½ tsp. granulated garlic
  • 1 tsp. kosher salt
  • 1 tsp. white pepper
  • 1 tsp. freshly ground black pepper
  • 1 tsp. paprika
  • ½ tsp. dry mustard
  • ½ tsp. dried thyme
  • ½-1½ tsp. cayenne (depends on how much heat you like or can tolerate)
  • ½ tsp. gumbo file

Combine all the ingredients and store in an airtight container.

CHEESE GRITS

  • 1 tsp. kosher salt
  • 5 c. water
  • 1 c. hominy grits (I use Quaker brand Quick cooking grits)
  • 3 T. unsalted butter
  • 2 T. cream cheese
  • ¼ c. grated Gruyère, Swiss, or Edam cheese

In a large saucepan over high heat, bring salt and water to a boil. Slowly whisk in the grits. Reduce the heat to low; cover and cook for 25 to 30 minutes, stirring occasionally to make sure the grits don’t stick to the bottom of the pan. (Grits are done when they have the consistency of smooth cream of wheat.) Remove from the heat and stir in the butter, cream cheese, and grated Gruyère. Season with salt to taste and serve warm.

OLYMPUS DIGITAL CAMERA

HAM, FARRO, CANNELLINI BEAN, AND SWISS CHARD SOUP


OLYMPUS DIGITAL CAMERAWe have experienced a really strange summer this year in the Pacific NW. No rain for weeks on end, hot temperatures, and more aggressive winds than normal. Then suddenly about 2 weeks ago, the skies clouded over, the winds whipped up to a mighty force, and we received our first rain in months. And believe me, there was rejoicing heard all around our glorious state. The farmers were happy, the hardy folks fighting our numerous wild fires were ecstatic, and those of us who were trying to keep our yards and gardens alive could be found dancing in the showers while sending grateful thanks up to whichever benevolent deity would listen.

So now, after several decent rain storms our yards are looking better, the webs are starting to come back between our toes, and at least to this native Washingtonian, it appears that fall is on its way. Now don’t get me wrong. I’m not wishing for the gray days of winter to get here any sooner than they must. But when I wake up thinking about making soup, I know that it’s my own internal precursor to the onset of fall.   (Some people get aches and pains in their joints when fall weather approaches; I suddenly get a desire to build soup.)

So yesterday morning I decided to build a version of Deborah Madison’s Smokey Farro and Chickpea Soup. I changed a couple of ingredients to suit my taste, and added some ham to add a depth of flavor and additional protein. The result was an absolutely divine new addition to my fall and winter soup recipe collection. I hope you too will add this to your soup recipe repertoire. It is delightfully easy to prepare, healthy to the max, and absolutely delicious.

  • 4 c. water
  • 1 c. emmer farro (I use Bluebird Grain Farms organic Emmer Farro)
  • ¼ tsp. kosher salt
  • 2 T. extra virgin olive oil
  • 1 lg. onion, finely chopped
  • 2 stalks celery, finely chopped
  • ½ c. chopped fresh parsley
  • 2 garlic cloves, minced
  • 1 bay leaf
  • 1 heaping cup diced ham (for vegetarian soup, leave out ham)
  • 3 c. vegetable broth
  • 2 c. water
  • 1½ tsp. Spanish smoked paprika
  • freshly ground black pepper
  • 1 (14.5-oz.) can fire-roasted diced tomatoes, undrained
  • 1 (15-oz.) can cannellini beans, rinsed and drained
  • 4 c. chopped Swiss chard
  • 4 good sized green onions, thinly sliced
  • ¾ c. finely grated Parmesan cheese, garnish
  • garlic croutons (see recipe attached) or toasted baguette slices, opt.

Place the 4 cups of water, emmer farro, and salt in a covered pan. Place on high heat and bring to a boil. Boil for 5 minutes, stirring frequently. Reduce heat, cover, and simmer for about 45 minutes or until berries are plump and chewy. When the farro is done, drain, reserving the excess liquid, and set both the farro and reserved liquid aside. (You may need the liquid to thin out the soup at the end of the cooking time.)

Meanwhile, heat the olive oil in a large heavy covered soup pot and fry the onion, celery, and parsley for a few minutes until onion is tender, stirring frequently. Add the garlic, bay leaf, and ham; cook for 2 minutes. Add the broth, 2 cups water, smoked paprika, pepper, cannellini beans, and canned tomatoes. Bring to a boil. Reduce heat, cover pan, and simmer gently for about 20 minutes. (If the farro isn’t done after the soup is finished simmering, remove the soup from heat and set aside until the farro is drained and ready to be added to the soup.)  When the farro is drained and ready, place pot back on heat, and stir in the Swiss chard and farro. Simmer for about 3 minutes or until the chard wilts. Adjust seasoning. If the soup seems too thick, add some of the reserved farro cooking water. (You want a nice brothy soup.) Stir in the green onions just before ready to serve.

OLYMPUS DIGITAL CAMERA

Serve with Garlic Croutons or toasted baguette slices, and grated Parmesan cheese.

GARLIC CROUTONS

Chop up some small bite sized pieces of a chewy, artisan baguette. Place in a frying pan with butter or olive oil (or a combination) and sauté until each crouton is crunchy. (This takes about 45 minutes because you need to go low (heat) and slow.) Add more butter or oil as needed. When desired crunchiness is attained, sprinkle with granulated garlic. Allow to cool completely before placing in an airtight container.


GRILLED LAMB PATTIES WITH TZATZIKI (GREEK CUCUMBER SAUCE)


OLYMPUS DIGITAL CAMERAIn my estimation lamb is under-utilized. And I believe one of the reasons is that a lot of parents with young children think their children won’t like the taste. Well, I beg to differ. When my children were growing up, a leg of lamb was one protein source I knew would be devoured right down to the bone. And I mean this literally. (I’m pretty sure they would have gnawed on the bone if I would have let them!) They truly loved it. And really, what’s not to love? A nice bone-in piece of meat with slits all over the surface stuffed with slivered garlic and fresh rosemary. Then liberally slathered with oil, sprinkled with salt and pepper, and baked to a medium rare. What person of any age could resist this delicacy?

Now granted, lamb isn’t cheap. But because it’s so lean, it doesn’t shrink as much as beef either.

So attached is a recipe for ground lamb that has tons of flavor and is a good way to introduce your family to the joy that is lamb. (Of course, even if your family are already lamby pie lovers, you can fix this recipe. The flavor just won’t be as much of a pleasant surprise.) I take that back. Because of all the herbs and spices, the flavor is still going to be a pleasant surprise! So regardless of your families’ level of culinary acquaintance with baby sheep, fix this quick and easy recipe while it is still BBQing season. You won’t be sorry.

And for all you parents out there introducing your children to lamb for the first time, at least you won’t have to explain that the lamb on the table absolutely did not come from Shari Lewis’s puppet Lambchop! True story! Thanks for the memories kids. Love you mucho!

  • 1 clove garlic, finely minced
  • 1 T. finely chopped red onion
  • 1 T. chopped fresh cilantro
  • 1 T. dry sherry
  • ½ tsp. kosher salt
  • freshly ground black pepper
  • ½ tsp. ground cumin
  • ¼ tsp. dried oregano
  • 1/8 tsp. ground allspice
  • pinch crushed red pepper flakes
  • 1 lb. ground lamb, room temperature

Combine the garlic, onion, cilantro, dry sherry, salt, pepper, cumin, oregano, allspice, and red pepper flakes in a bowl. Add the ground lamb and gently combine with the other ingredients. Don’t overwork the meat. Divide into 3 or 4 patties. While you are forming the patties don’t over press the meat together; just work enough so that the meat retains its shape and doesn’t fall through the grill while it is cooking. (Not good form and you will lose points if the patties fall apart on the grill!)

Place the patties on a medium hot grill and do not overcook. A little red in the middle is perfect. Let rest for 3-4 minutes before serving. Serve with Tzatziki (recipe below). Also great with Cucumbers with a Yogurt, Feta, and Dill Dressing.

TZATZIKI  

  • 2 T. extra virgin olive oil
  • 2 c. plain Greek Yogurt
  • 3 small or 2 medium garlic cloves, finely minced
  • ½ tsp. dill weed
  • ¼ tsp. kosher salt, or more to taste
  • freshly ground black pepper
  • 1 English cucumber, partially peeled, seeded, and grated

Combine all ingredients. Adjust seasoning. Cover and refrigerate until ready to serve.

SAUTÉED CHICKEN WITH GRUYÈRE CHEESE, MUSHROOMS, AND WHITE WINE

OLYMPUS DIGITAL CAMERA

This is yet another chicken recipe that is quick and easy to prepare, making it a perfect dinner entrée after a hectic work or play day. And of course, it’s delicious. (Like I would post anything but a delicious recipe!)

But this is one of those recipes that works best when all the chopping, slicing, mincing, and assembling has been done in advance. In other words, get your act together and have all your ingredients prepped and in place before you start sautéing the chicken. (Hey, why not? You have to do it anyway. So why not get it over with before you actually fire up the burners and curse yourself for not heeding my warning to begin with?) Anyway……

The bones of this recipe come from the Food.com web site. And while I’m giving that site credit, I would like to get on my high horse (with a little help from a tall self-righteous attitude), and say what I really think about all the cooking sites out there in internet land. Thank you, thank you, THANK YOU! (Bet you didn’t see that one coming, did you?) There isn’t a recipe under the sun that can’t be found either by title or ingredient combination. There isn’t a cooking technique, gadget, or unique ingredient that can’t be ordered on-line and delivered directly to your home. There isn’t an excuse in the world for someone to rely on fast food or packaged, processed products to feed their family when every resource imaginable to provide a healthy and delicious meal is at their fingertips! (That’s the high horse part in case you were wondering!)

So to all of those wonderful sites out in internet land that provide great recipes, cooking techniques, and commentary on every aspect related to culinary endeavor, I salute you. And to the Food network (I’m now back on my high horse again), please bring back more love (good cooks/chefs and their sterling recipes) and less war (cupcake, chopped, etc). I personally want recipes, not entertainment. If I wanted to occupy my time watching and listening to suspense, drama, and a staged production, I would watch the news and read every word written about the candidates and their race to be in next years’ presidential election!

  • 2 boneless, skinless chicken breasts, halved lengthwise, then cut in two (8 pieces in all)
  • kosher salt
  • freshly ground black pepper
  • nutmeg
  • 3 T. butter
  • 8 medium sized button mushrooms, halved and thinly sliced
  • 2 small or 1 large shallot, finely minced
  • ½ c. dry white wine (I use Pinot Grigio)
  • ½ c. heavy cream
  • ¾ c. finely grated Gruyère cheese (you can use plain Swiss cheese, but a premium Swiss cheese is best)
  • dash paprika

Season one side of each piece of chicken with salt, pepper, and a light sprinkling of nutmeg. Melt the butter in a large, covered fry pan over medium-high heat. Add the chicken and sauté until both sides are slightly browned and the chicken is cooked through. (Do not overcook the chicken.) Remove from pan, tent with aluminum foil, and set aside. Add the mushrooms and shallot to the pan, reduce the heat, and sauté until the mushrooms are starting to brown and the shallot pieces have all but disappeared from sight. Stir in the white wine and simmer until the wine has all but evaporated. Whisk in the cream, Gruyère cheese, and the paprika. Cook for one minute. Adjust seasoning. Stir in the reserved chicken along with any pan juices; remove from heat, cover, and let sit for about 3 minutes.

OLYMPUS DIGITAL CAMERA

Great served over mashed potatoes with a side green veggie or a nice crisp green salad. And of course, some more of that wonderful Pinot Grigio you used in the dish itself!

TACO SALAD

OLYMPUS DIGITAL CAMERA

Ok, this is not a fancy new recipe for taco salad. It doesn’t feature spectacular new ingredients, or a taco sauce that takes 14 ingredients, special equipment, and an hour to prepare. The meat is plain old ground beef, chicken, or turkey, and the toppings are just what you would expect if you ordered taco salad at any of your favorite restaurants.

What this recipe for Taco Salad does feature however, is an oven baked tortilla base, taco meat that is perfectly seasoned with dried herbs, spices, and ingredients that you should already have in your pantry, and a two ingredient taco sauce that is refreshingly light and delicious. And because you season the meat yourself; no more buying those expensive little packets of taco seasoning mix that contain unnecessary ingredients like too much salt and sugar that you wouldn’t even want your childhood nemesis to ingest, much less your family!

Oh, and did I mention that this salad is stinkin’ easy to prepare? Probably not! I get so excited about the ingredients and flavor of a dish sometimes that I forget to tell you about the ease of preparation. I also sometimes fail to mention that certain parts of the recipe, the taco meat and the taco sauce in this case, can be prepared ahead of time and sequestered on a shelf in your refrigerator.

So no matter how you want to look at this dish, as an easy to prepare one dish weekday meal, as an inexpensive one dish weekday meal, or as a delicious one dish weekday meal, you’re covered. (I’ve always got your back; don’t you ever forget it!)

  • 4 small (7½-inch) or 2 large (10-inch) flour tortillas
  • vegetable cooking spray
  • taco sauce (see recipe below)
  • taco meat (see recipe below)
  • chopped romaine lettuce (as much or as little as you want)
  • any of the following toppings for your salad:
  •     diced tomatoes
  •     halved black olives
  •     diced avocado
  •     diced yellow, white, red, or green onion
  •     grated sharp cheddar, Monterey Jack, or Cotija cheese
  •     canned black beans, drained and rinsed
  •     canned corn, drained and rinsed
  •     anything else that strikes your fancy

Preheat oven to 425 degrees. Place 4 oven-proof bowls or for larger tortillas, 2 6-inch cake pans on a large rimmed baking sheet. Warm the tortillas in your microwave for 20 seconds or until pliable. Spray both sides with cooking spray, then drape over the bowls (smaller tortillas) or nest the larger tortillas inside the cake pans. Bake until the tortillas are crisp and just starting to brown, 10 to 12 minutes. (Watch them carefully the last few minutes.) Set aside.

OLYMPUS DIGITAL CAMERA

Meanwhile prepare the Taco Sauce and the Taco Meat (recipes below).

OLYMPUS DIGITAL CAMERA

When ready to serve, place a taco shell on a large plate. Scatter lettuce in and around the shell. Scoop some of the taco meat into the shell and surround with your toppings of choice. Serve with taco sauce.

Taco Sauce:

  • 1 c. (8-oz.) sour cream
  • ½ c. salsa verde – I use Trader Joe’s Hatch Valley Salsa (which BTW contains no preservatives or ingredients that can’t be pronounced) when I’m feeling lazy. When I have time and inclination, I prepare the Salsa Verde recipe on this site.)

Whisk ingredients together, cover, and store in the refrigerator until needed.

Taco Meat:

OLYMPUS DIGITAL CAMERA

  • vegetable cooking spray
  • 1 lb. ground beef, chicken, or turkey
  • 2 T. dehydrated onion
  • 2 tsp. chili powder
  • 1 tsp. ground cumin
  • 1½ tsp. dried oregano (Mexican oregano if possible)
  • 1 tsp. granulated garlic
  • ½ tsp. seasoned salt
  • freshly ground black pepper
  • 1 T. tomato paste
  • ½ c. water

Spray a non-stick fry pan with cooking spray. Add the ground beef and cook slowly until the meat is just about brown. Add the remaining ingredients, bring to a high simmer, reduce heat, and cook for 5 minutes. Adjust seasoning.


MONGOLIAN BEEF WITH GREEN ONIONS

OLYMPUS DIGITAL CAMERA

During the 70s I worked for Seafirst Bank (remember them?) at their International Branch. I loved working there. Fabulous people to work with, great customers, and nothing like having wonderful Asian food available each and every day.

In those days, the area was known as “China Town”. (It is now more aptly referred to as the “International District”.) And more often than not I would go out for lunch on Fridays. And almost invariably I would order Mongolian Beef.

Now the Mongolian Beef of my yore was spicier (whole red chilies running throughout the dish) and included deep fat fried Saifun (mung bean) noodles. Then all the ingredients were mixed together and fried in even more oil. It was wonderful. But I can’t handle that much spice, fat, or salt anymore. So I needed a recipe for a milder, tamer, more polite, and definitely healthier version of this dish. So to the internet I proceeded. None of the recipes I found were just exactly what I thought I was looking for. So I added, subtracted, reduced, increased, and generally had my way with several recipes, and this combination of ingredients is the result.

And if I do say so myself, which of course I do, this doesn’t taste even close to the Mongolian Beef I used to get in the International District in the 70s! And this, if I’m honest with myself, is a good thing. Because of how I eat today, (less fat, salt, and my bodies rejection of really spicy food), I honestly don’t think I would enjoy “the real thing” any longer. So in remembrance of days gone by, I plan to lift a martini glass (complete with contents) tonight to the good old days when I could eat anything I wanted, was totally unaware of things like sodium content and saturated fat, and not eating spicy food meant you were a sissy!

So for all my readers who like me, are Mongolian Beef lovers, I offer my healthier version of this classic Asian dish. I think it’s pretty OK, and I hope you do too.

  • 1 lb. lean beef steak (round, London broil, sirloin, etc.) cut into very thin strips
  • ¼ c. cornstarch
  • ½ c. tamari (low sodium & GF)
  • ½ c. water
  • 2 tsp. sesame oil
  • 2/3 c. brown sugar
  • ¼-½ tsp. crushed red pepper flakes
  • 2 T. vegetable oil, divided
  • 1 T. minced ginger
  • 2-3 garlic cloves, minced
  • 1 bunch green onions, sliced on the diagonal

Mix the steak strips and cornstarch together and set aside. Whisk together the soy sauce, water, sesame oil, brown sugar, and red pepper flakes. Set aside.

In a large fry pan, heat 4 teaspoons of the oil to medium high. Add the meat and fry just until each side is lightly browned. (The middle should still be slightly pink.) Remove from pan and set aside. Add the additional 2 teaspoons of oil to the pan along with the ginger and garlic. Fry for one minute then add the reserved soy sauce mixture. Let burble for 2-3 minutes or until the sauce starts to thicken. Add the reserved meat and the green onions. Cook about 30 seconds. Remove from heat, adjust seasoning, and serve immediately. Great served over brown rice.

CHICKEN MARENGO (CHICKEN IN A SAVORY WINE AND TOMATO SAUCE)

OLYMPUS DIGITAL CAMERA

Every once in awhile Mr. C. will be completing the New York Times cross word puzzle, and will run across (or down) an answer that by its clue he knows is a cooking term or dish. And if he doesn’t recognize the term or dish, he asks me to enlighten him since I am the self proclaimed resident expert on all things cuisine. Now sometimes I can answer with assurance, sometimes with a faint idea of what I’m talking about, but more often than not, I haven’t got a clue. So when Mr. C. recently asked me about marengo, I just stared at him and shrugged my shoulders. But of course, later that morning I had to look it up.

I discovered that Marengo is a town in Italy, and that maybe possibly Chicken Marengo was prepared for Napoleon by his personal chef after the French won the battle of Marengo on June 14, 1800. (Myth or legend, who knows?!) What I do know for sure however, is that Melissa d’Arabians recipe for Chicken Marengo, with a couple of minor adaptations on my part, is an absolutely delicious, easy to prepare, and healthy chicken dish. So who cares about the origin of the recipe even though both the French and the Italian claim it as their own creation. (Well of course they do!) And incidentally, there are about as many wildly different ingredients and ways to prepare this dish as there are Carter’s Little Liver Pills! (Actually since 1959 they have simply been called Carter’s Little Pills.) And yes, they are still being made and apparently sold. Or they wouldn’t keep making them, right??? But back to the variety of ingredients possible in a Chicken Marengo.

Some include poached or fried eggs (yikes), crayfish, Cognac, garlic, black olives, thyme, etc. The list is endless. But for my taste, this simple preparation is absolutely perfect. (And no I don’t care if Napoleon would have liked it or not!)

So do yourself a favor. First of all, don’t buy any Carter’s Little Liver Pills (talk about an expired pull date), but do prepare this amazing dish next time you want to feature chicken in a new and exciting way.

  • 2 large boneless, skinless chicken breasts, sliced lengthwise, and then pounded thin
  • kosher salt
  • freshly ground black pepper
  • ¼ c. all-purpose flour
  • 3-4 T. extra virgin olive oil
  • 1 medium sized sweet onion, sliced
  • ½ lb. button mushrooms, sliced
  • 1 yellow bell pepper, seeded and thinly sliced
  • 2 T. tomato paste
  • ½ c. dry white wine
  • ½ c. beef broth (yes, beef broth)
  • 1 (14-oz.) can chopped tomatoes
  • 2 tsp. butter

Season the chicken with salt and pepper and lightly dredge in flour. In a large sauté pan, heat 3 tablespoons of the olive oil over medium-high heat and add the chicken. Brown on both sides, until lightly golden, about 3 minutes per side. Remove from the pan and set aside.

In the same pan, add another tablespoon of the olive oil, if needed, along with the onion, mushrooms, and pepper. Sauté until the veggies are almost soft, about 5 minutes. Stir in the tomato paste and cook for 2 minutes. Turn up the heat, and add the wine and let it reduce by about half. Add the beef broth and chopped tomatoes. Once the mixture begins to burble, reduce the heat, and cook for about 7-8 minutes. Add the reserved chicken and any accumulated juices and cook until the chicken is warmed through, about 2 minutes. Remove from heat and stir in the butter. Serve immediately. Great served over brown rice.


CHICKEN, SHRIMP, OR ROASTED VEGETABLES IN A CURRY MASALA SAUCE

OLYMPUS DIGITAL CAMERA

There really isn’t anything about Indian curry that I don’t like. And this curry dish, slightly altered from a recipe provided when I recently purchased a package of Aromatic Curry Masala at the Methow Masala shop in Winthrop, WA, is just about as good as an Indian style curry can get. It’s so delicious, that if I had been served this curry dish in a restaurant, I would have wanted to go back for more at my earliest convenience. The only changes I made to the original recipe were to replace tomato paste for diced tomatoes, use my own curry masala blend (the second time I made it), and add sour cream or yogurt right at the end. (Just makes the sauce a little creamier.)

Now if you happen to live near Winthrop, you can buy the curry blend any old time you want. But for those of us who would have to make a special trip, I went to all the trouble of working out what I believe to be an adequate Aromatic Curry Masala substitute. (BTW, Mr. C. loved both curries I made before writing this post. But he did admit that he liked the curry made with chicken better (curry number 1) than the curry I made with shrimp (curry number 2). No mention of the sauce flavor being any different when I used my own curry blend (curry number 2). Just that he preferred chicken curry over shrimp curry.

Now of course, many of you are not going to go to the bother of making your own curry masala powder. And believe me, if I still had 4 kids at home and worked full time, I wouldn’t be making my own curry powder either! But since my kids are grown and I am retired, I take no greater pleasure than trying my hand at what I call “seasoning blend mixology”. (I have kind of a spice and herb obsession if truth be known!) And if I do say so myself, my recipe below for Curry Masala Powder is darned good. But dear friends, even if you don’t have the time, energy, or interest in making your own curry powder, make this delicious dish anyway. Just use purchased curry powder. (There will be no points subtracted or shame attached to using a commercially produced curry powder. The only shame would be if you didn’t give this recipe a try when next you got a hankering for Indian food!)

So grind yourself up some curry powder (or start with purchased curry powder), steam up some rice (remember, brown rice is healthier for you than white rice), and prepare a chicken, shrimp, or roasted vegetable curry for your family in the near future. They will be delighted to have something new and exciting to eat for dinner. And you will have had a new adventure in the kitchen. And isn’t that the real reason many of us love to cook??

  • 1 tsp. cumin seed
  • 1 tsp. brown mustard seed
  • ¼ c. (½ stick) butter
  • 2 large onions, finely chopped
  • 5 lg. garlic cloves, finely minced
  • 1-inch piece of fresh ginger, finely minced
  • 3-4 T. Aromatic Curry Masala spice blend from Methow Masala or my version of Curry Masala Powder (see recipe below)
  • 1 tsp. kosher salt
  • ¼ c. tomato paste
  • 2-3 med. jalapeño chili peppers, seeds and veins removed, and finely minced
  • 4 c. (1 qt.) chicken or vegetable broth (or use 4 tsp. chicken or vegetable base and 4 c. water)
  • 6-8 boneless, skinless chicken thighs cut in bite sized pieces or 2 lb. large uncooked shrimp, peeled and deveined or 3 cups assorted roasted vegetables
  • ½-¾ c. sour cream or plain yogurt

Toast the cumin seeds and mustard seeds in a dry pan over medium heat until the aroma of the two spices is released. Set aside.

Melt the butter in a heavy covered pan. Add the onions and cook until they start to brown. Add the garlic and ginger and cook for one minute. Add the curry masala powder, salt, toasted cumin and mustard seeds, and the tomato paste. Let the mixture cook for about a minute. Whisk in the jalapeños and chicken broth and simmer uncovered for about 15 minutes. Add the chicken pieces and cook just until the chicken is no longer pink in the middle. If you are using shrimp, cook only until the shrimp turn light pink. If you are using roasted vegetables, add just long enough to heat through. Whisk in the sour cream or yogurt, adjust seasonings, cover, remove from heat, and let sit for 15 minutes. Serve over brown rice. And yes I know brown rice is not usually served with most curry dishes, but it’s healthy and we love it! If you must, you can serve the curry over basmati rice.

Also, since I know many of you are wondering – no this is not a recipe for a really spicy hot curry. The jalapeños truly add more flavor than heat, especially if you carefully remove the seeds and veins. Of course, there is a bit of heat, but I pride myself in not hurting anyone. So if you are super sensitive, you might want to use less jalapeños or none at all.

CURRY MASALA POWDER RECIPE

  • scant ½ c. coriander seeds
  • 2 T. fennel seeds
  • 2 T. cumin seeds
  • 1 T. black or brown mustard seeds
  • 1 tsp. black peppercorns
  • ½ tsp. fenugreek seeds
  • 2 tsp. crushed red pepper flakes
  • 2 tsp. ground cinnamon
  • 2 tsp. turmeric powder
  • 1 tsp. ground ginger
  • 1 tsp. ground cloves
  • 1/8 tsp. ground cardamom

In a small pan over low heat, individually dry roast the coriander seeds, fennel seeds, cumin seeds, mustard seeds, peppercorns, fenugreek seeds, and crushed red pepper until aromatic. Don’t hurry the process.

When each is toasted, remove to a bowl to cool. (And yes, it can be the same bowl.) When all of the spices are room temperature, whirl in a grinder until powdered. (It’s OK if there are still tiny chunks. If the chunks bother you, sieve the mixture before proceeding.) Add the ground cinnamon, turmeric, ginger, cloves, and cardamom. Store in an airtight container. Use in any of your favorite recipes calling for curry powder.

FYI: Internet source for dried herbs and spices www.myspicesage.com

I have always been more than satisfied with the price, delivery method (most of the time free delivery) and products I have received from this company.