Category Archives: MAIN DISH RECIPES

MARHAPÖRKÖLT (HUNGARIAN BEEF STEW)

Hungarian food entrances me because I have always loved the key ingredients in this delightful cuisine – sour cream, paprika, potatoes, pasta, onions, caraway seeds, poppy seeds, cabbage (including sauerkraut), and a wide array of sausages. I mean truly, what’s not to like?

So when I recently decided to prepare a beef stew, I decided to forgo my usual recipes in favor of something new. And almost any time I think “something new”, my thoughts automatically drift towards the Carpathian Basin.

I found plenty of recipes during my internet search. But I quickly realized, like American beef stew, there are as many recipes for this Hungarian standard, as there are cooks. And not just Hungarian cooks. I found recipes from cooks from almost every ethnicity, as well as recipes from magazines as disparate as Saveur and Women’s Day.

So I glommed together what I thought would work, and got out my largest LeCreuset Dutch oven. Following what I thought to be the key ingredients in most of the highest rated recipes, I came up with this mix. I had a few trepidations about using a whole green pepper, but in the final analysis, it’s the green pepper that sets the stage so beautifully for the paprika and caraway to work their magic. These three ingredients were obviously meant to be together. They set the flavor base for this incredible dish. The funny thing is, unless you have truly amazing taste buds, (of which I am not blessed), it is difficult to ascertain where the green pepper flavor leaves off and the paprika and caraway take the forefront. And really, isn’t that the essence of good cooking? Achieving a blend where no one ingredient hogs the stage. (Kind of like a good band. Every player in sync with every other player to form a blend rather than a cacophony of individual sounds.)   

So please give this recipe a try. It is the essence of comfort food, even before you place it on the table. The smell alone is worth the effort. All you have to do is read the first two ingredients to know of what I speak. 

  • 4 slices thick cut lean bacon, diced
  • 1 lg. onion, diced
  • 2 garlic cloves, minced
  • 1 green bell pepper, seeded and finely chopped (don’t even think of leaving the green pepper out)
  • 1 tsp. kosher salt
  • freshly ground black pepper
  • 1 lb. cubed lean beef (I use round steak because it’s inexpensive and very lean)
  • 3 T. sweet (mild) Hungarian paprika (yes, 3 tablespoons), or more to taste
  • scant ½ tsp. caraway seeds, coarsely crushed (don’t leave the caraway seeds out either!)
  • 1 lg. bay leaf
  • 8 oz. can diced tomatoes (preferably Italian)
  • about 2 c. beef broth
  • ½ lb. thick egg noodles
  • 1 T. chopped fresh parsley, garnish
  • sour cream, garnish, opt.

In a large covered Dutch oven or soup pan, fry the bacon until it is crisp. Remove from pan and set aside. Add the onion and sauté for about 8 minutes or until softened. Add the garlic, green pepper, salt, and pepper. Continue to sauté for another 5 minutes or until the garlic is fragrant and the bell pepper is tender-crisp.

Add the beef to the pan. Cook for 5-6 more minutes, stirring occasionally, or until the meat is brown. Add the cooked bacon, paprika, caraway seeds, bay leaf, and diced tomatoes to the pan. Pour enough beef broth into the pan to almost cover the meat. Stir and bring to a boil.

Reduce heat to a simmer and cover the pan. Let the mixture simmer slowly for about 90-120 minutes, stirring occasionally, and adding more broth as needed to keep the stew from getting dry. (If too much liquid, remove the lid the last 30 minutes or so of cooking time, thus allowing the excess liquid to evaporate.)

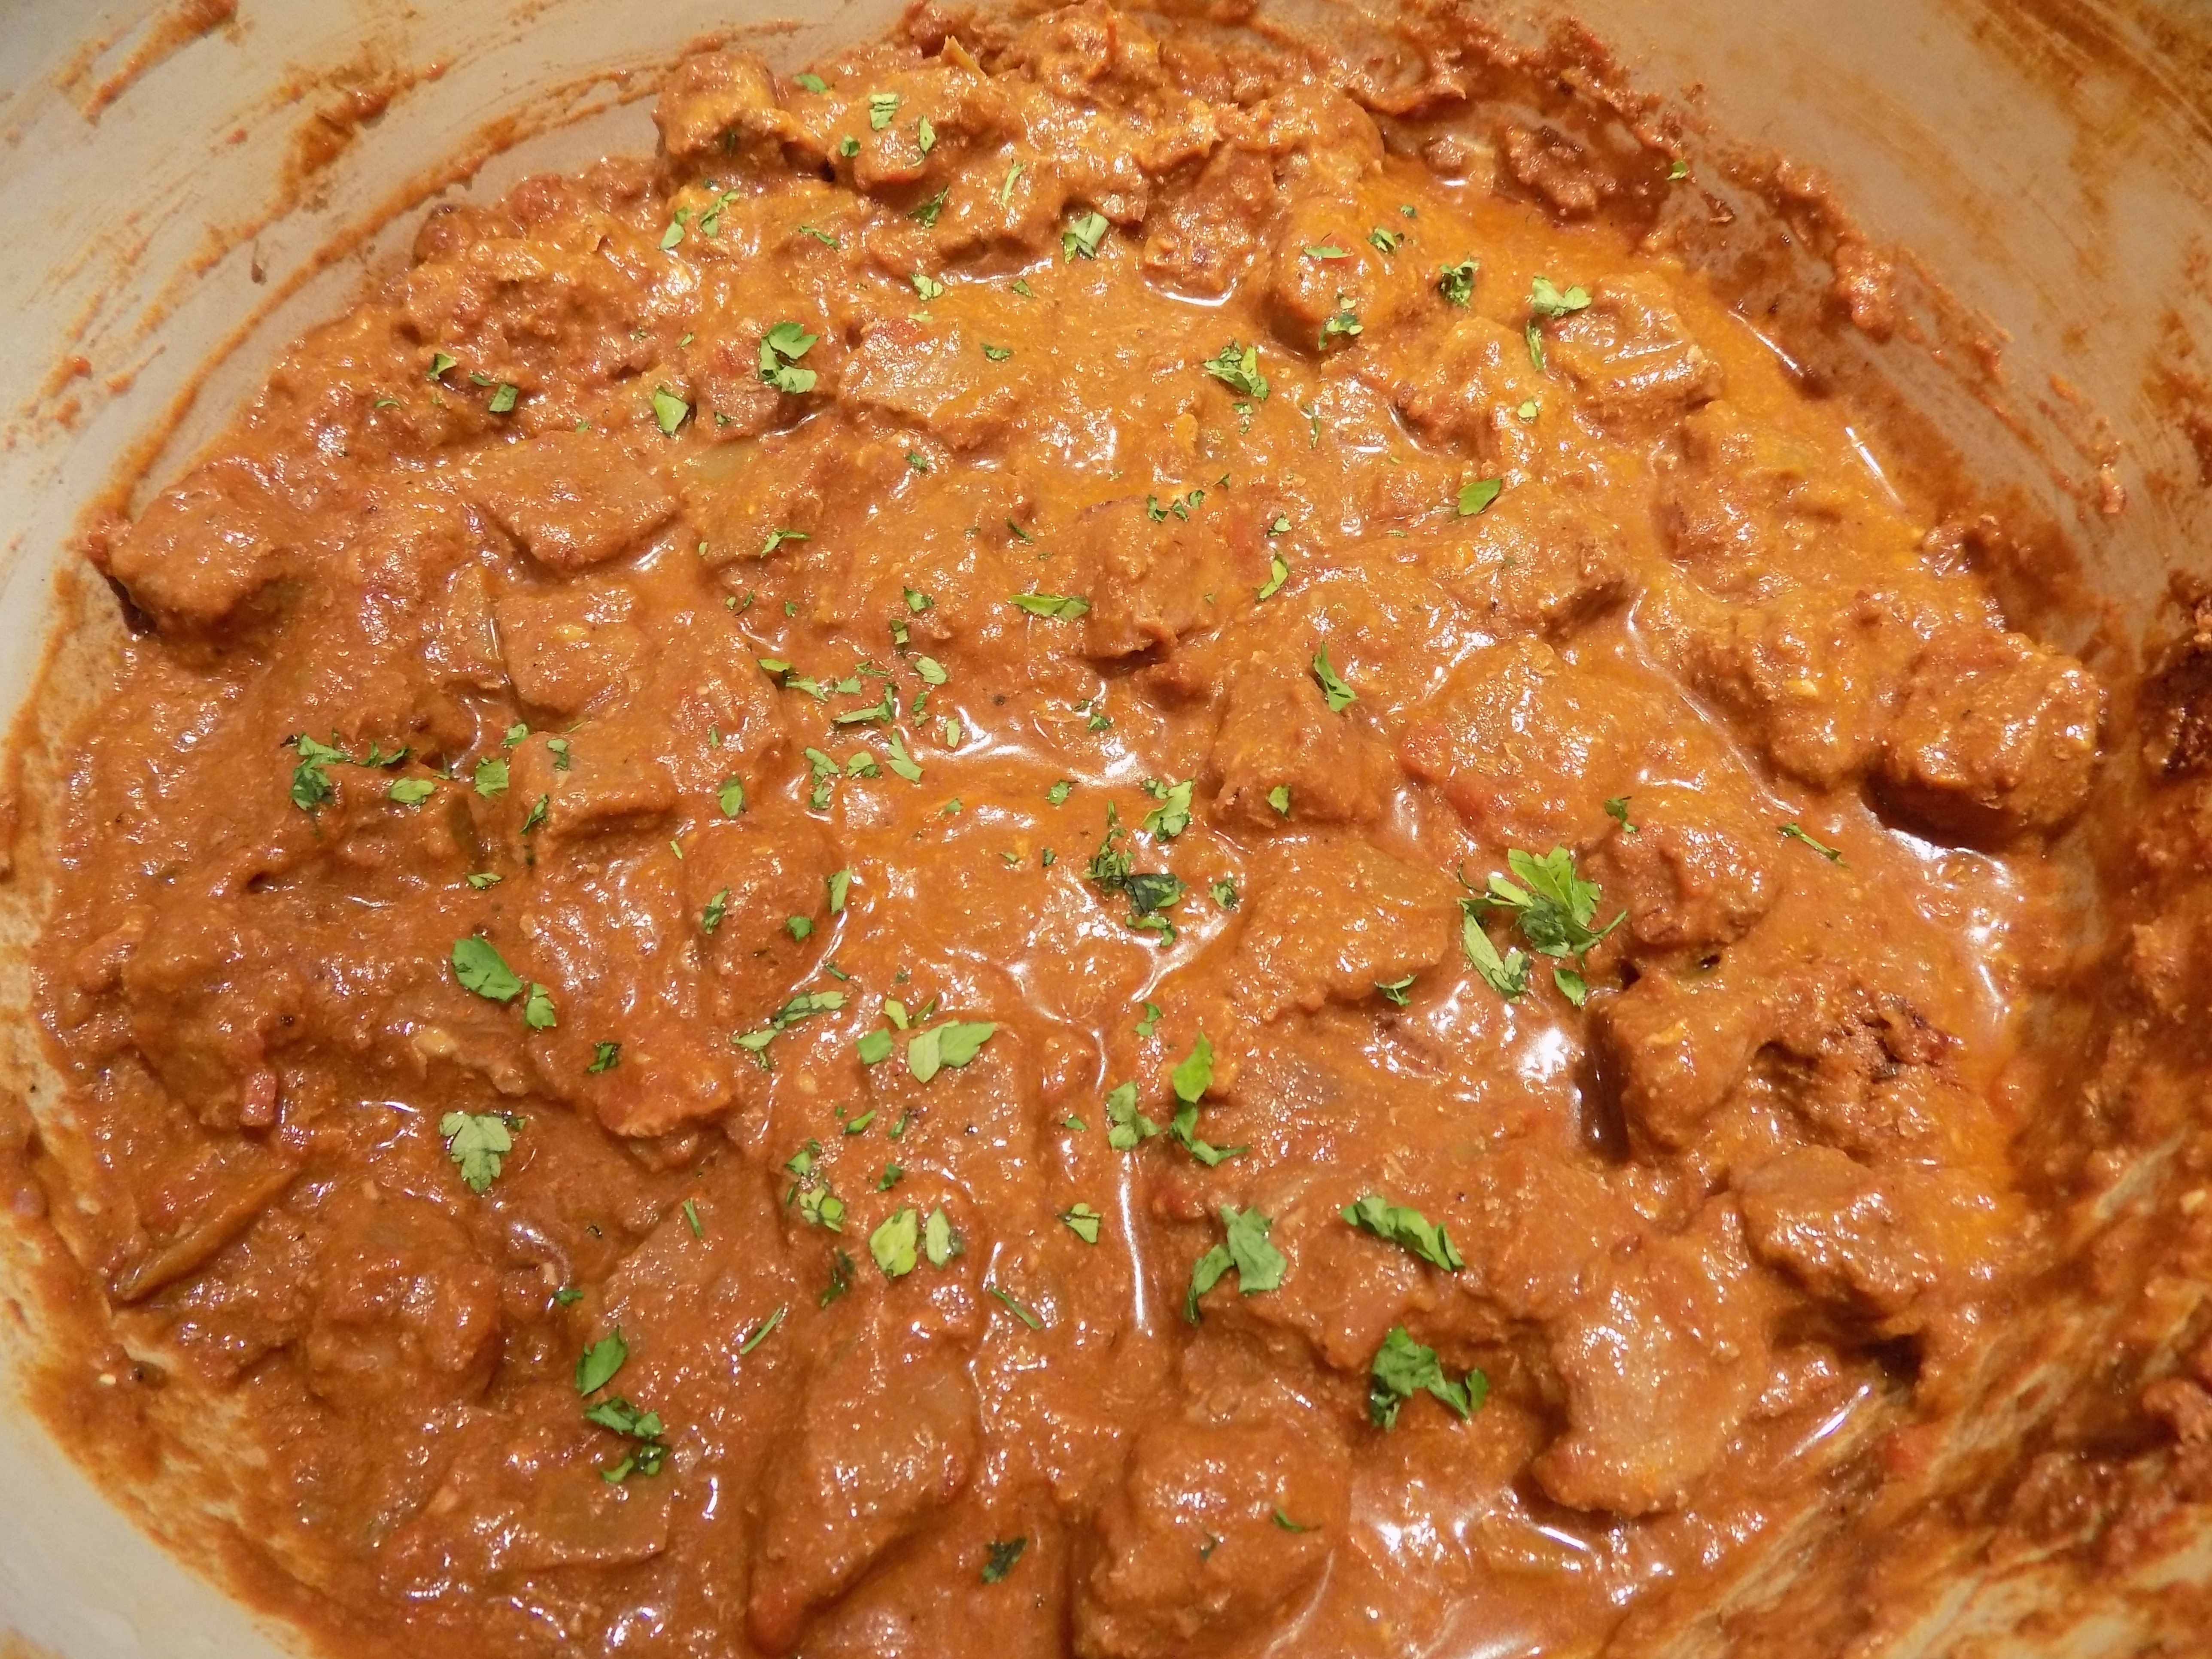
The stew is done when the meat is fork tender and the sauce is thick. Adjust seasoning.

Just before serving, cook the noodles to al dente and drain.

To serve, cover the bottom of a soup bowl with noodles, and ladle on the stew. Sprinkle with fresh parsley and offer sour cream at the table.

Can substitute mashed potatoes or steamed rice for the noodles.

Pairs very well with Hawaiian Won Bok and Carrot Slaw. (on blog)


CHICKEN LAYERED WITH SAGE, PROSCIUTTO, AND PROVOLONE CHEESE (CHICKEN SALTIMBOCCA)

There are just certain ingredients that really should appear in a culinary hall of fame. Each unto itself is magnificent, but when a combination of these marvelous ingredients are used in a dish, the result is almost mystical. This recipe contains four of what I consider to be wonder ingredients – chicken, sage, prosciutto, and provolone cheese. As an amalgam, their flavor is almost unbeatable, thus allowing a dish like this simple layered chicken to become a culinary work of art.

I say simple, because this recipe is very easy to prepare. Even lazy retirees like me can make this dish in quite a short amount of time. And working parents who might not think of fixing a dinner featuring such an exotic list of ingredients, might make it part of their regular rotation if they once gave it a go.

All it takes is a little planning. First of all, you must have the ingredients on hand. Duh! You also must decide what you are going to serve with the chicken. I recommend a nice rice dish like the one I so graciously supplied for you at the bottom of this post. Then something green. If you have the strength, a lovely green salad is always perfect. If you don’t have the strength, frozen petite peas warmed in the microwave with a dab of butter and a sprinkle of seasoned salt, works just fine.

So once you have the rice happily bubbling away and your green offering ready except for a bit of last minute attention, you are ready to focus on the star of the show.

As you can see, if you’ve taken the time to read the list of ingredients and directions below, this dish does not take a long time from stove/oven to table. But I would caution, assemble all your ingredients ahead of time and have them close at hand. (Pretend you are the prep cook in a fine dining establishment.) Because prep work is the key to successfully preparing this dish. Actually it’s a good plan of action for almost every recipe. Good prep work can save you time and frustration. Before almost every dinner, I do my prep work before I ever set a pan on the stove. Of course, I usually have a drink in my hand while I complete these preliminary functions. This of course helps the onerous tasks like chopping onions much easier to swallow. So to speak!

So regardless of your time in life – retired, eager to retire, or parent trying to provide your family with wholesome and delicious food, get thee to the kitchen and prepare this amazing dish at your earliest convenience. As you will also have noticed, this recipe makes just enough for 2 hungry, or 4 not so hungry adults. But luckily for you, this recipe can easily be doubled, tripled, etc. And remember – it really is OK to play with your food, regardless of what your mother told you when you were a child. Fix this dish for her, and she might even give you permission to play with your food more often! Cheers

  • ¼ c. flour
  • ¼ tsp. kosher salt
  • freshly ground black pepper
  • 2 T. butter
  • 2 small boneless, skinless chicken breasts, sliced in halves lengthwise
  • ¼ c. dry white wine
  • scant 1 T. minced fresh sage
  • ½ c. chicken broth, divided
  • ½ tsp. cornstarch
  • 4 slices prosciutto, cut in thirds
  • ½ c. grated provolone cheese
  • paprika, opt.

Combine the flour, salt, and pepper in a wide shallow dish. (I use an 8-inch cake pan.) Melt the butter in a frying pan over medium heat. Dredge the chicken breasts in the flour mixture, shaking off any excess. Fry just until done. Transfer the chicken to a 9×9-inch or 7×11-inch Pyrex dish. (Try not to overlap the pieces.)

Deglaze the frying pan with wine. Add the sage, ¼ cup of the chicken broth, and additional pepper. (Not too much pepper.) Slowly simmer for about a minute. Whisk the cornstarch into the remaining ¼ cup chicken broth and add to pan. Let simmer for about a couple of minutes, then remove from heat. Adjust seasoning and set aside.

Lay prosciutto over the cooked chicken breasts, sprinkle with grated cheese, and dribble the sauce over the whole mess. (Use a spatula to get every last bit of the sauce onto the chicken.) Sprinkle very lightly with paprika.

Bake in a pre-heated 325 degree oven for 10 minutes. Place under broiler for about 30 seconds to brown. (That is, if you aren’t afraid of your broiler, like I am.  Long story. Someday when I’m feeling strong I’ll tell you all about my ridiculous broiler phobia.) Remove from oven and let rest for about 3 minutes before serving.

WILD RICE SIDE DISH

  • 1 c. wild rice blend (I use Lundberg Wild Blend rice)
  • 1¾ c. chicken broth
  • freshly ground black pepper (not much)

Put the above ingredients in rice cooker. Turn the rice cooker on go. Walk away for about 45 minutes or until the rice cooker tells you the rice is done.

BTW – if you do not own a rice cooker, what are you waiting for? Christmas is coming. Put it on your list. Or do as I do. Order a rice cooker for yourself and inform your spouse that he/she has just purchased one of your Christmas gifts and you are positive you are going to like it. Saves your spouse time and inconvenience, and you get what you truly want or need!


CABBAGE CASSEROLE WITH MEATBALLS (LAZY COOK CABBAGE ROLLS)

Once again it’s Oktoberfest time in the city. And most years when we host a JazzVox concert in September, I serve a German themed meal before the concert. Well, this year is no different. Except this year I am expanding my geographic area to include food from some of the neighboring countries. After all, they celebrate Oktoberfest too. I mean really. Who doesn’t like a big old party featuring beer, rich food, and 16-18 days of revelry? Not we Washingtonians, that’s for darned sure. We have Leavenworth, which prides itself on celebrating Oktoberfest 365 days a year! Take that Munich! (Munich may host more than 6 million people each year for the 16-18 days, but our very own Leavenworth has endurance, 365 days a year, and that counts for something!) But back to this recipe.

I love cabbage rolls. But cabbage rolls for 30 some people – I think not! Just the thought of removing the core of several cabbages, boiling the cabbages until the leaves are softened enough to pull off individually, then gently removing the leaves as they become tender and setting them aside to drain and cool seemed like just too onerous a task. (Yah think!) So I decided to simplify the process so that I could still serve cabbage and savory meat to my guests, while at the same time avoiding a trip to our local hospital for exhaustion or a home for elderly nitwits who have delusions of being able to work like they were still in their thirties!

Now if you have already perused this recipe, you know there is still an average amount of work involved in preparing this dish. I simply couldn’t deprive you of the wonderful meat filling that is the reason for cabbage rolls in the first place. (The cabbage is really just there to justify all the time and energy you put into growing the darn things in the first place.) But please note, the Meatballs don’t take all that much time to prepare, and the Sauce and Topping are only about 3 minute tasks.

So get into the September spirit and fix this casserole for your family and friends before winter sets in. And if you’re interested, I posted my menu for this coming Sunday at the bottom of this post. (Guests attending the concert – no fair peeking!)

Cabbage Base:

  • ½ medium-large green cabbage (about 1 lb.), cored and cut into ¾-inch strips
  • ½ yellow onion, chopped, divided
  • 2 T. extra virgin olive oil
  • 2 T. chicken or vegetable stock
  • kosher salt
  • freshly ground black pepper
  • crushed red pepper flakes

Place the cabbage pieces in a lightly greased 9×13-inch gratin or baking dish. Scatter the cabbage with half of the chopped onion. Drizzle veggies with the olive oil and stock. Lightly sprinkle with kosher salt, pepper, and a scant amount of crushed red pepper flakes. Cover tightly with foil or lid, and bake in a pre-heated 350 degree oven for 1 hour. While the cabbage bakes, prepare the meatballs, sauce, and topping.

Meatballs:

  • 2 tsp. vegetable oil
  • 2 cloves garlic, minced
  • 3 tsp. Hungarian paprika, divided
  • pinch of ground cloves
  • ½ tsp. kosher salt
  • freshly ground black pepper
  • 1 can (14-oz.) diced tomatoes plus juice (canned Italian tomatoes are the best), divided
  • 1 egg
  • ½ c. cooked rice (white or brown)
  • ½ lb. lean ground beef
  • ½ lb. ground chicken
  • 1 T. minced fresh parsley

Heat the vegetable oil in a small frying pan. Add the remaining half onion and gently fry until softened. Add the garlic and sauté for one minute. Transfer the onion and garlic to a medium sized mixing bowl. Whisk in 1½ teaspoons of the paprika, cloves, salt, pepper, 1/3 cup of the diced tomatoes, and the egg. Gently stir in the cooked rice, ground beef, ground chicken, and parsley. Using a good sized ice cream scoop, form balls and lay them in a single layer on a sheet of waxed paper. Set aside. (I get 11 meatballs when I use my #16, 2-inch diameter scoop.) For information on ice cream/portion scoops, see The Real Scoop at bottom of post.

Note: You can use all ground beef or all ground chicken in the meatballs. I use both because I like the combination in these meatballs.

Sauce:

  • 1½ c. sour cream, divided
  • ¼ tsp. kosher salt
  • freshly ground black pepper

In a small bowl, whisk together the remainder of the can of diced tomatoes, remaining 1½ teaspoons paprika, ½ cup of the sour cream, salt, and pepper. Set aside.

Topping/Garnish:

  • 1 T. chopped fresh dill or 1 teaspoon dried dill weed (fresh is always best)
  • pinch of kosher salt

Combine the remaining 1 cup sour cream with the dill and salt. Refrigerate until ready to use.

Assembly:
When the cabbage has baked for one hour, remove from oven. Turn the oven heat up to 375 degrees. Carefully remove the aluminum foil (there will be steam) and set aside. Lay the meatballs in a single layer over the braised cabbage. Pour the sauce over the meatballs. Tightly cover with the saved aluminum foil and bake for 30 minutes. Remove the foil (again being very careful), raise the oven temperature to 400 degrees and change to convection (if you have a convection oven, that is). Continue to bake for an additional 15-20 minutes or until the meatballs are fully cooked and the sauce is almost gone. Remove from oven and let rest for 5-7 minutes before serving. Pass the sour cream and dill topping.

The Real Scoop:

To get uniform sized portions, be it cookie dough, meatballs, ice cream, etc., the most reliable method is to use a portion scoop.

Portion scoops, commonly referred to as “ice cream scoops”, are standard-sized scoops used to measure out food, both cooked and uncooked. They have a spring release that scrapes your food/ice cream/cookie dough, etc. out of the scoop as the handle is squeezed. The interesting thing about portion scoops is that they come in strange sizes. For example, a #16 has a 2-inch diameter which is perfect for the meatballs in this recipe and for scooping out muffin or cupcake dough. Many cookie recipes direct you to roll the cookie dough in a 1-inch ball or a rounded tablespoon. That would be a #100.

In addition to the 2 scoops listed above, I routinely use a #60 (1¼-inch diameter) for medium sized cookies, meatballs, etc., and a #40 (1 5/8-inch diameter) for larger cookies or portions.

The number on the scoop basically represents how many “scoops” it would take to fill a quart sized container. Therefore, the larger the number, the smaller the scoop. For practical application however, picking out the right scoop for your needs is as simple as going to a good kitchen shop. Then choosing scoops based on the size of the cookies or whatever else you plan to portion out. The time saved in not having to hand roll cookie dough, all by itself, is well worth the money spent on the scoop. (Oh – for just one nickel for every cookie I’ve ever baked. I would probably be able to buy us round trip tickets to Portland, or to some other fascinating destination.)

2017 JazzVox Oktoberfest Menu:

Appetizers – Viennese Liptauer (recipe on site), cornichons, and 3 types of cheese

Main Dish – Cabbage Casserole with Meatballs

Side – Roasted Garlic, Buttermilk, and Fresh Chive Mashed Potatoes (recipe coming)

Salad – Cucumber and Red Onion Salad (recipe on site)

Bread – Overnight Rye Beer Bread (never made it before, so it may or may not appear on this site)

Dessert – Berry Pie Bars with Cinnamon Whipped Cream (recipe on site)


HAMBURGER DIP SANDWICHES WITH ONION AND DRY SHERRY AU JUS

Well once again I have managed to use one of the many 1 pound packages of ground beef that currently takes up about a half shelf in our not-so-tiny freezer. Hurray for me! Don’t get me wrong, I love ground beef. But it does tax my old brain trying to think up new and inventive ways to serve it.

But, lucky for me, one of the best ways I know to dress up simple ground beef, is to use it in a dipping sandwich.

Almost everyone I know loves a good French dip sandwich, as long as the au jus and meat are really flavorful. (I hate some of the weak tasting excuses for an au jus served in many restaurants. But I’ll save that pontification for a rainy afternoon when it isn’t so pleasant outside.) But before I leave the subject, I would also appreciate if the sliced beef had some good flavor. Yes, I know – I’m picky, picky, picky!

Well one thing you can be sure of, although this sandwich is not made with thinly sliced prime rib, it is extremely flavorful. The ground beef is seasoned with Montreal Steak Seasoning (my favorite) and the au jus is absolutely divine. Also easy to prepare. And might I add – reasonably inexpensive. Always a nice thing.

So next time you have a pound of ground beef staring at you when you open your freezer door, take it out and make it into one of these sandwiches. You’ll thank me. They are just really, really yummy.

  • 1 lb. extra-lean ground beef
  • 1 T. Montreal Steak Seasoning
  • 2 tsp. extra virgin olive oil
  • ½ c. finely chopped onion
  • 1 garlic clove, finely minced
  • 2 T. dry sherry
  • 1 T. flour
  • 1 tsp. Worcestershire sauce
  • freshly ground black pepper
  • 2½ c. hearty beef broth (I use beef base and water)
  • 1 chewy baguette, cut into individual portion sized pieces, then halved and toasted just before serving

In a small bowl, gently combine the ground beef and Montreal seasoning. (You never want to work ground beef too hard or too long or you lose the wonderful tender quality of the beef.) Shape the meat into long and narrow patties. (Basically you want the meat patties to be just a tad bit larger than the size of your baguette pieces.)

Heat the olive oil in a medium sized frying pan. Fry the patties until they are done to your liking. Remove patties from pan and tent with aluminum foil. Set aside. (And no, they won’t be piping hot when your sauce is ready, but that’s why God gave us microwave ovens. Just don’t nuke them for too long. You want to slightly warm the meat, not over-cook it. No hockey pucks, please!)

Add the onion to the pan. Sauté the onion until slightly caramelized, about 10 minutes. Add the garlic and cook for 1 minute. Slowly add the dry sherry and then the flour, whisking the entire time. Slowly whisk in the Worcestershire sauce, pepper, and beef broth. Bring sauce to a boil, reduce heat, and simmer for about 10 minutes.

When ready to serve, place patties inside prepared baguette pieces and place on dinner plate. Pour the dipping sauce into small individual bowls and set beside the sandwich. Add a nice salad or roasted potatoes or vegetables, and dinner’s served!


SHRIMP APPETIZER OR MAIN COURSE SALAD

I love shrimp salad. But I don’t much care for the tiny, pre-cooked shrimp that are labeled “salad shrimp”. I prefer the nice big guys, lovingly sautéed just before adding to whatever version of a shrimp salad I happen to be preparing at the time. And yes I do know that the biggies are more expensive, but I’d rather have less shrimp if push comes to shove.

So, when good friends Jim and Margo invited us to dinner a couple weeks ago, and I asked what I could contribute, Jim said “how about an appetizer salad?” I said “how about a shrimp salad” and he said yes!!

So this is the result.

And if I do say so myself, it turned out pretty darn tasty. Plus it was very easy to prepare. (I just love it when a recipe comes together and it works! But believe me, that doesn’t always happen. Sometimes I try a dish, and although it is edible, it’s not something I ever want to serve again or pass on to my readers.)  But this recipe is a keeper. It’s terribly elegant when served as an appetizer and just plain wonderful when served as a main dish salad.

Speaking of main dish salads, I simply must tell you about eating a salad for dinner while on our recent trailer trip to British Columbia. (You can stop reading now if all you care about is this recipe. But if you want to hear a bit more about our recent trailer trip, continue reading at your own peril.)

As the pictures below show, we had a fabulous campsite at BCs Juniper Beach Provincial Park on the banks of the Thompson River. Ideal setting with the river so close, but not the ideal backdrop for a quiet dinner. I say, not quiet, because just across the river the main east/west line of the Canadian Pacific Railroad runs about 30 trains over any 24 hour period. And on the side of the river where we were camped, the Canadian National Railroad runs another 30 or so trains a day on their own east/west main line. So in case you are mathematically challenged, that’s a total of about 60 trains blasting our camp site with noise during every 24 hour period. And these are not dainty little trains. These are all incredibly long mother bear trains! Mr. C. counted the cars on a good number of the trains. The longest was 230 cars long! I kid you not! The average size was only about 150 cars long. Only! And many of the cars we counted had a second container on top of the one that was riding the rails. We didn’t even bother counting the second tier freight cars. It was just too overwhelming.

We were at Jupiter Beach for three nights and the trains won, hands down! Before camping at this park, I absolutely adored the clickety-clack of trains, especially at night. But after this episode with the trains from hell, I feel like a new mother just having gone through a difficult childbirth and saying to herself and anyone else who would listen, that never again would she subject herself to such an experience! But I suppose, like childbirth, the memory of “the trains” will fade and I will once again be able to look at a train and not flinch. I hope so. Because for 73 years I have loved trains with a passion. I hope to get back to that place, but frankly only time will tell. (Mr. C. thinks I’m suffering from PTTD (Post Traumatic Train Disorder), and I think he may be right. But good news. I recently read that gin helps with this disorder, so that’s encouraging. If gin truly is the wonder treatment, I should be fine in no time. I’ll let you know if it works.) Enjoy the recipe.

  • 1 T. unsalted butter
  • 1 lb. lg. uncooked shrimp
  • ½ tsp. seasoned salt
  • 1 shallot, minced
  • 1 celery stalk, finely diced
  • ½ c. finely diced red, yellow, or orange bell pepper (or combination of peppers)
  • juice of ½ lg. lime
  • 2 T. mayonnaise
  • freshly ground black pepper
  • 1 tsp. Old Bay Seasoning
  • dash hot sauce or 1 jalapeño, seeds and veins removed and finely diced
  • 1 tomato, seeded and diced
  • 1 Hass avocado, diced
  • romaine or Bibb lettuce leaves

Heat the butter in a medium-large fry pan. Add the shrimp and sprinkle on the seasoned salt. Sauté until the shrimp are just done. Do not overcook. Remove the pan from heat and set aside. Rough chop the shrimp when they are cool.

In a medium sized bowl combine the shallot, celery, bell pepper, lime juice, mayonnaise, salt, pepper, Old Bay Seasoning, and dash of hot sauce/diced jalapeño. Let stand for at least 5 minutes to allow flavors to blend. Taste and adjust seasoning. Gently fold in the chopped shrimp, tomato, and avocado. Adjust seasonings and serve as an appetizer either wrapped in lettuce leaves, heaped on one lettuce leaf, or over cut salad leaves. (See picture above.) Or serve as a main dish salad (see picture below) with whatever amount of cut lettuce you want stirred in with the other ingredients.


BANH MI (VIETNAMESE-STYLE SANDWICH)

OK, confession time. I have never tasted a real Bánh Mì sandwich. (I live on an island, remember! No local Vietnamese restaurant. We’re lucky just to have a half way decent grocery store on the island!) Anyway, our good friend Todd told Mr. C. and me all about his love for Bánh Mì sandwiches while we were enjoying a mini golfing vacation with him and his wife Cindy this last May. Todd just kept saying how much he loved these sandwiches. So sure enough, last week I decided to do some research and see what all the fuss was about. (My best sources were Cooking Light and nytimes.com.) I get it! Even though I have no idea if this recipe comes even close to what a “real” Bánh Mì sandwich should taste like; it is so good I just had to share it with you, regardless if it has as much semblance to a real Bánh Mì sandwich as a “Ritz” apple pie does to a “real” apple pie. I really don’t care. This is simply one very delicious sandwich, call it what you may!

So next time you want to tantalize your taste buds, give this recipe a try. And while you are busy in the kitchen fixing this recipe, I am going to try and find a Vietnamese restaurant less than 60 miles away. And when I do, I am going to order a real Bánh Mì sandwich. If I find that the recipe I have just shared with you has absolutely nothing in common with the real thing, I will do an edit, and call this by some other name, like “Pork Sandwiches with an Attitude” or Pulled Pork Step Aside Sandwiches”.

So, if you happen to be a Bánh Mì aficionada, and have a great recipe you would consider sharing, please send it my way. If we agree it is amazing, I’ll publish it faster than the time it takes to explain how to pronounce segue correctly.

  • 1 med. carrot, julienned
  • 1 small English cucumber, mostly peeled, cut in half, seeded, and thinly sliced
  • 4-5 radishes, very thinly sliced
  • 2 T. unseasoned rice wine vinegar
  • 2 T. sugar
  • ¼ tsp. kosher salt
  • ½ c. mayonnaise
  • 1/3 c. finely chopped green onions, divided
  • 1-2 T. Sriracha or other chili sauce
  • 1 T. vegetable oil
  • 4 garlic cloves, minced
  • 1 lb. ground pork
  • 2 T. Asian fish sauce
  • freshly ground black pepper
  • ½ c. chopped fresh basil
  • finely grated zest and juice of 1 lime
  • 4 individual ciabatta rolls, split, and toasted
  • 1-2 fresh jalapeño peppers, seeded and thinly sliced, opt.
  • mint sprigs, opt.
  • cilantro sprigs, opt.

Toss the carrot, cucumber, radishes, vinegar, sugar, and salt together in a small bowl; let stand at room temperature at least 30 minutes.

Whisk together the mayonnaise, 2 tablespoons of the green onions, and 1 tablespoon of the Sriracha. Taste and add additional Sriracha to liking. Cover and refrigerate until needed.

Heat oil in a large skillet over medium heat. Add the remaining chopped green onion and the garlic. Cook, stirring, for 1 minute. Add pork and cook, breaking up the ground pork with a spatula, until meat is no longer pink. Stir in the fish sauce and black pepper. Remove from heat and stir in the basil, lime zest, and lime juice. Adjust seasoning.  

Cut each ciabatta in half; bake in a pre-heated 400 degree oven for 7-10 minutes or until the bread is nicely heated and crisp.  Lightly spread all of the cut sides of the toasted ciabatta halves with the mayonnaise mixture. (Use it all!) Spread the bottom half of each cut ciabatta with the pork mixture. Press the jalapeño, mint, and cilantro sprigs into the pork. Spoon some drained pickled vegetables onto the sandwiches and serve immediately. Serve any extra pickled vegetables on the side.


BACON CHEESEBURGER PATTIES

OK, I like a good old fashioned bacon cheeseburger as well as the next guy. Maybe even more than the next guy. Add a slice or two of avocado and you have the recipe for my favorite burger.

Now either I’m getting sloppier or restaurant burgers are getting bigger and therefore more unwieldy. Whichever, I seem to always make a horrible mess when I eat a hamburger. Even if I try really, really hard, I usually manage to get hamburger detritus all over the front of me, the table, and whomever I am dining with! (Not a pretty sight!)

So the other day when I wanted to serve a ground beef pattie for dinner, I went on line and found the bones of this recipe on the allrecipes.com site. Of course I had to make a couple of changes, like adding an egg. The organic, open range, loved and pampered cow from whence our ground beef had cometh, was so lean, that if I didn’t know better, I’d swear the cow had been anorexic when butchered. But not to fret. This cow had been loved and well taken care of throughout its short but happy life. (Thank God no vegetarians will be reading this recipe. My reputation as a fairly decent person would dissolve in the time it takes to pop the lid on a container of hummus!) But fellow carnivores, back to this burger.

When I saw this recipe, or the bones for this recipe, I knew that I would love the outcome. And oh my, the burger patties were even better than anticipated. Next time I make them, I am going to serve them on really nice toasted buns (maybe brioche buns), with slices of avocado, red onion, tomato, and lettuce. And dressed with Thousand Island dressing. Yum. I figure if I’m lucky, with the bacon and cheese contained in the burger itself, I have about a 50/50 chance of making less of a mess. Wish me luck.

  • 1 lb. lean ground beef
  • ¼ tsp. seasoned salt
  • freshly ground black pepper
  • ½ tsp. granulated garlic
  • 1 tsp. dehydrated onion
  • 1 T. prepared horseradish
  • 1 egg
  • 4 slices cooked lean bacon, chopped  
  • ½ c. shredded sharp cheddar, pepper Jack, or blue cheese

In a large bowl, mix together the ground beef, salt, pepper, granulated garlic, onion, horseradish, and egg.   When well combined, stir in the bacon and cheese. Shape into 3-4 patties. Preheat your grill. When ready to cook the burgers, lightly oil the grill grate. Place patties on the grill, and cook for 4 minutes per side, or until done to liking. Or fry in a pan. That works too!


CHICKEN, PROSCIUTTO, AND PARMESAN CHEESE SALAD

While we were on our last RV camping trip to Eastern Oregon and Eastern Washington (remind me to tell you someday about watching a rattlesnake being killed on the site across from ours) I decided that upon our return I would start working on summer salads perfect for taking on picnics. (And no, none of them include baked rattlesnake even though I’ve heard it tastes a lot like chicken.)

So last evening I prepared this salad. (Unfortunately we couldn’t get away for an actual picnic because of time restrictions and uncooperative weather, but none the less we persevered.)

Anyway, this salad was just plain delicious. Mr. C. really loved it. (I think it’s probably the crispy prosciutto that really won him over.) Regardless, he said he could eat it any old time I wanted to fix it. (Always a good indication that he really likes something.) And truly, what’s not to like? The salad in and of itself is wonderful. But when topped with moist and tender chicken, crisp prosciutto, shaved Parmesan, and croutons, well it’s just a flavor burst with every bite. And, a meal unto itself. (I’m getting fonder and fonder of one dish meals. Part of getting older I’m sure!)

So while it’s still summer, whip up one of these salads and dine al fresco. Doesn’t need to be up in the mountains or next to water. Can be on your deck, patio, or lanai. Anywhere that reminds you that summer is the bomb. (Of course, if you live in a South Western state and the air temperature is 118F, you might want to stay inside cuddled up to your air conditioner.) But for those of us that live for long days, no rain, and temperatures in the 70s, it’s outside dining as much as possible.

So enjoy the rest of your summer. Stay cool. Go on picnics. Eat salads. (That’s my bonus recipe for a wonderful way to stay both healthy and happy.)

  • 1 T. fresh lemon juice
  • 1 tsp. Dijon mustard
  • ¼ tsp. kosher salt
  • freshly ground black pepper
  • 1 T. minced shallots
  • ¼ c. extra virgin olive oil
  • cooking spray
  • 4 thin slices prosciutto
  • 4 c. baby arugula
  • 1 romaine heart, chopped
  • ½ c. grape or cherry tomatoes, halved
  • 1 cooked boneless, skinless chicken breast, cubed or shredded (I use my recipe for Baked Boneless, Skinless Chicken Breasts (see recipe below) or when I’m feeling lazy, one of the chicken breasts from a Costco rotisserie chicken)
  • 1/3 c. shaved Parmesan, Asiago, or Pecorino Romano cheese
  • 1 c. croutons (see recipe below if you want to make your own croutons)

Whisk together the lemon juice, mustard, salt, pepper, and shallots. Slowly add the olive oil and whisk until emulsified and thickened. Adjust seasoning. Set aside.

Spray a small amount of cooking spray on a medium sized fry pan or griddle. Add prosciutto; sauté over medium heat for about 4 minutes or until the prosciutto is crisp. Remove from pan and drain on paper towels. When cool break into bite sized pieces.

When ready to serve, toss together the arugula, romaine, tomatoes, and chicken in a medium sized salad bowl. Add enough dressing to moisten the ingredients, but not drown them. (You may have extra dressing. All the better to use on another salad later in the week.) Scoop onto 2 dinner plates. Sprinkle on the cooked chicken, crispy prosciutto, shaved cheese, and croutons. Serve immediately.

This dish is loosely based on a recipe in the Cooking Light magazine.

BAKED BONELESS, SKINLESS CHICKEN BREASTS

  • 1 qt. warm water
  • ¼ c. kosher salt
  • 8 whole black peppercorns
  • 1 T. brown sugar
  • 2 garlic cloves, sliced
  • 4 boneless skinless chicken breasts, halved
  • 1 T. extra virgin olive oil
  • 1 tsp. seasoned salt
  • freshly grated black pepper
  • 1 tsp. granulated garlic
  • 1 tsp. paprika

Combine the warm water, kosher salt, peppercorns, brown sugar, and garlic cloves in a 9×13-inch glass baking dish. Whisk the mixture until it looks like most of the salt is dissolved.  Add the 8 pieces of chicken breast and let them sit in the mixture for 30 minutes. Remove from the brine, rinse with cold water, and pat as dry as possible with paper towels. 

Using the same pan, washed and dried of course, place the chicken breasts in a single layer. Pour on the olive oil. Using your hands, best tool in the kitchen BTW, massage the oil all over the chicken. Wash your hands and mix together the seasoned salt, pepper, granulated garlic, and paprika. Sprinkle the mixture evenly over both sides of the chicken.

Bake in a pre-heated 450 degree oven for 15-18 minutes or until the chicken is cooked through and no longer pink.  If you use an instant read thermometer to measure the temperature at the thickest part of the breast, it should read about 170 degrees. Remove from oven, loosely tent with aluminum foil, and let rest for at least 5-10 minutes before serving.

GARLIC CROUTONS

Chop up some small bite sized pieces of a chewy, artisan baguette. Place in a frying pan with butter or olive oil (or a combination) and sauté until each crouton is crunchy. (This takes about 45 minutes because you need to go low (heat) and slow.) Add more butter or oil as needed. When desired crunchiness is attained, sprinkle with granulated garlic. Allow to cool completely before placing in an airtight container.


BAKED BONELESS, SKINLESS CHICKEN BREASTS

Yah, yah, yah! I know at this time of year I should be posting a recipe for grilled chicken breasts, but hey – I’m lazy. It’s just so much easier to pop chicken breasts in the oven than heat the grill, go back and forth to the grill, and then clean the grill. Like I said, I’m lazy. And truthfully, heating up our grill for 4 chicken breasts just seems kind of wasteful. Well not so much of propane, because both grilling and firing up our oven require propane, but of Mr. Cs time and energy to clean the grill.  

So, if you will forgive me this crime against summer grilling, I will share with you one of the best ways to ensure a flavorful and moist piece of meat. The chicken is wonderful all by itself, but also perfect used in your favorite recipes that call for cooked chicken.

So give this recipe a try. And yes I know this recipe is not as easy as just slapping the chicken breasts on a sheet pan, sprinkling them with a little salt and pepper, and throwing the whole mess in the oven. This recipe takes a little time and planning. But please believe me, the time your chicken breasts spend in a warm soothing bath is well worth the effort. When prepared this way, the meat will practically melt in your mouth. And isn’t that so much better than trying to swallow a piece of meat that really should be classified as “chicken jerky”. (Believe me, I have made more than my share of chicken “jerky” in my time. I’m just sad it took me this long to figure out what I was doing wrong!)

Anyway, I hope you profit from my quest for a better cooked chicken breast. And don’t hesitate to share your new found knowledge with everyone you know. After all, brining isn’t just for turkeys anymore. It’s also absolutely wonderful with pork.

And should you wonder if it would work to grill the chicken rather than baking it, please give it a try. If it turns out just great, just let me know so I can feel even guiltier about being such a lazy daisy.

  • 1 qt. warm water
  • ¼ c. kosher salt
  • 8 whole black peppercorns
  • 1 T. brown sugar
  • 2 garlic cloves, sliced
  • 4 boneless skinless chicken breasts, halved
  • 1 T. extra virgin olive oil
  • 1 tsp. seasoned salt
  • freshly grated black pepper
  • 1 tsp. granulated garlic
  • 1 tsp. paprika

Combine the warm water, kosher salt, peppercorns, brown sugar, and garlic cloves in a 9×13-inch glass baking dish. Whisk the mixture until it looks like most of the salt is dissolved.  Add the 8 pieces of chicken breast and let them sit in the mixture for 30 minutes. Remove from the brine, rinse with cold water, and pat as dry as possible with paper towels. 

Using the same pan, washed and dried of course, place the chicken breasts in a single layer. Pour on the olive oil. Using your hands, best tool in the kitchen BTW, massage the oil all over the chicken. Wash your hands and mix together the seasoned salt, pepper, granulated garlic, and paprika. Sprinkle the mixture evenly over both sides of the chicken.

Bake in a pre-heated 450 degree oven for 15-18 minutes or until the chicken is cooked through and no longer pink.  If you use an instant read thermometer to measure the temperature at the thickest part of the breast, it should read about 170 degrees. Remove from oven, loosely tent with aluminum foil, and let rest for at least 5-10 minutes before serving.

Please note: This recipe can be halved, doubled, tripled etc. with no ill effect. In fact, the picture shown is of only 2 chicken breasts.


GREEK GROUND CHICKEN MEATBALLS WITH TZAZIKI SAUCE

Sometimes dishes get served before I have a chance to take a picture. That’s exactly what happened at a recent pre-concert JazzVox meal. Before I could take a picture of these meatballs based on a recipe from the Juicy Bites website and the tzatziki sauce (my recipe from about 25 years ago), they were history.

So the next time I serve this delicious combination, I will take a picture. But for now you will just have to content yourself with a mental image of light colored baked meatballs, smothered with a white sauce with green things in it, aka – tzatziki.

Now most of you know that I love chicken and serve it a lot. But chicken can be a bit boring. Well I’m here to tell you, there is nothing boring about these meatballs. The mint and the dill give the dish a unique flavor, and when slathered with tzatziki, well frankly, there is just nothing finer. (Actually, I think dog kibbles would taste good if they were slathered in tzatziki. But I’m not going to stand behind those words; just offer them up as a lazy summer afternoon rumination.)

So next time you want to serve ground chicken or turkey (I use ground turkey as much as I use ground chicken), give this recipe a try. Serve the meatballs and tzatziki with a savory pilaf, a crunchy Greek Salad, and a beautifully chilled bottle of white wine, and you will have captured the wonderful flavors and essence of Greek dining. Huh? Maybe Greece should be our next overseas adventure. Time to buy a couple travel books and see if Greece meets our criteria as a perfect travel destination. We love to visit countries with an ancient culture, beautiful art and architecture, interesting museums, pleasing climate, fun and friendly people, and of course – fantastic food. Wait! I don’t need a travel guide to tell me that Greece would be perfect for us. I already know all of our travel desires would be met in Greece. So, time to make a plan and present it to Mr. C. I know, I’ll serve up my idea along with a meal as described above, and I’ll bet you he’ll be searching our calendar for dates within an hour. Wish me luck! And enjoy the meatballs.

At the bottom of the post you will find 2 pictures of our orange cat Miles. The first picture shows Miles sound asleep on our catwalk. No problem, right? Wrong! The second picture shows why his sleeping at the end of the catwalk is of concern. It’s 9 feet down if our little darling were to fall. And since that part of the catwalk is above the bottom of the stairway, there is no way for either of us to fetch him. And no, when I designed our home Max and Miles were not even a glimmer in their papa’s eyes. We had another pair of orange brothers who were very coordinated and we never worried about them falling.

A little background. Miles and his brother Max are two of the least coordinated and skittish cats we have ever had the pleasure of owning. They can fall off the back of a couch and land on their backs at the slightest movement that might be threatening, like Mr. C. turning a page in his book, or me walking by with a glass in my hand. So the thought of either one of the brothers being startled awake while on the catwalk and reacting quickly to a perceived threat always scares the pickles out of me. And since I’m sure you want to know, Miles survived his nap and my heartrate is back to normal.

  • ½ c. panko bread crumbs
  • 1/3 c. whole milk
  • 1 small onion, finely minced
  • 2 garlic cloves, finely minced
  • ¼ c. finely chopped Italian parsley
  • ¼ c. finely chopped mint leaves
  • 3 T. finely chopped fresh dill
  • 2 tsp. dried oregano (Mexican preferably)
  • 2 tsp. kosher salt
  • freshly ground black pepper (not too much)
  • 2 eggs
  • 1 T. extra virgin olive oil
  • zest and juice of 1 small lemon
  • 2 lbs. ground chicken or turkey

Pour the milk over the panko bread crumbs in a large bowl and stir until liquid is absorbed. Add the onion, garlic, parsley, mint, dill, oregano, salt, pepper, eggs, olive oil, and lemon zest and juice. Mix together with a fork until well blended. (I use the large serving fork that came with my silverware set. Works great!) Add the ground chicken and stir with the same fork until just blended. (Do not overwork the meat.)

Using a small ice cream scoop, shape the balls and place on a baking sheet lined with foil and coated with non-stick cooking spray.  Bake in a pre-heated 400 degree oven for about 20-25 minutes until just done. (Do not overbake or the meatballs will be dry.) Serve with tzatziki sauce. Recipe below.

TZATZIKI  

  • 2 T. extra virgin olive oil
  • 2 c. plain Greek Yogurt
  • 3 small or 2 medium garlic cloves, finely minced
  • 1½ tsp. chopped fresh dill or ½ tsp. dill weed
  • ¼ tsp. kosher salt, or more to taste
  • freshly ground black pepper
  • 1 English cucumber, partially peeled, seeded, and grated

Combine all ingredients. Adjust seasoning. Cover and refrigerate until ready to serve.

Garlic trick:

If you are using fresh garlic in a recipe, but would like to reduce a bit of the “garlic bite”, place the peeled garlic cloves in a small bowl and cover with milk. Warm the cloves in your microwave, but do not cook them. Then remove the cloves from the milk and slice or mince according to your recipe. You will find that the flavor is still there, but the bite has mysteriously disappeared.