Category Archives: MAIN DISH RECIPES

CREAMY BAKED PASTA PRIMAVERA

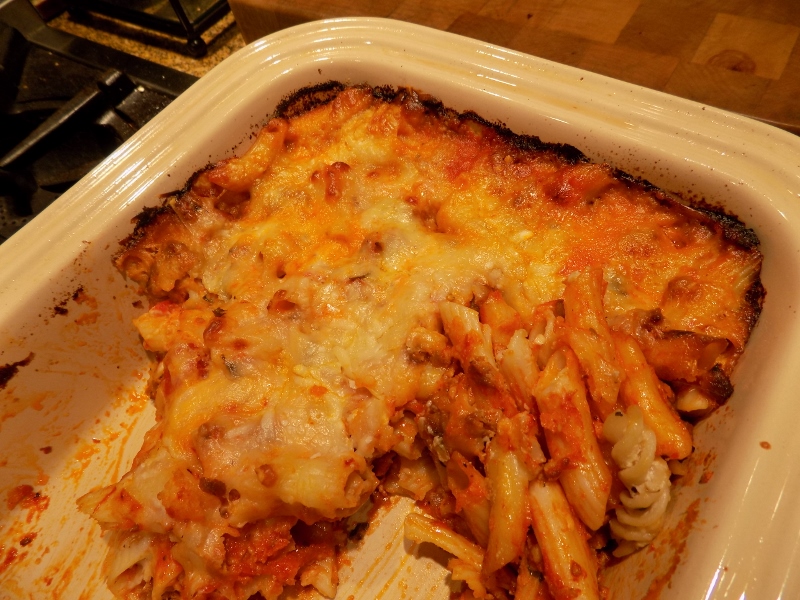
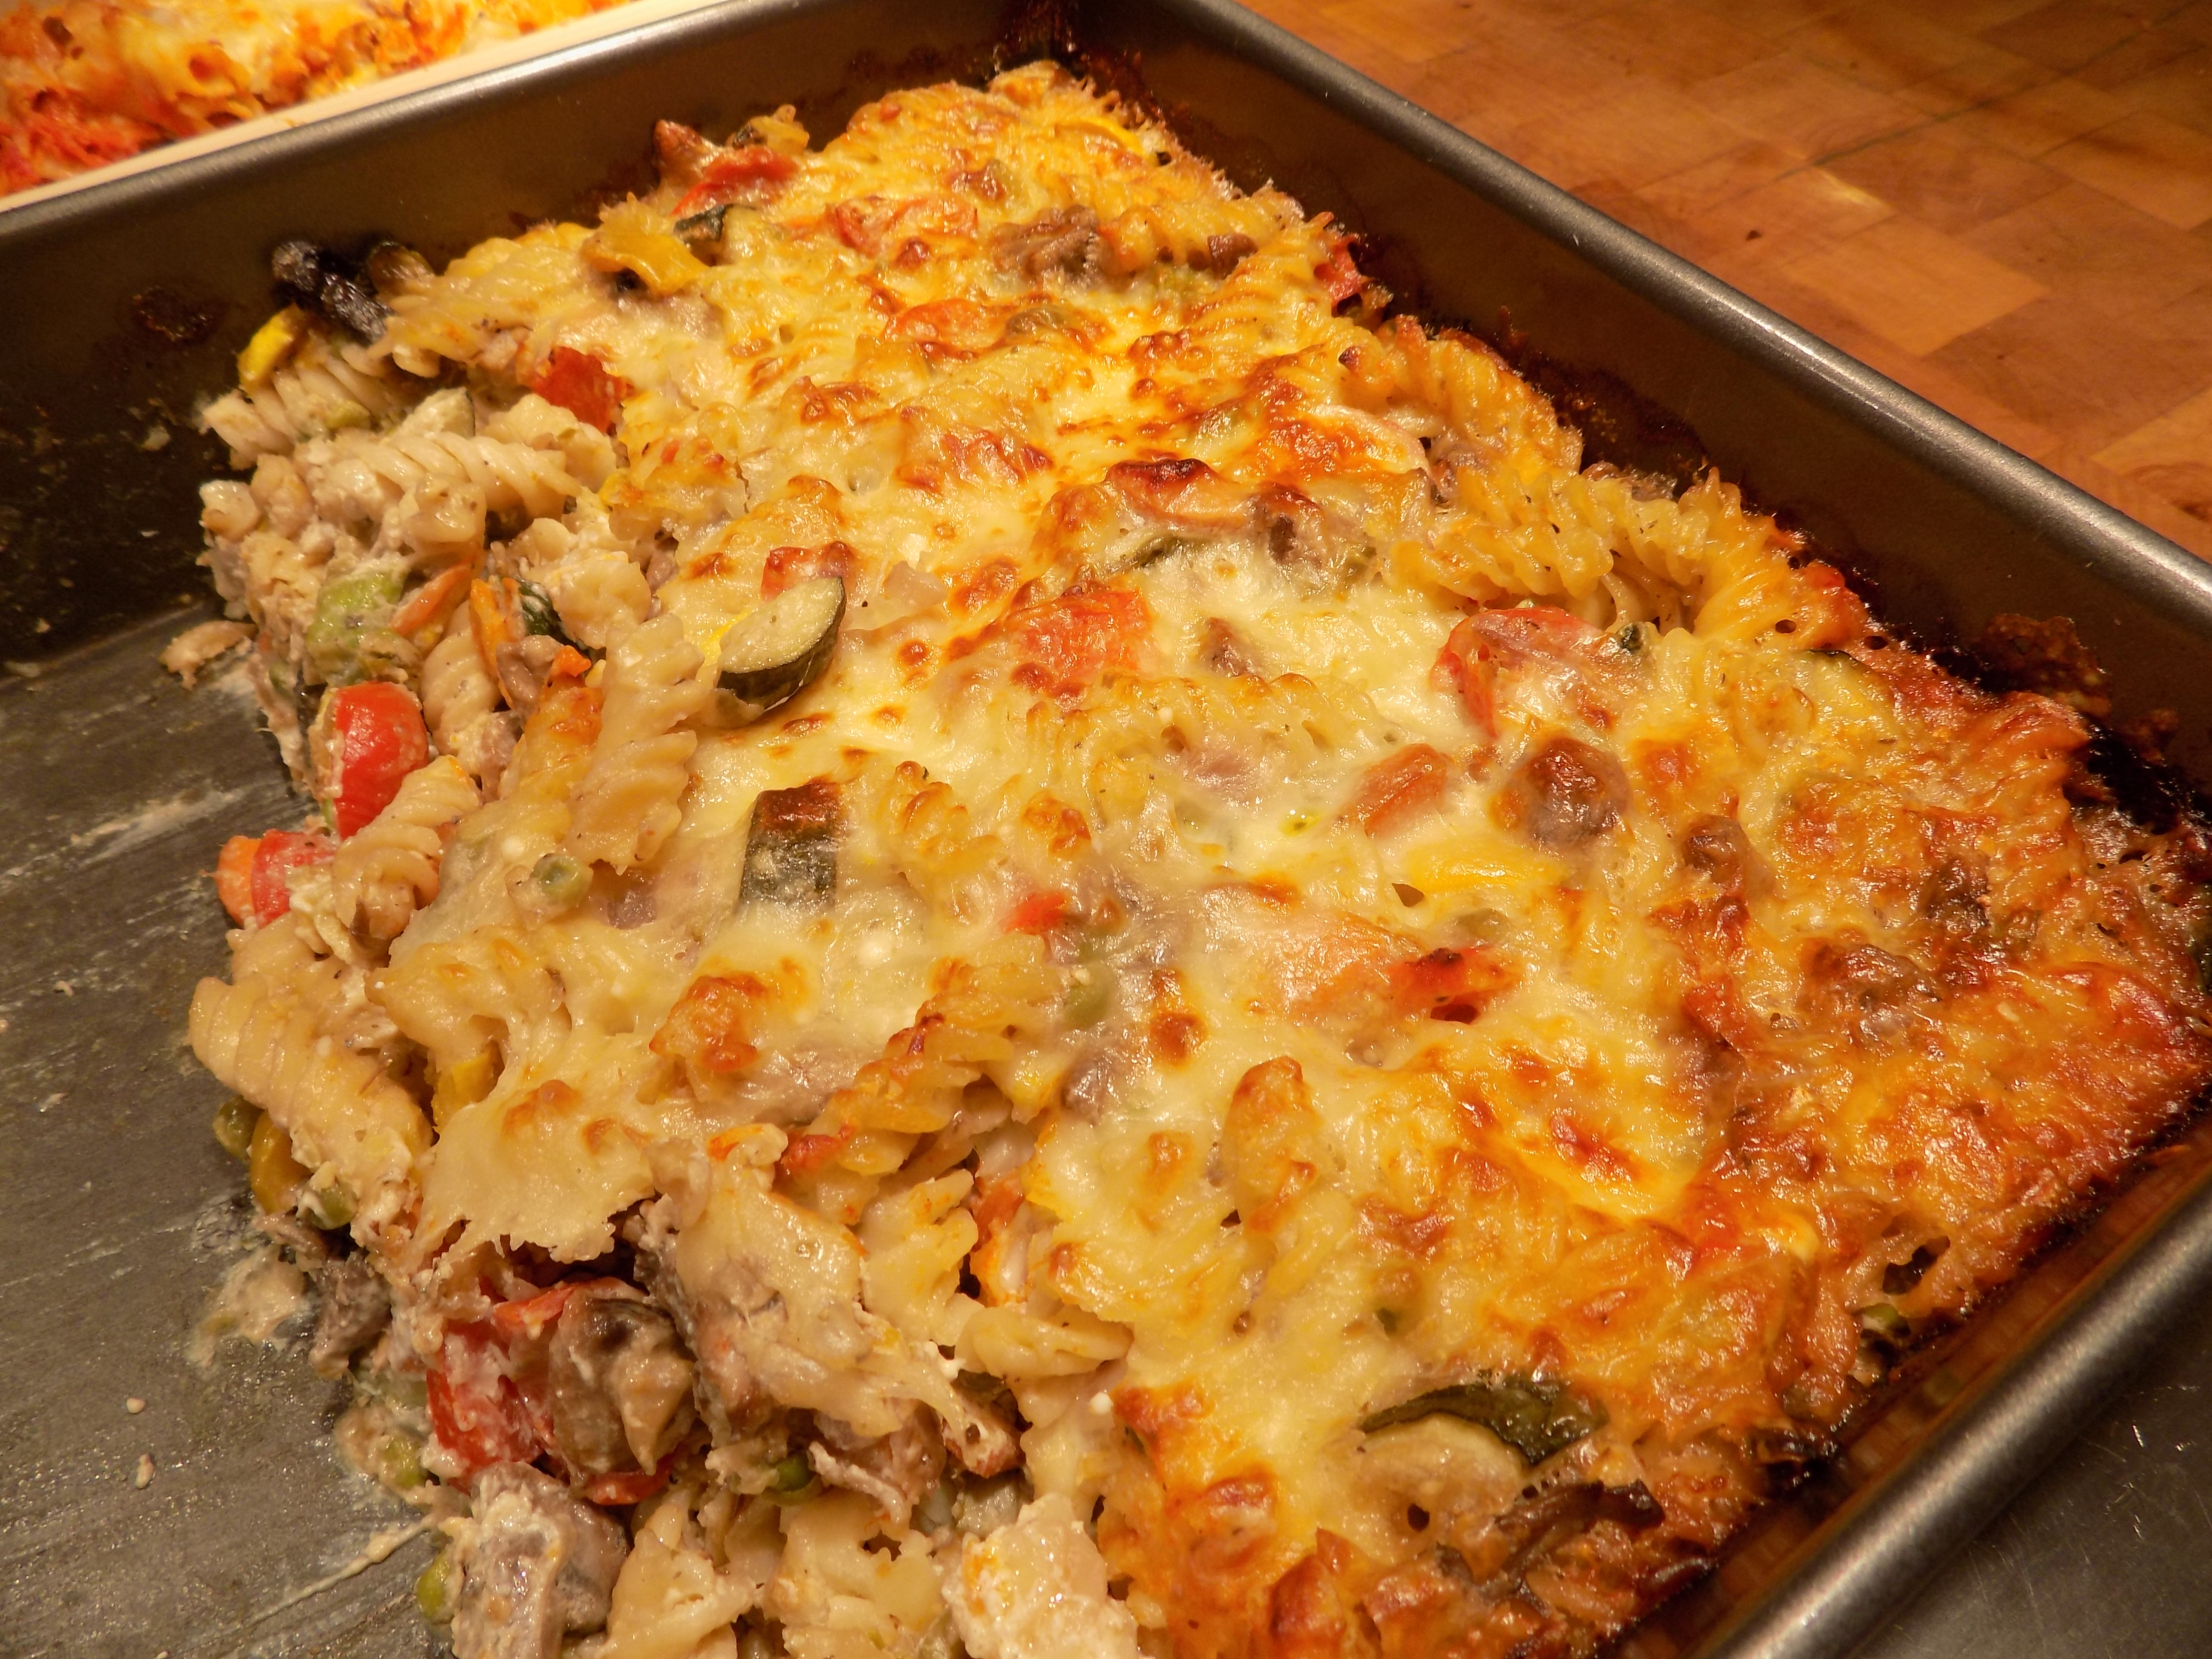
In my quest for vegetarian options to offer family and friends, I threw caution to the wind and glommed together this recipe for a primavera in the form of a casserole/lasagna want-to-be. (Too lazy to use lasagna noodles, so used fusilli instead.) (Coincidentally, using fusilli pasta is easy to serve. That always works for me!)

Now, at first glance you might think this recipe very time consuming to fix. But if you study the preparation instructions you will find that actually this dish comes together relatively quickly. Nothing fancy happening in any of the steps. And oh the results. If you are a veggie and cheese lover like I am, this is a dish you will love from first bite.

Now I’m not going to tell you that just because veggies are the star of this show, that this is a nutritionally perfect pasta dish. Yes the veggies are marvels of nature, but the butter, whipping cream, and various cheeses offset some of the benefits gained by “eating your veggies”. But once in a while, every mouth deserves a break from the mundane. And if you are going to indulge every so often, at least you can eat something with some nutritionally redeemable qualities at the same time. (That’s my theory and I’m sticking to it!)

So chop us some of your favorite veggies. (Be inventive and use the veggies you like best.) Grate some cheese, and al dente you up some pasta. (Use your favorite pasta. Doesn’t have to be fusilli.) Stir them all together, throw the whole mess in the oven, and serve yourself up a treat.

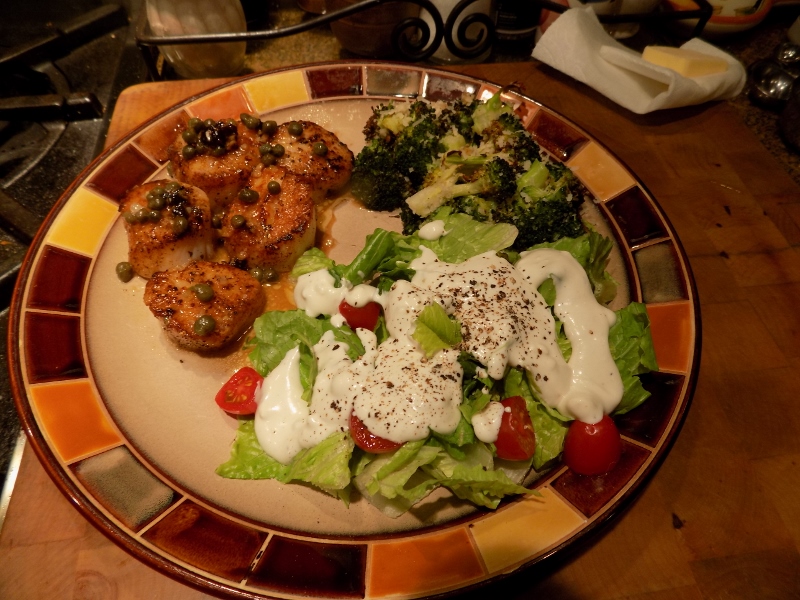
Perfect served with a nice crisp green salad and some chewy Italian bread. 

  • 3 T. extra virgin olive oil, plus more as needed
  • 1 sm. carrot, halved lengthwise, then thinly sliced into half rounds  
  • ½ yellow onion, chopped
  • ¼ red onion, chopped
  • ½ bunch asparagus, sliced into diagonal ¾-inch pieces
  • 1 red pepper, seeded and sliced into thin strips
  • 14-16 button mushrooms, thinly sliced
  • 1 sm. yellow summer squash, cut into ¾-inch pieces
  • 1 med. zucchini, cut into ¾-inch pieces
  • 3 garlic cloves, minced
  • ¼ tsp. kosher salt
  • freshly ground pepper
  • 1 c. halved small cherry or grape tomatoes
  • ½ c. unsalted butter (1 stick)
  • 1 c. heavy whipping cream
  • 1 c. whole milk
  • 4 oz. (½ lg. pkg.) cream cheese
  • 1½ tsp. Italian seasoning
  • 2 c. grated Parmesan cheese
  • 1 c. frozen petite peas
  • ¾ lb. fusilli pasta, cooked al dente  
  • vegetable broth or pasta water, as needed
  • 1 c. grated mozzarella cheese

In a large skillet, heat the olive oil over medium heat. Add the carrot and sauté for about 4 minutes. Add the yellow onion, red onion, asparagus, red pepper, and mushroom slices. Sauté until all the veggies are crisp tender, about 4-5 minutes. Add the squash and zucchini and sauté for a couple of minutes. Add the garlic, salt, pepper, and tomatoes; cook for 1 minute. Remove pan from heat; set aside.

In a saucepan set over medium heat, whisk together the butter, heavy whipping cream, milk, and cream cheese until the butter melts and the sauce is smooth and starting to thicken, 3-5 minutes. Remove from heat and add the Italian seasoning and grated Parmesan cheese. Adjust seasoning.

In a large bowl, combine the peas, cooked veggies, sauce, and al dente pasta. If the sauce needs a little more liquid, stir in a small amount of vegetable broth or pasta water.

Lightly grease a 9×13-inch baking dish and scoop in the pasta mixture. Pat down a bit and sprinkle with the grated mozzarella.

Bake in a pre-heated 375 degree oven for 30-40 minutes or until the entire dish is heated through and the mozzarella is melted and turning a light golden brown.

Please Note: If you are making this dish ahead of time, let each part of the recipe come to room temperature before mixing together. Cover and refrigerate until about an hour before you place in pre-heated oven.


OLD FASHIONED MEATLOAF

Having just returned from a month long trailer trip that was relaxing and invigorating at the same time, I decided that the JazzVox lunch menu for this past Sunday would be comfort food. (And yes, I cook a lot of comfort food, but that’s just who I am.) And it turns out – I am not alone. Many of our guests thanked me for cooking a couple of classic comfort dishes that brought back memories of days gone by.

So this meatloaf is my recipe for one of the dishes I prepared regularly for my children as they were growing up.

Now after you look at the ingredients, you will notice that not all are fresh. Dried parsley and granulated garlic are not only perfect for this recipe, they are also easy. Take the lid off a jar and measure. Simple. You could of course use fresh parsley and garlic, but this is comfort food, and part of the comfort for me is in the ease of preparation!

Then of course, there’s the topping. Now if that isn’t retro, I don’t know what is! But it works. And it has lasting appeal.

Now, if you haven’t used savory before, you are in for a treat. Savory is native to the Northwest and can be described as a cross between thyme and mint, with a bit of marjoram thrown in for good measure. It has an earthy flavor and is absolutely perfect in soups, stews, meat dishes, and stuffing.

So give this simple meatloaf recipe a try. It will take hardly any time to prepare, and you probably will have planned-overs. That too is comfort my friends. Talk about a win/win situation!

(BTW – Creamy Mac and Cheese was the other comfort food I served. Check it out too.)

  • 1 c. finely chopped onion
  • ½ c. dried bread crumbs (I use Italian breadcrumbs)
  • 1 T. dehydrated parsley
  • 1 tsp. seasoned salt
  • 1 tsp. granulated garlic
  • freshly ground black pepper
  • ¼ tsp. ground savory
  • 1 lg. egg
  • ¼ c. milk
  • 1 lb. bulk sausage (breakfast or sweet Italian)
  • 1 lb. lean ground beef
  • 2 T. brown sugar
  • 1/3 c. ketchup

In a medium large bowl, stir together the onion, bread crumbs, parsley, seasoned salt, granulated garlic, pepper, savory, egg, and milk. Gently stir in the sausage, then the ground beef. (Don’t overwork the mixture.) Form into 2 loaves and place on a small rimmed baking sheet.

Bake for 30 minutes in a pre-heated 350 degree oven. Remove from oven and spread with brown sugar and ketchup that have been stirred together. Return pan to oven and bake for another 20 – 25 minutes. (Don’t over bake.) Internal temperature should be 155-160 degrees.

BAKED PUTTANESCA WITH BÉCHAMEL SAUCE

I love puttanesca, but when you plan to serve it to a small army, serving the sauce over perfectly cooked pasta is for a cook with a lot better kitchen skill set than I possess! So what to do? Well, since I was already preparing a béchamel sauce for one of the other pasta dishes I was serving, I thought “what the heck”, why not make a puttanesca casserole too. So that’s just what I did. And it turned out pretty darn good. So that is the genesis of this recipe. (I tell you, necessity is indeed the mother of invention!)

I was slightly worried that the pasta bake would be too rich. But given that there is no meat in a puttenesca sauce, and a sharp bite from the Kalamata olives, capers, and red pepper flakes, it was just right. Of course the three different cheeses didn’t hurt either. They just helped with the creamy part. So all and all, a good dish to serve a crowd. And you can make it ahead of time. (The only way I can feed 30 some people at 1:00 in the afternoon!)

So if you like puttanesca and would like to serve it as a casserole, give this recipe a go. It is perfect company food, although I don’t think Mr. C. is going to think of it in that way. (That man loves his pasta.)

I also plan to make this dish using an arrabiata sauce instead of puttanesca sauce. I see no reason why it wouldn’t adapt well to a pasta casserole with a béchamel sauce layer. For my recipe for arrabiata sauce, see Pasta with Arrabiata Sauce on this site.

So dear readers, as in all of my recipes, make them your own. If you already have a favorite puttanesca sauce recipe, use it in this dish. Or change my recipe any way you like. I promise I will not be offended. After all, that’s what I do with other people’s perfectly good recipes all the time. I just want to provide you with ideas to make your job as family cook easier. I know I’ve said it before, but good food is a wonderful way in which to let your family and friends know in how high a regard you hold them.

So spend time in the kitchen. Make it a pleasure rather than a chore. Try new recipes. Use fresh and healthy ingredients. Be creative. But most of all, have fun in your kitchen. After all, it really is the center of your home.

  • 3 T. extra virgin olive oil
  • 1 med. onion, chopped
  • 4 garlic cloves, finely chopped
  • ¼ tsp. dried red pepper flakes, or more to taste
  • 2-oz. can anchovy fillets (or 10-12 fillets) 
  • 16 oz. can tomato sauce
  • 16 oz. can diced tomatoes (preferably Italian)
  • 18-20 Kalamata olives, sliced
  • 2 T. drained capers
  • 2 T. chopped fresh parsley
  • 4 T. butter
  • ¼ c. flour
  • 2½ c. whole milk
  • ¼ tsp. kosher salt
  • freshly ground black pepper
  • 1 c. grated provolone cheese
  • 1½ c. grated Parmesan cheese, divided
  • ¾ lb. penne or rigatoni pasta
  • 1 c. shredded mozzarella cheese

In a medium covered saucepan, heat the olive oil and add the onion. Fry until the onion is translucent. Add the garlic and red pepper flakes. Sauté for one minute. Add the anchovy fillets and stir them around with the other ingredients until they are all mushed up. Add the tomato sauce and diced tomatoes, cover the pan, and simmer for about 15 minutes. Stir in the olives, capers, and fresh parsley. Remove from heat.

Meanwhile, melt the butter for the béchamel sauce in a heavy saucepan over low heat. Whisk in the flour and cook for 3-4 minutes or until the flour starts to turn a delicate golden brown. Slowly whisk in the milk and simmer until the sauce thickens and comes to a boil. Boil for one minute. Remove from heat and add salt, pepper, provolone cheese, and 1 cup of the Parmesan. Set aside.

Before cooking the pasta, have all the other ingredients prepped and ready to go. Cook the pasta in boiling salted water until al dente (firm to the bite). Remove from heat. Don’t drain. Leave the pasta in the water as you assemble the pasta bake. Remove the pasta as needed with a slotted spoon.

Spread just a smear of the puttanesca sauce on the bottom of a buttered 9×13-inch, fairly high sided casserole dish. Place 1/3rd of the pasta in a single layer on top of the sauce. Spread 1/3rd of the puttanesca sauce over the pasta. Spread 1/3rd of the béchamel sauce over the puttanesca sauce. Sprinkle 1/3rd of the remaining ½ cup Parmesan cheese and 1/3rd of the shredded mozzarella over the béchamel sauce. Repeat. For the final layer, add the remaining pasta, puttanesca sauce, béchamel, and cheeses. Cover the casserole with a piece of aluminum foil that has been sprayed with non-stick cooking spray.

Bake for 30 minutes in a pre-heated 375 degree oven. Remove the foil and bake for an additional 15 to 20 minutes, or until the pasta bake is bubbly and the cheese is completely melted and starting to brown. Remove from oven and let stand 8-10 minutes before serving.

Note: This dish can be assembled, covered, and refrigerated for up to 3 days before baking. It can be frozen for up to 1 month. Bring to room temperature before baking. (This takes about 1-3 hours, depending if the casserole has just been refrigerated, or if it is just out of the freezer.)


HAMBURGER STEAK WITH MUSHROOM ONION GRAVY

Quick and easy meals appeal to me more and more as I approach middle age. (Middle age – right!?!?) Well isn’t 73 the new 53? Apparently only in my mind, because my body sure as heck isn’t going along with my brain on this one!

So when my body won the other evening after a long and arduous day, my mind decided to go along for the ride and helped me remember all the ground beef I have in my freezer.

So this dish is the result of a whole body agreement. And every part of my body must have been in sync because this dish turned out really yummy. And oh so easy to prepare. I served it with a simple mixed rice mixture cooked in my rice cooker, and warmed petite peas. So without even breaking a sweat, I had dinner on the table before my martini was finished.

So if you love ground beef and mushrooms, give this recipe a try. It’s comfort food to the max. It is also quite an economical dish to serve. And I can’t imagine my own children not thinking this was wonderful, especially if I served it with mashed potatoes.

So give this recipe a try. You will be reminded once again that even a meal that comes together quickly can be delicious.

  • 3 T. extra-virgin olive oil, divided
  • 1 tsp. Worcestershire sauce
  • 2 tsp. Montreal Steak Seasoning
  • ¼ tsp. kosher salt
  • freshly ground black pepper
  • 1 lb. lean ground beef  
  • 1 c. chopped onion  
  • 8-12 sliced button mushrooms
  • 1 lg. garlic clove, finely minced
  • 1 T. unbleached, all-purpose flour
  • 1 c. beef broth
  • 1 T. Cognac, opt.  
  • parsley, garnish

Whisk 1 tablespoon of the olive oil, Worcestershire sauce, Montreal seasoning, salt, and black pepper together in a bowl. Add the ground beef and gently mix until well combined. (You never want to mix the meat too much or too hard. Over mixing makes the meat tough.)

Using your hands, shape the mixture into 3-4 patties. (Again, don’t mess with the meat too much. No scrunching or tightly pressing the meat into patties allowed.) 

Heat a large skillet over medium-high heat. Add the remaining 2 tablespoons of olive oil. Sear the burgers on both sides to create a nice “crust” on the burgers. Remove burgers from skillet and place on a plate. Set aside. (The burgers will not be done at this point.)

Add the onion and mushrooms to the pan; sauté until tender and golden. Add the garlic and cook for 1 minute.

Sprinkle in flour and cook until golden, stirring constantly. Slowly whisk in broth. Turn off heat and add the Cognac. Adjust seasoning. Turn on heat and bring gravy to a simmer. Add the hamburger patties and cook until the gravy is thickened and the burgers are cooked to your liking. Garnish with parsley. Serve immediately.


SEARED SCALLOPS WITH A “PICCATA” SAUCE

One day while thinking about what I would serve for dinner, I thought about Chicken Piccata. But we had just had chicken the night before, and there really is such a thing as “too much of a good thing”. But the “piccata” part still lingered in my mind. So what about seafood in piccata sauce? Perfect!

And then, what about scallops for the seafood part? Again – perfect. So off to our local grocery store for some individually flash frozen scallops. (And yes, scallops that have been individually flash frozen are delicious. In fact, I have purchased “fresh” scallops thinking they would be better than those that had been flash frozen, just to find the fresh scallops seriously past their prime. Whereas, buying flash frozen scallops, I have never been disappointed.)

But, a couple of things to look out for in flash frozen scallops – ice crystals or evidence of freezer burn. If either of these two things are present, walk away. But if the scallops look good, go for it. It is best to defrost the scallops overnight in the refrigerator. But if you are like me, and usually only have a short time before wanting to cook these delicious babies, seal them in a freezer bag and place the bag in a bowl of cold (never warm or hot) water until they are defrosted.

Then assemble and measure all of your ingredients before you even think of turning on your stove, because the whole process of cooking the scallops goes very quickly. (You really don’t want to be squeezing the lemon juice while the scallops are cooking, for example.)

So some evening when you feel you are worthy of a special dinner, make this simple dish as your reward for good behavior. Believe me, if I could fix this dish for some of the politicians currently in office, with their promise that they would begin acting in a more dignified and concerned manner, I’d leave on a jet plane this afternoon. But promises from Washington DC seem to be about as reliable as a chocolate teapot or a support bra without under wires! So I guess I’ll just leave that sleeping dog lay and fix this dish for the more deserving. So, hope you give this recipe a try. And if you love Chicken Piccata, there’s a pretty darn good recipe already on this site.   

  • 1 lb. fairly large sea scallops (about 10)
  • ½ tsp. kosher salt
  • freshly ground black pepper
  • 3 T. unsalted butter, divided
  • 1 garlic clove, minced
  • 1 T. dry white wine
  • 2 T. fresh lemon juice
  • 1 T. capers, drained
  • 2 tsp. chopped parsley, opt.

Pat scallops dry with a paper towel and sprinkle with salt and pepper. Melt 1 tablespoon of the butter in a large, heavy skillet over medium-high heat. Add seasoned scallops and sear for about 2 minutes on each side. The bottom and top should be a lovely golden brown.

(You don’t want to cook scallops too long or they will be tough. It’s actually better to cook them a bit on the underdone side.)

Transfer the scallops to a serving plate and cover loosely with aluminum foil to keep warm.

Melt remaining 2 tablespoons butter in the same skillet. Add garlic; cook for 1 minute. Whisk in the white wine and remove skillet from heat. Whisk in the lemon juice and capers.

Spoon sauce over scallops, garnish with parsley, and serve immediately.


EASY CUBED CHICKEN TERIYAKI

Sometimes I get a wild hair to cook an Asian dish. And one day last week was no exception. I think I love Asian food because I adore soy sauce. There is just something about the saltiness that sets my taste buds singing. So on the morning of my “wild hair” day, I decided it was time for a chicken dish. And just happening to have a couple packages of organic chicken breasts in my freezer, I thought longingly of teriyaki chicken. So I went about searching for teriyaki recipes.

I found plenty of recipes, but none were just what I wanted. Many started with bottled teriyaki sauce, but that wasn’t what I was after. I wanted an easy recipe using simple everyday ingredients that could be thrown together in a reasonably short time. I also wanted some veggies in with the chicken. So I came up with this recipe.

The sauce is not overpowering, the cashews add a nice creamy crunch, and the pinch of red pepper flakes gives the dish a subtle spiciness. All together a tasty and easy dish that should appeal to even the pickiest of eaters.  

  • 1/3 c. low-sodium Tamari or soy sauce
  • ¼ c. rice wine vinegar
  • 2 tsp. sesame oil, divided
  • 1 T. brown sugar
  • 2 cloves garlic, minced
  • 2 tsp. finely minced fresh ginger
  • 2 tsp. cornstarch
  • 1 T. extra-virgin olive oil
  • 1 lb. boneless skinless chicken breast meat, cut into bite-sized pieces
  • ½ tsp. kosher salt
  • freshly ground black pepper
  • pinch crushed red pepper flakes
  • 1 carrot, cut into half or quarter rounds
  • ½ c. chopped onion
  • ¼ c. sesame seeds
  • 4 sliced green onions
  • ½ c. cashews

In a medium bowl, combine soy sauce, vinegar, 1 teaspoon of the sesame oil, brown sugar, garlic, ginger, and cornstarch. Whisk until smooth. Set aside.

Heat olive oil and remaining 1 teaspoon sesame oil in a large skillet over medium heat. Add chicken to skillet and season with salt, pepper, and red pepper flakes. Cook until just done, about 7-10 minutes. Remove from pan; set aside. Add carrot and onion to the pan. Cook until carrots are crisp tender. Add the cooked chicken back to the pan.

Pour the sauce over chicken and vegetables; simmer until sauce has thickened slightly. Stir in the sesame seeds, green onions, and cashews.  Wonderful served over brown rice.

Note: fried tofu, sliced fresh mushrooms, or small pieces of cooked broccoli would be wonderful in this dish. I just didn’t happen to have any of these ingredients in the fridge that day, and I was too lazy to go to the store. (The older I get, the less willing I am to go to the store for one or two ingredients. I’m slowly becoming more of a “make due” kind of gal and I’m just fine with that, thank-you!)


CHICKEN, PROSCIUTTO, ALMONDS, AND DRIED CRANBERRY SALAD

If I could bake a chicken with as much flavor and for the same price as a Costco rotisserie chicken, I’d be one happy camper. And even though I have a couple of good recipes for baked chicken on this site, for ease of preparation, nothing beats a trip to the Costco meat department. But Mr. C. and I can’t possibly eat a whole chicken at one seating! So, we usually start with the thighs and drumsticks, and save the breasts and other bits for future use. Since Costco chicken has so much inherent flavor, it is perfect in casseroles, soups, and of course salads.  

So the other evening, wanting to serve a chicken salad for dinner, and just happening to have leftover Costco chicken in the fridge, I went on line and found a recipe on the Diethood site. I changed it up a bit to fit our tastes, and the following recipe is the result.

This salad is hearty, flavorful, and perfect for a couple of senior citizens trying to eat healthier. Of course, even if you aren’t a senior citizen, you can prepare this salad and feel good about it. Eating healthy is not just the domain of those of us in our “golden years”. (Some might have said “those of us who are elderly”, but I hate that term. Its definition is just too relevant and therefore to be avoided at all costs!)

Synonyms for the word “elderly” – aged, advanced in years, long in the tooth, past ones prime, in ones dotage, decrepit, over the hill, senescent (whatever that means), and my favorite – doddery. (If elderly isn’t a horrible word to refer to oneself, I don’t know what is!)

So to all of you who are young at heart, regardless of your age – give this recipe a try. It’s easy to prepare, and tastes like one of those specialty salads served at fashionable restaurants. How cool is that?

  • 4-5 slices prosciutto  
  • ½ c. sour cream 
  • 2 tsp. Dijon mustard
  • 1 T. lemon juice
  • 1 tsp. finely chopped fresh rosemary
  • 1 garlic clove, minced
  • ¼ tsp. seasoned salt
  • freshly ground black pepper
  • 2 T. finely grated parmesan cheese
  • 2 romaine hearts, thinly sliced or greens of choice
  • ¼ c. chopped red onion
  • 1 cooked boneless and skinless chicken breast, cut into ½ -inch cubes (I use a breast from a Costco rotisserie chicken)
  • ½ c. toasted slivered almonds
  • ½ c. dried cranberries (the low sugar kind if you can find them)

Place slices of prosciutto on a parchment paper lined baking sheet. Bake in a pre-heated 350 degree oven for about 13 minutes or until fairly crisp. Remove from oven and let cool. Break or cut into pieces; set aside.

Meanwhile, whisk the sour cream, Dijon mustard, lemon juice, rosemary, garlic, seasoned salt, pepper, and Parmesan cheese together in a small bowl. Set aside. (If too thick, add a little water.)

In a large salad bowl combine the lettuce, red onion, chicken, toasted almonds, cranberries, and crispy prosciutto. When ready to serve, toss with salad dressing.


GROUND BEEF PATTIES WITH BALSAMIC VINEGAR SAUCE

OK, so here goes yet another ground beef pattie recipe. But as most of you already know, I love ground beef. Which incidentally, is a good thing since we still have about 20 pounds of beautiful ground beef in our freezer from the quarter of a beef we purchased a few months ago.

So the other evening, after having already spent what I consider to be way too many hours in the kitchen, the subject of “what’s for dinner” entered into our conversation. (In all fairness, it was dinner time. And normally at this time of evening I would be sipping one of Mr. Cs perfect martinis, while simultaneously chopping greens and stirring a sauce.) But that wasn’t happening. Instead I was finishing the stew I would be serving guests in a couple of days. So then, what to do about dinner?

I had some fresh green beans in the refrigerator longing to be used. I had a couple extra Yukon gold potatoes I didn’t need for the stew. So into the oven they went. So that just left the entrée.

The previous evening we had eaten at the restaurant at our local golf course. I had ordered the steak and it had come with a delicious balsamic reduction sauce. So I thought, why not try reproducing that sauce and serve it over ground beef patties. So that’s what I did!

Mr. C. retrieved a package of our precious ground beef from the freezer and I nuked it until it was defrosted. Then I added a couple of ingredients, fried the patties, and threw the sauce together. It was wonderful! And oh so easy. And hardly any effort. (That’s the part I liked the most!)

So if you ever need an entrée you can throw together in just a few minutes, give this ground beef recipe and sauce a try. (And yes, I did think of entitling this recipe Hamburger Steak with a Balsamic Reduction Glaze. But the patties were just so simple to prepare, that I thought a haughty designation would be just too presumptuous.)

  • 1 lb. ground beef
  • 1T. Montreal Steak Seasoning
  • ¼ tsp. granulated garlic
  • 1 tsp. extra virgin olive oil
  • 1 T. unsalted butter
  • ¼ c. balsamic vinegar
  • freshly ground black pepper (lots)

Mix the ground beef, steak seasoning, and granulated garlic together. Pour olive oil into a small frying pan. Form the ground beef mixture into 3-4 patties. Cook until medium rare or to your liking. Remove from pan. Cover with aluminum foil to keep warm.

Add the butter, balsamic vinegar, and pepper to the pan. Cook over low heat until reduced to about 2 tablespoons. Plate the ground beef patties and drizzle with the sauce.  


SAVORY BAKED PORK CHOPS

OK, something you should know about me. I used to kill pork chops. I could turn them into the driest, most unpalatable piece of meat anyone could ever imagine. And how did I do it? I totally overcooked the poor babies, that’s how! Oh they were seasoned beautifully and should have been great. But I’m from the generation that was taught to beware of under cooking pork. That tiny little off chance that the provider of the meat (that would be the pig) might have somehow contracted trichinosis. Well friends, trichinosis simply isn’t a major consideration any longer. So now that I have finally arrived in the 21st century, I too can turn out a mean pork chop. (And I mean mean in a good way!)

So the other evening as I was staring at two lovely, thick pork chops, I decided to bake them. But what was needed was some kind of flavor additive. And since I am really into smoked paprika right now, I decided to use it along with some of my other favorite ingredients to make a dry rub for the chops. The combination worked. And with a little help from my instant read food thermometer, I produced a couple of pork chops that were juicy, tender, and delicious. I am so proud of me!

So if you too have been butchering (figuratively speaking) pork chops to the point that your family runs and hides when they are being served, give this recipe a try. I promise if you start with a thick chop, dry rub it, and don’t bake it to extinction, your family will beg you to fix this easy recipe again. (BTW, brining works great too, but that’s a recipe for another time.)

  • cooking spray
  • 4 boneless pork chops, 1-inch thick (no thinner)
  • 4 tsp. extra virgin olive oil
  • 1 tsp. kosher salt
  • freshly ground black pepper
  • 1 tsp. onion powder
  • ¼ tsp. granulated garlic
  • 1 tsp. smoked paprika

Lightly spray a shallow baking pan with cooking spray. Lay the pork chops in the pan. Pour the olive oil over the top of each pork chop. Rub the oil all over the chop with your fingers. Wash your hands.

In a small bowl mix the salt, a goodly amount of pepper, onion powder, granulated garlic, and smoked paprika together. Season both sides of the pork chop with the mix. Rub the mix into the chops with your fingers. Yes, wash your hands again!

Bake the chops in a pre-heated 400 degree oven for about 15 minutes, or until pork chops reach an internal temperature of 145 degrees. No more! Remove from oven and let rest for 5 minutes before serving.


SWEET ITALIAN SAUSAGE AND TORTELLINI SOUP

I love fall! And do you know why? Because I love soup! (Not that I don’t build soup throughout the year, but there’s just something special about soup burbling on the stove while the wind and rain tear the leaves off of our trees and scatter them all over the yard.) What could be more exciting than that! (Some would say a trip to Italy or almost anything that doesn’t cause pain, loss of dignity, or the presence of mind not to inadvertently discard a winning lottery ticket.)

But for me, even the prepping of vegetables becomes a treat when I am inside warm and dry, while just outside my window Mother Nature is causing all kind of havoc in the yard. (Maybe I like fall so much because at least for a few months I don’t have to worry about Mr. C. mowing our vacant lot and working his fingers to the bone keeping the weeds at a reasonable level, and me spending countless hours watering! It really could be just as simple as that!)

But whatever the reason, soup in the fall is a must in my kitchen and hopefully also in yours. (And no, opening a can of chicken noodle soup and warming it on the stove just doesn’t cut it!) Real soup has that one ingredient that is missing from canned soup, well that and too much salt and all the ingredients listed on the can that are unpronounceable. Real soup has love mixed in during every step of the preparation. Plus, who in their right mind doesn’t relish walking into the kitchen and smelling soup simmering on the stove? Everyone loves good smells emanating from the kitchen. It just makes one feel loved and cared for. And homemade soup is one of the healthiest dishes you can feed your family. Without much trouble at all, you can tuck all kinds of nutritious ingredients into soup without any of your family suspecting your duplicity. (In this type of situation, I truly believe that duplicity is OK. Actually, it’s better than just OK. It’s almost mandatory to help keep you and your family healthy!)   

So when our dear fried Susan served us this soup after a band rehearsal that her husband Tim had called, we were in heaven. I liked the soup so much I immediately asked for the recipe. I made a couple of tiny changes, but then, that’s what I do. (I simply can’t help myself!)

I hope you fix this soup in the near future. It’s easy to prepare, relatively inexpensive, and absolutely perfect for a stormy fall or winter evening. Actually, it’s the perfect soup to serve after spending an afternoon raking leaves. (If that’s the case, I would also encourage that you bake up a batch of brownies as another surefire way of thanking your family for all their hard work!)

Speaking of thanks, thanks again Susie for this wonderful recipe.

  • 1 lb. bulk sweet (not hot) Italian sausage
  • 1 c. chopped onion
  • 1 med. sized green pepper, chopped
  • 2 lg. garlic cloves, minced
  • 4 c. chicken or beef broth/stock
  • 1-2 Parmesan rinds, opt. (I use 2 rinds, each approximately 2-inches square)
  • 28 oz. can diced tomatoes, including juice (preferably Italian tomatoes)
  • ½ c. dry red wine
  • 2 tsp. dried basil
  • 2 tsp. dried oregano (Mexican oregano is fabulous)  
  • freshly ground black pepper
  • pinch crushed red pepper flakes
  • 8-10 oz. pkg. fresh or frozen tortellini (I use three cheese tortellini)
  • 1 med. zucchini, cut in half lengthwise and then into ¼-inch wide half rounds
  • 2 T. chopped fresh parsley
  • ¼ c. chopped fresh basil, opt.
  • freshly grated Parmesan cheese

In a large covered soup pot, break up and sauté the Italian sausage until the meat is no longer pink. Remove sausage from pan to a small bowl. Set aside. Add the onion and green pepper to the pan. Sauté gently until the onion is translucent, about 5-6 minutes. Stir in the garlic and cook for 1 minute. (There will be brown bits (caramelized meat) sticking to the bottom of the pan. This is good. When you add the liquid in the next step, gently lift the brown bits off the bottom of the pan with your stirring utensil.)

Add the broth, Parmesan rinds, diced tomatoes, red wine, dried basil, dried oregano, black pepper, red pepper flakes, and half of the cooked Italian sausage. Bring to just under a boil, reduce heat, cover, and simmer gently for 40 minutes.

After 40 minutes, add the tortellini, zucchini, and the rest of the cooked Italian sausage; simmer until the tortellini is tender. Remove the Parmesan rinds and stir in the parsley and fresh basil. Adjust seasoning.

Ladle into individual soup bowls. Pass the grated Parmesan cheese.

I serve this soup with toasted crusty baguette slices. No butter required. Just dunk the bread in the broth. Yum