Category Archives: MAIN DISH RECIPES

GRILLED ASIAN MARINATED FLANK STEAK

Yesterday was a swell day. I made a few more reservations for our upcoming trip to Eastern Europe, got caught up on my “to do” list, and tried a new recipe featuring flank steak. (How could a day be more perfect than that?) Well – the only thing that would have made it even better is if I’d remembered to take a picture of the flank steak before we gobbled it down! But hey! I’m kind of out of the habit since I haven’t been posting recipes as regularly as usual. (Four weeks on a trailer trip and then two weeks of planning our next trip, is my only excuse!)

But I’m back now and eager to share exciting new recipes with you like this one I modified from the Skinny Taste site.

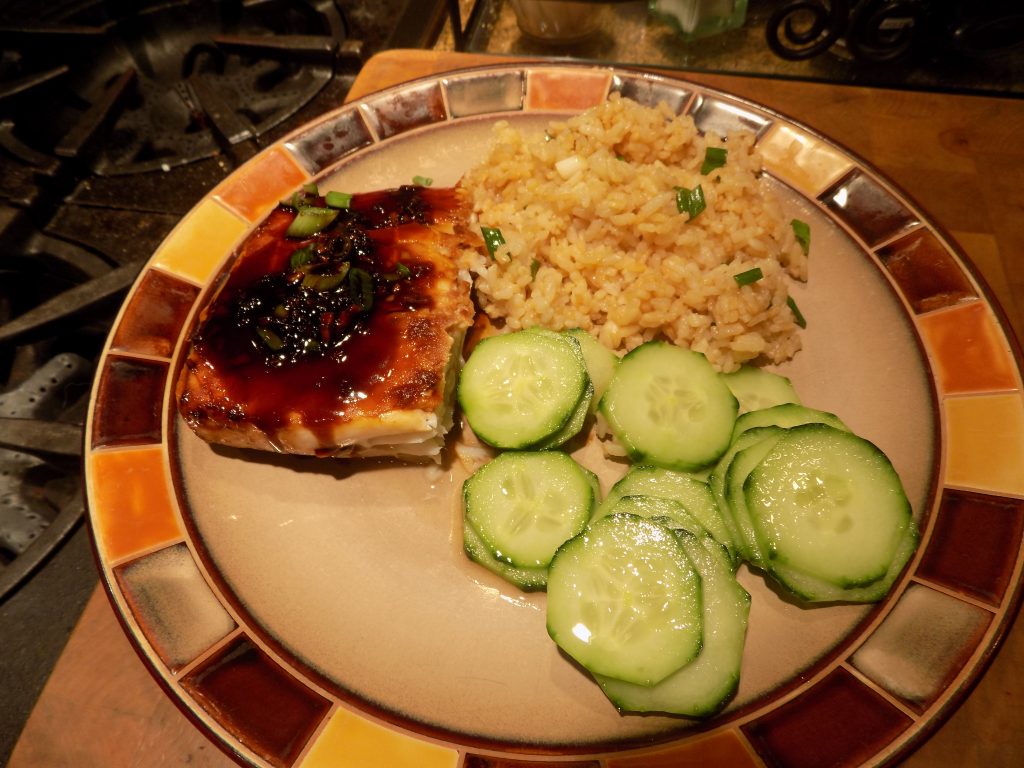
As I mentioned a few weeks ago, I have been on an Asian food kick for months now. So when it came time to think about last evenings’ dinner, I went searching for an Asian inspired marinade for the flank steak that was thawing in my sink. And I found this marvelous and simple recipe.

Mr. C. grilled the steak to perfection, and along with purchased frozen pot stickers “fried” in my air fryer and Sunomono Salad (on this site), we supped royally last evening.

So next time you want a simple and delicious flank steak for dinner, give this recipe a try. And if you have never cooked a flank steak, you are in for even more of a treat. So easy to prepare and the taste is simply marvelous. Just don’t cook the pickles out of it! If you don’t like your beef steak on the rare side, walk away from this recipe. Flank steak will get tough if you cook it too long. It will also loose flavor.

But, I would encourage you not to go to the other extreme either. Not with flank steak. Flank steak is at its best when medium rare. If you like your steak truly rare or even blue rare, then grill a flatiron or top sirloin steak instead. (And yes, I love rare steak as much as the next gal. Moo….) But different cuts of steak are simply tastier when cooked properly. And flank steak is no exception. Medium rare. Repeat after me – medium rare! Thank you. (And enjoy!)

¼ c. reduced sodium soy sauce or Tamari  

1 T. vegetable oil

2 T. honey

1 tsp. sesame oil

2 cloves garlic, minced

2 tsp. minced fresh ginger

freshly ground black pepper

pinch crushed red pepper flakes

4 thinly minced green onions, divided

1 tsp. seasoned or regular rice vinegar

1 lb. flank steak, trimmed of all fat and silver skin

In a medium-size bowl, combine the soy sauce, vegetable oil, honey, sesame oil, garlic, ginger, black pepper, crushed red pepper flakes, and half of the minced green onions. Remove 3 tablespoons of the marinade and combine it with the rice vinegar in a small bowl. Cover and refrigerate.   

Place remaining marinade and steak in a 1-gallon re-sealable bag (remove as much air as possible) or in the bottom of a small shallow container (cover the pan with plastic wrap).  Refrigerate for at least 6 hours or for up to 12 hours. Turn the steak every hour or so during this time. Remove from refrigerator about 45 minutes before you plan to grill the meat.

Remove the steak from the bag or pan and discard the marinade. 

Set the grill to high heat. Carefully grease the grill with some oil. Once the grill is hot, add the steak.

Cover and cook the steak until well browned, about 3 to 4 minutes, then flip and cook until desired doneness, about 3 to 4 minutes. Use a thermometer to make certain the temperature doesn’t surpass 122 degrees for a perfect medium rare steak. (If you cook flank steak until no pink is showing, it will be tough.)

Remove from grill, and tent with aluminum foil for about 10 minutes before slicing very thinly against the grain and on a diagonal. Garnish with the remaining green onions. Serve immediately. Pass the reserved marinade as a sauce.

BAKED TERIYAKI HALIBUT

OK, I am never going to buy bottled teriyaki sauce again. (Of course I might have to if I’m traveling, but if I’m at home, there is no reason to spend the money or to settle for a product that is less than perfect.) Because in making this dish the other evening, I was blown away by the complex flavor in this simple recipe for teriyaki sauce.

Now one thing you should know. This is an Emeril Lagasse recipe. And if I had the opportunity, I would kiss his toes. He really understands food. So after saying that, I need to give full disclosure. I changed his recipe to fit my way of preparing food. (Now there’s a new concept, right?!?!)

But truly, any way you look at it, this is a dish fit for the Gods. It’s simple. It’s delicious. It’s NW cuisine at its finest. (Well NW with an inspired Asian (via New Orleans) influence.) Just make it soon. It is over the top amazing. Thank you dear Emeril.

1/3 c. mirin or rice wine

½ c. soy sauce

1 T. sugar

2 tsp. minced gingerroot

1 garlic clove, minced

pinch cayenne

2 (6-7-oz.) halibut fillets

minced green onions, as garnish

Combine the mirin, soy sauce, sugar, ginger, garlic, and cayenne in a small saucepan and bring to a boil. Lower heat and simmer until reduced to a syrup like consistency, 5 to 6 minutes. Remove from heat. (Don’t reduce too much.)

Pour a thin layer of the sauce/syrup in the bottom of a lightly greased baking pan. Place the halibut fillets skin side up in the sauce. Marinate for 1 hour.

After an hour bake the halibut in a pre-heated 400 degree oven for 12-15 minutes or until the flesh is opaque and the internal temperature has reached 140 degrees. Remove from oven and serve flesh side up garnished with green onions. Pass the remaining teriyaki sauce. Great with Asian Flavored Steamed Rice (on this site) and a steamed green veggie.

All I can say is – don’t be daft! Make the sauce, but at least double the recipe. This is truly the teriyaki sauce you have always dreamed of. But if you are like me, never quite achieved!

So Emeril, you Asian (not) darling – thank you. I shall forever be in your debt. And if you ever desire a Camano Island experience, we (Mr. C. and I) are here for you! Mi casa es tu casa!

SMOKED SALMON, ASPARAGUS, AND CAPER PASTA

Yesterday morning when I asked Mr. C. what he would like for dinner his immediate response was pasta. Big surprise! And since it was Valentine’s Day and I was receptive to the idea, I decided to honor my dear husbands request and a pasta dish would be on our dinner table that evening. But what kind of pasta? Then I remembered that I had a package of smoked salmon in the refrigerator. So then – smoked salmon pasta seemed the likely choice with some grilled or baked asparagus on the side. But wait! How about adding asparagus to the pasta and serving a nice green salad on the side? So to the internet I proceeded.

And what do you know! I was not the first person to think of adding asparagus to a pasta dish. So taking hints from several posted recipes, and borrowing ingredient ideas from a smoked salmon tortellini recipe I had on file, I came up with this dish.

Now, the first thing I liked about this dish when I dug into it last evening was the creaminess. Then the little bit of tang from the lemon zest, lemon juice, white wine, and capers hit my palate. And finally, the smoky and savory flavor of the salmon caught up. The result was a quite complex and satisfying blend of yumminess.

So if you too love smoked salmon and like to feature it as an ingredient, I recommend that you give this recipe a try. It’s very easy to prepare and can easily be assembled even on a work night. And good enough for company? You bet. Serve it with a crunchy green salad and Garlic Toast (recipe on site) and your guests will forever thank you for all the effort you went to on their behalf. (You need not tell them the ease of preparation on this dish. That can just be our little secret.) Cheers!

2 T. olive oil

1 lg. shallot, finely chopped

10 asparagus spears, bottom ends trimmed off; top ends cut on the diagonal into 1-inch pieces   

2 lg. cloves garlic, minced

¼ c. dry white wine

1 small lemon, zested and juiced

¼ tsp. kosher salt

freshly ground black pepper  

1 c. whole milk   

8 oz. (lg. pkg.) cream cheese, room temp., cut into large chunks

2 T. drained capers

2 T. minced fresh parsley

8 oz. smoked salmon, roughly chopped or torn into bite sized pieces

8 oz. linguini, fettucine, or spaghetti cooked al dente (save some of the cooking water)

2 T. chopped fresh chives, opt.

Heat the olive oil in a large frying pan over medium heat. Add the shallot and asparagus; sauté until tender, about 5-7 minutes. Add the garlic and cook for 1 minute. Pour in the wine and cook until all the moisture is evaporated. Add the lemon zest and juice, salt, and pepper.

Stir in the milk and bring to a simmer. Add the cream cheese and stir until melted. Add the capers, parsley, and salmon. Bring to just under a boil. Add the cooked pasta and some of the pasta water if needed to reach desired consistency. (I used about a cup last evening.) Serve sprinkled with chives.


SHIRRED EGGS à la NERO WOLFE

It has been quite the winter, at least the past week or so. With unprecedented low temperatures and heavy precipitation, we have had several snow storms the last few days resulting in 10-12 inches of snow here on Camano Island.

For us that means – we ain’t goin’ nowhere! We live on a hill, with a steep drive way, and even though Mr. C. shovels the snow off the driveway daily, there is no way we are going to risk life and limb just to fishtail to the grocery store, or wherever, even for the sake of a vast amount of bragging rights!

So what to do with the time? Of course we could have done some deep cleaning on our house. Right, like that’s going to happen! (We didn’t want to set some kind of snowy weather precedent, after all!) Or we could spend our time recovering from surgery (me), recovering from the horrible cold/flu that’s going around (both of us), reading books (both of us), researching recipes (that would be me) or working on Beethoven, Mozart, and Schubert piano sonatas (Mr. C. for sure). So that’s what we did.

For me, it was re-reading for the umpteenth time, many of the Rex Stout books featuring my favorite detective Nero Wolfe. I love Nero. And I know. I shouldn’t presume to call him by his first name. But since I feel that I know him better than most, thanks to Archie Goodwin, and share a couple of his most characteristic traits (being round and worshipping excellent food), that he would forgive me this tiny indiscretion. All of which brings me to this recipe.

I have known for a long time that there are really no subjects that haven’t in some way been covered on the internet. But even so, I was quite surprised when I decided that I would like to try preparing a couple of Nero’s favorite dishes. (Like a fictional character is going to be the author of gourmet recipes!) But on my first search, right there in print, was an invitation to purchase the Nero Wolfe cookbook. Holy cow. And I must say, I was sorely tempted.

But then the practical side of me took over (pfui) and I realized that as much as I admire haute cuisine and love hearing Nero and Fritz (his cook/chef) discuss dishes like Bacalhau (Portugese Salt Cod), the chances of me ever preparing most of the dishes in the cookbook was somewhere between slim and nil! So I tucked my credit card back where it belonged, and searched other posts for simpler and more modest recipes from the cookbook. Which of course I found. And this is one of them. Hopefully, more to follow.

Since it’s Valentine’s Day, and both of us long ago decided we would not celebrate Hallmark holidays (no gifts or cards exchanged), I never-the-less fixed this recipe for breakfast this morning. (OK, I still have a bit of romance in my soul.) But you can bet your bottom dollar, I’m not going to wait for a special occasion to serve it again.

So next time you feel like a little something fancy would brighten your otherwise normal first meal of the day, give this recipe a try. It truly is delicious and very easy to prepare.

And just for Mr. C. because he asked, shirred eggs, also known as baked eggs, are eggs that have traditionally been baked in a flat-bottomed dish (shirrer) which is another name for a ceramic or porcelain ramekin.  

unsalted butter

4 breakfast link  sausages, fully cooked

2 T. half & half

4 tsp. dry sherry

4 lg. eggs

kosher salt

freshly ground black pepper

paprika

1 tsp. chopped fresh chives

Generously butter 2 shallow baking dishes. (I use small oblong Corningware French White dishes.)

Place 2 cooked sausages in each dish. Add 1 tablespoons half & half and 2 teaspoons dry sherry to each dish. Carefully add 2 eggs to each dish (don’t let the yolks break), then sprinkle lightly with salt, pepper, paprika, and chives.

Bake in a pre-heated 325 degree oven for 14 to 17 minutes or until the egg white is set and the yolk is still runny (or cooked to desired firmness). (I used convection the last 3 minutes.) Remove from oven and serve immediately with toast.

Enjoy the dish.

STUFFED GREEN PEPPERS WITH GROUND BEEF, CORN, BLACK OLIVES, AND TWO CHEESES

our courtyard
still stormy out there – brrrrr

I am always looking for new ways to cut carbs in the dishes I prepare without sacrificing flavor, texture, or nutritional value. So while it was snowing like crazy a couple of days ago, I was inside happily working on this new recipe for an old favorite. And I know what you’re thinking. With 2 perfectly good stuffed green pepper recipes already on this site, why another one? Well the answer is simple. I didn’t want a filling that included rice or any other grain.

So I decided to think a little out of the box. I knew that using rice was a standard ingredient because not only was it inexpensive, it acted as the binder that held the filling together. But when I gave the problem a bit of thought, I realized that who cares if the filling hangs together! Where’s it going anyway? Could it really escape the confines of a green pepper shell?

And when served, does it matter if the filling spills onto your plate. After all, God gave us forks and spoons for a reason! So with no concern for appearance or points for presentation expected, I offer you this wholesome recipe for stuffed green peppers. And if I weren’t far too modest to pat myself on the back, I’d tell you that these peppers are pretty darn delicious. But like I said – I’m far too modest! You will just have to judge for yourself.

4 lg. green bell peppers

1 T. extra virgin olive oil

1 lb. lean ground beef

½ small onion, diced

1 stalk celery, thinly sliced

3 cloves garlic, minced

2 heaping T. tomato paste

¼ c. water

1½ tsp. Montreal Steak Seasoning by McCormick

¼ tsp. kosher salt

freshly ground black pepper

1 T. Worcestershire sauce

1 c. frozen corn

½ c. sliced black olives

1 generous c. grated sharp cheddar cheese, divided

1 generous c. shredded mozzarella cheese, divided

Cut the tops off each bell pepper and remove seeds and membrane from inside. Set cleaned peppers aside. Chop the tops and set aside. (You may through away the seeds and membranes.)

In a large skillet over medium high heat, heat the olive oil and add the ground beef, onion, celery, and chopped green pepper tops; cook until the meat is browned. Add the garlic and cook for 1 minute.

Remove from heat and stir in the tomato paste, water, Montreal seasoning, salt, pepper, Worcestershire sauce, corn, olives, and ¾ cup of each of the cheeses.

Meanwhile, bring a pan of water to a boil. Add the green peppers and cook for 6 minutes. Remove from water and drain upside down. Place in a lightly greased baking dish. Spoon meat mixture into bell peppers.  

Bake in a preheated 375 degree oven for 30 minutes. Sprinkle remaining cheese over the top and continue baking another 10-15 minutes or until the cheese topping is melted and starting to brown.


BROCCOLI CHEDDAR CHEESE SOUP WITH CROUTONS

Yesterday was a very pleasant day for us. We began our adventures by attending a Met opera broadcast at the Lincoln Theater in Mount Vernon. Starting time: 9:55 am. (We attend as many of these live movie theater opera transmissions as possible. We also enjoy the broadcasts from the National Theatre in London.)

After leaving the theater we decided to have a small lunch, then hit the French bakery at Terry’s Corner. (I draw the line at baking my own croissants). After that, the grocery store. But before going home, we decided we still had the strength to take a short walk along a couple of the new trails on Barnum Point. (And no, for those of you who don’t have the privilege of living in beautiful NW Washington, it was not raining! It was a beautiful, balmy winter day.) Which leads me, in kind of a roundabout way, to this soup.

All day I had been vaguely thinking about building soup for dinner. But while walking along the trails (very enjoyable I might add) I decided to definitely make soup when I got home. But by the time we actually walked in the door, 4:30 or so, it was a little too late to start a soup that would take 2-3 hours to burble. (Yes I know, I could have used my Instant Pot, but that thing actually still terrifies me!) So I looked in my fridge and pantry and made up my mind. Broccoli cheddar soup would fit the bill nicely!

I went on line and searched my blog for the recipe. (And yes I actually use and follow my own recipes!) Well usually that is. This time I just about gasped out loud when I read the ingredients. Three fourths cup butter. Yikes! (No wonder it was so good!)

So in trying to become a reformed butter over user, I decided to work out a new recipe using less butter, while at the same time keeping the wonderful mouth feel of a truly rich, delicious, and thick soup base.

Thus this recipe. We both proclaimed it not just edible, but very yummy. (And yes, I do realize that cheddar cheese is hardly a low fat ingredient. But if you can show me how to make a wonderful cheddar cheese soup with some type of low-fat replacement product, then please use your super powers to also bring about world peace!)   

Just give this recipe a try next time you are in the mood for a creamy soup. Or use my original recipe (Broccoli Cheddar Cheese Soup) if you have no fat restrictions or are under 17 years of age.

BTW, I will learn to use my Instant Pot. I just need a little more time to get used to the idea that this is a newfangled pressure cooker that is not likely to explode! (Or so they say!)

3 c. small chunks of broccoli flowerets and peeled stems

¼ c. (½ stick) unsalted butter

½ med. onion, chopped

½ c. grated carrot

1 garlic clove, finely minced

¼ tsp. seasoned salt

freshly ground black pepper

¼ c. flour

2 c. milk   

2 c. chicken stock (or veggie stock for vegetarian)

pinch paprika

pinch ground nutmeg

3 c. grated sharp cheddar cheese

Garlic Croutons, opt. (see recipe below)

Steam the broccoli until crisp tender. Remove from heat. Set aside.

Melt the butter in a medium sized heavy sauce pan. Add the onion and carrot; cook slowly until tender, about 10 minutes. Don’t let the onion brown. Add the garlic, seasoned salt, and pepper; cook for about a minute.

Whisk in the flour and cook for a short time. Gradually whisk in the milk and chicken stock. Let simmer for about 20 minutes.

Stir in the cooked broccoli, paprika, and nutmeg. Adjust seasoning. Remove from heat and stir in the cheese. Serve immediately garnished with a few croutons.

Garlic Croutons:

1 T. butter or extra virgin olive oil

2-3 c. cubed crusty, chewy bread

granulated garlic

Melt butter or olive oil in a large sauté pan. Add bread cubes and slowly sauté until crunchy and browned. (This takes upward of 45 minutes, so plan to make croutons when you are working on other dishes and are close at hand.) Stir frequently. When the bread cubes are golden brown and crunchy, lightly sprinkle with granulated garlic. Cool and store in an airtight container.  

CREAMY SHRIMP AND SCALLOP PASTA

So here I am at my local QFC (Quality Food Center) in front of the fresh seafood case contemplating buying some of the beautiful large fresh scallops. When next thing you know I hear the fellow next to me order some of the shrimp that are on sale. Wait – I know that voice! It’s Frank, one my neighbors who also happens to be a good friend. After we greet each other, our conversation immediately turns to his decision to buy some of the shrimp. If I remember correctly, he had previously purchased the same type of shrimp and was eager to buy more. So, never being one to not take a hint from someone who appreciates good food, I decided to buy some of the shrimp and still remain faithful to my first choice. So I bought a few of the scallops too. I figured I could decide how to prepare these beauties when I got home.

I remembered that I already had 3 wonderful recipes for this glorious seafood combination (Shrimp and Scallop Ceviche, Spicy Risotto with Scallops and Shrimp, and Seafood and Fried Tofu Lo Mein) in my repertoire. But I was in the mood for a pasta dish. (When am I not in the mood for a pasta dish?) So I did a little research, took some bits and pieces from other creamy sauced pasta dishes that I prepare, and came up with this recipe.

And oh my! The pasta was delectable. We both loved it. In fact, we almost came to fisticuffs over the leftovers the next day. (Not really of course, but the pasta was just that good!)

So next time you pay a visit to your local fishmonger, buy some large shrimp and a few fresh scallops. Then make this pasta dish. Serve the pasta with a simple green salad, and if you are feeling terribly worthy, treat yourself to some garlic toast too. (See recipe below.) You may thank me later! Buon Appetito   

2 T. unsalted butter, divided

1 T. vegetable oil

6-8 lg. sea scallops, patted dry with paper towels

1 lb. lg. uncooked shrimp, peeled, deveined, and cut in half

kosher salt

freshly ground black pepper

paprika

2 shallots, finely minced

2 garlic cloves, finely minced

1 T. flour

1/3 c. dry white wine

1 c. heavy cream

1 c. whole milk

½ lb. spaghetti or fettuccini, cooked al dente (actually use any pasta shape you want)

½ c. grated Parmesan cheese

1 T. finely chopped Italian parsley, garnish  

Heat 1 tablespoon of the butter and oil in a large frying pan. Add the scallops, making sure they are not touching each other. Sear the scallops for 1½ minutes on each side. The scallops should have about a ¼-inch golden crust on each side while still being translucent in the center. Remove from pan and place in a bowl. Once the cooked scallops have cooled a bit, cut them into the same sized pieces as the cooked shrimp. (I use my cooking scissors.)

Add the shrimp to the pan. Lightly season with salt, pepper, and paprika. Cook 1-2 minutes or just until fully cooked and no longer translucent. (They should be pink on the outside and opaque white on the inside.) Don’t overcook or they will be tough. Remove shrimp to another bowl or the same bowl with the scallops if they have been cut to size.

In same pan, melt the remaining 1 tablespoon of butter and sauté shallots until translucent. You do not want them to get brown, so go easy. Stir in the garlic and sauté another minute.

Whisk in the flour and let cook for 1 minute. Whisk in the wine lifting all the bits on the bottom of the pan during the process.

Whisk in the cream and milk; simmer for 2 min. Remove pan from heat and stir in the grated Parmesan cheese, cooked seafood, and hot, just cooked fettuccini noodles*. (I lift the noodles right out of the boiling water with a pair of tongs and add them to the sauce.) Toss until everything is combined, adjust seasoning, then serve immediately sprinkled with fresh parsley.  

*Reminder: Never make the cooked noodles wait for the sauce. The sauce can wait. Perfectly cooked pasta is always the number one priority. (At least in my book!)

GARLIC TOAST

4 T. unsalted butter (½ stick), room temperature

2 medium garlic cloves, minced

2 tsp. finely chopped fresh Italian parsley leaves

½ tsp. kosher salt

½ of a crusty Italian or French baguette, cut in half lengthwise, and then cut into serving size pieces

Place the butter, garlic, parsley, and salt in a small bowl and mix with a table fork until well blended. Place the bread on a baking sheet, crust side down. Spread the butter mixture evenly over all of the pieces.

Bake the bread in a pre-heated 425 degree oven for about 10 minutes or until the top is a nice golden brown.

GARLIC AND GINGER GLAZED STICKY PORK


I really love Chinese food. Well, maybe not all Chinese food. For example, I don’t ever want to even try chicken feet! I’m really just talking about loving the kind of Chinese food that is more American than Chinese.

Now don’t get me wrong. I love traditional dim sum, but even then my tastes run to the little dishes that I feel certain only contain ingredients that I can buy at my local IGA. So call me a coward, sissy, or your favorite term for someone who lacks courage when it comes to edible unknowns, but the reality remains the same. I prefer to know what ingredients are contained in the dishes I am being served. In an Italian restaurant, I have no qualms. In an authentic Chinese restaurant, I tend to feel less confident.

So how do I assuage my love of Chinese food with the fear of unknown ingredients? Easy. I build the food myself. (Or I stick with restaurants I’ve known for decades, like Tai Tung or House of Hong in Seattle’s International district.) And yes, these restaurants have dishes that are authentic, or to me they appear authentic, but I have learned through experience which dishes to order and which to avoid. But back to the real reason for this post. Sticky Pork.

I love pork. But if I’m honest with myself, pork can be a bit bland. And some people don’t appreciate pork for that very reason. But if you combine pork with the other ingredients listed below, there is enough flavor going on to make a believer out of even the most ardent pork critic.

So what are you waiting for? Give your family a treat for dinner. Go Chinese for the evening. Or better yet, go totally ethnic and serve Sunomono (Japanese recipe on this site) as a side dish.   

Serving different ethnic cuisines, even in the same meal, is a wonderful way to travel the world. Makes for a lovely topic of conversation around the dinner table too. Enjoy

½ c. honey

1 T. Sriracha, or more to taste

1 T. rice wine vinegar

2 T. Tamari or soy sauce

1 T. water

1 tsp. kosher salt

freshly ground black pepper

1 T. cornstarch

1½ lbs. boneless pork chops, loin, or country style ribs, cut into ¼-inch thick pieces, then ¼-inch thick strips, about 2 inches long

2-3 T. vegetable oil, plus extra if necessary

3 garlic cloves, finely minced   

2 T. finely minced fresh ginger

toasted sesame seeds, opt. garnish

4-6 thinly sliced green onions, opt. garnish

Mix the honey, Sriracha, rice wine vinegar, Tamari, and water together in a small bowl. Set aside.

Place the salt, pepper, and corn starch in a large plastic freezer bag. Add the pork and shake until the meat is thoroughly coated.

Heat the oil in a heavy large skillet over medium high heat. Carefully add the pork to the pan, working in batches to avoid overcrowding the pan. Let the first side brown, flip the pieces with tongs or a spatula, and brown the second side. Transfer the pork to a bowl. Repeat until all of the meat is cooked. 

Reduce the heat and stir in the garlic and ginger. Cook until fragrant, about 45 seconds. Raise the heat to medium-high and pour in the sauce mixture; bring to a boil, stirring frequently. When the sauce is very bubbly and somewhat thickened, add the cooked pork and simmer until the sauce is reduced to a thick, sticky glaze. Serve over rice.

Garnish with toasted sesame seeds and sliced green onions. Pass the Sriracha bottle for those who like more heat.  

PARMESAN BAKED COD

So, the last few days I have been posting mainly recipes associated with the holidays and/or cold weather. This recipe for baked fish however is a lot more versatile. It can be served any old time and for any occasion, be it fancy or down home. Winter, summer, for two or more people, a gang of people, or just for yourself. And it is so stinkin’ easy to build. A few simple ingredients to assemble, a bit of time in your oven, and your main dish is ready to serve. It even comes with its own sauce; no tartar or aioli required. Add a simple side dish and veggie or salad and dinner is on the table in no time flat.

And the most important part. It’s fish! We are trying to include more fish in our diet. It’s good for us and frankly, I will almost always choose something from the sea rather than from a farm. (OK, once in a while I crave a big ol’ honkin’ rare steak, but most of the time I prefer seafood to beef.)

Now I’m sure you’ve already noticed that this is not a low calorie dish. But in my defense, it’s not deep fat fried with a side of French fries either. So when I serve this dish, I make sure my sides are very simply prepared. (I try to be good, I really do!)

So next time you crave seafood (the kind with fins), give this recipe a try. And no, I see no reason why this dish wouldn’t be just as marvelous with salmon, halibut, catfish, tilapia, etc. Just make sure it is a fairly firm-fleshed sea critter. And check for bones. Nothing spoils the enjoyment of a delicious seafood dish faster than trying to work your way around bones. BTW, I use a pair of tweezers for removing fish bones. And no, I do not pluck my eyebrows with the same pair. I keep a dedicated pair of tweezers in the kitchen just for dealing with pesky bone removal. And yes you can run them through your dishwasher.

Well I think I have covered everything I needed to say about this dish. Mr. C. has just delivered a beautiful martini to me, so that must mean it is time for me to get going with dinner. And of course I am trying out a new recipe tonight. I’m calling it Roasted Honey-Mustard Chicken Breasts. If it works, I’ll be sharing the recipe with you in the next few days. If it doesn’t work, you’ll never hear about it again. Cheers!

¾ c. grated Parmesan cheese

½ tsp. granulated garlic

1 tsp. paprika

¼ tsp. kosher salt

freshly ground black pepper (not too much)

zest from ½ of a large lemon

1 T. chopped Italian parsley

3 T. unsalted butter

2 T. drained capers

4 cod fillets (total of about 1½ pounds), de-boned and patted dry 

4 lemon wedges

Combine the Parmesan cheese, granulated garlic, paprika, salt, pepper, lemon zest, and parsley in a shallow pan. Lightly butter a baking dish large enough to accommodate the fish in a single layer.

Melt the butter in a medium fry pan. Remove from heat and stir in the capers. Dip both sides of the fish in the butter, then in the cheese mixture, coating both sides as well as possible.

Place in the prepared pan and pat the remaining topping onto the cod as much as possible. (If you have leftover caper butter, pour over the unbaked fish.)

Bake in a pre-heated 400 degree oven for 12-15 minutes or until the fish is easily flaked with a fork. Serve each piece with a lemon wedge. 


CHICKEN WITH PROSCIUTTO AND PEPPER JACK CHEESE

After two weeks of painters having their way with our living room, kitchen, butler’s pantry, entry way, hall, stairway to the lower level, downstairs hall, and our master bath, I was just about ready to go crazy. (They aren’t quite done yet, but at least I can see my floors and the counters in my kitchen.) So, this past Friday, after they had removed most of the protective paper and tape from the kitchen, I was finally able to cook a real dinner for the first time in 13 days. 13 DAYS!

Now, I don’t know whether this chicken dish tasted amazing because I was totally tired of restaurant food, or because it truly was flat out delicious, but I’m going to lean towards the latter. Plus it was easy to prepare. That’s always a plus in my book!

I found this recipe on the Genius Kitchen site, but of course I made a few changes. I often do a search under ingredients that I really need to use up before they go bad. And sometimes the list is very unusual. But I never fail to find a recipe, even if the ingredients appear at first site to be totally incompatible. Not these ingredients which were obviously made for each other. But you know what I mean. Ingredients like brie and mango chutney. (See my recipe under Two Brie or Not two Brie. Or bacon, onions, garlic, and brown sugar under Bacon Jam.)

So when I searched under chicken, prosciutto, and Pepper Jack cheese, there were a fair number of recipes that included this combination. But the basis for this recipe really caught my eye. And I am so glad it did! This recipe is so scrumptious it should be in its own category – Perfect for Company!

So next time you need an easy and stress less main dish for a family and/or friends gathering, I recommend this lovely recipe. It can easily be doubled, tripled, etc. It can even be made ahead and refrigerated until needed. If you do make it ahead, be sure to bring it to room temperature before you place it in your oven. You really don’t want to overcook the chicken by having it in the oven for any longer than necessary.

  • ¼ c. unbleached all-purpose flour 
  • ½ tsp. kosher salt
  • freshly ground black pepper
  • 2 boneless, skinless chicken breasts, cut in half lengthwise
  • 4 T. unsalted butter, divided
  • 4 slices thinly cut prosciutto, roughly chopped into pieces
  • 1 c. shredded Pepper Jack cheese 
  • 2 T. finely chopped shallot  
  • 8-10 button mushrooms, thinly sliced
  • 2 small garlic cloves, minced
  • ¼ tsp. dried thyme
  • ¼ c. dry white wine
  • ¼ c. chicken broth
  • ¼ c. dry sherry
  • ¼ c. half & half, whole milk, or whipping cream

Place the flour, salt, and pepper in a bag. Shake the bag to blend the ingredients. Add the chicken and shake until the chicken pieces are totally coated. (Save any remaining flour in the bag for the sauce.)

Melt 3 tablespoons of the butter in a large frying pan over medium heat. Cook the chicken until it is a nice golden brown on both sides. Remove from frying pan (set aside the pan) and place the chicken in a lightly buttered 9×13-inch Pyrex baking dish or casserole in a single layer.

Top each piece with a quarter of the cut prosciutto and a quarter of the shredded cheese. Set aside.

Return the frying pan to the stove, add the remaining 1 tablespoon of butter, and cook the shallots and mushrooms until the shallots are soft. Add the garlic and cook for one minute.

Add about a rounded teaspoon of the coating flour to the pan; cook for one minute. Stir in the thyme, white wine, and broth. Let burble over low heat for about 5 minutes. Add the sherry and heavy cream. Adjust seasoning. Cook for another minute or two.

Pour the sauce over the chicken. Bake in a pre-heated 375 degree oven for about 20 minutes or until bubbly.