Category Archives: MAIN DISH RECIPES

HEALTHY GROUND TURKEY MEATBALLS IN HOMEMADE MARINARA SAUCE

This is a low fat recipe. Both the meatballs and the sauce are basically good for you. Now what you serve them on can be a different story. But I’ll get to that later. For now let’s just concern ourselves with the meatballs and sauce.

First the meatballs. What can I say except I probably have never met a meatball I didn’t like. OK, that’s not true. Let me re-state that. I have never met a homemade meatball I didn’t like. I have unfortunately met quite a few mass produced meatballs that, well frankly, I wouldn’t give to a dog. (And I’m not crazy about dogs.)

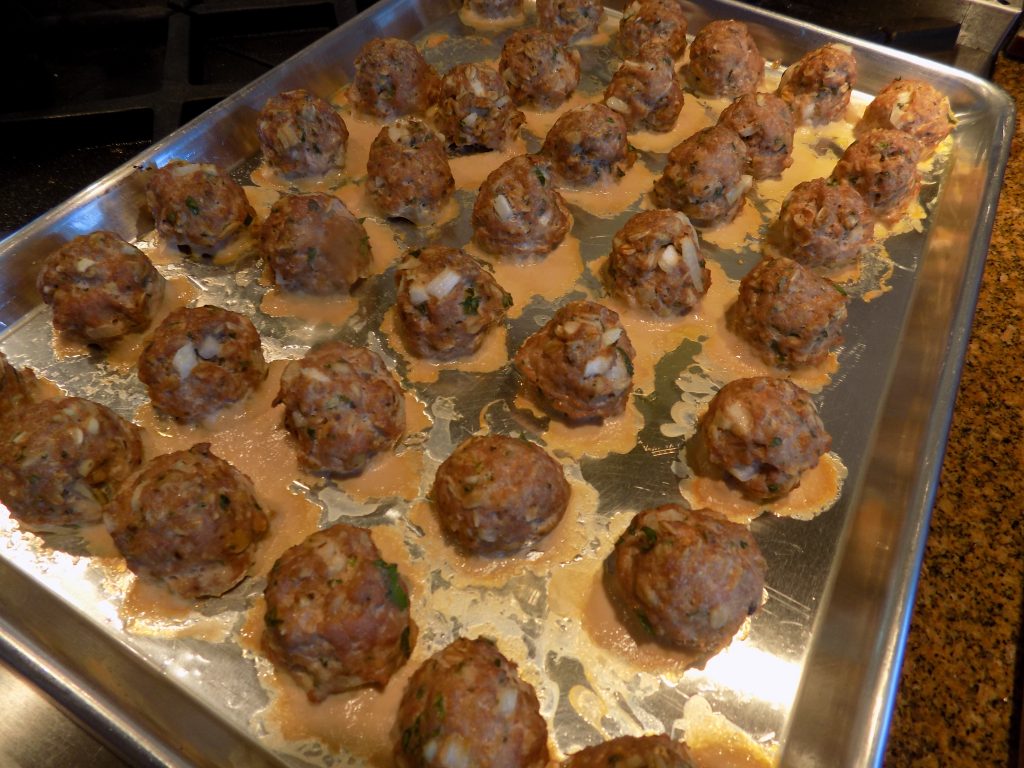
But homemade meatballs. Ahhhhh. They are routinely delightful. And these ground turkey meatballs are no exception. Thanks to the Culinary Hill web site for this terrific meatball recipe.

Now on to the marinara sauce. This is my “go to”, never fails me, always loved by one and all, never to be changed, simple, always in style, Italian to the core, decades old recipe for marinara sauce. (If that description doesn’t win you over, I haven’t a ghost of a chance of converting you to my thinking, so leave this post immediately.)

But if you are still with me, this is the sauce for you.

Now onto what to serve these delightful meatballs and this incredible sauce on. (And yes I know not to ever, ever end a sentence with a dangling participle. But shucks, I only minored in English in college, so cut me some slack!) Anyway…..

If you are truly concerned about healthy eating, you can always serve these meatballs and this sauce on spaghetti squash, quinoa, black beans, or shirataki noodles. (Haven’t tasted shirataki noodles myself, but what I have read scares the heck out of me, so you will have to venture into this uncharted territory with someone else as your guide.) But if you are like me, and want to stick to the real reason meatballs and sauce were invented in the first place, let’s talk pasta. (And yes I know, pasta gets a lot of bad press.) But from everything I’ve read and heard, foods we eat affect our blood sugar. And since pasta is a high carbohydrate food, diabetics particularly need to watch portion sizes so their blood sugar levels don’t spike.

But pasta itself is a lower glycemic index food. And eating food with a lower glycemic index can help keep blood sugars more stable than eating foods on the higher glycemic index scale. So here’s the good news. Cooking pasta al dente, which I always recommend, helps keep blood sugar in better control. Plus, when pasta is cooked al dente, it remains firmer for better texture, mouth feel, and taste. So for those of you who are especially concerned, but don’t want to entirely give up pasta, always cook pasta al dente, if not molto al dente, and reduce the quantity you normally consume.

For more information, go on line. There is more information about pasta being OK (within limits) than you can ever hope to read. Also there are some great articles on how to cook pasta al dente. Actually molto al dente is best when you are adding the pasta to a sauce. I recommend an article written by Alex Delany for Bon Appétit magazine – December 14, 2017. Good information.

I hope you enjoy these recipes. Happy eating everyone.

Meatballs Recipe:

½ c. finely minced onion

3 garlic cloves, finely minced

1/3 c. minced fresh parsley

2 lg. eggs

2 tsp. Worcestershire sauce

½ tsp. dried basil

½ tsp. dried oregano

1 tsp. seasoned salt

freshly ground black pepper

1 c. rolled oats

2 lbs. ground turkey or chicken (93% lean)

extra virgin olive oil

In a large bowl, combine the onion, garlic, parsley, eggs, Worcestershire sauce, basil, oregano, seasoned salt, and pepper.

Stir in the oats and ground turkey. Mix well, but don’t over work the meat. Using a small ice cream scoop, plop meatballs on a lightly greased rimmed baking sheet. Using a pastry brush, gently slather each meatball with olive oil.

Bake the meatballs in a pre-heated 400 degree oven until browned and cooked through, about 15 to 20 minutes (an internal thermometer should read 155 degrees). Remove from oven and use immediately, or allow to cool and refrigerate or freeze.

To freeze the meatballs:

Arrange in a single layer on a baking sheet, not touching. Freeze until solid, about 1 hour, then transfer to a freezer-safe container and store up to 1 month.

Marinara Sauce Recipe:

2 T. extra-virgin olive oil

½ c. chopped onion

2 cloves garlic, chopped

1 (28-oz.) can chopped or diced tomatoes (Italian tomatoes preferably)

1 bay leaf

pinch crushed red pepper flakes

1 tsp. dried oregano (I use Mexican oregano)

½ tsp. kosher salt

freshly ground black pepper

3 T. chopped fresh basil leaves

1-2 T. butter, opt.

In a large covered sauce pan, heat the oil over medium high heat. Add the onion and sauté until soft and translucent, about 6 minutes. Stir in the garlic and cook for an additional minute. Add the tomatoes, bay leaf, red pepper flakes, oregano, salt, and pepper. Stir to combine ingredients. Bring to a boil, reduce heat, cover, and simmer for about 30 minutes. (Take the lid off part way if the sauce is too thin or allow to gently burble away until the sauce reaches your desired thickness.) Remove from heat, discard bay leaf, add the basil, and adjust seasoning. If the sauce tastes acidic, add butter 1 tablespoon at a time to round out the flavor.


CHEESY STUFFED GREEN PEPPERS

For me, there is nothing that says “fall is really here” better than large, relatively inexpensive green peppers in the produce section of our local IGA. And every fall I buy the biggest and most gorgeous peppers I can find to fix one of my favorite dishes – stuffed green peppers. I absolutely love stuffed peppers. And of course, most years I decide that yet another stuffed pepper recipe on this site wouldn’t be a problem because everyone likes choices – so here goes with another option for this perennial favorite.

Since I’m still on my “let’s get healthier” kick (please may it last forever God), I decided to come up with a recipe that contained no starch. (Of course it still contains fat, because really, could you even conceive of a stuffed green pepper without cheese? I didn’t think so!) Anyway, this recipe does contain cheese, and plenty of it. But remember – cheese is a great source of calcium, fat, and protein. It also contains high amounts of vitamins A and B-12, along with zinc, phosphorus, and riboflavin. So to my thinking, all things considered, if I am going to push the boundaries of healthy eating, cheese is still better for me than say – a chocolate chip cookie even if it’s made with whole wheat flour. But if you are still concerned about the amount of cheese in this recipe, you can always reduce the quanity. Just don’t tell me about it or I will feel guilty. In other words, don’t spoil my self-delusion that cheese is really good for us. Thank you.

But back to this recipe. For starters, let me just say that McCormick’s Grill Mates Montreal Steak Seasoning is a really great item you should consider adding to your spice collection. I use it a lot. Just a tablespoon added to a pound of ground beef makes for truly delicious hamburger patties. And I often sprinkle it on steaks before I throw them on the grill. It’s also fabulous in meatloaf. Or added to the braising liquid for pot roast. And the best part. If you buy it at Costco in the 1 lb., 13-oz. container, it is very inexpensive. If you don’t want to start with as large an amount, Bartell’s (drug store) usually carries the small bottles in various flavors at a very good price. (FYI: I buy the small jars in several flavors for my trailer collection of spices and herbs.)

Anyway, give this recipe for peppers a try. Or check out my other stuffed green pepper recipes on this site. All are really tasty. And if you have never eaten a stuffed green pepper because you think that every bite would include green pepper – you’re right. But also know that cooked peppers are milder in flavor than when they are raw, and are a perfect partner with savory sauces and nicely seasoned meat.

Now you will have to excuse me. There’s half of a stuffed pepper in the refrigerator. And I’m hungry. And Mr. C. is at a rehearsal. So it’s mine. All mine. Life is good!

3 large or 4 small green peppers

1 T. extra virgin olive oil

1 lb. lean ground beef

½ c. chopped onion

1 lg. stalk celery, finely diced

3 garlic cloves, finely minced

8-oz. tomato sauce

pinch crushed red pepper flakes

1 T. Montreal Steak Seasoning

1 T. dried parsley

freshly ground black pepper

1 T. Worcestershire sauce

1½-2 c. shredded cheese (whatever combination of cheese you happen to have on hand)

Slice the tops off the peppers and remove the seeds and membranes. Set peppers aside. Discard the stem, and chop the pepper tops into small pieces.   

Heat the olive oil in a large frying pan and sauté the ground beef until it’s starting to brown. Add the chopped pepper tops, along with the onion and celery; cook until onion is translucent. Add the garlic and cook for 1 minute. Add the tomato sauce, crushed red pepper flakes, Montreal Steak Seasoning, parsley, black pepper, and Worcestershire sauce. Simmer for a few minutes to blend flavors. Remove from heat.

While the meat sauce is simmering, bring a pan of water to a boil. Add the green peppers and cook for 5 minutes. Remove from water and drain. Place in a lightly greased baking dish.

Fill each pepper half way, add half the cheese; add remaining meat mixture until it reaches the top of the pepper. (If you have extra filling, tuck it in among the peppers. Makes for great nibbles for the cook!)

Bake in a pre-heated 375 degree oven for about 40-50 minutes or until the peppers are soft and the filling is brown. (If the top is browning too quickly, gently lay a piece of aluminum foil over the whole mess.)

Remove from oven, top with remaining cheese and return to oven until cheese is melted. Great served with a side of brown rice and/or a salad.   

LEMONY BONELESS, SKINLESS CHICKEN THIGHS

Now this is what I call a quick and easy chicken dish. Really very little time spent in either preparation or cooking time.

I based this dish off of one of my favorite ways to cook chicken breasts – Chicken Piccata (recipe on site). But unlike my piccata recipe, there is no flour, butter, or chicken stock in this recipe. (I am trying to cut down on our butter and high carbohydrate consumption, so this is my stab at eating healthier. Without sacrificing flavor. Not an easy task, I assure you!)

But when each of us bit into the chicken last evening, we didn’t feel like we were missing a thing. Great flavor, great texture, and just the right amount of zing from the lemon juice and capers. And even a tiny bit of sauce to spread on the chicken pieces.

And sure, I could have made a meal of the sauce alone. But sauces are not what I should be eating, even if they are one of my favorite food groups.

Unhappily, my list of food groups is very different than the 5 healthy traditional food groups listed below:

Vegetables

Fruit

Grain (cereal) foods, mostly wholegrain and/or high cereal fiber varieties

Lean meats, poultry, fish, eggs, tofu, nuts, seeds, dried beans, and legumes

Milk, yoghurt, and mostly reduced fat cheese

My food groups:

Vegetables and some fruits

All dairy products, the higher fat content the better

Lean meats, poultry, fish, eggs, tofu, nuts, seeds, whole grains, dried beans, and legumes

Every conceivable kind of sauce

Bread

Chocolate

Gin

(And yes, I have 7 in my food groups list.) But there is not one of those categories on my list that I would ever be able to give up without feeling that I was being severely picked upon. But alas, with age some eating habits simply have to change. And hopefully I will continue to realize as I did with this recipe, that it is sometimes much better for us if I gracefully substitute a healthy ingredient for one that is possibly not as good for us.

But never fear. I will still be posting recipes that might cause some health-food conscience foodies to break out in hives. Because I am still alive and great food is still one of the reasons I get out of bed in the morning. I just plan to practice moderation. And continue to create and adapt recipes to better help all of us remain healthy. Stay tuned. In the meantime, give this simple recipe a try. It really is delicious. And easy.

5-6 small boneless, skinless chicken thighs (organic if possible)

kosher salt

freshly ground black pepper

2 T. extra virgin olive oil

1/3 c. dry white wine

1 garlic clove, finely minced

juice of 1 lemon

1 T. drained capers

1 T. chopped Italian parsley

Cut off any fat or sinew on chicken thighs. Dry off the pieces with a paper towel and sprinkle lightly with salt and pepper.

Heat the olive oil in a medium-sized frying pan. Add the chicken pieces and cook for about 3-4 minutes on each side or until light brown and done. Do not overcook. Remove to a plate. Tent with aluminum foil to help retain heat.

Deglaze the pan with wine and add the minced garlic. Cook for about a minute and add lemon juice and capers. Cook until the sauce is about 1/3 reduced.

Place the cooked chicken back in the pan and turn pieces until both sides are covered with sauce. Remove from heat; garnish with parsley. Serve immediately.

GARLIC AND ROSEMARY ROASTED RACK OF LAMB

Now, I have a quest for each of you readers. If you can find an easier and more delicious way to serve Lamby pops (that’s what we call the individual ribs on a rack of lamb) please do not hesitate to send me an email with that recipe. But remember, one of the qualifications is easier. Because I too have an incredibly delicious recipe for lamby pops already on this site (Rack of Lamb with Kalamata-Rosemary Crust). But dear friends, it is just a whole lot more work to prepare. (But you should try it too, because it is really fantastic.)

Anyway, the main thing I want to convey is that this is an almost foolproof recipe that can be prepared in minutes. And yes, I am getting more and more inclined to take the easy road on meal preparation. But having confessed that, I still want the food I serve to be delicious. I just don’t want to spend as many hours in the kitchen as I used to.

So I came up with this take-off of my other recipe and found no fault with it at all. And to make the whole meal an effortless experience, I oven roasted some tiny potatoes in a bit of olive oil and herbs, and sliced up a couple of lovely tomatoes, sprinkled them with kosher salt and freshly ground black pepper, drizzled them with balsamic glaze, dribbled on some extra virgin olive oil, and lay a nice layer of fresh basil chiffonade over the whole works.     

All my prep work for this meal took me less than 30 minutes. In fact, I was finished prepping the meal before I finished drinking my before dinner libation. And that almost never happens. So for ease of preparation, overall presentation, and culinary appeal and flavor, I awarded myself the “Carr family spontaneous achievement of the day award”. (I received no resistance from Mr. C. for my self-aggrandizement. He knows on which side his bread is buttered. Smart man!)

4 garlic cloves, rough chopped 

2 tsp. finely minced fresh rosemary leaves

3 T. extra-virgin olive oil

1 tsp. Dijon mustard

1 Frenched rack of lamb, (just means you can see the nice shiny bones)

kosher salt

freshly ground black pepper

Whirl the garlic, rosemary, olive oil, and Dijon mustard in your food processor (use your mini processor if you have one) until the garlic is finely chopped and the mixture resembles a thick paste. (You probably won’t get a smooth paste, but that’s not you want anyway. Tiny chunks are your friend in this case.)

Lightly season the lamb with kosher salt and pepper. Rub the garlic mixture all over the rack of lamb, but mostly on the fatty side. Place the rack fat side up on a rimmed baking sheet and let stand at room temperature for at least an hour.

Roast the lamb in the upper third of a pre-heated 450 degree oven for 15 minutes. Turn the rack over and roast for 5-10 minutes longer for medium-rare meat. (The internal temperature for medium-rare lamb is 120-125 degrees.) When the meat reaches the desired temperature on your Instant thermometer, remove from oven and transfer to a carving board. Let rest for 10 minutes.

Cut the racks in between the rib bones and serve immediately.

INSTANT POT AND OVEN OLD FASHIONED BAKED BEANS

before the beans went in the oven

So call me old-fashioned, but I don’t think a BBQ picnic is complete without baked beans. And not the kind of baked beans containing fancy new ingredients like quinoa, agave nectar, or stevia. I’m talking about the kind of baked beans I’ve been preparing since my early 20s. Dry beans rehydrated with lots of ketchup, brown sugar, bacon, onion, rum, Dijon mustard, etc. (OK, I didn’t use rum or Dijon mustard when I first started making baked beans. But a few concessions for the sake of flavor simply had to be made as I developed as a cook. And I’m sure my father, the baked bean maker in our family would agree with each of my respective inclusions.)

So, because I consider myself to be am open minded person, and my daughter Paula just happened to have gifted me with an Instant Pot a couple of Christmas’s ago, I decided to make this recipe for baked beans a generational mash up.

First and foremost, baked beans have to be made from scratch. (And yes I have cheated over the years and purchased a big old can of baked beans and doctored them up to my liking. But in my defense, that was when I was much younger, still working, and had kidlets littered about the house. However, now that I am retired with virtually nothing stopping me from spending hours in the kitchen, I no longer go that route.)

Anyway, this recipe contains all of the ingredients I used when I began preparing baked beans decades ago, except for of course the aforementioned rum and Dijon mustard.

So if you too love baked beans, give this recipe a try. And yes it still takes a good deal of time to bake beans from scratch. But most of the time you are free to pursue other activities. Very little prep time is involved. The rest of the time your Instant Pot and oven are doing the heavy work.   

So host a picnic before the summer is over. There is just no better way to spend quality time with your family and friends than by getting your faces totally smeared with BBQ sauce, or having your arms and elbows become sodden from the juices dripping out of a luscious hamburger. Good times my friends. Good times!

And for a recipe for Vegetarian Baked Beans – check out the recipe already on this site.

2 lbs. Great Northern beans, picked over and washed (about 4½ cups dry beans)

8 c. water, plus more as needed

1 lg. yellow onion, chopped, divided

2 tsp. paprika

3 garlic cloves, chopped

2 bay leaves

¾ lb. lean thick-cut bacon, cut into small pieces

2/3 c. molasses (not blackstrap – too strong)

2 c. ketchup, or more to taste

½ dark rum, opt.

2 T. Worcestershire sauce

2 T. dried parsley

½ tsp. dried thyme leaves

½ tsp. dried savory

1-2 tsp. seasoned salt

freshly ground black pepper

¼ c. Dijon mustard

1½ c. brown sugar

Place half of the beans, water, half of the chopped onion, paprika, garlic, and bay leaves in the Instant Pot. Note the water level for future reference. Set on high and cook for 35 minutes. (See guide below if not using Great Northern dry beans.) Once machine is done cooking, allow it to naturally release pressure for about 20 minutes. Manually release the remaining pressure and carefully remove the lid. Using a large slotted spoon, lift the beans into a container. Save the water.

Add the remaining half of the dry beans and enough water to bring the level in the pot up to where it was for the first set of beans.

Please note: If you have a large Instant Pot, you may be able to pressure cook all the dry beans at once. If so, lucky you! I only have a 6 quart pot so I had to cook the beans in 2 batches.

While the beans are cooking, fry the bacon in a large fry-pan until crisp. Add the remaining onion and sauté just until translucent. (And no, you don’t drain off the bacon fat unless there is quite a bit. But with lean bacon you shouldn’t have too much.) Remove pan from heat and stir in the molasses, ketchup, rum, Worcestershire sauce, parsley, thyme, savory, salt, pepper, Dijon mustard, and brown sugar.

When the beans are all cooked, drain off all the water. (Save a couple cups of the water just in case additional liquid is needed during the baking process.) After the beans are drained, add them to the fry pan. Taste the sauce and adjust seasoning as required.

Pour into an oven proof covered casserole. Cover and bake in a pre-heated 275 degree oven for about 2 hours. Remove the lid and continue baking for another hour so that the top can brown nicely. (During the baking time, check the beans periodically to make sure they aren’t drying out too much. Add reserved Instant Pot water as needed.)

Remove from oven and serve warm.

Can be made ahead, refrigerated, and warmed just before serving.  

Instant Pot Cooking Time for Dried Beans:

Black Beans–30 Minutes on High Pressure

Chickpeas–40 Minutes on High Pressure

Kidney Beans–35 Minutes on High Pressure

Pinto Beans–25 Minutes on High Pressure

Navy Beans–30 Minutes on High Pressure

ĆEVAPČIĆI (SERBIAN GRILLED SAUSAGES)

Although this is basically a Serbian recipe, Ćevapčići – pronounced chae vap chee chee (or something like that) is served in some form or another throughout the Balkan States. Basically Ćevapčići is just a wonderful combination of 3 types of ground meat, spices, and veggies. When formed into patties, or into the more traditional shape of small sausages, grilled, then laid in a warm pita and smothered with Tzatziki, shredded lettuce, diced tomatoes, and chopped white onion, there is just nothing finer.

And who told me about this wonderful dish? My PA (Randy) at my dermatologist’s office. (You just never know when you might meet a foodie.) Life is wonderful. Right!

Anyway. You need a new taste sensation? You need a new way to fill a pita bread pocket? You need an amazing new way to justify eating an inordinate amount of Tzatziki at a single meal? Well thanks to Randy, you now have it! And while you’re at it – make some hummus to go along with the meal. (You can never have too much “Mediterranean” food around. In all our travels, we have never found anything that was made, grown, or served around the Adriatic and Mediterranean oceans that we didn’t love!)

So go a little out of your comfort zone, and treat yourselves to some Ćevapčići. Even if you just grill this mixture up and serve it like you would a regular all beef hamburger, you will not be disappointed. Even go without a pita pocket or bun of any kind! Set a new trend. Be the first on your block! So stop balking and go Balkan in the near future. You will thank me. I know you will.

Oh, and sorry I haven’t posted any new recipes for a while. We were on vacation and posting our trip report when we got home took precedence over posting a new recipe. But I have some fun recipes to share with you, so keep tuning in.

1 lb. pork sausage

1 lb. ground beef  

1 lb. ground lamb

1 egg white

1 T. Hungarian paprika

1 tsp. baking soda  

1 tsp. kosher salt

¼ tsp. cayenne pepper

freshly ground black pepper

1 c. finely chopped onion

4 cloves garlic, minced

2 T. finely chopped Italian parsley

warm pita bread, opt.

Tzatziki (recipe below), opt.

shredded lettuce, opt.

chopped tomato, opt.

chopped white onion, opt.

Combine the pork sausage, beef, and lamb together in a large bowl. Whisk the egg white, garlic, onion, parsley, paprika, baking soda, salt, cayenne, and black pepper together in another bowl. Pour the egg mixture over the meat and mush together with your hands.

Form into fairly thick patties about 3½-inches in diameter. Place on a waxed paper lined platter. Refrigerate for at least 4 hours and up to 24 hours.

Grill over 350 degree heat, 4-5 minutes per side, or until nicely browned and kind of spongy. Serve in warm pita bread with Tzatziki, shredded lettuce, chopped tomato, and chopped white onion.

TZATZIKI  

2 T. extra virgin olive oil

2 c. plain Greek Yogurt

3 small or 2 medium garlic cloves, finely minced

½ tsp. dill weed

¼ tsp. kosher salt, or more to taste

freshly ground black pepper

1 English cucumber, partially peeled, seeded, grated, and allowed to drain for a few minutes in a colander

Combine all ingredients. Adjust seasoning. Cover and refrigerate until ready to serve.

CHICKEN CORDON BLEU CASSEROLE

Once in a while I get an idea that won’t stop nagging at me. And the inspiration for this recipe came as one of those thoughts that just would not go away! And I’m glad it didn’t. Because the result was this recipe that is ever so much easier not only to prepare, but to eat than a regular chicken cordon bleu.

Now the first time I prepared this dish, I made the mistake of not making enough sauce. The casserole came out too dry. (My own fault since I glommed this recipe together from several I looked at on the internet.) But having eliminated that problem by doubling the sauce part, this is now a dish fit to serve company. Very tasty, and can be prepared ahead of time. I love that in a casserole.

So if you too love chicken cordon blue, but don’t appreciate the mess associated with the real thing, give this dish a try. It’s lovely. Great flavor and even a nice presentation.

And a general apology to our guests Tim & Susie, Todd & Cindy for having to eat my first attempt at this recipe. This version is much better. Honest it is!

And sorry about no photo of the casserole. Must have been brain dead. Just imagine a Pyrex dish with browned crumbs on the top and you have the whole picture. So to speak.

Chicken:

2 T. unsalted butter

4 boneless, skinless chicken breasts, cut into ¾-inch cubes  

kosher salt

freshly ground black pepper

Heat the butter in a large skillet. Add the chicken cubes lightly sprinkled with salt and pepper. Fry just until cooked through. Do not over-cook. Remove pan from heat. Using a large slotted spoon, transfer the cooked chicken to a roughly 9×13-inch casserole or glass Pyrex dish. Set aside. Pour the remaining liquid from the fry pan into a 4 cup measuring implement. Set aside.

Sauce:

6 T. unsalted butter

3 cloves garlic, finely minced

6 T. all-purpose flour

3 c. whole milk (approximately)

1 tsp. chicken bouillon  

3-4 T. Dijon mustard, or to taste

1½  c. grated Parmesan cheese

kosher salt

freshly ground black pepper

Melt the butter in a heavy pan. Add the garlic and cook for 1 minute. Whisk in the flour, and cook for 1-2 minutes. Add enough milk to the reserved chicken frying liquid to make 4 cups. Slowly pour in the milk mixture while whisking quickly to avoid lumps. Add the chicken bouillon. Whisk constantly over medium heat until the mixture begins to simmer and thicken, about 3-5 minutes. Once the sauce has bubbled and thickened, remove from heat and stir in the mustard and Parmesan cheese. Stir until the cheese is melted. Season to taste with salt and pepper.

Casserole Assembly:

12 slices deli ham (about ½ lb.), cut into small pieces (I use Black Forrest ham)

12 oz. shredded Swiss cheese, or more to taste

2 T. unsalted butter  

2 c. Panko bread crumbs    

Scatter about half the cut ham over the cooked chicken pieces. Evenly place the grated Swiss cheese over the first bit of ham. Scatter the remaining ham over the cheese. Spread the sauce evenly over the top.  

Melt the remaining 2 tablespoons of butter in a skillet over medium heat. Remove pan from heat and stir in the panko. Sprinkle over the top of the casserole. Note: If you are making this dish ahead of time, don’t add the Panko topping until just before you pop the casserole in the oven.

Bake in a pre-heated 350 degree oven for 30-40 minutes or until the top is browned and the casserole is bubbling. The last half of the baking time can be convection. (This will help brown the top.) Remove from oven and let sit for about 5 minutes before serving. 


PIZZA

OK, I know I am probably alone here, but I actually like homemade pizza better than 90% of the pizza found in restaurants. The 10% that I like better is baked in Italy but I simply can’t afford to fly to Rome every time I get a pizza craving! No duh!!!! And I have to admit; the part about actually being in Italy probably has something to do with my feeling that the best pizza is made there. I do so love Italy!

Now of course, intrinsic to my preference for homemade pizza I include the fact that I have friends who make incredible pizza in and outside of their own homes. Our dear friends Chip and Linda who own the Quillayute River Resort* in Forks, WA have an Italian pizza oven in their home. And Chip is a master bread baker. So between the amazing crust that he prepares from scratch and the oven that is designed for the purpose, Chip’s pizzas are amazing. And our great friend Tim in Anacortes also prepares fantastic pizzas. He actually bakes his creations on his grill. Fabulous.

But I do neither. I use my oven. I crank the sucker up to 475 degrees, bake the pizza on the bottom rack, and use the convection setting. That’s as far as I am willing to go to insure tasty pizza. I simply can’t foresee a real pizza oven in my future. And if I tried baking pizza on our grill, I would either burn myself or worse yet, burn down the house. (I am not a grill queen. And I don’t want to task Mr. C. with a grill assignment I am unwilling to try myself. We have our positive attributes, but mechanical aptitude is not one of them! Two spatulas, hot flames. Not going to happen!) So we are stuck with pizza ala Chez Carr.

In my opinion, the first thing about any good pizza is the crust. And I happen to like thin crust. I want it to have flavor, but not so much that it detracts from the rest of the ingredients. The second thing I think is essential to the overall appeal of a pizza is the sauce. For years I would make a tiny bit of sauce and spread it on very lightly. Wrong! The sauce is important. It should be very flavorful and should not be used sparingly.

The next ingredient that is super important – cheese. Gotta have plenty of cheese or why bother?

And then pepperoni, Italian sausage, chopped onion, black olives, mushrooms, and bell pepper. What is not to like in this combination? For me it is the very definition of pizza. But I live with a guy who likes pesto sauce or a white pizza sauce, so I am going to be trying out recipes with more contemporary ingredients in the next few months. If you have a favorite I would love to hear from you.

But in the meantime, give this recipe a try. Your kids will love it. They won’t even notice the whole grain flour in the crust. They might not like the extra onions or bell pepper pieces. But the great thing about pizza is that you can add ingredients to one part of the pizza, and leave them off the other side. Everyone gets what they want and everyone is happy. Now how often does that happen with any other dish? Bon appetito!

Whole Wheat Pizza Crust:

¾ c. + 1 T. lukewarm water

1 pkg. or 1 scant T. active dry yeast

1 tsp. sugar

1 c. whole-wheat pastry flour

1 c. bread flour

½ tsp. kosher salt

extra virgin olive oil

Place water, yeast, and sugar in the bowl of your stand mixer. Stir with your bread hook. Let stand until the yeast has dissolved and starts to look bubbly, about 5 minutes. Stir in whole-wheat flour, most of the 1 cup of the bread flour, and the salt until the dough begins to come together. Add enough remaining flour to make a smooth, elastic ball of dough that pulls away from the sides and bottom of the bowl, about 4 to 5 minutes.

Pour a small amount of olive oil over the dough and turn to coat. Cover with a clean kitchen tea towel or plastic wrap. Let sit for about an hour or until doubled in size. Punch down. While the dough rises, prepare the pizza sauce and get the topping ingredients ready.

When the dough is ready, punch it down. Spread it out on a lightly greased large pizza pan or baking sheet. Spread the dough as thin as possible. Form a small rim by pinching edge of dough.

Red Pizza Sauce:

1 sm. can (8 oz.) tomato sauce

3 T. (about half of a 6 oz. can) tomato paste

1 T. Italian seasoning

1½ tsp. dried oregano (I use Mexican oregano)

½ tsp. dried marjoram

½ tsp. sugar s 

½ tsp. granulated garlic

¼ tsp. onion powder o

¼ tsp. kosher salt

pinch crushed red pepper flakes

freshly ground black pepper

Stir all ingredients together until thick and smooth.

Pizza Toppings: (my favorite)

sliced or shredded mozzarella cheese (about ¾ lb.)

1 lb. crumbled cooked bulk Italian sausage

1 lb. pepperoni slices

½ c. chopped onion

¾ c. halved black olives

1 c. sliced mushrooms

½ of a bell pepper, chopped

½ c. grated Parmesan cheese

Pizza Assembly:

Spread the pizza crust with a nice thick layer of pizza sauce. (Lots of sauce is best! If you don’t use it all, put the rest in the freezer for the next time you get a pizza craving or make marinara sauce.)

Spread about a third of the mozzarella over the sauce, then add the other topping ingredients. Finish with the rest of the mozzarella and the grated Parmesan.

Bake in a pre-heated 475 degree oven on the lowest rack for 12-14 minutes or until the cheese is bubbly and the crust is browned. Let sit for 3-4 minutes before slicing.

And of course you can change topping amounts, add or delete toppings, do whatever you want to your hearts content. Other topping ingredients we enjoy – sun-dried tomatoes, artichoke hearts, and anchovy fillets (when we are feeling worthy).

*Quillayute River Resort

Nestled in a secluded forest by the Quillayute River, this relaxed, all-suite resort is 7 miles from La Push Beach and 16 miles from Bogachiel State Park.

The cozy 1-bedroom suites feature full kitchens with vintage-style appliances, as well as living areas with fireplaces and pull-out sofas. All have satellite TV, free Wi-Fi and heated bathroom floors, plus covered porches with river views and BBQ grills.

Each of the five riverside housekeeping suites have a comprehensively-equipped kitchen with charming, completely refurbished 1950s era appliances, and new pots, pans, dishes, and utensils – everything you need. Kitchens also come equipped with toasters, blenders, electric hand mixers, microwaves, coffee makers, coffee, salt, and pepper.

Bedrooms have either 2 double beds or 1 King size bed, DISH TV with ESPN, and DVD/CD players. Other amenities in all the suites include DSL Internet connections, clock radios, telephones, and a collection of books for the non-electronically inclined.

Relax in the comfort of your living room while you watch the river flow and cozy up next to the fireplace.

Bathrooms are equipped with heated tile floors, hair dryers, full-size bathtubs, and EO Products – Organic Skin and Hair Care Products soaps, bath gels, and lotions.

Each suite has its own set of deck chairs and a charcoal barbeque on the covered porch overlooking the river. Each suite is also separated from the next by an enclosed garage.

INSTANT POT MEXICAN SHREDDED BEEF ENCHILADAS

I want you to know just how brave I have become. I have actually used my Instant Pot 3 times in the last few weeks. Amazing right? And I must say in all honesty – what in the heck was I worried about? My Instant Pot is so easy to use, and so far the results have been terrific. OK, I still don’t sauté in my Instant Pot because I like to control that step on my stove top. But cook dried beans, or in this case meat that would normally have to simmer for hours, well I am now so on board the Instant Pot train! And the pot is even easy to clean! Better and better.

So the other day I got a wild hair to make a shredded beef enchilada. I love Mexican food, and already had a great recipe for Cheese Enchiladas with Red Chili Sauce (the best red sauce you could ever hope to create at home BTW), but my mouth was craving shredded beef. So I went on line and glommed together this recipe. And I must say it filled my expectations and then some. And easy? Oh yah!

So if you too have been the least bit hesitant to use your Instant Pot, get over your fears and give this recipe a try. I topped the enchiladas with homemade Pico de Gallo (on site) and sour cream. And served Mexican Cabbage Salad (see recipe below) and Instant Pot refried pinto beans on the side. (Beans recipe to be posted in the next few days.)

And if you love shredded beef enchiladas as much as I do, make this recipe at your earliest convenience. It is just plain yummy. And if you have extra meat, don’t hesitate to freeze it for the next time you experience an enchilada craving.

2 T. extra virgin olive oil

3 lb. boneless chuck roast, all visible fat and gristle removed, and cut into 3-inch pieces

1 c. beef broth

juice of 1 lime

1 sm. can (8 oz.) tomato sauce

2 tsp. chili powder

2 tsp. dried oregano, preferably Mexican oregano

2 tsp. ground cumin  

1 tsp. paprika

1 tsp. kosher salt

¼ tsp. crushed red pepper flakes

¼ tsp. ground cloves

freshly cracked black pepper

1 can (lg. or sm.) chopped green chilies

1 sm. yellow onion, rough chopped

4 cloves garlic, rough chopped

2 bay leaves

flour tortillas, warmed on a dry griddle

Heat olive oil in a large frying pan. Brown all the pieces of meat and place them in your Instant Pot. Add more olive oil if necessary. (The beef chunks should be very well browned on all sides.) Don’t wash the fry pan. Pour off any fat, but leave the brown bits for later.

In a medium sized bowl, whisk the broth, lime juice, tomato sauce, chili powder, oregano, cumin, paprika, salt, crushed red pepper flakes, ground cloves, and black pepper together. Stir in the canned green chilies, chopped onion, chopped garlic, and bay leaves.

Pour over the meat and give the whole mess a good stir.

Place the lid on the instant pot and lock.  Steam release knob should be set on “sealing”.  Cook on manual setting (high pressure) for 60 minutes.  Allow pressure to release naturally.

Remove beef from pressure cooker and shred with 2 forks, discarding any fat. 

Pour the remaining liquid from the Instant Pot into the fry pan. Discard the bay leaves. Heat and stir up the brown bits on the bottom of the pan. If the sauce is not thick enough, make a simple water and cornstarch slurry (1 to 1 water and cornstarch mixture) and add to the meat juices. Bring to a boil, and whisk until smooth and sauce reaches desired consistency. Add shredded beef to pan. Adjust seasoning. Cook until warm.

Fill warmed tortillas with meat, roll, and top with Pico de Gallo and sour cream. Or whatever your heart desires. Meat can also be used as a filling for tacos or on a taco salad. Let your imagination be your guide.

Note: I have not tried making this shredded beef the more traditional way. That is on either my cook top or in the oven, but I see no reason why it wouldn’t turn out just fine. Just check it every hour or so to make sure the beef is not getting too dry. Add water or beef broth as required.

MEXICAN CABBAGE SALAD  

½ small head cabbage, chopped

1 jalapeno pepper, seeded and minced

½ small red onion, minced

1 carrot, shredded  

1 T. chopped fresh cilantro

juice of 1 lime

pinch kosher salt

freshly ground black pepper

In a bowl, mix together the cabbage, jalapeno pepper, red onion, carrot, cilantro, lime juice, salt, and pepper. Store in refrigerator until ready to use.

This salad would also make a great accompaniment to fish tacos. Just sayin’!  


SPICY FRIED FISH

I’m always looking for delicious ways to prepare fish. And we love cod. But cod is not a strong flavored fish, so that means it needs a little flavor boost from either the method of preparation or from the sauce it is served with. But Mr. C. is a strong believer that not only should the fish itself be flavorful, there simply must be a sauce or aioli to create perfection.

So yesterday I went on line and found yet another combination of spices that sounded appealing. I messed with the amounts, but the spice combination itself comes from the Kitchen Stewardship site and calls itself “St. Peter’s Seasoning”. It’s really a wonderful spice blend. (I’ve only been looking for the perfect fried fish recipe for 50 some years now. And this comes as close as any that I have tried. I added the flour, cornmeal, and milk part, and that worked very well with the spice combination. This is now my go-to recipe when I want a really tasty fried fish. And just in case you were worried. This coating is spicy, but not crazy spicy. And of course, you can always cut down or totally eliminate the cayenne pepper from the recipe.)

So please give this recipe a try. Although I used cod last evening, I think it would work just as well with halibut or any other firm fleshed fin critter. Happy dining.

1 T. granulated garlic

1 T. kosher salt

1 T. paprika

1½ tsp. onion powder

1½ tsp. freshly ground black pepper

1½ tsp. dried oregano leaves (ground in a mortar & pestle)

1 tsp. dried thyme leaves (ground in a mortar & pestle)

¼ tsp. cayenne pepper, or to taste  

½ c. unbleached all-purpose flour

1/3 c. finely ground cornmeal

½ c. milk

2 lb. fresh cod (the thicker the fillets the better), cut into portion size pieces

veggie oil

Blend the granulated garlic, salt, paprika, onion powder, pepper, oregano, thyme, and cayenne pepper together in a shallow pan. Whisk in the flour and cornmeal. Set aside.

Pour the milk in another shallow pan. Place the cod in the milk, turn the fillets so that all sides have been exposed to the milk, and refrigerate for 20-25 minutes.

Pour enough oil in a fry pan to coat the bottom. Heat to medium-high. When the oil is hot, remove the fish from the milk and coat with the flour/corn meal/spices mixture. Fry the fish until it is nicely browned. Carefully flip and cook the second side of the fish until it too is nicely browned. Remove the fish to a wire rack and serve immediately. I like to serve this fish with a simple tartar sauce. (See recipe below)

Simple Tartar Sauce:

¾ c. light mayonnaise

2 small garlic cloves, finely minced

1 tsp. finely grated lemon peel

4 tsp. fresh lemon juice

1-2 T. finely chopped dill pickle

1 T. finely minced onion

¼ tsp. kosher salt

freshly ground black pepper

Combine all ingredients. Refrigerate until needed.