Category Archives: DESSERT RECIPES

CANDIED GINGER REFRIGERATOR SHORTBREAD COOKIES

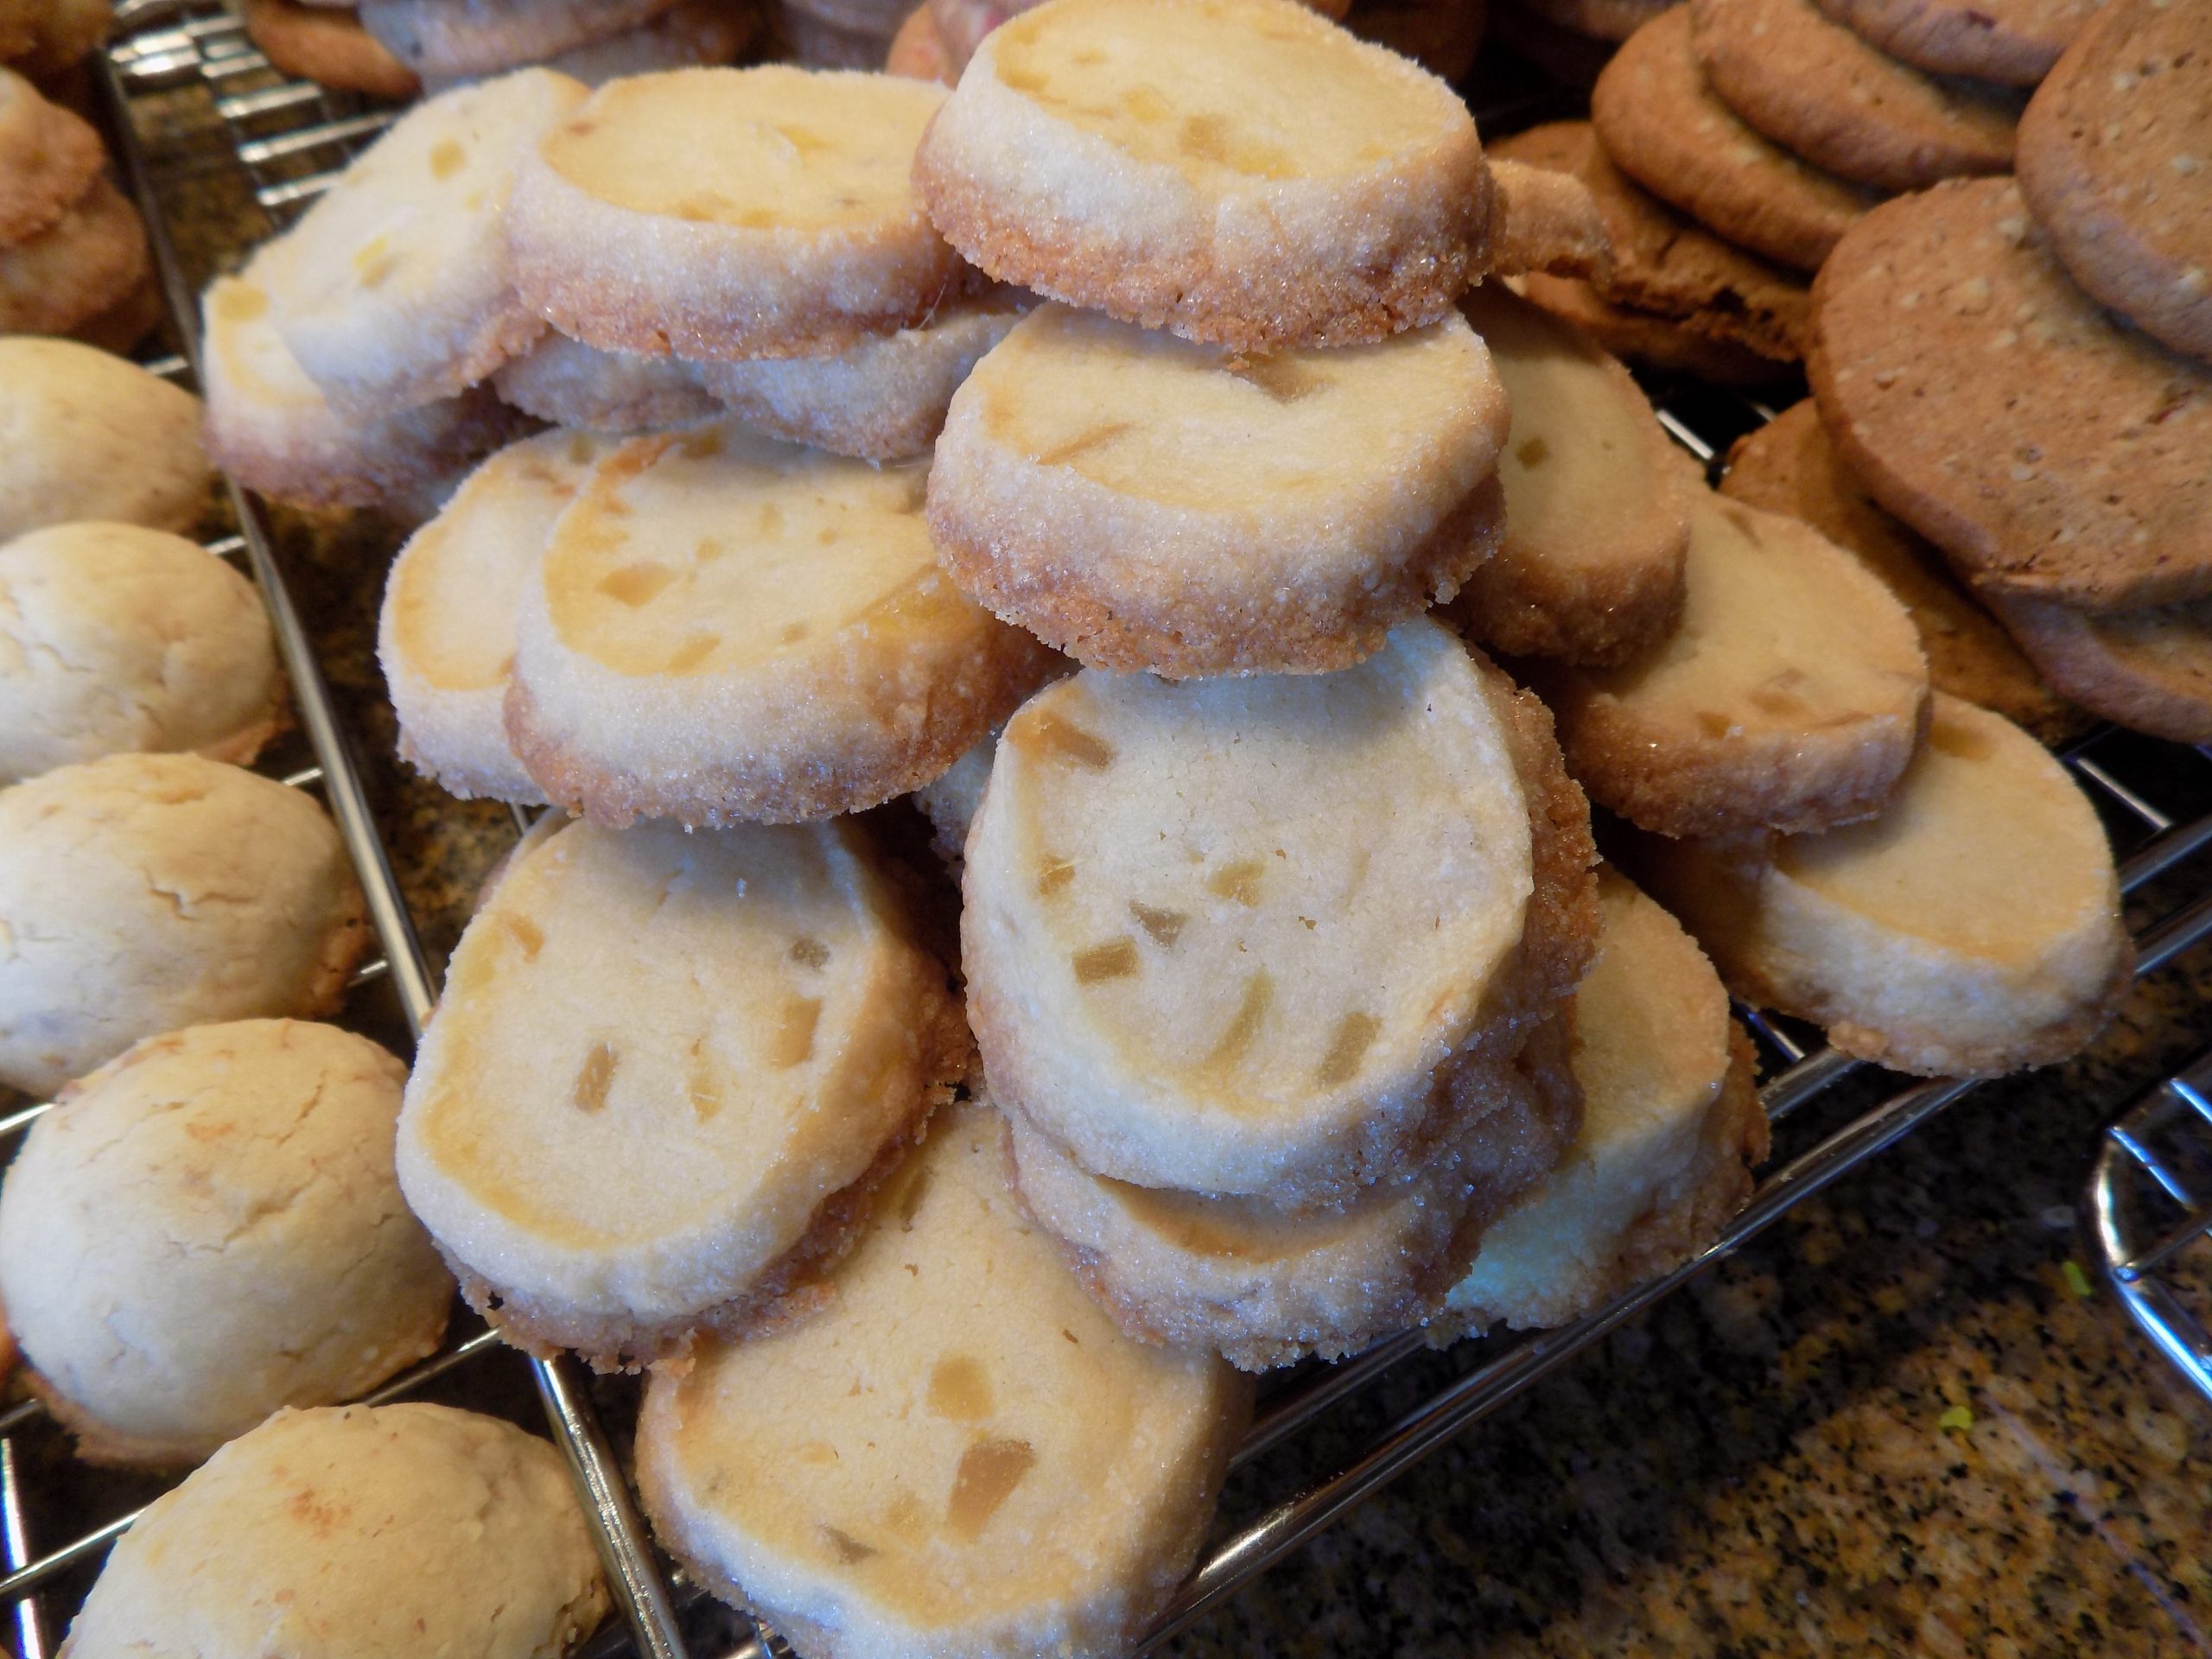
And yes, I know I already have a couple of recipes for candied ginger shortbread on this site. And they too are fine recipes, yes indeed they are. One is just a little different from this recipe and found under Christmas Refrigerator Shortbread Cookies. With the other, you bake the dough in a more traditional manner. That is to say, like a bar cookie. And most of the time, that’s how I make shortbread, regardless of what additives I choose to use that day. But for shipping, bar cookies are not the best way to ensure freshness. All of those cut edges and all. So, this recipe came into being. And I really like how these cookies turned out. But then, I love candied ginger. And shortbread. I mean really, what’s not to like? Anyway, these cookies are going to be part of my Christmas goodie packages this year. That is of course if we don’t eat them all first! But they’re so easy to build, I can easily make more.

Speaking of making life easy for yourself. (We weren’t, but we are now.) When building multiple types of cookies for gift exchanges, bake sales, Christmas gifts, etc., I have found what works best for me, is to make it a two-day process. One day building the dough, and the next day baking them off.

So, first day, you have a messy kitchen, but can re-use many of the same measuring cups and bowls over and over throughout the day. Same with ingredients. Designate an area in your kitchen to place all the supplies needed that day. Then as an ingredient is called for, you go to your stash, measure out what you need, and return the rest to its assigned place. Makes life so much easier. And believe me, it took me years to figure this out. My first inclination is always to clean up after myself as I go along. And this includes putting everything away after I’ve used it. And washing all the dishes before I go onto the next dish. That’s really how I normally work in the kitchen.

But like the other day when I was making 5 different kinds of cookie dough, I would have run myself ragged returning the flour to the pantry after every use. As if was, I just turned around, set it on the back counter, and proceeded to the next ingredient. And when that dough was complete, on to the next with all the necessary ingredients close at hand. Same thing with the measuring cups. Is it absolutely essential to wash out the measuring cup I use just for flour every time? Of course not! So why go to the bother?

Now I do realize that not everyone makes 5 kinds of cookies in one day. Most people are smarter than to do that to themselves. But even if I were only making 2 types of cookies, I would still use the same principal. Just a practical way to use my time more efficiently. And to save my body a few steps here and there. And that’s getting mighty important as I pack on the years. So, anyway I can save myself both effort and time, I do it! But on to the fun part of this 2 day adventure.

Day 2 of this process. Yeah team! No mess, just cookies going in and out of the oven for a few hours. (Kind of like a reward or a day off for good behavior.)

So, if you too are planning edible gifts for family and friends, I suggest you try my method for keeping sanity a reality. And make this one of the cookies you decide to gift to family and friends. And if you have quite a few goodie packages to put together, I would suggest doubling this recipe. You are definitely going to want to keep a few of these cookies for yourself.

As always, think giving not getting, think blessed if you have a roof over your head and enough food to feed your family, and think how you can make life better for those around you. Baking and sharing cookies is an easy way to lift both your own spirit and the spirits of the person or persons who are the lucky recipients of your largess. Peace and love to all.

1 c. (2 sticks) unsalted butter, room temperature

1 c. powdered sugar

1 tsp. vanilla

½ tsp. salt

½ tsp. ground ginger  

2 c. unbleached all-purpose flour

½ c. finely chopped candied ginger

granulated sugar

With an electric mixer, beat butter, powdered sugar, vanilla, and salt together until smooth and creamy. In a separate bowl whisk the ground ginger and flour together. Add the chopped ginger to the flour mixture and make sure every little piece of ginger is coated with flour. Add the whole mess to the butter mixture. Mix only until dough forms.

Divide the dough roughly in half. Place each piece of dough on a long piece of plastic wrap. Sprinkle granulated sugar over and around the dough. Using your hands, wrap the dough into the plastic wrap gently shaping it into a round log 1-1½-inches wide. (Your choice.) Refrigerate for at least 1 hour. Preheat oven to 350 degrees.

Un-wrap logs and using a serrated knife, slice dough 3/8-inch thick. (If dough feels too hard, leave at room temperature for 5 to 10 minutes before slicing).

Arrange slices, about 1-inch apart on a parchment paper lined baking sheet. Bake until lightly golden on the bottom and around the edges, 13-15 minutes. (Do not under-bake.) Cool on baking sheets 1 to 2 minutes, then transfer to a wire rack to cool completely. Store in an airtight container.   

SWEET POTATO PIE WITH BOURBON CARAMEL WHIPPED CREAM

There are as many recipes for pumpkin pie and sweet potato pie available as there are cooks to bake those pies. (I tend to think of pumpkin and sweet potato pies as almost synonymous.) And almost every cook has his or her favorite recipe. Me too. Or I thought I did until I baked this year’s Thanksgiving sweet potato pies.

I used the basic recipe I’ve been fixing for several years now, but instead of including Kahlúa or rum, I chose bourbon. And I substituted heavy cream for the evaporated milk called for in my original recipe. Well boy howdy – these 2 changes really worked. The filling was super smooth, almost custardy. And very, very flavorful. And then topped with homemade bourbon caramel whipped cream – OMG. Pretty darn amazing. But then, I love sweet potatoes almost any way I can think to fix them. But when combined with all the other lovely ingredients in this recipe, they are absolutely raised to a new level of yumminess. But enough about this pie. Just make it. You won’t be disappointed.

Yesterday, Thanksgiving, was weird. Everything about the day felt as if I were viewing it through some kind of altered reality. OK, throwing the turkey stock together, making the dressing, and preparing the turkey for its long, slow roast was the same as usual. But not setting the dining room table for guests, and not making appetizers to begin the festivities just didn’t seem right. Even as I prepared other traditional favorites, and a couple of new recipes just for the shear fun of it, the feeling of unreality never really went away. The only saving grace was that we were able to share food with 2 other couples. Not eating together, but through home deliveries. (Masked, of course!)

On Wednesday evening we delivered a couple of pies and assorted goodies to our dear friends Jim and Margo. And were sent home with a large container of delicious clam chowder. And at 4:00 pm yesterday there was an exchange between our home and our dear friends Mark and Vicki next door. This allowed us to at least experience the sharing part of Thanksgiving which in my estimation is basically what it’s all about anyway. So that felt good. It also left us with so much food that neither household will have to cook for at least a week! But I think it was more about the divided effort than about the food itself. It just felt right to be able to share the bounty of our wonderful lives with some of the people we love.

And as a truly special treat, Andy and I were part of a Zoom extended family get-together commencing at 3:00 pm. So, while I was preparing gravy, I was able to see and hear, via my computer screen, many of our family members and closest friends as they too were preparing for their own unprecedented celebration. That was great. That felt good. But even with all the positives, it still was weird sitting down on such a momentous occasion, just the two of us at table.

As I drifted off to sleep last night, there were lots of wonderful memories doing their best to keep me awake. So, I gave them full rein. I remembered my first Thanksgiving with Dick and Eloise 50 years ago. (Also, the occasion of the first turkey I ever baked.) Then, all the subsequent Thanksgivings with the extended family. But finally, just before I let Mr. Sandman do his thing, I gave special thanks for the wonderful life I have had, for my children, for my old friends who have helped me through a few rough patches, for my new friends that daily brighten my life, but mainly for my best friend and the love of my life, Mr. Andy Carr. My dear husband who constantly keeps me grounded, keeps me laughing, entertained, feeling special, feeling loved, and all the other positive adjectives you can think of that represent unselfish love. And how just saying thank you to Mr. C. could never be enough. (But I do it anyway!) So what I plan to continue doing, is try my darndest to live up to his expectations. That is, after all, the only lasting thing I can offer him to prove my undying love and respect.

Peace and love to all.

3 c. mashed sweet potato*

4 T. (½ stick) unsalted butter, melted

3 lg. eggs

1 tsp. vanilla

¾ c. brown sugar, packed

¼ c. granulated sugar

¼ tsp. fine sea salt

¼ tsp. baking powder

1½ tsp. ground cinnamon

½ tsp. ground nutmeg

1/8 tsp. ground cloves

1 c. heavy cream

3 T. good bourbon

1 lg. (9-inch) unbaked pie crust

Whisk the mashed sweet potatoes, melted butter, eggs, and vanilla together until creamy and smooth. (There should be no lumps in the mixture.) Then stir in the brown sugar and granulated sugar.

In a small bowl, whisk the salt, baking powder, cinnamon, nutmeg, and cloves together. Stir into the sweet potato mixture until thoroughly combined. Finally stir in the heavy cream and bourbon.

Pour into prepared pie shell. Cover edges of crust with 1½ inch strips of aluminum foil. (This prevents the crust from getting too brown.) Remove the aluminum strips the last 5 minutes of baking.

Bake the pie in a pre-heated 350-degree oven until the filling is set, about 60-70 minutes. To test, shake the pie; the center of the pie should jiggle slightly. If you still aren’t sure, stick a toothpick or a butter knife in the center. If it comes out fairly clean, the filling is set.

Remove from oven and let cool completely before serving. Best stored in a cool place. Serve dolloped with Bourbon Caramel Whipped Cream. Recipe below.

*I use the darkest skinned sweet potatoes I can find, sometimes labeled Ruby Garnet yams. But they aren’t really yams. They are just dark-skinned sweet potatoes. Then I bake the sweet potatoes in their skins. When tender, I remove them from the oven, let them cool completely, remove the skin, then whirl them smooth in my food processor.    

BOURBON CARAMEL WHIPPED CREAM

¼ c. unsalted butter

½ c. brown sugar

tiny pinch salt

¼ c. + 1¾ c. (1 pint total) heavy whipping cream, divided

2 T. good bourbon

Whisk butter, brown sugar, and salt together over medium heat in a small heavy saucepan until brown sugar has dissolved completely. (This happens after the mixture comes to a boil and allowed to burble for a couple of minutes or until it turns kind of shiny. Continue whisking the whole time the mixture is on the heat.) Remove from heat and gently whisk in the ¼ cup heavy cream and bourbon. Allow caramel to come to room temperature and then refrigerate.

Beat the remaining 1¾ cups of whipping cream to stiff peaks. Add some of the cold caramel sauce and whip just until well blended. (The caramel sauce and whipped cream can be combined up to a few hours before serving.) Serve the remaining caramel sauce on any of your favorite desserts. Or spoon it directly into your mouth. Your choice!


Wednesday (before Thanksgiving) – a good days worth of baking. 2 sweet potato pies, 2 French Apple Pies, Cinnamon Rolls, and Soft Sourdough Discard Dinner Rolls (recipe soon to be posted) And yes I was tired after all that baking! Ya think!?


ALMOST KNOCKOFF LEVAIN BAKERY OATMEAL RAISIN COOKIES

First off, I know Levain Bakery doesn’t put walnuts in their oatmeal raisin cookies. I got that. But I love walnuts in my oatmeal raisin cookies, so my recipe – my choice. And to be completely up front with you, I’ve surmised that Levain Bakery doesn’t use vanilla either. But I just couldn’t see myself building an oatmeal cookie without vanilla. (Hence the “almost knockoff” part of the recipe title.)

Now another thing you should know. I have never actually tasted a Levain Bakery cookie. So, I thought to remedy the situation, I would order a package. I quickly changed my mind. $27 for 4 – 6 oz. cookies, plus a $49 shipping charge. Well then, that sure as heck wasn’t going to be happening. At least not on my watch! Holy moly! I could build several batches (16 count each for the size I prefer, 8 count for a full 6-ounce cookie) for that amount of money and enjoy them any darn time I felt the inclination. So, I would just have to build my own unsubstantiated “Levain Bakery” cookies. Possible warts and all! Like I did with my Knockoff Levain Bakery Chocolate Chip Walnut Cookies. (See recipe on site.)

I started by comparing several knockoff recipes on-line. Then after much deliberation and a fair bit of cookie baking knowledge, I cobbled this recipe together. And I must say, these are the best oatmeal raisin cookies I have ever tasted or produced. They are semi gooey in the middle (the trademark of a Levain Bakery cookie) and sweet, but not too sweet. With a bit of crunch from the nuts. And a delicate hint of the essence of the vanilla bean. In other words – perfect. I also enjoy the occasional burst of salt from using coarse sea salt. Just another dimension of yummy as far as I’m concerned. (And remember – it’s really, just all about me!)

Anyway, I would love to have you bake up a batch of these delicious cookies. And because I couldn’t make up my mind about golden versus regular raisins, I used a combination. (Nothing like compromise for finding the perfect solution.) And no, you don’t have to include nuts. Just add a few more raisins. And if you don’t choose to use vanilla, I won’t think less of you either. You would be wrong, but that’s on you!

So as always, have a blast in your kitchen. Try new recipes to keep yourself invested in the whole business of keeping everyone in your family well fed. If nothing else, it might help stave off boredom for yourself and your family. And boredom is a serious concern for many of us right now, especially with the holidays so close at hand.

I miss going to plays, concerts, live music performances given by Mr. C. and his musician buddies, restaurants, and all the other cultural events that are such a vital part of our lives. I miss getting on an airplane and visiting foreign lands. (Well not the airplane part, but you catch my drift!) I also really miss all the places and natural wonders that we can visit while towing our travel trailer all over God’s creation. But mainly I miss visiting our family and friends and having them in our home. (My normal minimum weekly hug quotient is way off the bottom of the scale and I am severely feeling the loss! I know. Everyone is in the same boat.)

So, I continue to pray daily, to every deity I can think of, for a speedy resolution to the covid-19 crisis. But I know until that happens, I can’t let down my guard. So, I mainly stay at home, continue to cook up a storm, try new recipes, and if they work – post them on my blog. That’s how I have chosen to keep joy alive in my life. (Plus keeping myself on the right side of sane while this crazy world sorts itself out! I pray about that daily too!)

I fervently hope you too have found joy, peace, and love in your life. Happy Thanksgiving.

1 c. (2 sticks) cold unsalted butter, cut into small cubes

1 c. light brown sugar, packed

½ c. granulated white sugar

2 lg. eggs

1 tsp. vanilla extract 

½ c. cake flour (fluffed)

2 c. unbleached all-purpose flour (fluffed)

1 T. cornstarch

1 tsp. baking soda

1 tsp. coarse sea salt

½ tsp. ground cinnamon

1½ c. old-fashioned oats 

1½ c. raisins (golden, regular, or a combination)

1 c. chopped walnuts, opt. (but why?) 

Place the butter, brown sugar, and granulated sugar in the bowl of your stand mixer. Using the paddle attachment, beat the butter and sugars on medium low speed until smooth and completely blended, 2-3 minutes. Add the eggs and vanilla. Beat just until the eggs and vanilla are incorporated with the butter/sugar mixture.

In a small mixing bowl, whisk the cake flour, all-purpose flour, cornstarch, baking soda, salt, cinnamon, and oats together. Add to the wet ingredients and mix only until combined. Add the raisins and walnuts and slowly mix until combined. Refrigerate dough for 15 minutes.  

And now the hard decision has to happen. Do you want cookies the size that made the Levain Bakery in NYC famous? Or do you wish to make a smaller, more manageable version? My choice – smaller. But for those purists out there, I’m providing both ways to enjoy these incredible cookies.

Purist (8 cookies per batch)  

Divide the dough into 8 equal parts, about 6-ounces each. Line two half sheet baking pans (roughly 18 x 13-inches) with parchment paper or silicone baking mats.  Use your hands to shape the dough. Place in a staggered pattern, 3″ apart on the baking sheet with only 4 cookies to a pan. Do not flatten the dough. The cookies are meant to be roughly shaped. Refrigerate for about an hour. Start heating your oven to 400 degrees after the cookies have been cooling in the refrigerator for about 45 minutes.  

Bake one sheet at a time on the middle rack of your pre-heated 400- degree oven for 9-12 minutes or until the cookies appear dull and light golden brown on top.  Do not over-bake. The top should look done, but the cookies should not be fully set. 

Remove from oven. Cookies will continue to finish cooking as they set and cool on the baking sheets for at least 20 minutes before removing to a wire rack to cool completely. The cookies are quite delicate after just baking, so handle them carefully. They should still be plenty gooey inside.

Bigger than normal cookies, but half the size of Purist (16 cookies per batch)

Divide the dough into 16 equal parts, about 3-ounces each. (Or as equally portioned as possible.) Drop dough onto parchment paper or silicone mat lined baking pans about 3 inches apart. (I used three half sheet (roughly 18 x 13-inch) baking pans. Six cookies on sheets 1 & 2. Four cookies on sheet number 3.) Do not flatten the dough. (I round the dough in my #10 ice cream scoop and proceed from there. Cheating I know, but I’m lazy!) Refrigerate for about an hour. (To make life easier on myself, and because I don’t have room in my refrigerator for 3 sheet pans, I plop the balls of dough close together on one of the parchment paper lined pans. Then I refrigerate the whole mess. When I’m ready to bake the little darlings, I take 6 from the fridge and place on another of the parchment paper lined baking sheets. The others dough balls I just leave in the fridge until I am ready to bake them off.) 

Bake in a pre-heated 400-degree oven for between 8-10 minutes. I found, after baking each of the three pans of cookies a different way, that 5 minutes regular heat and 4 minutes convection heat worked the best for me. But you may find your oven works differently than mine.  Just don’t over-bake the cookies. The top should look done (browned), but the cookies should not be fully set.  

Remove from oven and let cool for at least 15 minutes on the baking sheet before transferring to a wire rack to finish cooling completely.

Store the cookies in an airtight container on your kitchen counter.    

KNOCKOFF LEVAIN BAKERY CHOCOLATE CHIP WALNUT COOKIES

I looked at a lot of online knockoff or copycat recipes for these cookies. All the recipes were pretty much the same, but I decided to go with my own slightly different conglomeration. But the main thing all of the recipes had in common, was that every author almost guaranteed that these would be the best chocolate chip cookies you would ever taste. And I have to admit, they are totally amazing. These babies make it completely clear why Levain Bakery has helped put New York City on the map. And why you should spend absolutely no time deciding to whip up a batch at your earliest convenience.

When you look at the ingredient list, almost all of the ingredients are exactly what you would expect to find. Ok, not the use of cold butter or necessarily a bit of cornstarch, or even the use of cake flour. But there certainly aren’t any peculiar ingredients, like half a cup of parsnip puree or anything like that. Pretty standard ingredients found in many baked goods. So what makes these cookies different? Well first of all, they’re big cookies. And I bake mine half as large as the Levain Bakery offers. And these cookies are pulled out of the oven before the center gets fully set. And the ratio of nuts and chocolate chips to dough is greater than called for in most of the chocolate chip cookie recipes I have previously made. And believe me, I have made a lot of chocolate chip cookies over the years!

So are these now my favorite chocolate chip walnut cookies? You bet your sweet – – – they are! And I believe they will become your favorite too. They are just that delicious. And very easy to prepare, especially if you have a #10 ice cream scoop.

Now you know I don’t have any advertisements on this site. And I am not specifying any brand of scoop that I think you should purchase. But if you do a lot of cookie baking, or make meatballs, muffins, and cupcakes, to name a few uses for ice cream scoops, you should own a few scoops in different sizes. Makes life a lot easier when you have the right tools. Remember, Christmas is coming. And I know my Mr. Santa always loves hints at about this time of year. And being the good wife, I never fail to help him out! And usually my hints are for gifts that most people would find unromantic. But I figure, that’s their problem. Anything that makes my life easier or more pleasant is a gift I would never think to discourage. Besides, romantic gifts are overrated in my opinion. Give me practical gifts. Like a round trip ticket to Iceland, for example. That and a new frying pan are practical gifts I would never consider turning down! 

So as always, make life pleasant for those around you. Create a home atmosphere that is comfortable, cozy, and inviting. I don’t know anyone who doesn’t appreciate a smile or a kind word. Simple gestures, but very effective ways to spread joy to those you love. Peace and love to all.   

1 c. (2 sticks) cold unsalted butter, cut into small pieces

¾ c. light brown sugar

½ c. granulated sugar

2 lg. eggs

1 tsp. vanilla

1½ c. cake flour (fluffed)

1¼ c. unbleached all-purpose flour (fluffed)   

1 T. cornstarch

1 tsp. baking powder

¼ tsp. baking soda

1 tsp. coarse sea salt

2 c. walnut halves, roughly chopped

2 c. semi-sweet chocolate chips (a 12-ounce bag) (I prefer Guittard semi-sweet baking chips)  

Place the butter, brown sugar, and granulated sugar in the bowl of your stand mixer. Using the paddle attachment, beat the butter and sugars on medium low speed until smooth and completely blended, 2-3 minutes. Add the eggs and vanilla. Beat just until the eggs are incorporated with the butter/sugar mixture.

In a small mixing bowl, whisk the cake flour, all-purpose flour, cornstarch, baking powder, baking soda, and salt together. Add to the wet ingredients and mix only until combined. Add the walnuts and slowly mix until combined. Add the chocolate chips, and again, mix only until combined.

And now the hard decision has to happen. Do you want cookies the size that made the Levain Bakery in NYC famous? Or do you want to make a smaller version for us normal folks. My choice – smaller. But for those purists out there, I’m providing both ways to enjoy these marvelous cookies.

Purist (8 cookies per batch) (these would make some humongous damn cookies!)

Divide the dough into 8 equal parts, about 6-ounces each. Line two half sheet baking pans (roughly 18 x 13-inches) with parchment paper or silicone baking mats.  Use your hands to shape the dough. The cookies are meant to be roughly shaped. Place 4 on each pan. Do not flatten the dough. Refrigerate for about an hour. Start heating your oven to 400 degrees after the cookies have been cooling in the refrigerator for about 45 minutes.

Bake in the pre-heated 400 degree oven for 11-13 minutes on regular bake or a bit shorter time on convection bake. The cookies are done when the top is a bit golden and the bottom is also golden. The top should look done, but the cookies should not be fully set. Do not over bake.

Remove from oven and let cool for at least 15 minutes on the baking sheet before transferring to a wire rack. This allows the inside of the cookies to bake a bit more and helps prevent breaking the cookies while they are being transferred to the cooling rack. They should still be plenty gooey inside. Serve slightly warm if possible.   

Bigger than normal chocolate chip cookies, but half the size of Purist (16 cookies per batch)

Divide the dough into 16 equal parts, about 3-ounces each. (Or as equally portioned as possible.) Drop dough onto parchment paper or silicone mat lined baking pans about 3 inches apart. (I used three half sheet (roughly 18 x 13-inch) baking pans. Six cookies on sheets 1 & 2. Four cookies on sheet number 3.) Do not flatten the dough. (I round the dough in my #10 ice cream scoop and proceed from there. Cheating I know, but I’m lazy!) Refrigerate for about an hour. (To make life easier on myself, and because I don’t have room in my refrigerator for 3 sheet pans, I plop the balls of dough close together on one of the parchment paper lined pans. Then I refrigerate the whole mess. When I’m ready to bake the little darlings, I take 6 from the fridge and place on another of the parchment paper lined baking sheets. The others dough balls I just leave in the fridge until I am ready to bake them off.)  

Bake in a pre-heated 400 degree oven. I found, after baking each of the three pans of cookies a different way, that 6 minutes regular heat and 4 minutes convection heat worked the best for me. But you may find your oven works differently than mine. Just don’t overbake the cookies. So anywhere from 9 minutes all convection, or 11 minutes regular oven should work out fine for you. Just be aware, the top should look done, but the cookies should not be fully set.   

Remove from oven and let cool for at least 15 minutes on the baking sheet before transferring to a wire rack.

Store the completely cooled cookies in an airtight container on your kitchen counter. Then you will always be reminded that they are there just for lifting the lid. You don’t want them to go stale after all!  

SALTED CARAMEL UPSIDE DOWN APPLE CAKE

When autumn arrives, has there ever been a better twosome to toast the change of seasons than apples and caramel? I think not. Well OK, soup and homemade bread works too. But if you want to raise a cheer, it should be with something a little more auspicious than a humble bowl of soup and a piece of bread. At least to my thinking. Of course a Hot Buttered Rum or a warm cup of Glögg and a Chewy Ginger Molasses Cookies or two would work also. But for today I’m going to celebrate apples and caramel. (My blog, my choice!)

So the other day I got a wild hair to make a caramel-apple upside down cake. (And no, I have not made many upside down cakes before. So this was going to be a fairly new experience for me.) So why now you might ask? And I would have no adequate answer to give you. “Just because” is probably as close as I could come to the actual reason.

But then I love caramel. And apples are OK too. And I was in the mood for cake because I truly love a really delicious homemade cake. All I knew was that I didn’t want to bake a huge old cake because then I would be forced to eat more than I really should. And then I’d feel guilty. And if I ended up throwing some of it away I’d also feel guilty. (We still don’t have a new freezer even though we ordered and put a down payment on one months ago! Grrrr….) So, how could I avoid guilt tripping myself in any manner available to do just that? (I’m so very good at it, you see.)  

So to the internet to get some ideas about how to build an upside down apple caramel cake. And to my delight, on the pinchofyum.com site, (great site BTW) was what appeared to be the perfect recipe for me. A salted caramel-apple cake that would fit in a 9-inch cake pan. So, not too large a cake. In fact, just the perfect size to share with our neighbors Mark and Vicki.   

Now sometimes I try a recipe and it’s just OK tasting, or it doesn’t have all of the qualities I hoped for. And you never know about it. Not this recipe. This wonderful recipe is delicious and absolutely what I had in mind. And the recipe contains common ingredients that are easy to put together. So in my book, this is a perfect recipe. Thank you very much Lindsay for this delightful, welcome to autumn, recipe.

So as always, be content with what you have, who you are, and for what’s to come.

I’ve been a bit concerned about how I was going to handle being confined to quarters for the long fall and winter ahead. But as I was drifting off to sleep last night, I thought about all the wonderful delights fall and winter have to offer that I can enjoy from the comfort of my own home. Watching the clouds come and go. Seeing beautiful colored autumn leaves drift by my window. (Sounds like a song lyric, right!?) Catching a bit of movement out of the corner of my eye as a tree twists and turns in the wind. Sit in my comfortable den chair and read. And cook up a storm.

And then there’s the holidays to plan for.

This year of course is going to be different than any previous year. But there are still things I can continue to do to make life a little bit more fun for myself and my family and friends.   

Every year I send a goody package to each of my kids. I bake fruit cake (yes fruitcake can be delicious), candy, and cookies. So this year isn’t going to be any different in that regard. (Maybe more types of cookies and candy. Maybe different types of goodies like spice and herb blends. Maybe gourmet chocolate or even a large bottle of really good vanilla or a favorite ice cream sauce. Lots of fun for me to plan and build, and I’ll bet there will be some delight on the other end too.) And I can plan fun things to build for my friends. Who knows, there could even be something containing alcohol involved. Been known to happen.

And then, maybe it will snow. I love snow. I’m just about as bad now as I was as a kid praying for a snow day. And then before I know it, the first signs of spring will appear. And a whole new cycle will begin. And once again I will be reminded how lucky I am and how wonderful life really is for me. May each of you also find joy in your life. Peace and love to all.

For the Caramel and Apple Part:

½ c. unsalted butter

2/3 c. brown sugar, packed

¼ tsp. kosher salt

1 tsp. ground cinnamon

½ tsp. freshly ground nutmeg

¼ tsp. ground cloves

1 tsp. vanilla extract

2 c. thinly sliced peeled apple (takes about 1 big apple)

Generously butter a round 9-inch high sided cake pan. (If you don’t have a high sided cake pan, be sure to place a rimmed baking sheet under your cake pan before placing in the oven. A bit of the caramel will undoubtedly try and probably succeed in escaping while the cake is baking. At least it did for me. (And yes, I just ordered a couple of high sided cake pans because I plan to make this cake again and again. The girl can learn!)

Melt the butter in a medium saucepan. Add the brown sugar, salt, cinnamon, nutmeg, cloves, and vanilla. Keep over medium-low heat and cook for about 3 minutes or until smooth and slightly thickened. Pour the caramel into the greased cake pan and top with the apple slices.    

For the Cake:

½ c. (1 stick) cold unsalted butter*

1 c. brown sugar, packed

2 lg. eggs

¼ c. whole milk

1½ c. unbleached all-purpose flour, fluffed

1 tsp. baking powder

¼ tsp. kosher salt

½ tsp. ground cinnamon

coarse sea salt for topping

Beat the cold butter and brown sugar until well combined. (The mixture will not be creamy and light like you would normally get if you started with room temperature butter. That’s what you want. See reason below.) Scrape the sides of the bowl. Add the eggs and milk and beat until incorporated. (Might be a few small lumps. That’s fine. Not too worry.) Scrape the sides of the bowl again or whenever the ingredients are sticking to the sides and bottom of the mixing bowl.

Whisk the flour, baking powder, and cinnamon together. Stir into the butter mixture just until combined. Spoon the stiff cake batter onto the top of the apples. Using an offset spatula, carefully smooth out the cake batter until the apples and caramel are evenly covered.    

Bake in a pre-heated 325 degree oven for 45 minutes. Stick a toothpick into the cake part. If it comes out clean and the top of the cake is a lovely brown, the cake is done. Remove from oven and let cool for 10 minutes. (Letting the cake cool for 10 minutes is very important.) Using a knife or offset spatula, cut around the edge of the cake to make certain it is not still attached to the pan. Invert the cake onto a cake plate and tap the top until the cake comes out onto the plate. Sprinkle with coarse sea salt and serve with vanilla ice cream or whipped cream. Lovely warmed or at room temperature.  

*I use cold butter for this recipe because I want the batter to stay a bit stiff and not incorporate as much air as if I had started with room temperature butter. When you cream sugar with room temperature butter, the sugar crystals punch little holes in the butter and those holes capture air. In this recipe, I prefer the cake part to be fairly dense.   

GF SALTY CHOCOLATE COOKIES

Ok, I am not a dark chocolate lover. And I know, that definitely defines me as a non-gourmet, but I can’t help it. I know what I like, and dark chocolate ain’t something I enjoy. Until this cookie came along, that is. I don’t think I have ever bit into anything starring chocolate (be it milk, white, or dark) that I like any better than one of these cookies. OMG. They are beyond delicious. And as it turns out, very easy to prepare. Don’t even need a mixer. And for all of you out there who find wheat flour intolerable, this recipe is going to set you free. You will be in your kitchen making these delightful treats at every opportunity.

We first had a taste of one of these little darlings on our recent trailer trip. Mr. Cs sister Katie brought them along to share with us while both couples were camped at Wanapum State Park. Andy and I fell madly in love after just one bite. So of course, I just had to have the recipe. Not only so that I could bake these for our own enjoyment, but I could also share this wonderful recipe from Alison Roman published on the cooking.nytimes.com site with all of you. I truly like nothing better than either discovering or being given a recipe like this, and then being able to pass it along to each of you. And this recipe, ladies and gentlemen, is truly a gem. (Thank you again Katie.)

So don’t hesitate. Bake up a batch of these wonderful cookies at your earliest convenience.

As always, have fun in your kitchen and live each day to the fullest. Peace and love to all.

6 T. (¾ stick) unsalted butter

2½ c. powdered sugar

¾ c. unsweetened cocoa (I use either Valrhona Cocoa Powder or Ghirardelli Premium Cocoa Powder)

1 tsp. kosher salt

2 lg. egg whites

1 lg. egg

8 oz. bittersweet chocolate (at least 67% cacao), chopped (I use 1⅓ cups roughly chopped Guittard 63% cacao extra dark chocolate baking chips)

½ c. finely chopped nuts (pecans, walnuts, almonds, hazelnuts)

flaky salt, such as Maldon or Pacific Blue Kosher Flake Sea Salt

Line 2 large baking sheets with parchment paper.

Melt the butter in a small pan, whisking frequently until foam appears and the butter starts to brown. Remove from heat and allow to cool.

Using a fine mesh strainer or sifter, combine the powdered sugar, cocoa, and salt in a medium sized mixing bowl.

Using a spatula, mix in the egg whites, whole egg, and cooled browned butter until the mixture is smooth. Add the chopped chocolate and nuts.

Using a very small ice cream scoop* (I use my #100 scoop for these cookies), drop balls of dough at least 2 inches apart on the prepared cookie sheets. Sprinkle with flaky salt.

Bake in a pre-heated 350 degree oven for about 10 minutes, or until the cookies are flat and look baked through and a bit wrinkled.

Remove from oven and let sit on the pan for about 4 minutes before carefully transferring to a wire rack to cool completely. Store in an air-tight container at room temperature.  

*The scoop on Ice Cream Scoops:

I use ice cream scoops for all kinds of cooking projects. But mainly I use them to make certain all the cookies from a batch are of similar size. Let’s face it, it’s much easier and more efficient to form cookies using a scoop. Takes about a third the time of dropping it by spoonfulls. Anyway, I have 4 scoop sizes that I mainly use. (OK, I only own these 4 sizes of scoops. But none-the-less, they work for me.)

#100 – 2 teaspoons (which means that if you are dishing up ice cream, you would get 100 scoops from 1 quart of ice cream) I use this scoop not only for this recipe, but anytime I want tiny little cookies.

#60 – 1 tablespoon. I use this scoop for small cookies and meatballs

#40 – 1½ tablespoons. I use this scoop for larger cookies

#10 – 3/8 cup. I use this scoop for muffins, cupcakes, and ice cream  

SOFT AND CHEWY OATMEAL, DRIED APPLE, GOLDEN RAISIN, AND WALNUT COOKIES

So when I thought about what kind of cookie I wanted to make for our upcoming trailer trip, I decided an oatmeal cookie would be absolutely perfect. But I wanted an oatmeal cookie that was just a little different than how I usually doctor up my oatmeal cookies for more flavor. So no chocolate chips. No peanut butter. But maybe introduce a lot more spice action.

So I thought some kind of dried fruit would be nice. But not the usual suspects, like dried cranberries, or dried cherries, or dried blueberries. It just happened that I had a few thin slices of dried apple in my stash of dried this and that. Not enough to feature in a major cooking project. But too much to simply discard. So I thought, why not an apple presence in an oatmeal cookie? But the apple slices, in many ways, except flavor, resembled shoe leather. (OK, I’ve never tasted shoe leather, but I’m pretty sure it doesn’t taste like dried apples!) So I knew that something had to be done to soften up the chopped up apple slices a bit. And what better way to macerate fruit than by a small application of some type of booze. And since I just happened to have some spiced rum on hand, I felt it was the best bet since the cookie recipe I was developing already had ground cinnamon and ground nutmeg as important flavor additives. And really, can a bit of spiced rum ever hurt? I think not! And of course, you can’t really taste the rum. It’s more like you just kinda sorta know there is a just a little something extra in the mix. 

So if you too are a fan of oatmeal cookies, you are going to love these babies. They are soft, but chewy, sweet, but not too sweet, and between the golden raisins and the dried apples, there is just a nice fruit note in every bite. And of course there is a delightful crunch from the chopped walnuts. In other words, these cookies are yum!

So as always, keep having fun in your kitchen, keep helping your friends and family cope with the devastating circumstances of life right now, and take especially good care of yourself. You can’t be of any value to anyone, including yourself, if you let down your guard or start feeling that all is out of your control. Everything is not out of your control. You can still choose to be happy. You can still choose to be positive. You can still choose to be that one person who helps lift the spirits of those around you. And yes it’s not fair. Why should you always have to be the designated good guy? Well, dear readers, first of all, let me explain that life is not always fair. (You’ve probably already figured that out for yourself.) But we are cooks. We are used to nourishing bodies and minds through the food we fix. But there is even more that we can do. We can smile. We can say please and thank you. We can liberally offer praise. We can offer help, when help is needed. We can refuse to let the little everyday “revoltin’ developments” (thank you Chester A. Riley) get to us. And no it isn’t easy. But it is so much better than the alternative. And of course after a long day of helping others and listening to and watching all the news about fires, the pandemic, racial injustice, and the current political catastrophe, there’s always the option of quietly going into your bedroom closet to let out a silent scream. I find that often helps me when dealing with all of life’s little unpleasantries. Well that and a big old bowl of Ben and Jerry’s Cherry Garcia ice cream.

Peace and love to all.  

2 T. spiced or regular rum

½ c. chopped dried apples (I use thin dried apple slices, cut into small pieces)

1¾ c. unbleached all-purpose flour (fluffed)

½ tsp. baking soda

½ tsp. baking powder

½ tsp. fine sea salt

2 tsp. ground cinnamon

½ tsp. ground nutmeg

1 c. (2 sticks) unsalted butter, softened slightly 

1 c. brown sugar, packed

½ c. granulated sugar

2 lg. eggs

1½ tsp. vanilla extract

3 c. rolled old fashioned oats

¾ c. chopped walnuts

½ c. golden raisins

Mix the spiced rum and apples together in a small bowl. Set aside.

Lightly grease or line baking sheets with parchment paper. Set aside.

In a small mixing bowl, whisk the flour, baking soda, baking powder, salt, cinnamon, and nutmeg together.  

In the bowl of your electric stand mixer, cream the butter, brown sugar, and granulated sugar together until soft. Mix in one of the eggs, then blend in the second egg and vanilla extract. Add flour mixture and mix just until combined. Add the oats, chopped walnuts, golden raisins, and the macerated dried apples (including any liquid that may remain).

Form dough balls with a small ice cream scoop, and place on prepared baking sheets about 2-inches apart.

Bake in a preheated 350 degree oven until golden brown on edges and nearly set, about 10-12 minutes. (Center should look a bit under-baked.)

Remove from oven and transfer to a wire rack to cool completely. Store in an airtight container at room temperature.

CINNAMON TWISTS

OK, I’d never made cinnamon twists before because I thought the level of difficulty in making the puff pastry part would be way past my skill set. (I was pretty sure I could mix granulated sugar and ground cinnamon together successfully, so that part was of no concern.) But I figured the time involved in preparing the puff pastry would drive me crazy. And absolutely, if this puff pastry recipe was true to form, I’d probably still be screaming and running down my driveway to get away from the kitchen. That’s because I was thinking about all the layering of butter, rolling out the dough, then chilling it, then rolling some more, then chilling, etc. etc. I simply don’t have that kind of patience any longer. I want recipes that show me how to get marvelous results with very little time or effort involved. Especially for a pastry as simple as a cinnamon twist. (And yes, that is called being lazy. I confess!)     

Now granted, Parisian pastry chefs would undoubtedly scoff at this recipe. But I don’t plan to share even a bite of one of these cinnamon twists with any of them. Even if they begged me to do so. Nope. Ain’t going to happen. I’m just going to share this wonderful recipe with you, so that you too can fly in the face of haute cuisine! Because these cinnamon twists are beyond belief delicious. (And so darned easy to make.) And it’s all because of this recipe that I found on the reneenicoleskitchen.com site. Thank you, thank you, thank you, Renee.

The beauty of this recipe starts with the pastry, which is unbelievably delicious and unbelievably easy to build. I’m going to write that again, because it truly bears repeating.

ROUGH PUFF PASTRY IS STINKIN’ EASY TO MAKE!!!! And, it’s also quick – as in fast and expeditious!

Now I know some of you aren’t going to believe me, and you’re going to continue to pay at a minimum $5.19 for a package of Pepperidge Farm Frozen Puff Pastry Sheets. But store bought puff pastry should cost more than making your own homemade version, because they don’t just include flour, salt, butter, and water. The ingredient list for Pepperidge Farm Frozen Puff Pastry Sheets includes (and this is directly from the label) – Unbleached Enriched Wheat Flour (Flour, Niacin, Reduced Iron, Thiamine Mononitrate [Vitamin B1], Riboflavin [Vitamin B2], Folic Acid), Water, Vegetable Oils (Palm, Soybean, Hydrogenated Cottonseed), Contains 2 Percent Or Less Of: High Fructose Corn Syrup, Salt, Mono And Diglycerides, Soy Lecithin, Malted Barley Flour, Turmeric And Annatto Extracts For Color.

What I find most interesting in that list of ingredients, is not what’s in the product, but what’s not included. Butter. No real butter anywhere to be seen. So really, how dare they call it puff pastry!! Even in this rough version, butter is still the star of the show. (I bet if Parisian pastry chef’s realized what mass production has done to their prized pâte feuilletée, it would frost their gizzards. And I for one would not like to be around to see that happen!)

Anyway, the point of all this rambling rhetoric, is to try and convince you to MAKE YOUR OWN PUFF PASTRY. And of course, make these cinnamon twists. They truly are a work of art.  

So I’m excited. I see a whole new world of recipes that have opened up to me because I now have a simple and fool-proof way to make my own puff pastry. I’m thinking dishes like savory mushroom palmiers, Spanakopita, or even just a simple chicken pot pie with a lovely puff pastry top crust. (Thanks Mark for that great idea!) I’m absolutely revved I tell you. Revved!

So even if this puff pastry dough is considered “rough” and doesn’t require a degree from Le Cordon Bleu to prepare it, I could give a flying fig! Who the heck cares? I surely don’t. But then my favorite food is a cheeseburger. Make of that what you will!

As always, stay happy, stay healthy, and stay excited. Excitement leads to inspiration, enthusiasm, motivation, ambition, and creativity. And boy do we all need those positive attributes in our lives, especially now.

Peace and love to all. 

1 sheet Rough Puff Pastry (see recipe below)

3 T. unsalted butter

¼ c. granulated sugar

1 tsp. ground cinnamon

Line a baking sheet with parchment paper.

If you haven’t already done so, roll the pastry sheet into a rectangle that is roughly 8 x 10-inches. Carefully transfer the pastry sheet to a piece of wax paper. (Using the wax paper saves a great deal of mess. You will see why as you proceed with the recipe.) Melt the butter in a small bowl. In a separate small bowl, combine the cinnamon and sugar.

Using a pastry brush, lightly coat the top side of the pastry sheet with half of the melted butter. Sprinkle on half of the cinnamon sugar mixture evenly over the butter. Press down lightly to help the cinnamon sugar stick to the butter.  

Gently turn the sheet over. Brush on the remaining butter, and sprinkle on the remaining cinnamon sugar mixture.   

To create ten eight-inch wide strips, score the pastry sheet along the long side at one inch intervals. Repeat with the opposite end of the pastry sheet. Use a pizza cutter or sharp knife to connect the score marks.

Place the strips on the parchment lined cookie sheet. Hold one end of the first strip down and rotate the other end like a cork screw. Repeat with remaining strips.

Chill the twists for at least 1 hour. This is very important. Please do not skip this step.

Bake the chilled strips in a pre-heated 400 degree oven for 19 – 21 minutes, or until puffed and golden brown. Remove from oven and allow to cool on the baking sheet. Best served the same day as baked.

Rough Puff Pastry:

1 c. unbleached all-purpose flour

¼ tsp. fine sea salt   

10 T. (1¼ sticks) cold unsalted butter  

⅓ c. ice cold water

Measure flour and salt into the bowl of your food processor. Pulse twice to combine.

Cut the butter into cubes and place in the food processor. Pulse about 18 times, or until butter is in very small chunks.

Slowly pour in the water while pulsing 8 – 10 times. The dough should just be starting to come together. Dump the dough onto a lightly floured surface and press together into a ball. 

Roll the dough into a rectangle about ½-inch thick. (It will not be a very large rectangle.) Fold the top ⅓ down towards the middle, then fold the bottom ⅓ up towards the middle. Turn it 90 degrees so that the openings are at the top and bottom.  

Roll the dough into another rectangle until again it’s about ½-inch thick. Fold the top ⅓ down towards the middle, then fold the bottom ⅓ up towards the middle. Turn it 90 degrees so that the openings are at the top and bottom. Repeat this process 4 more times.

Note: Work quickly. You don’t want the butter to get so warm that the dough starts to fall apart. Perfection of an exact ½ inch for each roll out is not only unnecessary, it’s not good for the dough.

You are now ready to roll the dough into an 8 x 10-inch rectangle.  Proceed with the directions as written at the top of the post.   


BLUEBERRY RHUBARB SAUCE

Well yesterday was a sad day. I harvested the last of our rhubarb. But it was also a great day because with my scant 1 cup of chopped rhubarb in collaboration with some lovely blueberries we happened to have on hand, I made this sauce. And for breakfast this morning, we dolloped this sauce on our buttermilk pancakes. (Slightly warmed, of course.) Boy howdy, that made for some fine eatin’!

And truly, this sauce could not have been easier to prepare. Rhubarb is easy to cut up, and blueberries are ready to go right out of their little molded fiber berry baskets. How cool is that!

So if you too have just a bit of rhubarb left and want to do something special with it, I suggest this recipe.

Well that’s it for today. I made Slow Simmered Smoked Shank with Mixed Greens yesterday in preparation for this evening’s meal. Tonight I’m going to tackle creole seasoned roasted pork tenderloin. Along with the tenderloin, creole gravy over cheezy grits. If it all comes together I will be sharing the recipes with you in the next few days. If not, all or some of the recipes will go the way of many of my creations not fit for your very discerning palates. (It’s called the circular file in our home.) So, I hope these recipes work. For all our sakes.

And for all our sakes, I hope and pray for lasting peace. But for now, I’d be happy with just one day where I didn’t have to read about someone killing another person for some real or perceived grievance. Just one day where I didn’t have to read about politicians blaming “the other guy” for every conceivable problem in our country today. Just one day when the headlines were positive rather than negative. Just one day when I could hold my head up and once again loudly proclaim that I am proud to be an American.

3 c. blueberries

1 c. sliced rhubarb

¼ tsp. lemon zest

3-4 tsp. fresh lemon juice (I used 4 teaspoons because I love me my lemons)

½ c. granulated sugar

tiny pinch ground cinnamon, opt.

1 T. water

1 T. cornstarch

Combine the blueberries, rhubarb, lemon zest, lemon juice, sugar, and cinnamon in a medium-size saucepan. Cook over medium heat, stirring often until the berries and rhubarb begin to give off some liquid and the sugar has dissolved.

Bring the mixture to a boil. Partially mash the fruit with a fork as it cooks.

In a small bowl, whisk the water and cornstarch together. Stir into the blueberry mixture and return to a boil. Boil for 30 seconds to 1 minute or until the mixture thickens.

Remove from heat. Serve warm, room temperature, or cold. Great on ice cream and buttermilk pancakes. (And with a spoon straight out of the container. Especially in the middle of the night!)

View East from our deck last evening over Port Susan Bay and into the foothills and mountains of the Cascade range.
Mt. Baker
Three Fingers at dusk. (Alpen glow and all!)

PEACH AND BLUEBERRY GALETTE IN A CINNAMON SUGAR CRUST

There is just something about the combination of fresh peaches and blueberries. Of course they look beautiful together, but it’s really the taste combination that seals the deal. And yesterday, I had two peaches that really needed to be eaten, and Mr. C. had just purchased 4 pints of fresh organic blueberries from a farm stand he had found on his way to purchase canned cat food. And thank heaven we needed cat food, because fresh local blueberries won’t be available much longer. Of course, without cat food, our kitties wouldn’t be around much longer either! But there’s not much chance of them going even remotely hungry – ever! Anyway – all are happy at Chez Carr. The kitties got dinner and we got this lovely galette for dessert.

Now for those of you unfamiliar with galettes, let me spell out exactly what qualifies as a galette. A galette is a French pastry similar to a tart or a pie. It’s essentially pie-like pastry dough under and partially wrapped over a fruit filling. The wonderful thing about galettes, as opposed to pies, is that the crust is thicker (and therefore easier to work with), no pie plate required (or fancy crimping of dough around the rim of the pie plate), and less fruit is needed for the filling. And truly, very easy to prepare. BTW, the only difference between a galette and a crostada is that crostatas are the Italian term for these rustic, but distinctly elegant desserts. Whereas, galette is French. However, by definition, you can use these terms interchangeably. They’re basically referring to the same delightful desserts.

Tarts, on the other hand, are usually baked in a low, straight sided pan. They too only have a bottom crust, but the crust is more like a cookie than flaky pie or pastry. Bottom line – regardless what you call any of these aforementioned darlings (galette, crostada, or tarts), they are all wonderful.

So if you find baking a pie a bit intimidating, let me recommend building a galette instead. Even if you have been baking pies since you were a teenager, you are going to love how quickly you can throw one of these babies together. The same level of fuss is just not there.

And don’t we all need less fuss, especially now, when fuss (a display of unnecessary or excessive excitement, activity, or interest) seems to be our new norm.

I’m frankly tired and terribly distraught by a lot of the fuss going on currently in our nation. Maybe I’m just getting old, but there is productive fuss, and then there is fuss that smacks of anarchy. And when I hear and read about radical groups that are looting and destroying property, my blood boils. We don’t need burning buildings, people being hurt, and more reasons to hate. And we absolutely do not need a national leader who refuses to condemn violence, and insists that legitimate protestors are either Antifa, Democrats, or liberals who are responsible for the violent protests. A leader who is actually inciting riot. A leader whose incendiary remarks create division rather than work towards healing societal differences and further the tenets of a true democracy.   

Please consider carefully the changes that have happened in America the last 4 years. If you don’t like the direction we are being led, do something about it. Take a stand! And vote! As always, I feel better for speaking my mind. Peace and love to all.

Pastry:

1¼ c. unbleached all-purpose flour

1 T. granulated sugar

¼ tsp. kosher salt

½ tsp. cinnamon

½ c. (1 stick) unsalted butter

¼ c. + 1 T. ice water

In the bowl of a food processor, pulse the flour, sugar, salt, and cinnamon together. Cut the butter into small pieces, then add to the food processor. Pulse at 1 second intervals until butter is the size of tiny peas. Should take about 10 quick pulses. Add the ice water and pulse again about 10 times until the mixture is crumbly but holds together when pinched. 

Dump the crumbly dough onto a lightly floured work surface. Using your hands, press the dough into a flat, thick disk. Roll the dough out into a 12- or 13-inch round. Use as much flour as needed to prevent the dough from sticking.

Fold the dough in half, then half again. (This makes it easier to transfer the dough to a parchment-paper lined baking sheet.) I use one of my cookie sheets that has one side that has a rim, and the other 3 sides are un-rimmed. (See picture below.)

As you can see, I built the tart on a piece of parchment paper on a baking sheet with a rim only on one side. This allows me to slide it onto a serving plate or board very easily after it’s baked and cooled. And note also that I place the first baking sheet in a larger baking sheet. I’m lazy. I never want to clean my oven. Double sheeting the galette prevents a possible mess in my oven.

Filling:

2 T. brown sugar

2 T. flour

pinch kosher salt

1/8 tsp. cinnamon

2 peaches, peeled and cut into ½-inch slices

1 pint fresh blueberries

2 tsp. brandy

Whisk the brown sugar, flour, salt, and cinnamon together. Gently stir in the peaches, blueberries, and finally the brandy.

To assemble the Galette:

1 egg, plus a few drops of water beaten together, for brushing

2 T. finishing sugar for sprinkling (turbinado, demerara or any large grained sugar)

cinnamon, for sprinkling

berry liqueur flavored whipped cream, for serving

Heap the filling in the center of the galette crust, then spread evenly to about 2-inches from the edge.

Fold the edge of dough towards the center to make a rustic enclosure. (See picture above.) Brush the edge of the dough with egg and water mixture. Sprinkle finishing sugar evenly over the top, crust and all. Then sprinkle the crust with cinnamon.

Bake in a pre-heated 400 degree oven for 30-35 minutes or until the crust is golden brown. Remove from oven and let rest on a cooling rack for 5 to 10 minutes before carefully sliding the galette off the pan and parchment paper onto a serving or cake plate. To serve, cut into wedges and dollop with Berry Flavored Whipped Cream or vanilla ice cream.

Berry Liqueur Flavored Whipped Cream:

1 c. whipping cream (reserve a bit for decorating the top of the trifle)

1-2 T. powdered sugar

1 T. berry liqueur (Chambord, Framboise)

Beat the whipping cream until it reaches stiff peaks. Add the powdered sugar and berry liqueur. Whip until combined. Refrigerate until needed.

Our Hardy Fuchsia (started as a 4-inch pot) that blooms all summer and late into the fall. And the gentleman? That’s Mr. C. doing some pruning.
A lovely greeting for our guests