One of the amazing spots we were lucky enough to snag on our recent trailer trip. KOA in Placerville, CAAnother view of this site plus Mr. C. enjoying a drink and his book before dinner. The island on the pond.
Just
before leaving on a trailer trip, I always make granola, a couple of main dish
entrees for the trailer freezer, and cookies. (One simply can’t go on holiday
without cookies!) But this time my right foot was giving me trouble, so
standing too long was painful. I remembered that I had been wanting to try a
gluten free peanut butter cookie, so no time better than the present to see
what I could come up with.
And
because I needed enough cookies to make it through 4 weeks, I made certain that
the recipe I glommed together from several recipes posted on the internet would
be large enough to accommodate my needs. And oh am I glad I did! These were the
best peanut butter cookies I ever made, or tasted for that matter. They were so
crunchy and so flavorful. And ever so simple and quick to fix. I didn’t even
need my mixer. So not only was my foot happier, my mouth was seriously pleased
with the results.
So
next time you want a simple and perfect cookie, and don’t have the time or
energy to spend getting out your mixer, creaming the butter and sugar, etc.
etc., this is the recipe for you.
Mr. C’s only comment: “I think they would be great with chocolate chips in them too!” So next time, there will be mini chocolate chips in the mix. Still only 6 ingredients! Can’t be much simpler than that!
2
c. chunky peanut butter (not the old fashioned or freshly ground kind)
1
c. brown sugar, firmly packed
2
tsp. baking soda
2
lg. eggs
1 tsp. vanilla extract
Preheat
oven to 350 degrees. Line a large baking sheet with parchment paper. Set aside.
Stir
the peanut butter, brown sugar, and baking soda together in a medium sized
bowl. (I use a regular table knife for this process. Works great!)
In
a small bowl, beat the eggs and vanilla together. Add the egg mixture to the peanut
butter mixture and stir until well blended.
Drop
balls of dough using a small ice cream scoop onto prepared baking sheet
2-inches apart. Press down lightly with your fingers to flatten cookies a bit. Bake
for 14-17 minutes or until edges and tops start to brown. If you prefer
crunchier cookies, bake a minute or two longer.
Remove
pan from oven and allow cookies to cool on baking sheet for 2-3 minutes before
transferring to a wire rack to cool completely. Store in an airtight container.
Note: For chocolate chip peanut butter cookies, add ½ cup mini chocolate chips to the batter.
And sorry about no picture of these cookies. Just too busy getting ready to leave on our trip to even think about snapping a picture. That, and my camera was already at the trailer anyway!
It’s
really wonderful when you find a chef/cook/baker/fellow food fanatic on the
internet that you know you can trust implicitly. Well that’s how I feel about
David Lebovitz. So much so that I would actually like to meet him just to tell
him how much I appreciate his recipes. (I’d even be thrilled to make dinner for
him and listen with rapt attention as he told me how I could have done better!)
So it should come as no surprise that there are actually quite a few David
Lebovitz inspired/lifted recipes already on this site. And because he is just
that good, you will undoubtedly find more recipes in the future with his name
attached.
So
about this recipe. First of all I’d be lying to you if I told you this was a fast
dessert to prepare. I wouldn’t be lying to you however, if I told you the recipe
directions were easy to follow and not threatening in the least. So I will state,
in all good conscience, that even a beginning baker could prepare this amazing
concoction! However, as implied above, this is not a 30 minute wonder. It takes
time to prepare. But OMG (Oh My Golly) it’s worth every minute spent. This is it
folks when it comes to a dessert for all seasons.
There
simply isn’t anything to dislike about this sweet treat. The bottom crust is
slightly savory from the fresh rosemary, the filling is chewy, boozy and tangy,
and the crumb topping is a buttery and crunchy delight! All in all – perfect!
I
served this yesterday as a luncheon dessert for Mr. C’s tango group rehearsal
here at Chez Carr. First I served them Tortilla
Soup (on this site) and then ended with a small rectangle of this decadent
yummy still warm from the oven. It was immediately regaled as a winner.
So if you are looking for just that special dessert to serve at a gathering of friends or family, do not hesitate to give this recipe a try. And David, if you are reading this blog post (yah right!), please forgive the minor changes I made to your recipe. And be sure to let me know when you can come over for dinner. I promise I won’t serve you one of your own inventions!
Apricot Filling:
2 c. (8-oz.) dried apricots, chopped as fine as possible
1½
c. sweet white wine (I use a California
moscato (Electra) from the Quady Winery)
½
c. granulated sugar
3 T. honey
2 T. brandy
pinch of kosher salt
Combine the chopped apricots, wine, granulated sugar, honey, brandy, and a pinch of salt in a medium saucepan. Bring to a boil, reduce heat, and simmer over low heat for about 45 minutes, or just until almost all of the liquid has been absorbed. Remove from heat and set aside.
Rosemary Shortbread Crust:
12 T. (1½ sticks) unsalted butter, cubed, room temp.
½
c. powdered sugar
½
tsp. kosher salt
¾
tsp. vanilla extract
grated
zest of half a lemon
1½
tsp. finely chopped fresh rosemary
1¾
c. unbleached all-purpose flour
In
the bowl of your stand mixer, cream the butter, powdered sugar, and salt until light
and fluffy. Add the vanilla, lemon zest, and rosemary, then gradually add in
the flour, mixing until a dough ball is partially formed.
Pat
the mixture into a buttered 7 x 11-inch or 9-inch square baking pan (glass is
best). Refrigerate for 30 minutes.
Bake
in a pre-heated 350 degree oven for 25-30 minutes or until a light golden
brown. Remove from oven and allow to cool.
(No need to wash the mixer bowl as you will need it for the crumb topping.)
Crumb Topping:
½
c. unbleached all-purpose flour
½
c. packed brown sugar
1/3 c. coarsely chopped almonds
pinch of salt
3 T. unsalted cold butter, cubed
In your stand mixer bowl, combine the flour, brown sugar, nuts, salt, and butter until the mixture just barely starts clumping together. (If it feels like the crumb topping is never going to clump, not to worry. As you spread it over the filling, you can pinch it together with your fingers.)
Putting it all Together:
Spread
the apricot filling evenly over the cooled shortbread. Top with bits of the
crumb topping evenly spread over the filling.
Bake
in a pre-heated 350 degree oven for 20 to 25 minutes, or until the topping is lightly
browned.
Remove from oven and let bars cool completely before cutting into desired size pieces. (If still slightly warm, that’s OK too.)
Note: These dessert bars are really, really rich. Cut serving size pieces accordingly. The bars can be stored at room temperature or in the refrigerator for up to three days.
This recipe comes from the Serious Eats site. (Wonderful cooking site BTW.) I changed the directions a bit, and reduced the amount of salt, but the rest is true to its author.
And
I am here to tell you, these bar cookies are amazing. I just wish I could say
they were my invention, but that would be very, very wrong of me. I’m a good technician,
but I could never have envisioned a bar cookie as good as this one. Now that’s not
to say that I don’t have original ideas in the kitchen. Just that I know my
limitations and work around them. And original recipes for sweets are never
going to be my forte.
And
that is why I love the internet. There are so many terrific bakers out there.
It is truly humbling to read a recipe like this, prepare as directed (well
within reason), and then reap the rewards of another person’s efforts and creative
ability.
That
leads me to why I have this site, why I often feature other cook’s recipes, and
why I don’t advertise and make some money off my efforts. (I’m only bringing
this up because I was recently asked about this very subject.) It’s simple.
I love good food and I want to share fabulous recipes with you that are tested, found to be wonderful, and as easy to prepare as possible. I simply want you to be able to trust this site. Because as you probably already know, for all the fantastic recipes out there, there are some (and I’ve made my share of them) that are absolutely not to my liking. I just want you to feel that if I have taken the time to post a recipe, it is because both Mr. C. and I have found the dish to be pretty darn delicious.
My
ultimate goal is to help you in the kitchen whenever and however I can. And I
don’t want you to have to wade through advertisements. I hate them myself, so
why would I want to subject you to any more “special offers” for things you
neither want nor need?
So on that happy note, you simply must try this recipe. It is beyond belief easy to prepare and so darn good that you are not going to believe that such a simple recipe can produce something so delicious. Actually you better just bite the bullet if you have several mouths to feed, and make a double batch to begin with. If you do double the recipe, bake in a 10×16-inch pan or 2 9-inch square pans. And thank you again Serious Eats.
11
T. unsalted butter
1
c. packed light brown sugar
½
tsp. salt
¼
tsp. baking soda
½
c. plus 2 T. maple syrup, divided
1
large egg
2
tsp. vanilla extract
2
c. unbleached all-purpose flour
1¾ c. toasted walnuts, chopped, divided
Preheat
your oven to 350 degrees for a glass pan, or 375 degrees for a metal pan.
Partially
melt the butter in a large microwave safe mixing bowl. Stir in the brown sugar,
salt, and baking soda. Stir in the ½ cup maple syrup and egg until well
combined. Add flour and stir until completely combined. Add 1½ cups of the chopped
walnuts.
Spread
into a lightly buttered 9-inch (preferably glass) square pan; smooth the top.
Drizzle remaining 2 tablespoons of maple syrup over the top and swirl into
batter. Sprinkle with remaining quarter cup walnuts.
Bake
for about 30 to 35 minutes or until golden brown and almost set in the center (should
still be slightly jiggly). Don’t overbake. Remove from oven. Place pan on a wire
rack to cool completely. Cut into serving sized pieces just before
serving.
OK,
in complete honesty, I have never baked this cake. But, my dear friend Vicki
has made this recipe twice, and I have had the pleasure of tasting a piece both
times. (OK, more than one piece the second time she baked this cake for a
JazzVox concert.) So, I am here to tell you that this is one of the best cakes
I have ever tasted. And that’s saying something, because I love me a great big
old piece of truly great cake!
The
recipe comes from Jocelyn Delk Adams on her Grandbaby Cakes web site. (Fabulous
site BTW.) And in my estimation, it could not possibly taste any better than it
does! Not possible. Really!
The
cake part is moist, flavorful, slightly dense, and not too sweet. In other
words, it’s just what I have been looking for! Because, if you are like me, and
have tried many, many recipes for yellow cake over the years in hopes of
finding just that perfect one, this is your lucky day. Not only is the flavor perfect,
the crumb is everything I believe a truly great yellow cake should possess. (And
yes, I’m picky. I can’t help it!) And then there’s the icing. Oh caramel icing lovers
rejoice. This is the real thing! Amazing!
Now
a bit of information you should know before you go rushing off to your kitchen.
The cake part is easy, the caramel icing, not as much. You don’t have to stir
the icing the whole time its cooking (1½ – 2 hours), but you do need to pay
attention to it. And it can burn, even if your dedication is exemplary. It can just
happen. But don’t let me scare you off. I just wanted to provide you with full
disclosure so you won’t hate me if 100% perfection is not achieved.
But next time you need a dessert for a special birthday, or just to let someone know how much you love them, bake them this cake. And let me know how it turns out. I love to receive comments. Thank you again Ms. Adams. I think you are a national treasure!
Cake:
1
c. (2 sticks) unsalted butter, room temperature
1/3
c. vegetable oil
2½
c. granulated sugar
6
lg. eggs, room temperature
2
lg. egg yolks, room temperature
2
T. pure vanilla extract
3
c. fluffed up or sifted cake flour
1
tsp. baking powder
½
tsp. salt
1 c. sour cream
In
the bowl of your stand mixer, cream the butter, oil, and sugar on high until light
and fluffy, about 5-6 minutes. (Do not skimp on the time for this step. Very
important.)
Add
eggs and egg yolks one at a time until well incorporated. Scrape the bowl as
needed. Add in the vanilla extract and mix until well combined.
In
a medium sized bowl whisk the cake flour, baking powder, and salt together.
With
mixer on low speed, alternate adding in flour mixture and sour cream. Do not
over mix.
Grease
and flour three 9-inch round cake pans or a 12×16-inch (half-sheet) pan. Pour the
batter evenly into the pans or pan. Shake to help even off the batter.
Bake
9-inch round pans in a pre-heated 350 degree oven for 23-30 minutes or until a toothpick
stuck into the middle of the pan comes out clean. Do not overbake. Check after
23 minutes to be sure. Bake a 12×16-inch pan for 30-35 minutes or until a toothpick
stuck into the middle of the pan comes out clean. Again, do not over bake.
If
you are making a layer cake, remove pans from oven and place on cooling racks
for 10 minutes. Then gently remove cakes from pans and allow to
cool completely before icing. If you are baking a large single layer cake, just
remove cake from oven and allow to cool completely on a rack.
For
a layer cake, place one of the cakes upside down on your cake plate. (Best if
you have a domed cover for your cake plate, because plastic wrap is just not
going to work!) Spread icing over layer. (Not too much.) Place the second layer
over the icing, and add icing. Again not too much. Add the top layer and frost
the top and sides of the entire cake. (Don’t worry if the icing puddles at the
base of the cake and onto the cake plate. That’s the plan!
Please
note: if your cakes are rounded at the top, slice off a bit of the cake to make
top flat before frosting. If the cake layers start sliding around, stick a
couple of long picks through the layers to keep the cake together. Store at
room temperature.
To frost a large single layer cake, just pour on the icing and smooth out as much as possible. Store at room temperature.
Caramel Icing:
¾
c. (1½ sticks) unsalted butter
2
(12-oz.) cans evaporated milk
tiny
pinch of salt
2
c. granulated sugar
2 tsp. pure vanilla extract
Place
butter, evaporated milk, salt, and sugar in a fairly large, heavy, stainless
steel saucepan over medium heat. Whisk until melted together.
Leave
over medium to low heat stirring periodically for about 1½ to 2 hours. Watch
the entire time to make sure the contents don’t burn until the mixture is thickened
and the caramel has darkened to a beautiful golden brown. Just don’t be afraid
to cook it long enough. You need to make sure the caramel turns golden before
stopping the heat. It should also thickly coat the back of a spoon. You may
find yourself adjusting the heat in order to not let it burn. When the color
and the thickness are perfect, remove from heat and stir in the vanilla
extract.
Cool
for about 30 minutes to allow it to thicken properly before icing the cake.
So,
what do you do when a really great friend gives you lime curd for
Christmas. Well, I’ll tell you what I did. I made dessert! (Thank you again
Vicki for the lime curd.)
With
the assignment to bring dessert for our traditional Christmas Eve dinner with
our dear friends Jim and Margo at their home, and hosting Andy’s dad and Katie
(Andy’s sister) and her husband (Rick) for Christmas dinner, I wanted to serve
a dessert that would work for both evening meals. So I looked at the lime curd,
and imagined that it would make a fabulous top layer for cheesecake. But I didn’t
want to build a big old cheesecake that I would have to cut in two (sloppy
presentation). So I thought – cheesecake bars. (Sometimes I amaze myself!)
So
I went on search for a cheesecake bar on the internet. I found lots of recipes
for the cheesecake part, but all that I researched called for a graham cracker
crust. (Not my favorite.) So after talking with daughter Paula, I decided to follow
her advice and use vanilla wafers instead. So after taking a smidge from this recipe and
a pinch from that recipe, I came up with my own recipe.
And
I have to tell you, the cheesecake part of this recipe is as creamy, smooth,
and luscious as anyone could imagine cheesecake should be. Just be warned that
the baking time is going to seem too little. Forget that, and do as you are
told!
So give this recipe a try next time you need a splendiferous dessert to serve to your family and friends. Happy New Year my friends. May next year be the best ever!
½
c. finely
crushed vanilla wafers (you can use graham crackers if you must)
1 T. + ½ c. granulated sugar, divided
3
T. unsalted butter, melted
aluminum foil
cooking spray
2
(8-oz.) packages regular cream cheese, room
temperature (none of that light stuff for this recipe)
3
tsp.
fresh lime or lemon zest, divided
1
T. fresh lime or lemon juice
1
tsp. vanilla extract
2
lg. eggs
½-¾ c. lime or lemon curd (see recipe
below)
whipped cream
Line an 8-inch
square baking pan (glass is best) with foil. Lightly grease the foil (bottom
and sides) with cooking spray. Set aside.
In a medium bowl,
stir together the crushed vanilla wafer cookies, the 1 tablespoon sugar, and
melted butter. Spoon the mixture into the prepared pan. Firmly press the
mixture into an even layer.
In the bowl of your
stand mixer, beat the cream cheese, remaining ½ cup sugar, 2 teaspoons of the
lime or lemon zest, juice, and vanilla together until well combined. Add the
eggs one at a time, beating well after each addition.
Pour the
cheesecake mixture over the crust, spreading it into an even layer.
Bake the
cheesecake in a pre-heated 350 degree oven for 20 to 25 minutes or until the
center is almost set. Do not overbake.
Remove the pan
from the oven and let cool completely before spreading with the lime or lemon
curd. Cover the pan with plastic wrap and refrigerate for at least 4 hours.
Overnight is even better.
When ready to serve, remove the cheesecake from the fridge. Lift the cheesecake out of the pan by the foil and place it on a cutting board. Cut the cheesecake into serving sized portions, carefully pealing each piece away from the foil, and place on plates. Decorate with a small amount of whipped cream and garnish with the remaining zest.
LIME OR LEMON CURD (remember, if time is a factor, you can always
buy the lime or lemon curd)
1¾ c. granulated
sugar
½ c. (1 stick)
unsalted butter
pinch salt
finely grated
zest and juice of 4 limes or lemons
4 eggs
In a medium sized
saucepan, combine the sugar, butter, salt, zest, and juice. Cook over low heat
until the sugar dissolves. Whisk in the eggs one at a time. Continue stirring
until the mixture is thick, approximately 20 minutes. Remove from heat and store
in an airtight container in your refrigerator.
Please note: Unfortunately, this recipe for curd
does not double well. So if you were thinking of making a super big batch,
forget it!
As you well know, I love to mess with already perfectly wonderful recipes just for the heck of it. And one of my favorite things to do is experiment with adding liquor or liqueur to dessert items such as cake batter, pie filling, frosting, glaze, whipped cream, etc. etc.
So while contemplating how to kick my cream cheese frosting recipe for Apple Cake (on this site) up a notch, I decided to add some cinnamon, because there’s cinnamon in the cake batter, and some Calvados (apple flavored brandy) because there are apples in the batter. (I’ve always excelled at stating the obvious!)
Anyway, that’s exactly what I did when I prepared the frosting for the apple cake I made for last weekend’s JazzVox pre-concert meal. And our guests told me they thought the frosting was pretty darn OK.
Note: When I use alcohol in a dessert, I usually cut down on the amount of vanilla. (If vanilla is called for, that is!)
So next time you make a cake, try enhancing the flavor of the batter and/or the frosting with a bit of spice and/or a wee dram of something from the adult beverage category. And please don’t worry about the alcohol content. Adding a tiny bit of liquor or liqueur to your frosting recipe is about the same as adding pure vanilla extract. Pure vanilla extract legally has to contain at least 35% alcohol, which is basically the same proof as vodka or rum. So don’t fret about adding alcohol to your favorite frosting even if your children are going to be the primary consumers. You have undoubtedly been “spiking” their frosting since the first time they smeared it all over their face, your clothes, and the tray of their high chair! Have a great day.
½ c. (1 stick) unsalted butter, room temperature
1 (8-oz.) pkg. cream cheese, room temperature
pinch salt
2 T. brown sugar
¼ tsp. ground cinnamon
½ tsp. vanilla
1½ T. liqueur – Calvados, brandy, bourbon, spiced rum, etc. (whatever flavor goes best with the ingredients in your baked goodie)
1 lb. powdered sugar, more or less
Beat the butter, cream cheese, salt, and brown sugar together until creamy. Mix in the cinnamon, vanilla, and liqueur. Add powdered sugar until you reach your desired consistency.
FYI: For more information about pure vanilla extract, read the January 21, 2015 article entitled Why Don’t You buy Vanilla Extract in a Liquor Store by Michael Y. Park (via Bon Appétit magazine). It’s a really well written, informative, and scary article!
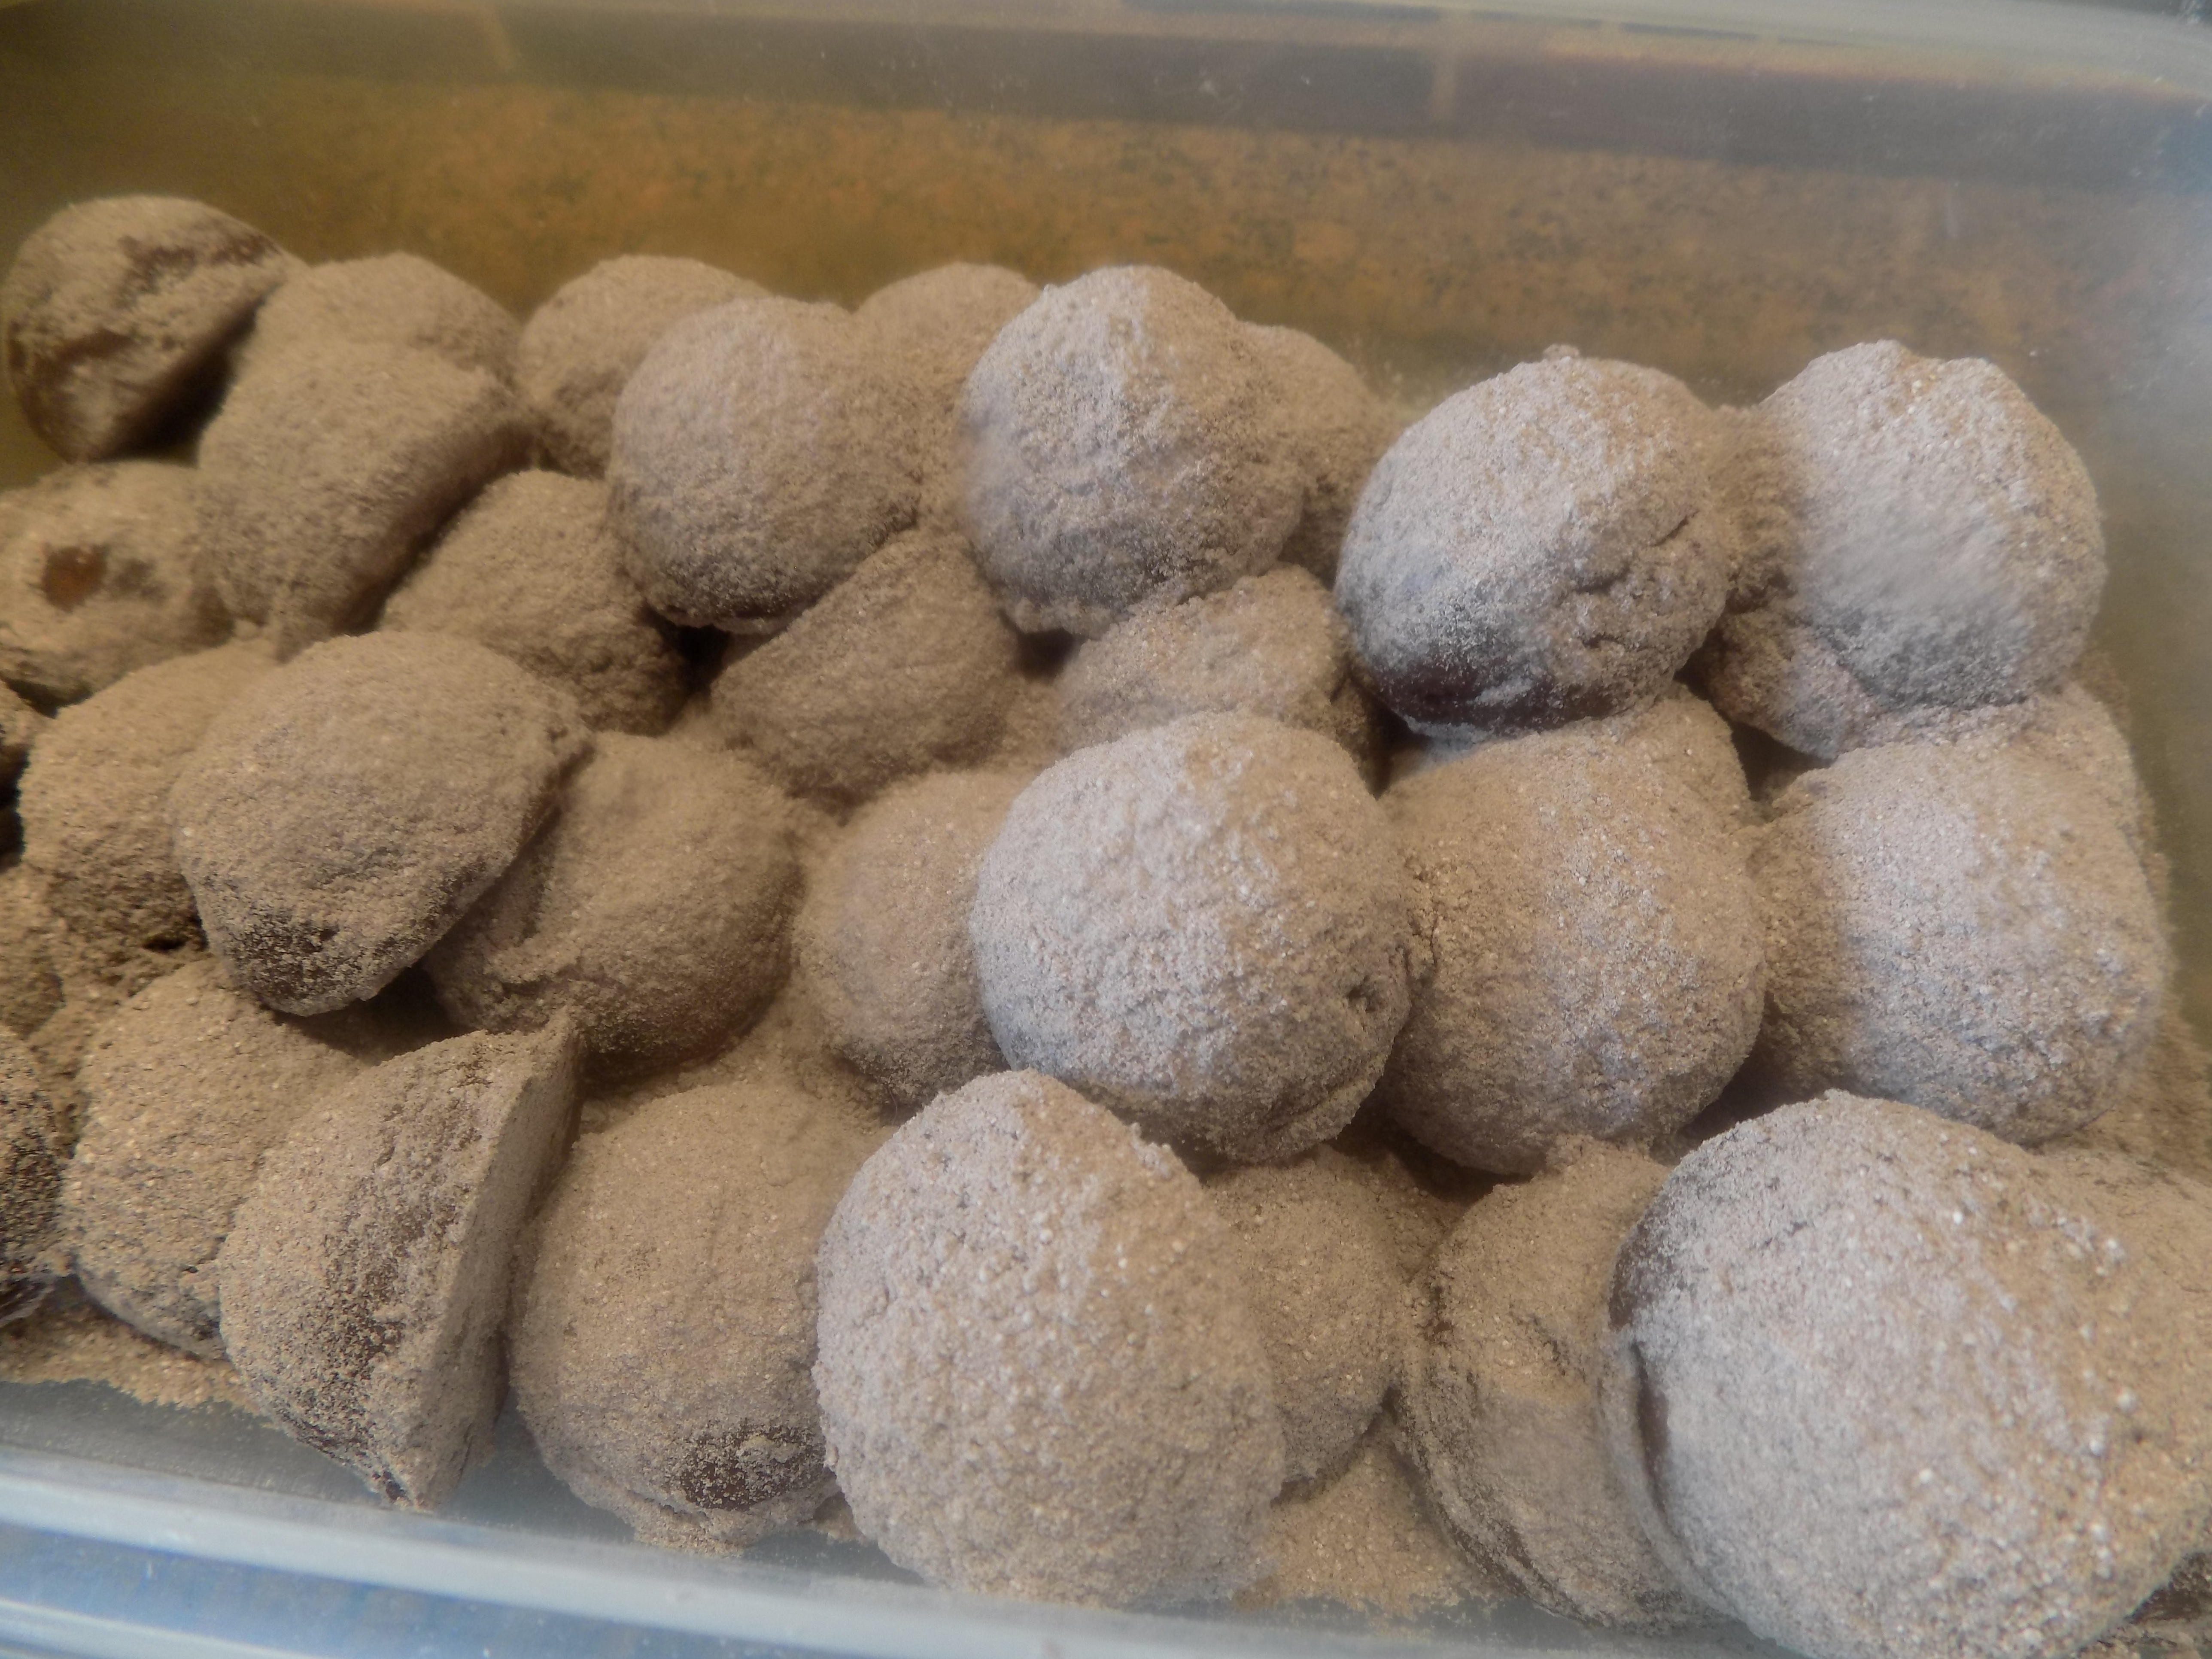
So, what do you call a chocolate version of a Russian tea cake, Mexican wedding cake, or a snowball cookie (just a few of the many names given to these melt in your mouth delights)? That was my quandary recently when I decided to create a copycat recipe for La Panzanella’s Chocolate Dolcetini. (They are amazing BTW.)
So I basically started with my Russian Tea Cake recipe on this site that I have been using since God was a child, (please, no irreverence intended except towards my advancing age) and performed a tiny switcheroo of unsweetened cocoa powder for part of the flour. Couldn’t have been easier! And guess what? It worked! Of course I did add a tiny bit of espresso powder, but then I often add coffee to enhance the flavor of chocolate when making cookies, cakes, or frostings. (Learned to do that a few years ago, and truly it does make a difference.)
Anyway, the cookies are really tasty and very easy to prepare. They literally melt in your mouth.
So next time you need a small respite from the hectic times in which we live, sit down with a hot cup of coffee or a lovely hearty glass of red wine and a couple of these little darlings. Relax, count your blessings, and enjoy a few moments of chocolate decadence.
A special thank you to Vicki Corson of Camaraderie Cellars in Port Angeles, Washington for her gracious hospitality and for introducing us to La Panzanella’s Chocolate Dolcetini. And of course to her husband Don for making and sharing his fine wines with all of us. I would strongly recommend that if you are a wine connoisseur, you pay a visit to the winery at your earliest opportunity. You can thank me later!
For additional information, visit https://camaraderiecellars.com
1 c. unsalted butter, room temperature
1 c. powdered sugar, divided
6 T. unsweetened cocoa powder, divided (I use Ghirardelli premium cocoa)
1/8 tsp. espresso powder (I use Medaglia d’Oro)
½ tsp. fine grain sea salt
1 tsp. vanilla
2 c. unbleached all-purpose flour
Mix the butter, ½ cup of the powdered sugar, 4 tablespoons of the cocoa, espresso powder, salt, and vanilla together with an electric mixer until light and fluffy. Add the flour and mix until the dough is thoroughly blended, but don’t over-mix. Place the bowl of dough in the refrigerator for 30 minutes.Using a small ice cream scoop, drop balls of dough on an ungreased baking sheet.
Bake in a pre-heated 350 degree oven for 14-16 minutes, or until the cookies feel firm to the touch and slightly brown on the bottom. (Hard to see if they are brown on the bottom because they are dark brown already. But give it your best shot!) The main thing is not to under-bake.
Remove from oven and transfer to a wire rack; cool completely.
Meanwhile whisk the remaining ½ cup powdered sugar and remaining 2 tablespoons cocoa powder together until no clumps remain. Place the mixture in a fine mesh strainer and shake over the tea cookies until they are well coated. Store cookies in an airtight container at room temperature.
So here’s how it all started. My dear friend Vicki gifted me with a bottle of chocolate olive oil. And since I have never been impressed with flavored olive oil, I was naturally suspicious. Especially since it was chocolate and olive oil mixed together. Obviously too foreign a concept to resonate clearly in my brain! So therefore the bottle sat in my pantry for a good couple of years. It may have been hidden, but I never forgot that it was in there.
So one day last week I remembered the poor lonely bottle being ignored in my pantry and sought out recipes for this frankly intimidating ingredient. And oh my! I found this recipe on the Queen Creek Olive Mill site, but added espresso powder and used my own frosting recipe.
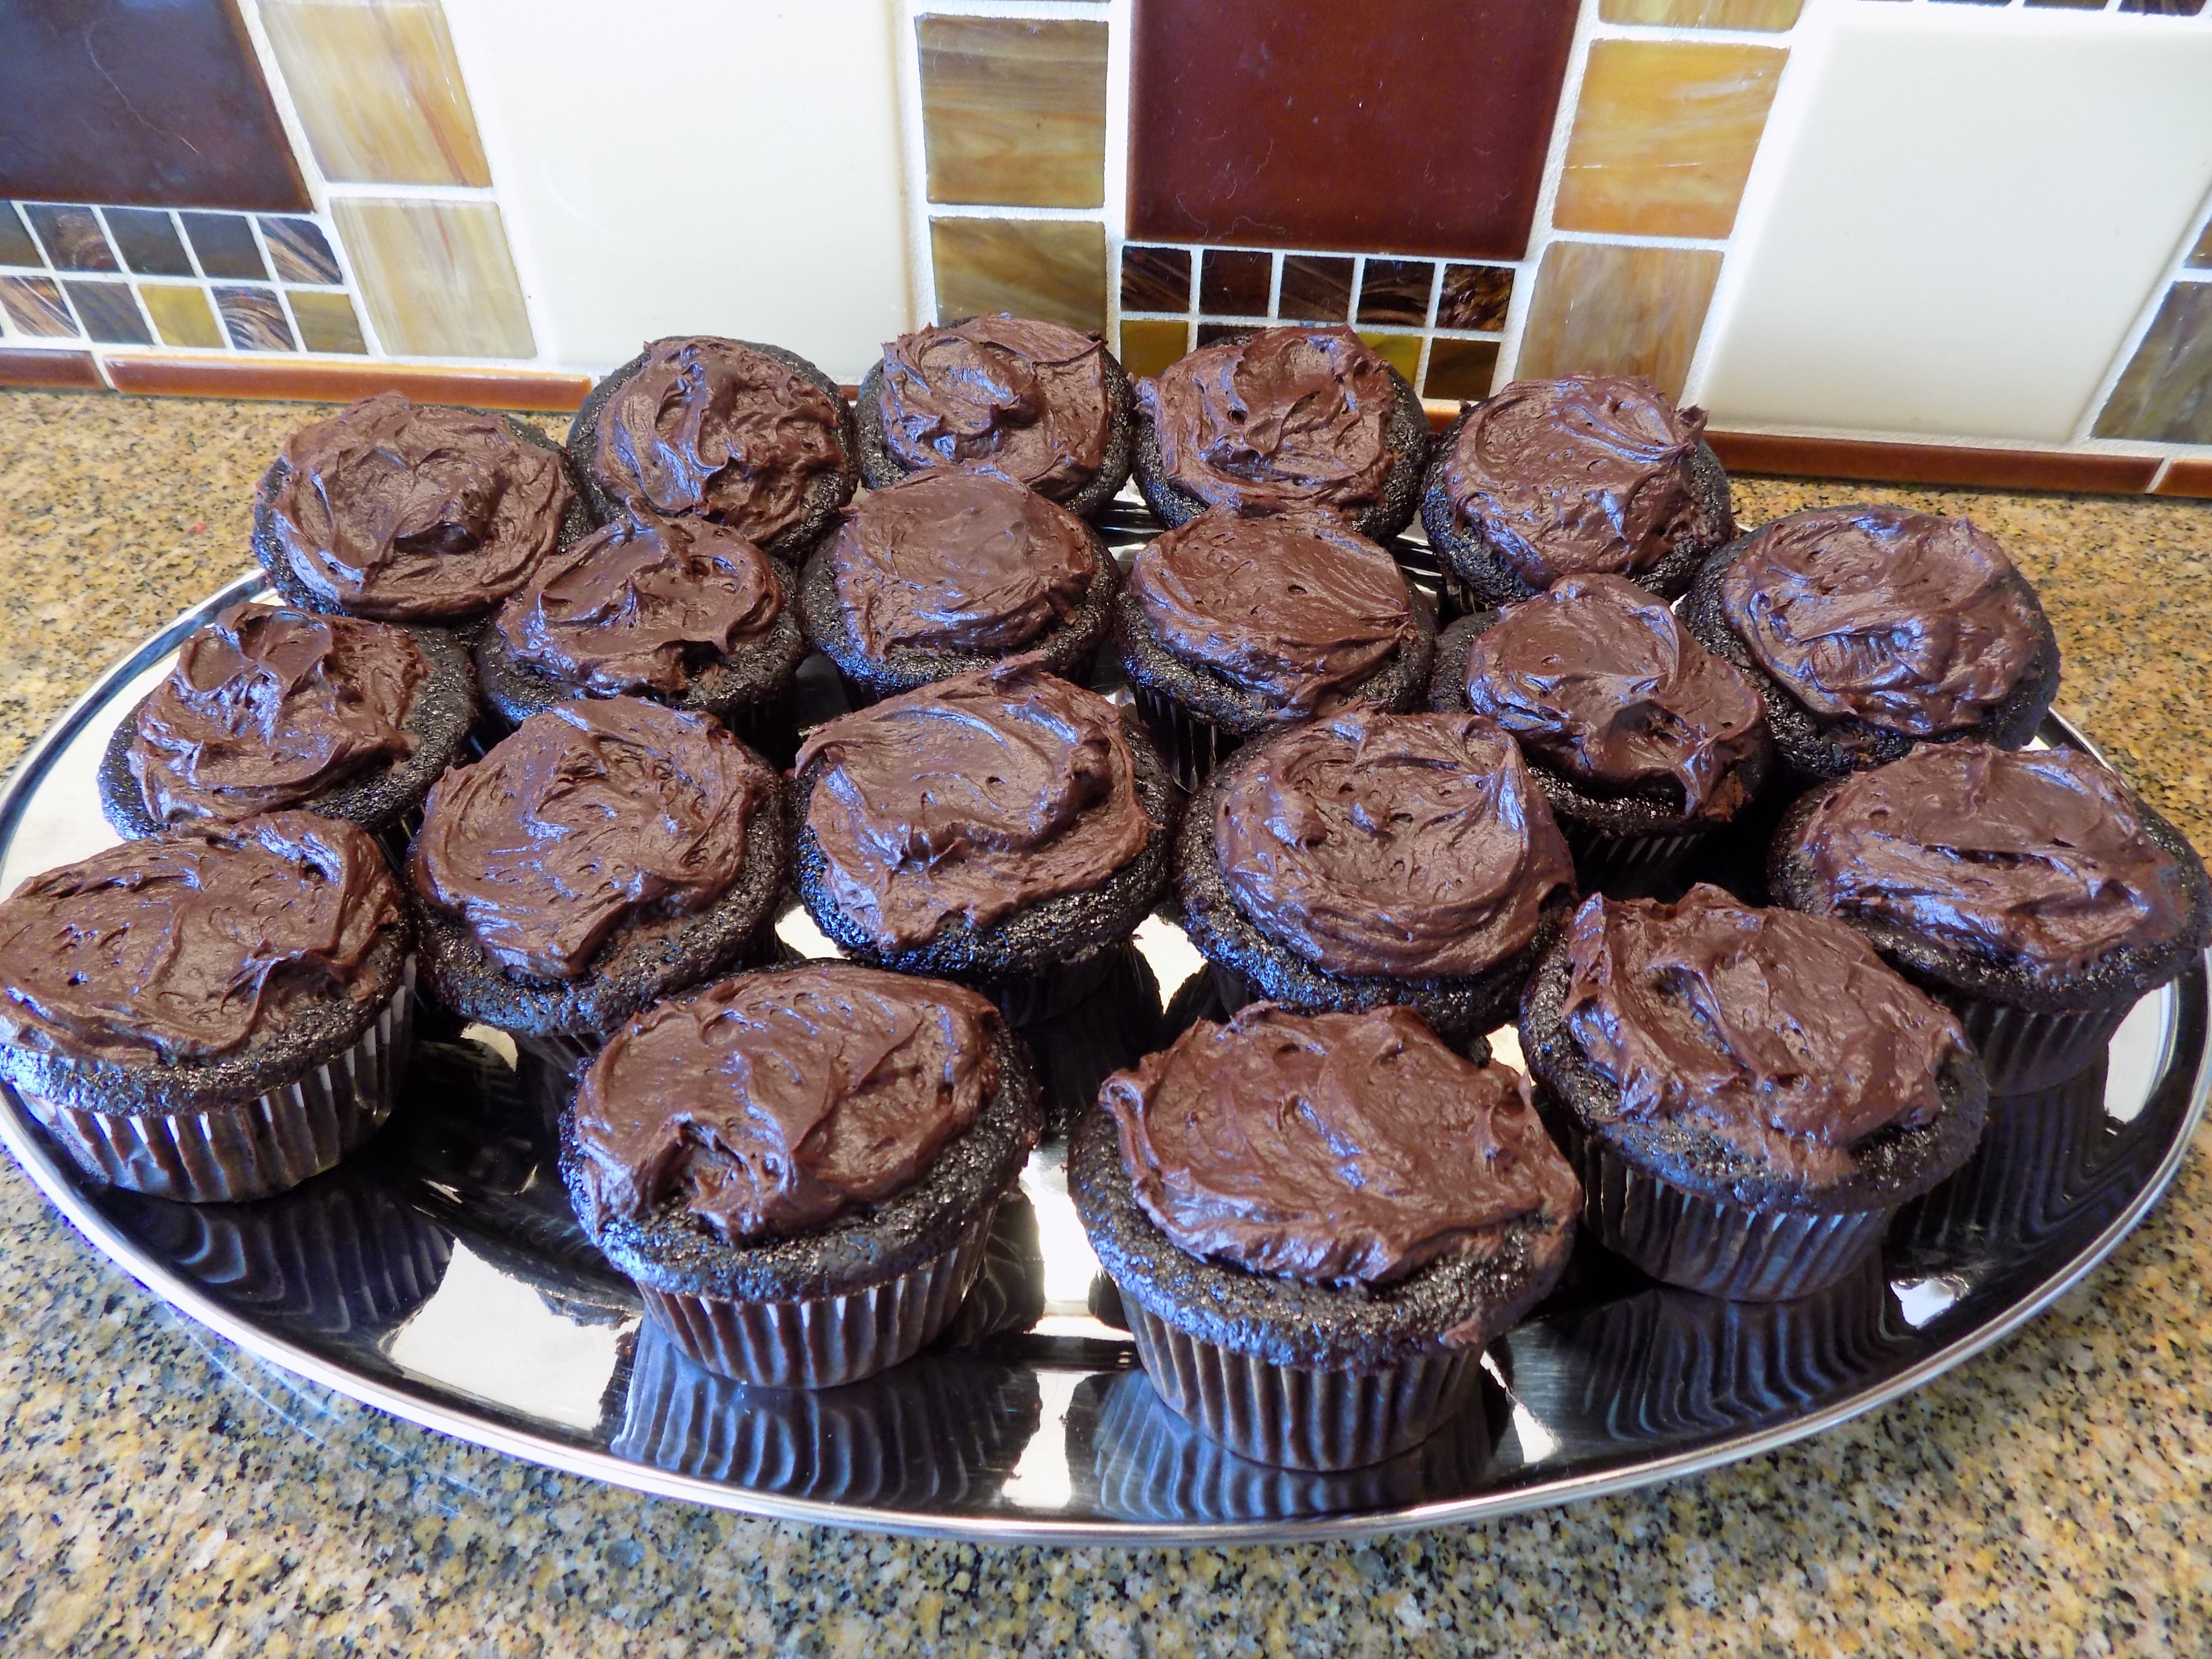
Well I’m here to tell you, this recipe makes possibly the best chocolate cupcakes I have ever had the pleasure of putting in my mouth. They turned out super moist, super chocolaty, and absolutely delightful. So much so, that I have spent about 6 hours now looking at other recipes that contain chocolate olive oil, because I know that olive oil is a lot healthier for me than either butter or vegetable oil. Actually I’m looking at sweet recipes that use regular olive oil too. (And yes, you can make this recipe with regular olive oil, as long as it isn’t too herby or bitter.)
And why the espresso powder in both the cake and frosting recipes you might ask. Well, it’s because coffee is a great way to enhance the flavor of cocoa powder, resulting in a chocolatier flavor. And even if you don’t like the flavor of coffee, you poor deprived person, you won’t notice the coffee flavor. So not to worry.
So next time you want to make cupcakes that will knock the socks off whomever you are gracing with your baked goods, mix up a batch of these little darlings. They truly are out of this world. Thanks again Vicki for your fun gift. Actually, I found a recipe for preparing homemade chocolate olive oil. If it tastes as wonderful as it appears, I will be sharing the recipe with you in the near future. That and a couple of other homemade recipes for fabulous products introduced to me by my sister-in-law Katie – preserved lemons and black garlic. Thanks again Katie.
(And yes I know you can buy preserved lemons and black garlic in upscale markets or over the internet, so I will be posting recipes that include these 2 fantastic taste treats in the next couple of weeks. But because I’m cheap frugal, I’m going to show you how to make them at home too. That is, after I learn how first. Stand by!)
1¾ c. unbleached all-purpose flour
2 c. sugar
¾ c. cocoa powder (I use Ghirardelli Majestic Premium Cocoa Powder from Cash & Carry)
1½ tsp. baking powder
1½ tsp. baking soda
1 tsp. salt
½ tsp. instant espresso coffee (I use Medaglia D’oro)
2 eggs
2 tsp. vanilla
½ c. chocolate olive oil or “light” regular olive oil
1 c. whole milk
1 c. boiling water
Using a regular whisk, mix the flour, sugar, cocoa, baking powder, baking soda, salt, and espresso together in the bowl of your mixer. (You can also pour the ingredients into the mixer bowl through a fine mesh strainer.) You just want to eliminate any possible lumps.
Using the beater, add in the eggs, vanilla, and chocolate flavored olive oil. Add the milk and beat to blend. Add the boiling water. Continue to beat at low speed until well blended.
Pour the thin batter into cupcake paper lined cupcake pans and bake in a preheated 325 degree oven for 20 to 25 minutes. Cupcakes are done when a toothpick inserted into the center comes out clean.
Cool in pan for 10 minutes then remove to wire rack to finish cooling. Top with frosting.
Hint: Because the batter is so thin, I pour it into a glass measuring cup to fill the cupcake papers ¾ full. Don’t fill them any higher because the batter is going to expand a great deal. Should make 24 cupcakes.
Creamy Chocolate Frosting:
3 c. powdered sugar, or more as needed
7 T. unsweetened cocoa powder
½ tsp. instant espresso coffee
1/8 tsp. salt
6 T. unsalted butter, room temperature
1 tsp. vanilla extract
5 T. half & half or heavy cream, or more as needed
In a medium bowl, sift the confectioners’ sugar, cocoa, instant espresso powder, and salt or press through a fine mesh strainer; set aside. (You just want to break up any lumps.)
In a large bowl, beat butter and vanilla together until smooth and creamy. Gradually beat in sugar mixture alternately with half & half. Beat until very light and fluffy. If necessary, adjust consistency with more half & half or powdered sugar.
I love shortbread cookies for oh so many reasons. They are stinkin’ easy to build, their taste is unrivalled, and they are super crunchy. Now I’ve always understood the part about how easy they are to prepare (so few ingredients), and why they taste so great (has something to do with the butter), but I’ve never completely understood why they are so wonderfully crunchy, and remain so even after several days. I reasoned that storing them in an airtight container was part of the equation, but I knew instinctively that there had to be another reason. So I went in search of an answer.
According to several sources, the tender, crumbly texture of shortbread is the result of the high ratio of flour to liquid. In this case the liquid contained within the butter and the extracts. Transversely brownies, for example, contain a lower proportion of flour to the amount of liquid or egg resulting in a cakey or chewy texture. Furthermore, even the type of sugar you use can have an impact on the final result. Brown sugar contains more moisture than granulated sugar. So if you use brown sugar, your brownies are going to be even more moist and chewy. Cool, huh! Anyway, back to this recipe.
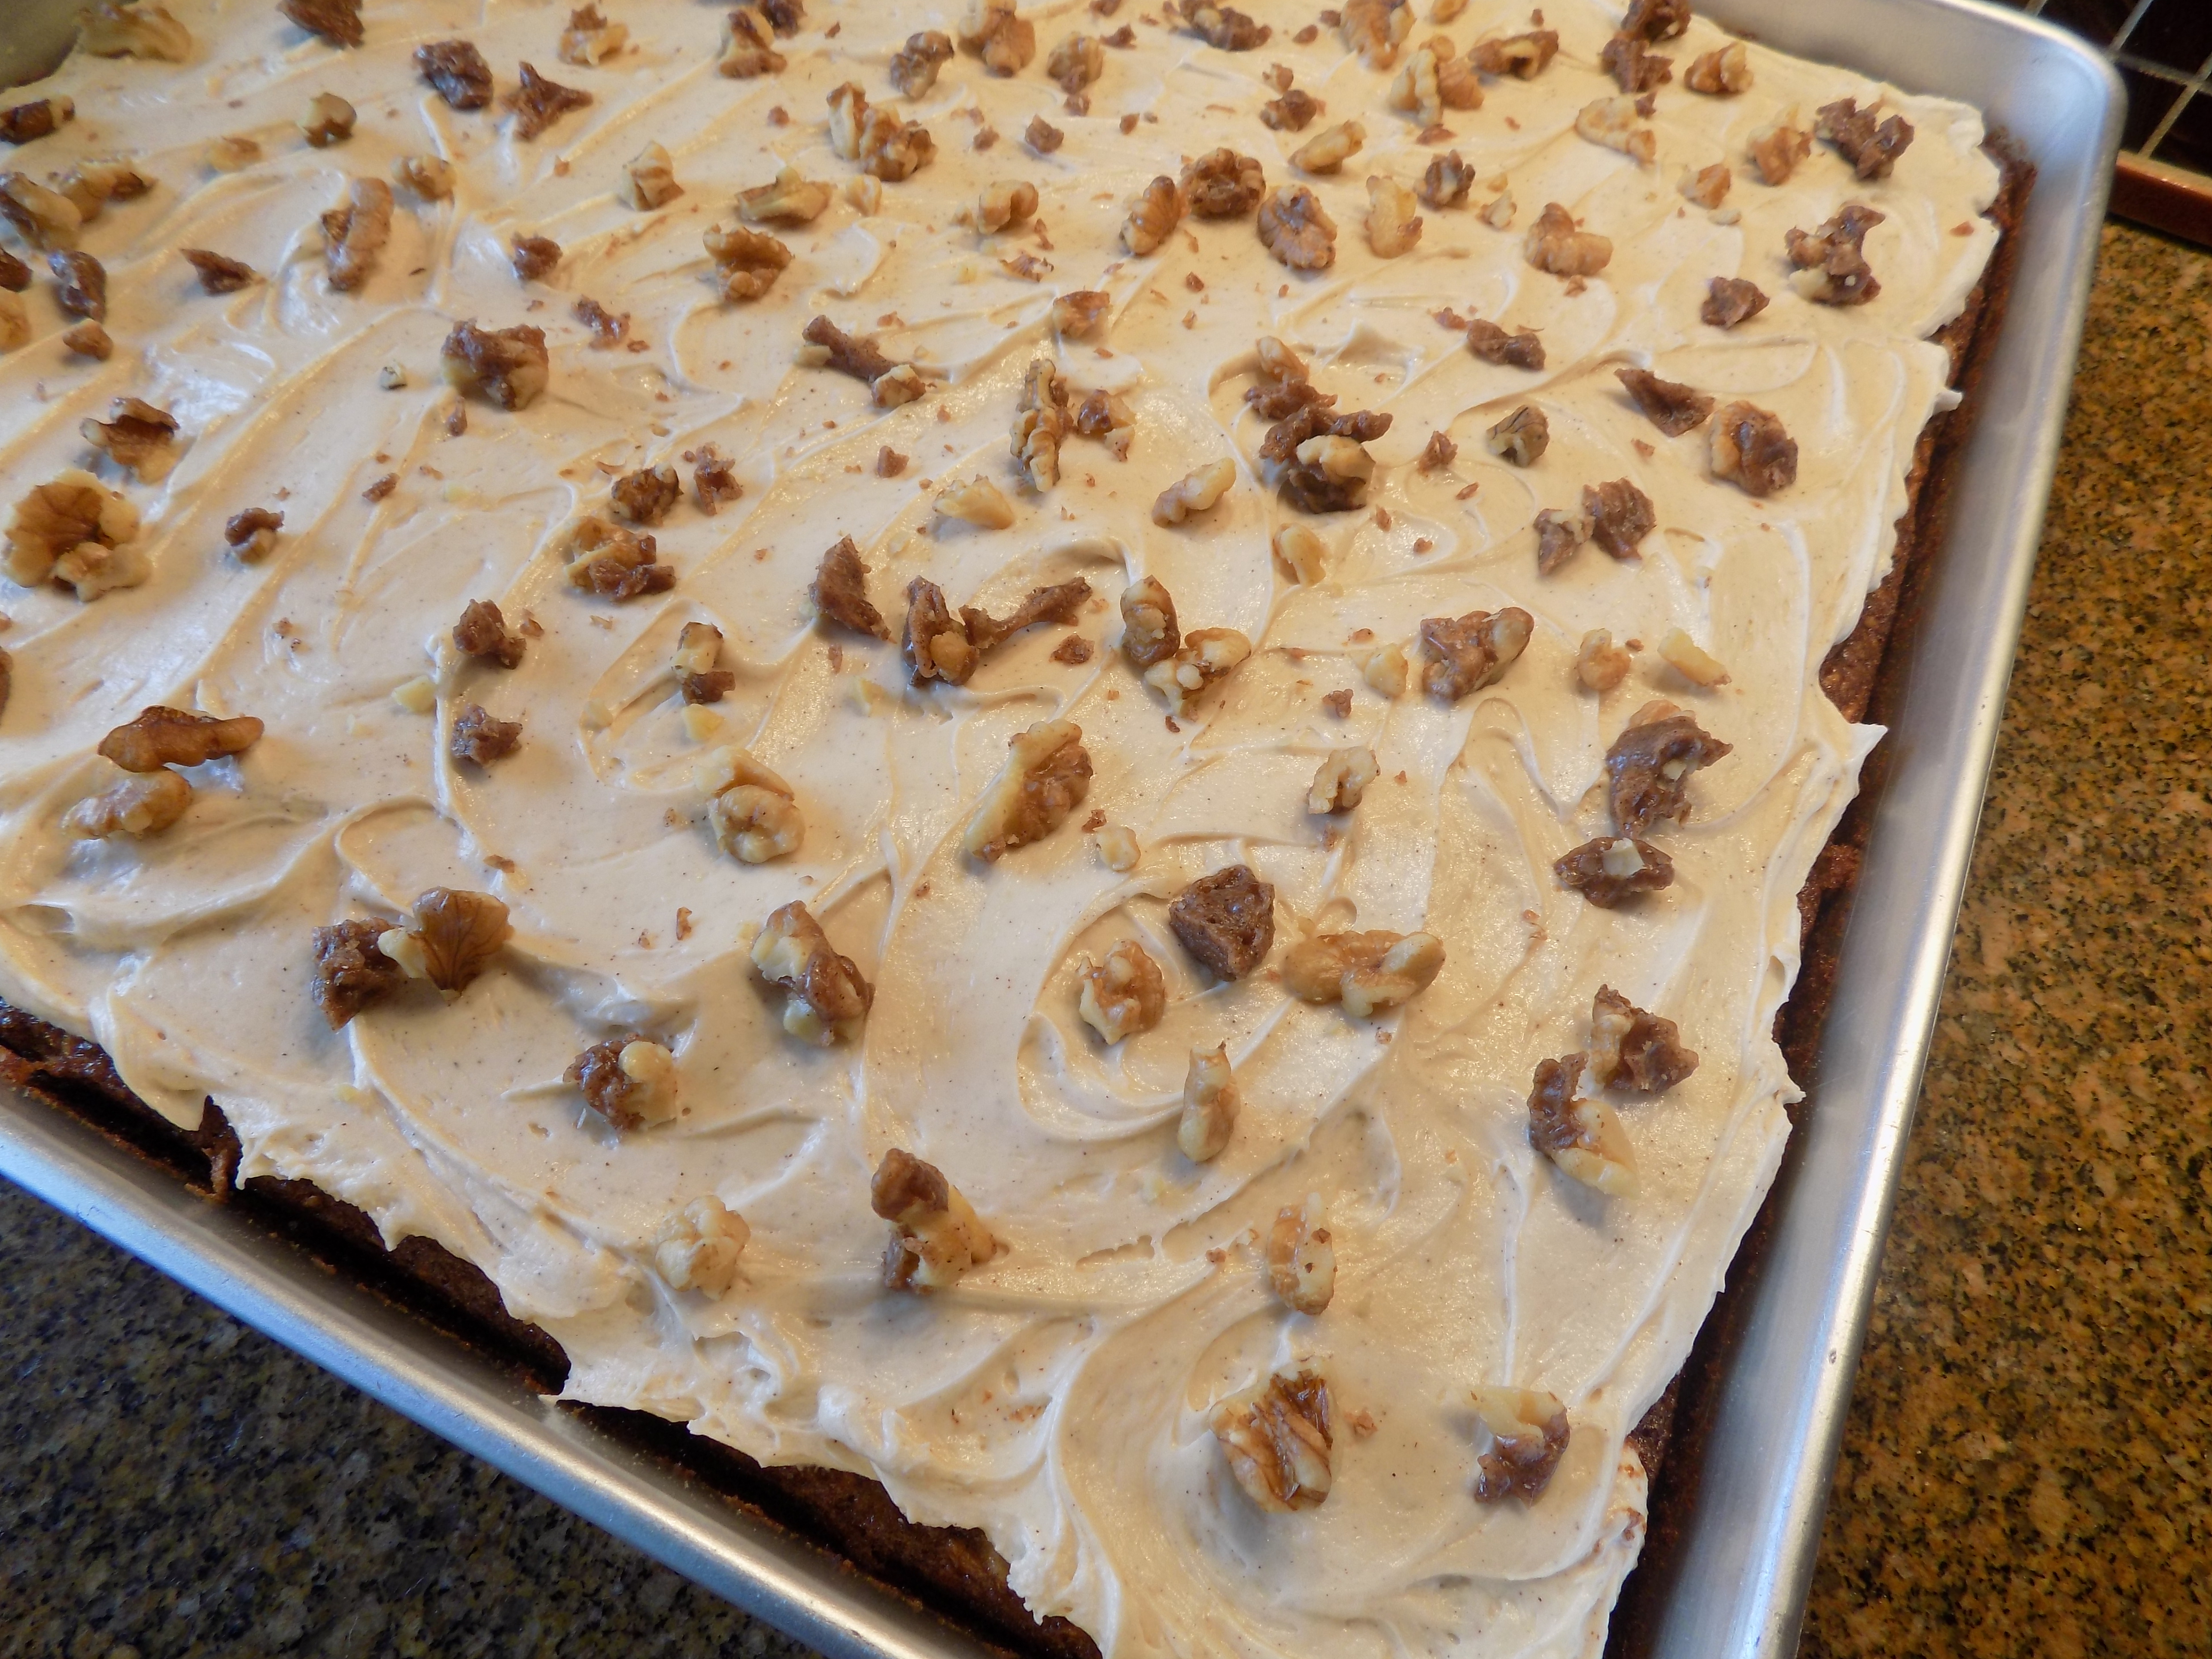
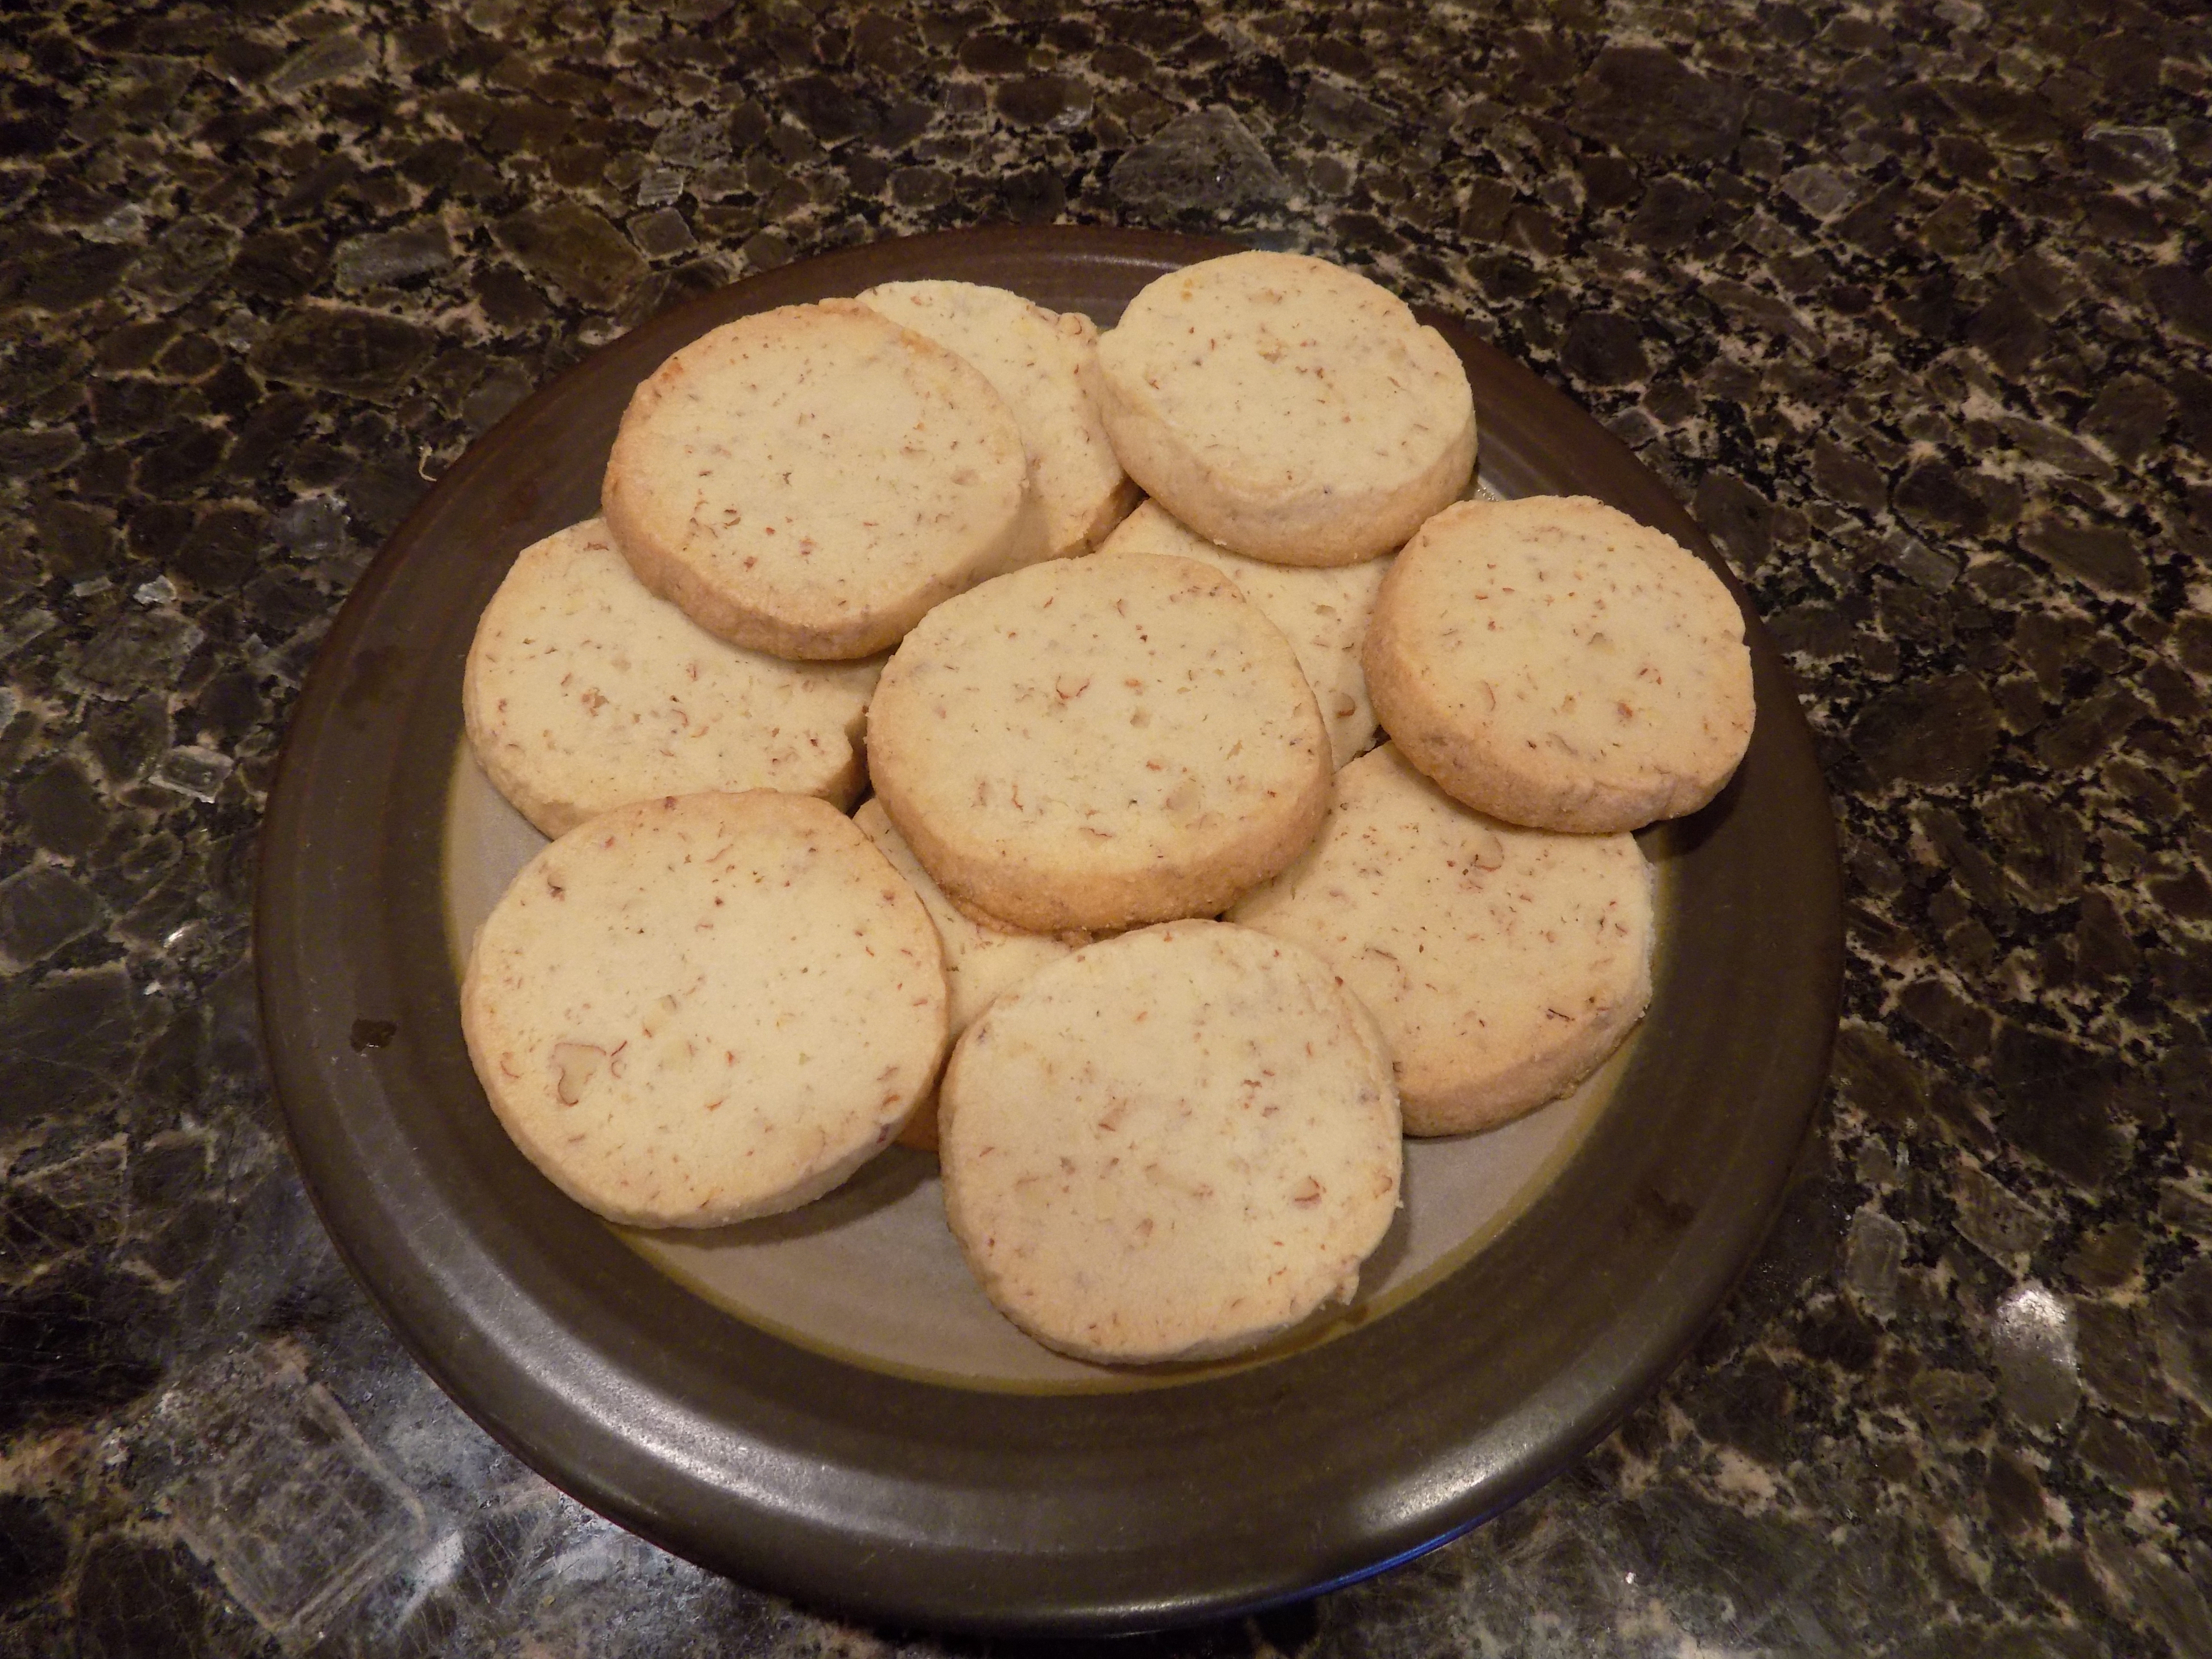
Maple flavoring and pecans just seem to be meant for each other. So when I got a wild hair to prepare shortbread to take along to Winthrop for a visit with Mr. Cs sister Katie and husband Rick (and not coincidentally attend a couple of chamber music concerts), I decided to try out this fabulous combination in cookie form. And it worked! Lovely maple flavor, and delicious additional crunch and taste from the finely chopped pecans. A great, all around the clock cookie. Equally delectable served first thing in the morning with a cup of coffee, or last thing in the evening with a wee dram of Scotch. This is a husband, sister-in-law, brother-in law, and baker approved recipe. Enjoy!
1 c. (2 sticks) unsalted butter, room temp.
1 c. powdered sugar
½ tsp. vanilla extract
½ tsp. maple extract (I use Cook’s Choice)
½ tsp. salt
2 c. unbleached all-purpose flour
¾ c. finally chopped pecans
With an electric mixer, beat butter, powdered sugar, vanilla extract, maple extract, and salt until smooth and creamy. In a separate bowl combine the flour and chopped pecans. With mixer on low speed, add flour mixture, mixing just until a dough forms. With your hands, shape the dough into a long, thick, rope shape. Place on a long piece of plastic wrap. Again using your hands, wrap the dough into the plastic wrap gently shaping it into a round log with a 1½-inch circumference. Refrigerate for 1 hour.
Unwrap log and using a thin serrated knife, slice dough a generous 3/8-inch thick. (If dough feels really hard, leave at room temperature for 5 to 10 minutes before slicing). Arrange about 1-inch apart on baking sheets. (No need to grease the baking pan.)
Bake in a pre-heated 350 degree oven until lightly golden around the edges, 15 to 20 minutes. (Do not under-bake.)
Transfer to a wire rack to cool completely. Store at room temperature in an airtight container.
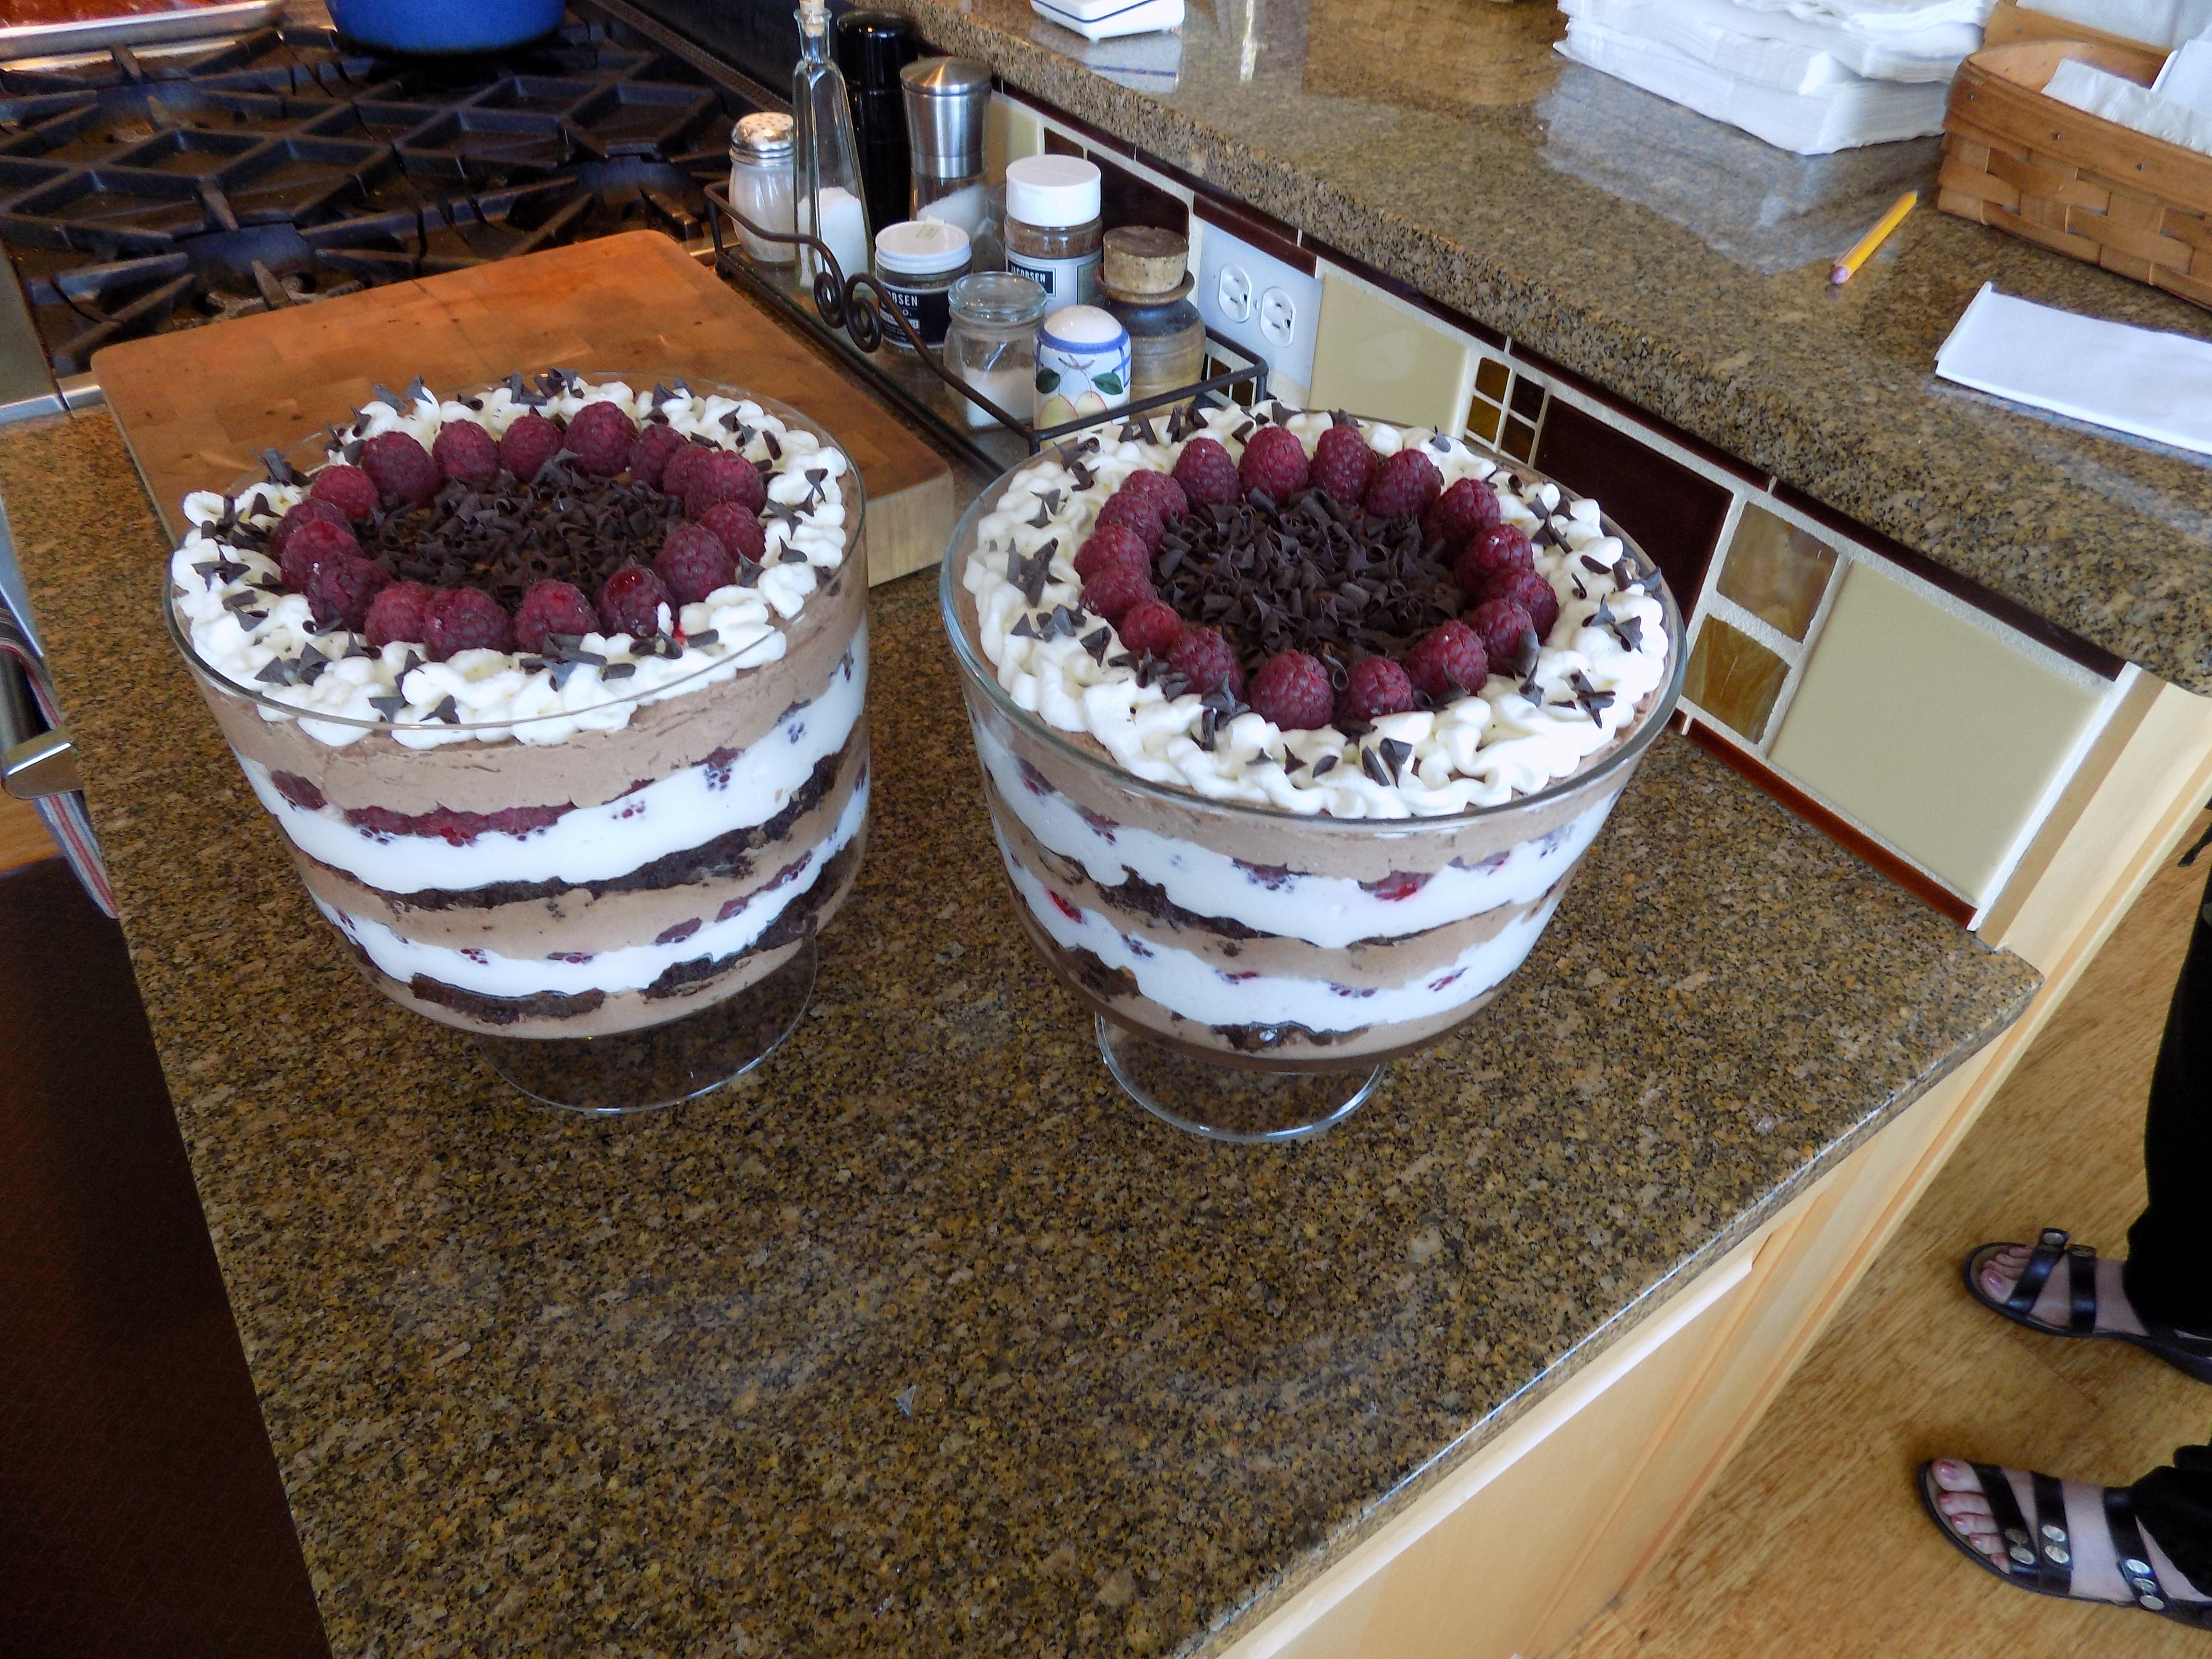
Sometimes I get a wild hair to create a dessert that is kind of fancy. And for me, seeing a beautifully layered trifle in a lovely straight sided glass bowl, comes about as close to extravagant as I am ever going to get. And if truth be told, trifle is not only lovely to behold, it is practically fool-proof to prepare and the taste and mouth feel are absolutely fabulous. Trifle is merely a layered dessert made with fruit, layers of cake, lady fingers, or as in this case brownies, layers of some type of liqueur fortified whipped cream, sometimes layers of custard, pudding, or mousse, then topped with whipped cream. Sounds onerous, right? Well it really isn’t!
And this trifle, based on a recipe from Gemma on the Bigger Bolder Baking site, is a perfect example. Yes there are several steps, but none are difficult, and all can be prepared ahead of time. (You can even cheat like I did, and use a mix for the brownie layer. See note below.)
And if you don’t happen to own a trifle dish, the best places I’ve found for something of this nature, at a reasonable price, are Marshall’s, Ross Dress for Less, or thrift shops.
So the next time you need a fantastic dessert for 15-20 people, make a trifle. You will forever thank me. And don’t hesitate to play with the ingredients. It’s peach season, make a trifle using peaches as the fruit. Love rhubarb and strawberries together, make a thick sauce and layer your trifle with this delicious compote. Just about any combination will work. Have fun. And if you make a trifle that rocks your socks, let me know. I’m always on the lookout for amazing new recipes to share with my readers.
And no, I didn’t decorate the top of the trifles. My dear friend Vicki put on the finishing touches. Thanks again to both you and Mark for helping me with last minute set-up for the JazzVox pre-concert meal.
Brownies:
1 c. (2 sticks) unsalted butter, melted and cooled
2 T. vegetable oil
1 c. plus 2 T. brown sugar
1 c. plus 2 T. granulated sugar
4 lg. eggs, room temperature
4 tsp. vanilla extract
1 tsp. kosher salt
1 c. unbleached all-purpose flour
1 c. good quality, unsweetened cocoa powder
1½ c. (9oz.) mini chocolate chips, or roughly chopped regular size chocolate chips, divided
Combine melted butter, oil, and both sugars in a medium sized mixing bowl. Whisk in the eggs, vanilla extract, and salt till batter smooth and creamy.
In a separate bowl whisk together the flour and cocoa which you have first run through a fine mesh strainer. (Nothing worse than having chunks of cocoa or flour in your finished product.) Gently fold the dry ingredients into the wet ingredients just until combined. (Do not over mix). Fold in half of the chocolate chunks.
Pour the batter into a parchment paper lined 7×11-inch baking pan (preferably glass), smooth out the top, and sprinkle with the remaining ¾ cup chocolate chips over the top.
Bake for 35-40 minutes in a pre-heated 325 degree (for glass) oven just until the center of the brownies no longer jiggles and is just set to the touch. (Set your oven at 350 if you are using a metal pan.)
Remove from the oven and allow to cool completely before cutting into small chunks. Can be prepared a day ahead.
Chocolate Mousse
1 c. (6-oz.) semi-sweet chocolate chips
1 (8oz.) pkg. cream cheese, room temperature
2 c. whipping cream
1 tsp. vanilla
pinch salt
Gently melt the chocolate chips in a glass bowl. Set aside to cool.
Using an electric mixer or the whip attachment for your stand mixer, beat the cream cheese until it is light, creamy, and totally devoid of lumps.
Slowly add the whipping cream, vanilla, and salt. Continue beating until the mixture becomes thick. Take a large spoonful of the cream cheese mixture and quickly mix it into the cooled melted chocolate. Then swiftly fold the chocolate into the rest of the cream cheese mixture. Move quickly, because the chocolate will start to harden once added to the creamy mix.
Once the mixture is thick and creamy, place in the fridge until needed. The mousse can be made a day ahead.
Chambord Whipped Cream
2 c. whipping cream (reserve a bit for decorating the top of the trifle)
2 T. powdered sugar
2 T. raspberry liqueur (Chambord, Framboise)
Beat the whipping cream until it reaches the stage just before hard peaks. (Somewhere between soft and hard peaks.) Beat in the powdered sugar and raspberry liqueur. Refrigerate until needed.
Raspberry Layer
3 pints raspberries, divided
Garnish
Shaved chocolate (dark, milk, white or a combination thereof)
Building the Trifle
Cover the bottom of a trifle dish or 4-quart glass bowl with a bit of the chocolate mousse. Then cover the mousse with half of the brownie chunks. A few gaps here and there are great because then the next layer can help soften the brownie chunks.
Spread half of the Chambord whipped cream over the brownies. Press down a bit so the whipped cream fills in all the empty spaces.
Top the whipped cream with one pint of the raspberries. (Make sure some of the raspberries show through the glass.) Press down slightly. You want a nice compacted trifle. Spread on half or the chocolate mousse.
Repeat layering. (When you add the second layer of brownies, push them down a bit so they mush down into the chocolate mousse.)
Decorate the top with reserved whipped cream, the final pint of raspberries, and shaved chocolate. Refrigerate for at least a day before serving.
Note: If you are feeling lazy or overwhelmed, you can always use a package of brownie mix instead of baking your own brownies. To tell the truth, when I doubled this trifle recipe this past weekend, I used a couple of pouches from my supply of Ghirardelli Triple Chocolate Premium Brownie Mix (6 pouches to a box) I always keep on hand. Thank you Costco. Perfect brownies every time and I retained at least some of the sanity I am fervently trying to preserve! (I had several other dishes to prepare, and my energy level just isn’t where it used to be. And that’s putting it mildly!) But cooking is still my favorite way to keep my mind and body active. Now, where did I put that new box of baking soda again?