Category Archives: COOKIE RECIPES

CHOCOLATE CHIP, TOASTED COCONUT, AND CHOPPED ALMOND BLONDIES

I’m sure you noticed that there don’t appear to be any chocolate chips in my picture of these bar cookies. In fact, if you look really, really closely, you will see (or more correctly not see) any picture above at all! There’s a very good reason for this. I failed to take a picture. But here’s where your imagination comes into play. Place tiny dots of chocolate in the picture of my regular Blondies (recipe on site) below, and you have as close a resemblance to what these bar cookies actually look like as you are going to get until I bake another batch. That is, if I remember to take a picture the next time I build these amazing treats. (It’s all a game of chance with me these days!)

I was just so excited to taste these babies, I totally spaced on my duty as resident food photographer. (Hard to get good help these days!) Anyway, back to these cookies.

Now I know everyone loves blondies (butterscotch brownies). But I decided to add a couple of my favorite ingredients to my daughter Paula’s recipe. And, oh my! These cookies are really chewy and absolutely delicious. But then, I really love coconut. Mr. C., not as much. But he likes these cookies, as do a couple of other people I know who profess to not like coconut!

So next time you need a bar cookie that is not only scrumptious, but easy and quick to prepare, you need look no further. This is the cookie for you.

  • ½ c. melted unsalted butter
  • 2 c. brown sugar
  • 2 eggs
  • 1½ tsp. vanilla
  • ½ tsp. almond extract
  • 2 tsp. baking powder
  • 1 tsp. salt
  • 2 c. flour
  • 1 c. shredded coconut, toasted
  • 1 c. semisweet chocolate chips
  • 1 c. coarsely chopped almonds

Stir the melted butter, brown sugar, eggs, vanilla, almond extract, baking powder, and salt together using a whisk. Using a rubber spatula, stir in the flour just until combined with the other ingredients. Fold in the coconut, chocolate chips, and almonds. Spread the dough into a lightly buttered 9×13-inch pan (glass is best). Bake in a pre-heated 325 degree oven (350 for metal) for 40 minutes, or until a nice golden brown on top and around the edges. (Do not overbake.) Remove from oven and cool completely on a wire rack. Cut into bar shaped pieces just before serving.


CHOCOLATE CHIP, MACADAMIA NUT, AND TOASTED COCONUT BARS

I love bar cookies because not only are they delicious, they are just so darned easy to prepare. And I needed an easy treat to serve the guys who would be rehearsing in our home later that afternoon.

So having just returned from Hawaii where macadamia nuts are considered a staple, I decided to include them with a couple of my other favorite tropical ingredients to create a simple bar cookie that would remind all of us of warm and sunny places. I also wanted to be able to leave my stand mixer in the pantry and while I was at it, make the cookies GF (gluten free). (I sometimes ask a lot of myself!)     

So I started with a basic Blondie (a butterscotch or vanilla flavored bar cookie) recipe and went from there.        

Now I know what you are thinking. Not an inexpensive cookie to make. And of course, you are right. But these are quite rich so you really don’t need to eat a very large bar to feel like you have just eaten a rare treat.

So if some day you find yourself short of time, but need a really good cookie to serve your family or friends, I would recommend you give this recipe a try. If you want to fancy up your bars to look like an expensive dessert that just came from the kitchen of a fine restaurant, place 1 bar on top of (at an angle) a second bar placed on a lovely small plate. Surround the bars with 2-3 small scoops of vanilla ice cream, dollop with a small amount of real whipped cream, sprinkle with finely chopped macadamia nuts, and finally top with a shave or two of dark chocolate. If that doesn’t impress your family and friends, I don’t know what would? Komoika (enjoy)

  • ¾ c. unsalted butter
  • 1½ c. GF flour (I use Cup4Cup) or unbleached, all-purpose flour
  • 1 tsp. baking powder
  • ¼ tsp. kosher salt
  • 1½ c. brown sugar
  • 2 eggs
  • 1½ tsp. vanilla extract
  • 1 c. semi-sweet chocolate chips
  • 1 c. lightly salted macadamia nuts, chopped
  • 1½ c. toasted coconut

Melt the butter in a large glass bowl. Remove from microwave and set aside to cool. Meanwhile whisk the flour, baking powder, and salt together in a separate bowl. Set aside.

When the melted butter is cool, stir in the brown sugar and mix until well combined and smooth. Add the eggs and vanilla. Add the dry ingredients to the butter mixture and mix just until combined. Do not overmix. Gently stir in the chocolate chips, nuts, and coconut. Scoop the batter into a greased 9×13-inch baking pan and level with an offset spatula.

Bake in a pre-heated 325 degree oven (for glass) or 350 degree oven (if using a metal baking pan) for 30 to 40 minutes (takes longer when you use GF flour) or until the bottom is a nice golden brown and the top feels set when touched.

Remove from oven and place on a wire rack to cool. When completely cooled and the chocolate chips have once again hardened, cut into bars. Store in an airtight container.   


RUGELACH

Whenever I think about soft, delicious cookie like pastries, I think of rugelach. They are just so tasty. To my thinking it’s a sin and a shame that they are not served more often both at home and in restaurants. But then I have always daydreamed of owning my own restaurant for one reason, and one reason only. Dainty desserts. Allow me to explain how this has anything to do with this recipe.

After a lovely restaurant meal, I would be in heaven if I were able to order a couple 1-2 bite desserts to finish my meal. Miniature morsels of sweetness, just large enough to provide that little something that says my fine dining experience has come to a fabulous end. Instead, what is usually offered is the same old standard collection of choices, each large enough to easily serve 4-6 aging appetites! I don’t want a warm brownie the size of a dinner plate served with 2 scoops of not-so-special vanilla ice cream! 

I want a tiny tart (lemon and pecan come to mind), or a diminutive piece of pie bar (see several examples on this site), or a beautifully frosted miniature cupcake, or a tiny exquisite chocolate mousse served in an espresso cup, or a lovely truffle (the chocolate variety), or a perfect little shortbread cookie, or a delicious little pastry like rugelach. The variety that could be served is endless.

Now, because I understand that restaurants need to make money, I wouldn’t expect any restaurant to carry more than 6-8 types of these miniature wonders. Just as long as they were small, different, and absolutely delicious, I would be one happy lady. But enough about my daydreams. Back to rugelach.

According to Wikipedia, “rugelach is a Jewish pastry. It is very popular in Israel, commonly found in most cafes and bakeries. It is also a popular treat among American and European Jews. Traditional rugelach are made in the form of a crescent by rolling a triangle of dough around a filling.”

According to me, “rugelach is easy and relatively inexpensive to prepare, absolutely delicious, and enough different from other desserts/cookies/soft pastries, as to qualify for the “Dainty Desserts” menu at the restaurant I am still daydreaming about.”

(I’ll let you know when I open this restaurant. Do not hold your breath!)

  • 1 c. (2 sticks) unsalted butter, room temperature
  • 8 oz. cream cheese, room temperature
  • ¼ c. sour cream
  • 2 c. unbleached all-purpose flour
  • ¼ tsp. salt
  • 2 T. granulated sugar 

Cream the butter, cream cheese, and sour cream together in the bowl of your stand mixer. In a separate bowl, whisk together the flour, salt, and sugar. Slowly add the dry mixture to the wet mixture, mixing constantly, until dough holds together and begins to pull away from the sides of the bowl. (Don’t overmix.) Scoop dough onto a lightly floured surface and form into a rough ball shape. Divide the ball into four equal pieces and again roll into balls. Flatten each ball to look like a fat disc. Cover each disc with plastic wrap and place in the refrigerator. Refrigerate for at least 90 minutes, or up to 48 hours. Meanwhile, prepare one of the following fillings and the egg wash.

Brandied Apricot

  • 1 c. chopped dried apricots
  • 1½ c. water
  • pinch of kosher salt
  • ¼ tsp. nutmeg
  • ¼ c. brown sugar, depends how sweet you want your filling
  • ¼ c. brandy

Place the ingredients in a small pan. Bring to a boil, reduce heat, and simmer uncovered until most of the liquid has evaporated – 20-25 minutes. Remove from heat, cool, and mash. (Some small lumps are desired, so don’t mash too much.) Can be prepared ahead and kept in the refrigerator.

Cherry Almond

  • ¾ c. dried cherries
  • 1 c. toasted almond slivers
  • ½ c. cherry preserves
  • 1/8 tsp. almond extract

Combine ingredients in a food processor. Pulse until a thick, coarse paste forms. Can be prepared ahead and kept in the refrigerator.

Raspberry, Chocolate, and Pecan Filling

  • 1½ c. pecans, toasted and very finely chopped
  • 1/3 c. very finely chopped semisweet chocolate
  • ¾ c. raspberry jam

Combine and spread on dough as directed above. Can be prepared ahead and kept in the refrigerator.

Egg Wash:

  • 1 egg
  • 1 tsp. water
  • granulated sugar
  • ground cinnamon, opt.

Beat the egg and water together. Set aside.

To Assemble:

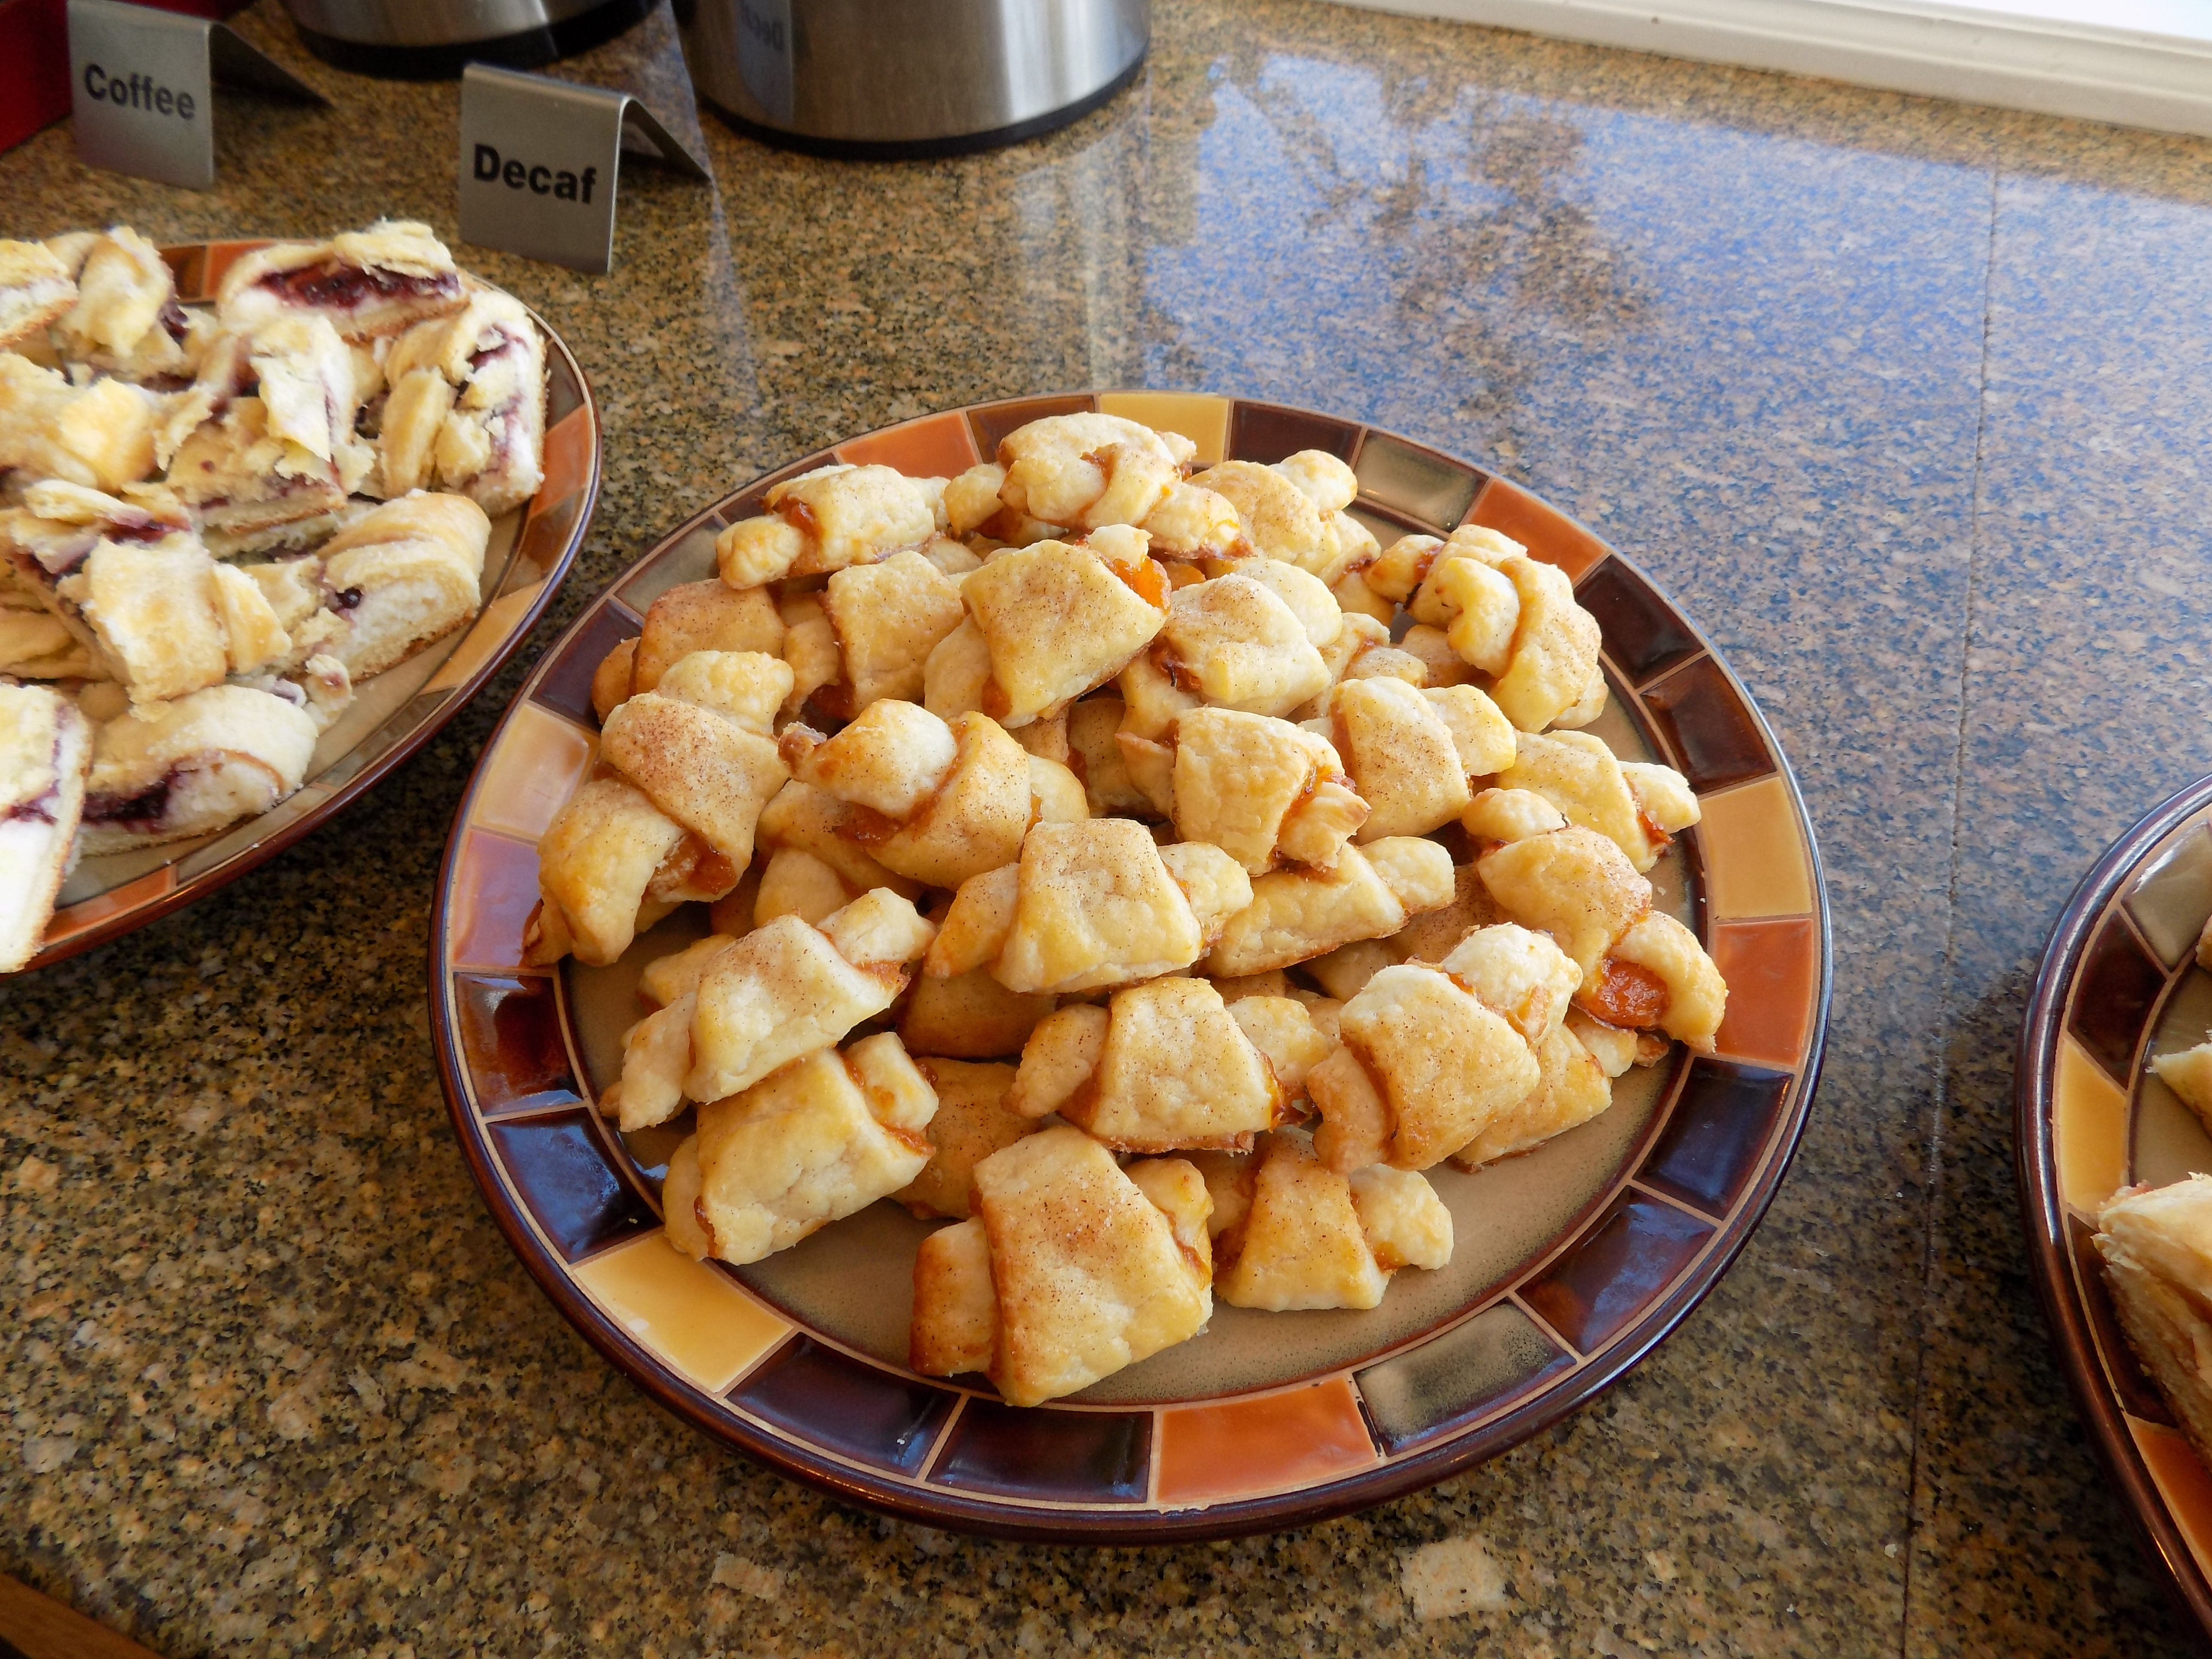
On a well-floured board, roll each disc of dough into a 9-inch circle. (Only take one disc out of the refrigerator at a time.) Using a small offset spatula, spread a scant quarter of the filling onto the dough to within 1-inch of the edge. Cut the circle into 12 equal wedges, cutting the whole circle first into quarters, then each quarter into thirds. Starting with the wide edge, roll up each wedge. Place the cookies, points tucked under, about an inch apart on a parchment paper lined baking sheet.

Brush each cookie with the egg wash. Lightly sprinkle with granulated sugar mixed with cinnamon to taste. Bake in a pre-heated 375 degree oven for 15 to 20 minutes, or until lightly browned. Remove to a wire rack and serve warm or at room temperature.

Rugelach will keep for a several days in a tightly sealed container. They can be rewarmed in a microwave

Hint: To get a perfect 9-inch circle, use a 9-inch cake pan. Place upside down on the dough and cut around the pan with a sharp knife. Save scraps. After the 4th dough round, you will probably have enough scraps to make another 9-inch circle.


BERRY PIE BARS

Yes, I know. Berry season is just about over. So why am I publishing this recipe now rather than 2 months ago? Well the answer is simple. I didn’t have time to work on this recipe until now. (I have a life you know!) Besides, I mostly use frozen berries when I bake with berries anyway. So using fresh berries is not the least bit necessary. (I know I didn’t really need to explain myself on this issue, but sometimes I just like to set the record straight right up front.)

So – this is my spin on an averiecooks.com recipe. And why “pie” in the form of a bar cookie you might ask? Well, first of all – I love pie. But pie is a lot of work. And making enough traditional pies to serve a crowd would be a ridiculous use of my dwindling energy level. (Not that my guests aren’t worth the effort. I’m just not the energizer bunny I used to be.) 

So last evening when we hosted a potluck dinner for our friends and neighbors who are on the board and committees of our homeowners association, our guests got their blueberry pie in the form of a blueberry pie bar. And I’m happy to report, no one complained about it either. (18 good people, each and every one!)

Now, if you have already glanced at the recipe below, you might be a little put off that there are 4 steps to compiling this delicious concoction. But in my defense, each step is very easy and takes no time at all. You don’t even need a mixer, which in my case means I don’t have to take my stand mixer off a shelf in the pantry and carry it to one of the counters in my kitchen. So anytime I can leave my mixer firmly planted to a pantry shelf, I am ever so delighted.

But back to these bars. OMG, what can I say? Well, to begin with, they are just plain delicious. The crust is crunchy, the filling isn’t runny, and the cinnamon flavored topping is as lovely to look at as it is to savor. So regardless of the fact that these bars don’t come in a round pie pan and cut into wedge shape pieces, they are still the essence of pie at its’ finest.

Just so you know, I actually do know how to build a pie. Search this site for my Lemon Meringue Pie, Bourbon Pecan Pie with Bourbon Whipped Cream, French Apple Pie, and Chicken Pot Pie. Ok, ok – maybe Chicken Pot Pie is a bit of a stretch, but it‘s still a pie, and delicious to boot! Enjoy them all. 

Crust and Topping

  • 1 c. (2 sticks) unsalted butter
  • 1 c. granulated sugar
  • ½ c. light brown sugar, packed
  • pinch kosher salt
  • 3 c. unbleached all-purpose flour
  • 1 tsp. ground cinnamon

Melt the butter in a medium sized, microwave-safe bowl. Whisk in the sugars and salt. Add the flour; stir to combine. Set aside 2 cups to be used as the topping. (Before topping the dessert, add the cinnamon to the set-aside mixture. Don’t break up the crumbs as you incorporate the cinnamon. Its best if the cinnamon just coats the crumbs.

Transfer remaining mixture to a lightly buttered 9 x 13-inch baking dish. (I prefer glass.) Using your fingers, pack the mixture down hard to create an even crust slightly sliding up the sides of the pan. Set aside.

Filling

  • 1/3 c. granulated sugar
  • 1 T. unbleached all-purpose flour
  • 1 lg. egg
  • ½ c. plain Greek yogurt or sour cream
  • 2 tsp. vanilla

In a medium bowl, whisk together the sugar and flour. Add the egg, yogurt, and vanilla. When thoroughly blended, pour the filling over the crust and tilt the pan to evenly cover the crust. Set aside.

Berry Layer

  • 2/3 – 1 c. granulated sugar (use full cup if the berries are tart)
  • 4 tsp. cornstarch
  • 1-2 T. fresh lemon juice (depending on the tartness of your berries)
  • 4 c. frozen or fresh berries – blackberries, Marionberries, blueberries, raspberries, etc. (no need to thaw frozen berries)

In a medium mixing bowl, whisk together the sugar and cornstarch. Add the lemon juice and stir well. Add the berries and lightly toss until the berries are thoroughly coated. Evenly distribute the berry mixture over the filling. Sprinkle the reserved crust/topping mixture over the berries.

Bake in a pre-heated 350 degree oven for 50-60 minutes, or until the berries are bubbling around the edges and the bottom crust is a nice golden brown. (That’s just one of the reasons I use glass baking pans! I can see the bottom crust. Thank you Pyrex.)

Remove from oven and cool on a wire rack for at least 2 hours before cutting into serving sized pieces. Great dolloped with whipped cream or a small scoop of vanilla ice cream.


CHOCOLATE CHIP AND SALTED PEANUT BAR COOKIES

Never one to refrain from proceeding where others would tell themselves enough is enough, here is yet another cookie recipe featuring peanuts and/or peanut butter. What can I say? I love peanuts. Maybe it’s because my dad loved peanuts and I loved my dad. (Funny how that works sometimes!) Anyway, as a child there were always peanuts in our kitchen pantry or mixed in with the always available bowl of popcorn liberally “garnished” with either regular salted peanuts or red-skinned Spanish Peanuts. So how could I not love these salty little bites of heaven? They are part of my cell structure. It’s kind of like baseball fans loving hot dogs. It’s organic.

But back to this recipe. (I am so easily distracted. Sorry about that.) Anyway, this recipe evolved because I’m lazy. Simple as that. I wanted to bake a batch of cookies to feed 4 distinct groups of people, but I didn’t want to spend a lot of time in the kitchen. I needed to have a treat for the Board of our home owner’s association meeting at our home last evening, the guys tiling our new shower, Mr. C. and his trio drummer Grant who would be practicing in our living room for an upcoming performance, and still have some cookies left over to take with me to Keizer, Oregon for my daughter Paula’s 50th birthday celebration this weekend. Yikes – that’s a lot to ask from one batch of cookies.

A bar cookie seemed like the perfect solution. So I went on-line in search of a bar cookie recipe that would be large enough to feed my army. I found the bones of this recipe on the Land O’Lakes web site. I changed a few things, but the real credit belongs to the fine cooks in the Land O’Lakes test kitchen. Thank you one and all.

So if you too have an occasion when you need a goodly number of cookies and you’re feeling a little lazy, give this recipe a try. It’s pretty darn wonderful. Oh what the heck, bake up a pan of these little darlings even if you aren’t feeling lazy! They’ll still be delicious.

  • 1 c. (2 sticks) unsalted butter, room temperature
  • ¾ c. packed brown sugar
  • ¾ c. granulated sugar
  • 2 lg. eggs
  • 1 tsp. vanilla
  • 2 c. unbleached all-purpose flour
  • 1 tsp. baking soda
  • ½ tsp. kosher salt
  • 1½ c. rolled oats
  • 1 c. chocolate chips
  • 1 c. peanut butter baking chips
  • 1 c. salted peanuts

Beat the butter, brown sugar, and granulated sugar in your mixer bowl until thick and creamy, about 4 minutes. Add the eggs and vanilla; beat until well blended. In a separate bowl, whisk together the flour, baking soda, and salt. Add to the butter mixture and beat on low speed just until blended. Add oats; mix well. Stir in the chocolate chips, peanut butter chips, and peanuts.

Press dough evenly into an ungreased 16 x 10-inch baking pan. (Preferably glass)

Bake in a pre-heated 350 degree oven (glass) or 375 degree oven (metal) for 20-30 minutes until just set and a lovely golden brown. Don’t overbake.

Remove from oven and cool completely on a wire rack. Cut into bars just before serving. 

BTW, if you too are a peanut freak, check out my other cookie recipes that include Mr. Peanut and his friends – Chunky Peanut Butter and Chocolate Chip Cookies, Triple Peanut Butter Cookies, Peanut Butter, Oatmeal, and Chocolate Chip Bars, and Payday Candy Bar Bars.

TRIPLE PEANUT BUTTER COOKIES

Yesterday we decided to go for an evening picnic up the Finney Creek Road out of Concrete, WA, then up a long, very skinny National Forest road to the Gee Point trailhead. (Mr. C. had wanted me to see this view since he had hiked up to Gee Point a couple of years before.) The view from the top of this road (and I use the word “road” loosely) is spectacular. You can see Glacier Peak, White Horse Mountain, and various other peaks around the Marblemount and Darrington environs. Fantastic. But this is not a drive for sissies. (I told Mr. C. when we reached the end of the road that I was very glad I had worn my big girl panties, because the last several miles of this “up to the top of the world” drive had scared the bajesus out of me. (Having survived some fairly amazing roads on our travels over the years, I’m usually fearless. But this road path we took yesterday was the scariest I have ever experienced.) But we made it up and down without breaking an axle, having to change a tire, or reaching the main road with a wet spot on the passenger side seat. (Just barely!)

We had planned to eat at the top. But when we got out of the truck, it was really cold, and the million or so mosquitos hovering around our bodies would have eaten us alive before we even got the table set or the cooler unpacked! So back we climbed into the truck and started our very slow trek down the long and winding road. Half way back to the main road we stopped at a one lane bridge, got our table and chairs out, and had our dinner. These delicious cookies were part of our picnic dinner.


Earlier in the day I had decided to build some cookies for our adventure. (We never want to go into the wilds of the North Cascades without a supply of homemade cookies. It’s almost a sacred Carr tradition. You just never know if a hungry bear might show up and demand a cookie as ransom for our lives!) So I decided to try out a recipe that I had been envisioning for quite some time.

Now I know, there are those of you out there that strongly believe that a good old fashioned peanut butter cookie simply cannot be improved upon. And I agree. But a variation on the basic peanut butter cookie can be delicious too. (Like my Chunky Peanut Butter and Chocolate Chip Cookie recipe already on this site.) For this variation, I decided to add salty peanuts and Reese’s Peanut Butter Chips. Yum! They came out soft, with a delightful crunch from the whole peanuts.

So regardless of whether you like your peanut butter cookies standard (see recipe below for my standard recipe) or enhanced, bake up a batch in the near future. Peanut butter cookies are just one of the loveliest creations on planet earth. Unless of course you are allergic to peanuts, then of course all bets are off!

  • ½ c. unsalted butter (1 stick), room temperature
  • ¾ c. packed dark brown sugar
  • ¼ c. granulated sugar
  • 2 lg. eggs, room temperature
  • ½ c. creamy peanut butter
  • 1 tsp. vanilla extract
  • 1¼ c. unbleached all-purpose flour
  • 1 tsp. baking soda
  • ¼ tsp. kosher salt
  • 1½ c. roasted, salted peanuts
  • 1 c. peanut butter chips

Beat butter and sugars together in the bowl of a stand mixer for about 4 minutes. Scrape down the sides of the bowl. Add eggs, peanut butter, and vanilla and beat until thoroughly combined.

Whisk together the flour, baking soda, and salt in a separate bowl. Add to the butter mixture and beat on low until incorporated. Scrape down the sides of the bowl, add peanuts and peanut butter chips; beat on low just until incorporated.

Using an ice cream scoop, drop cookies about 1-inch apart on an ungreased baking sheet. Bake in a pre-heated 350 degree oven for 12-14 minutes or until light brown on the bottom edges but soft in the middle. Transfer to a rack to cool. Cool completely before storing in an airtight container.

 PEANUT BUTTER COOKIES – straight out of my Betty Crocker cookbook

  • ¼ c. Crisco (plain)
  • ¼ c. unsalted butter, room temperature
  • ½ c. peanut butter
  • ½ c. granulated sugar + more for dipping
  • ½ c. packed brown sugar
  • 1 egg
  • 1¼ c. unbleached all-purpose flour
  • ½ tsp. baking powder
  • ¾ tsp. baking soda
  • ¼ tsp. salt

Cream shortening, butter, peanut butter, sugars, and egg until light and fluffy. In a separate bowl, whisk together the flour, baking powder, baking soda, and salt. Add to shortening mixture.

Using an ice cream scoop, drop batter onto ungreased baking sheet(s) about 1½ inches apart. Slightly flatten each cookie with fork dipped in granulated sugar.

Bake in a pre-heated 375 degree oven for 8-10 minutes. Don’t overbake. As soon as cracks appear on the surface, they are done. Remove from oven and cool on racks. Store in an airtight container.


FUDGE BROWNIES – MINT CHOCOLATE CHIP & REGULAR

OK, so I’m nuts about mint! I confess. I also rather enjoy chocolate. So in my estimation, mint brownies are one of the best ways to enjoy this terrific flavor combination. And these are the most delicious mint brownies I can ever imagine eating or serving to my family and friends.

First of all, the brownie itself is perfect. It is fudgy, dense, minty and above all a snap to prepare. You don’t even need to drag out your mixer. Plus, all of the ingredients are relatively inexpensive. No fancy chocolate required. Just good old fashioned, easy to obtain bulk cocoa. Doesn’t even have to be “Dutch” processed cocoa. And truly, no frosting is needed on these brownies. Simply not necessary. They are perfect unto themselves.

Then of course there are the mint chips. And because I shop at Bartell Drugs and Right Aid, when the Guittard mint chips appear on the shelves, usually around Christmas, I buy up several 12-ounce packages at a super good price. Then into the freezer they go. There is simply no way to anticipate when a mint crisis might hit me. Can even be in the middle of the night. Just knowing that there are mint chips in the freezer is like having my very own security blanket. (I really am a simple soul. Easily made happy and secure.)

Now I know there are those of you out there who do not like mint. I can’t fathom how that must feel, but I know it to be true. So for those of you unfortunate few, or for those of you who are purists and feel that additives like mint, chocolate chips, or nuts is a desecration to the true character of a fudge brownie, I have also given you my favorite brownie recipe from the King Arthur Flour recipe collection.

So all that’s needed now is for you to drag yourself into the kitchen and bake up a batch of either of these amazing bar cookies. And yes I know. You can buy some really good brownie mixes at a reasonable price. I use them on occasion myself. But when I want the very best, I turn to one of these two recipes.  Hope you enjoy them as much as we do. And sorry in advance. I know how addictive these brownies can be, but I still felt duty bound to share the recipes with you in the name of culinary excellence. Comments (keep them civil please) can be directed to me via email at chezcarrcuisine@wavecable.com

MINT CHOCOLATE CHIP FUDGE BROWNIES

  • ½ c. (1 stick) unsalted butter, melted
  • ¼ c. vegetable oil
  • 3 eggs
  • 2 tsp. real vanilla
  • ¼ tsp. good mint extract
  • 1 c. unbleached all-purpose flour
  • ¾ c. cocoa
  • ¼ tsp. baking powder
  • ½ tsp. salt
  • 2 c. sugar
  • 2 c. (12-oz.) mint chips (I use Guittard Green Mint Baking Chips)

Melt the butter in a large glass mixing bowl. When the melted butter is room temperature, beat in the oil, eggs, vanilla, and mint extract. Whisk the flour, cocoa, baking powder, salt, and sugar together in a separate bowl. Pour the flour mixture over the liquid mixture and stir until well blended and smooth. Stir in the mint chips.

Scoop the batter into a lightly greased 9×13-inch baking dish (preferably glass) and bake in a pre-heated 350 degree oven for 35-40 minutes, or until the brownie just barely begins to pull away from the sides of the pan. Do not overbake.

Remove the pan from the oven and let the brownies cool completely before cutting. Store covered at room temperature.

FUDGE BROWNIES

  • ½ c. (1 stick) unsalted butter, melted
  • ¼ c. vegetable oil
  • 3 eggs
  • 2 tsp. real vanilla
  • 1 c. unbleached all-purpose flour  
  • ¾ c. cocoa
  • 1 tsp. espresso powder, opt. (I use Madaglia D’Oro Instant Espresso Coffee)
  • ¼ tsp. baking powder
  • ½ tsp. salt
  • 2 c. sugar

Melt the butter in a large glass mixing bowl. When the melted butter is room temperature, beat in the oil, eggs, and vanilla. Whisk the flour, cocoa, espresso powder, baking powder, salt, and sugar together in a separate bowl. Pour the flour mixture over the liquid mixture and stir until well blended and smooth. Scoop the batter into a lightly greased 9×13-inch baking dish (preferably glass) and bake in a pre-heated 350 degree oven for 30-40 minutes, or until the brownie just barely begins to pull away from the sides of the pan. Do not overbake.

Remove the pan from the oven and let the brownies cool completely before cutting. Store covered at room temperature.

DRIED CRANBERRY, PISTACHIO, AND WHITE CHOCOLATE BISCOTTI

Biscotti is one type of cookie I always try to send my kids in their Christmas goodie package. They all drink coffee and/or tea, and there is nothing better on a busy holiday morning than a sweet and crunchy biscotti to help set the holiday spirit. So when I read this recipe from Giada De Laurentiis which contained dried cranberries (red) and pistachios (green), it seemed too fortuitous to ignore.

So I baked up a couple batches, decorated them in honor of the season, and sent them off to the kids via the capable hands of UPS.

Now something you should know about biscotti. THEY ARE STINKIN’ EASY TO MAKE! And why they are so expensive in bakeries or off the grocery store shelf is way beyond my understanding. I mean really! Just because they look impressive should not give providers the right to charge so darn much. And because I like to stand behind some of the outlandish statements I make on this blog, I went on line and found an example of what I’m talking about. From Etsy, 1 dozen traditional Italian Almond Biscotti – $20.00. Shipping – $13.75. I assume you can do the math on this, but in case your calculator is at the repair shop, that’s $2.82 each! You can practically prepare an entire batch of 36-40 biscotti for about double the amount of 1 of these purchased babies. And yes I know, someone had to buy the ingredients, pay for the facility, heat, electricity, labor etc. etc. But $13.75 for shipping? How heavy are these little darlings anyway? That would be my first question! All together, in my opinion, way too much money to spend on a simple to prepare cookie. 

Anyway, I’ll get off my high horse and get back to this recipe. (Steam is still coming out of my ears, but I shall contain myself for your sake.) Like I said before, biscotti are really very easy to make. And this recipe is no exception. It is just delicious and perfect for the Christmas holidays.

So give this wonderful biscotti recipe a try. You can find my other biscotti recipes under Biscotti – 6 Ways From Sunday also on this site. Cheers

  • 2 c. all-purpose flour
  • 1½ tsp. baking powder
  • ¼ tsp. salt
  • ¾ c. sugar
  • ½ c. (1 stick) unsalted butter, room temperature
  • 1 tsp. grated lemon zest   
  • 2 lg. eggs, room temperature
  • ¾ c. pistachios, toasted and coarsely chopped
  • 2/3 c. dried cranberries
  • 6-oz. good-quality white chocolate, chopped
  • ¼ tsp. vegetable oil
  • red and green sugar crystals, for garnish (if making for Christmas)

Whisk together the flour, baking powder, and salt in a medium bowl to blend. Set aside. Using an electric mixer, beat the sugar, butter, and lemon zest until light and fluffy. Beat in the eggs 1 at a time. Add the flour mixture and beat just until blended. Stir in the pistachios and dried cranberries.

Form the dough into a 13-inch long, 3-inch wide log on a parchment paper lined baking sheet. Bake in a pre-heated 350 degree oven until light golden, about 30 minutes. Cool for 30 minutes.

Place the log on a cutting board. Using a sharp serrated knife, cut the log on a diagonal into ¾-inch thick slices. Arrange the biscotti, cut side down, on the baking sheet. Bake the biscotti until pale golden, about 15 minutes. Remove from oven and place on a rack and cool completely. Don’t clean the cookie sheet.

Melt the white chocolate slowly in a microwave oven. Stir in the oil. Place cooled biscotti back on the baking sheet close together so they are touching. Lightly drizzle the melted chocolate on each biscotti in a zig-zag pattern. Sprinkle with the sugar crystals if preparing the biscotti for Christmas. Otherwise just leave plain. Leave on the cooling racks until the white chocolate is set. (This takes a while.) Or refrigerate until the chocolate is firm, about 50 minutes.

The biscotti can be made ahead and stored in an airtight container, or wrapped in foil and frozen in re-sealable plastic bags.


CHUNKY PEANUT BUTTER AND CHOCOLATE CHIP COOKIES

I am writing from my trailer parked in the rain next to a rushing creek at Beverly Beach State Park in Oregon – South of Depoe Bay and North of Newport. We have had rain every day since we left home, except for the day when we were traveling from Forks, Washington to Grayland Beach State Park in Grayland, Washington. That lovely day it was snowing heavily, which, if you have ever pulled a trailer, is no damn fun at all! But thanks to Mr. C., we arrived safe and sound.

And because we now own a wonderful new land yacht (all 24 feet, 7 inches of it from hitching ball to the back of the spare tire) complete with a fabulous walk-around bed, a shower that I can actually turn around in, a galley large enough to prepare chili gracefully, and a dining/reading/computer operating/game playing table and comfortable bench seats, it can rain its bloody head off for all I care! I’m sitting warm and dry and ever so comfortable with my love by my side and my computer ready to grant my every off-line wish. The only thing missing is Wi-Fi and a Verizon cell tower. (Most privately owned RV parks have Wi-Fi available, but state parks tend to be more rustic, which is of course why we like them to begin with!) So although I am using word to create this preamble, I won’t be able to post this recipe until I reach civilization. But enough about me, let’s get on with this recipe. (Sending this from Harris Beach State Park in Brookings, Oregon using our Verizon Jetpack!)

But first, I must tell you how this recipe came to be.

Before we left for our month long trailer adventure, I asked Mr. C. what kind of cookie he would like me to bake for the trip. His answer – peanut butter. OK, I have a great recipe for peanut butter cookies. Actually the same one I’ve been using for about 50 years. Maybe it was time to update it a little? So I asked my dear husband if he would like a bit of chocolate with his peanut butter. He said, “couldn’t hurt”, so this recipe is the result.

I wanted the soft texture of my original recipe, with some crunch added to give the cookie a bit of character. So I added whole peanuts. Then I added chocolate chunks for the sheer joy of biting into a bit of chocolate once or twice a cookie. Mighty fine!

Now, when I baked my cookies, I left them in the oven a little too long. So instead of being soft, they turned out crisp. Nothing wrong with crisp, but I was after a softer texture. As it turns out, a crisper cookie was probably better for our trip because these cookies were planned to last the entire trip. (That is, if I dole them out they’d make it to the end of the trip!) So from a longevity perspective, a longer baking time probably produced a better outcome. But regardless of how you like your cookies, soft or crisp, this recipe is probably going to work well for you.

Just as a side note from my recent near death (not really) snow travel day. If you want to challenge yourself to something a little more difficult than baking cookies, sit in the shotgun (aka passenger) seat while your beloved spouse tows your brand new trailer through a blinding snowstorm. I promise you there is nothing quite like the feeling of pending doom as when snow continues to fall, the road surface is packed with slush or hard packed snow, and you are still far from camp. (Baking cookies just can’t achieve that same level of anxiety– thank God!) During such times, even if you are not intimately acquainted with the inside of a house of worship, you are none the less going to secretly invoke the blessing of every deity you have ever heard or read about. A religious experience, especially for someone as cowardly as I am! My suggestion for myself – stick to baking cookies. Much safer and ever so much more rewarding. And at all cost, try and stay away from snow when on a trailer adventure. Ya think!?!?

  • 1 c. unsalted butter, room temperature
  • 1 c. creamy or crunchy no-stir peanut butter (do not use natural peanut butter or your cookies will be oily)
  • 1 c. brown sugar
  • ¾ c. granulated sugar
  • 2 lg. eggs
  • 1 tsp. vanilla
  • 2½ c. unbleached all-purpose flour
  • 1 tsp. baking soda
  • ½ tsp. baking powder
  • ¼ tsp. salt
  • 1 c. roughly chopped salted peanuts
  • 1 c. chocolate chunks or chocolate chips
  • Place the butter, peanut butter, brown sugar, and granulated sugar into the bowl of your mixer. Beat until light and fluffy, about 5 minutes.  Scrape down the sides as needed. Add the eggs one at a time, beating for about a minute after each addition. Beat in the vanilla.In a medium bowl, whisk together the flour, baking soda, baking powder, and salt. Add the dry ingredients gradually, mixing only until just combined. Mix in the chopped peanuts and chocolate chunks. Using an ice cream scoop, drop balls of dough onto parchment paper lined baking sheets about 2-inches apart.      

    Bake the cookies in a pre-heated 350 degree oven for about 8-10 minutes, or until they are set but still a little soft. (Don’t overbake if you want soft cookies. If you prefer crisp, crunchy cookies, bake a little longer.) Remove from oven. Leave the cookies on the baking sheet for 1 minute before transferring to a cooling rack. When completely cooled and the chocolate is hard again, store in an airtight container. 


ROLLED SPRINKLE COOKIES

Since I have been concentrating on recipes that fit my current lifestyle (no added sugar, low calorie, terribly healthy, and perhaps a bit boring), I have ignored posting some of my favorite recipes that I’m sure you would benefit from knowing about. And this recipe which I have been making every Christmas since my children were very young is one of them.

The recipe was originally published in Sunset Magazine sometime in the 70s. And since the recipe came from Sunset Magazine, our dear friend Eloise who introduced the cookie to our extended family, named them accordingly. And to date they remain “Sunset Cookies” to those in the know. (If I ever knew the real name of these cookies, it has long since eroded from my memory.)

But I am here to tell you, these cookies are really, really good. They are crisp like a shortbread cookie, but have a distinct flavor from the margarine. (And no, I hardly ever use margarine, but for these cookies it’s a must!)

These cookies are also fun to look at because of the variety of sprinkles that adorn their edges. And because they are formed in a log, then rolled in sprinkles, these “decorated” little darlings are a snap to assemble. No rolling out the dough, cutting them into shapes, and decorating them with various colored sprinkles, etc. After rolling in sprinkles, and refrigerating for about 30 minutes, simply remove the log from the refrigerator, remove the plastic wrap, slice into 1/3-inch rounds, place on a cookie sheet, throw in oven, wait the requisite time for the oven to perform it’s magic, remove from oven, and Bob’s your uncle!

Another lovely quality of these cookies is their longevity. They will gladly hang out in an airtight container for weeks without losing quality.

Now I know what you’re thinking. Do I really have to wait until next Christmas to make some of these cookies for my family? Of course not! You can build these cookies any old time you want. In fact, they would be great to send along with your child for a school event. That is if schools let you do that sort of thing anymore. Being about 30 years out of date when it comes to providing goodies for kids to take along to school, proof of ingredient origin, organic status, and non GMO manipulated ingredients might be required for all I know! What I do know is that airlines don’t serve peanuts anymore because someone might be allergic. What they have failed to realize, is that most people who are allergic to peanuts, know they are, and also know how to say – no thank you! But I digress……….. (It’s just that my dear friend Vicki and I miss those little bags of peanuts, so I’m a trifle touchy on the subject!)  

Anyway, peanuts on airplanes aside, give these cookies a try. Your family and friends will love them, and with the money you save by making these cookies instead of a double batch of chocolate chip cookies, you can afford to buy yourself some peanuts. I call that a win-win situation.  

  • 1 lb. margarine (do not use butter)
  • ¾ c. sugar
  • 2 tsp. vanilla
  • 4½ c. unbleached all-purpose flour
  • colored sugar sprinkles

Cream margarine and sugar until light and fluffy. And vanilla and flour. Form into 1½-inch diameter round logs and roll in colored sugar sprinkles of choice. Wrap in plastic wrap and refrigerate for at least 30 minutes. Cut into 1/3-inch (no thinner) slices, place on an ungreased cookie sheet, and bake in a pre-heated 400 degree oven for about 10 minutes or until very lightly browned on and around the bottom of the cookie. Remove from oven and transfer to a cooling rack. When completely cool, store in an airtight container.

 [contact-form][contact-field label=’Name’ type=’name’ required=’1’/][contact-field label=’Email’ type=’email’ required=’1’/][contact-field label=’Website’ type=’url’/][contact-field label=’Comment’ type=’textarea’ required=’1’/][/contact-form]