Category Archives: APPETIZER RECIPES

ITALIAN GRILLED VEGETABLES

OLYMPUS DIGITAL CAMERA

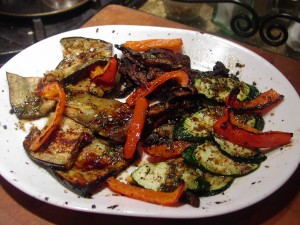
When we were in Italy recently, grilled vegetables were on just about every menu. Sometimes it was just grilled zucchini, sometimes a mixture. But always the preparation was very simple; grilled with just a little olive oil slathered on before being placed on the grill. Off the grill the cooked veggies were then lightly sprinkled with salt and pepper. I personally like a little more oomph to my grilled veggies so this recipe (my take on a Giada De Laurentiis recipe) is perfect for me. (It’s still an Italian recipe since Giada was born in Rome!)

Grilled veggies are usually served with the secondi course, but since I don’t usually prepare what I consider two main courses, they are simply my veggie for that meal. (Or they make a wonderful additional to an antipasto platter.) But amazingly, one of the best dishes we tasted in Italy was prepared with just olive oil and salt.

We had made reservations at a small hotel in the mountain town of Santa Maria (about half way between the east coast and Rome on the west coast). But when we arrived we were greeted by the owner and loud, booming music. Roberto tried to explain what was going on, but finally resorted to going inside and eliciting the help of a young woman on the staff who spoke very good English. She explained that the hotel was hosting a large birthday party that evening and what we were hearing was just a taste of what was to come. Mr. C. and I looked at each other in horror, but the owner soon relieved us of our worry by calling a local B&B and booking us there for the night. (In his defense, he had called Expedia and explained the situation and Expedia had both emailed us explaining why we might want to change hotels and had also left messages on my cell phone. (I had taken neither my lap top or my cell phone along on the trip.)

So after learning that we really didn’t have to listen to crazy loud music all night, we were very relieved. The hotel owner offered to show us the way to the B&B that was just about a km away from the hotel. So we followed him and were absolutely delighted with our new accommodations. The hosts were friendly and the room was beautiful. We asked the staff for a dinner recommendation and they directed us to the nearby town of Tagliacozzo and the Osteria del Borgonovo. After driving around the little town of Tagliacozzo and not locating our restaurant, we parked along the central piazza and asked directions from three local boys. They pondered our question for a moment or two and finally came up with the general direction to take. They were charming young men and seemed thrilled to be able to help a couple of poor hapless Americans. Although we had driven by the osteria twice by this time, we almost walked by it too. Only Mr. Cs eagle eyes spotted a small and poorly illuminated sign that led down a long passageway and into the entrance of the restaurant.

The osteria looked like it had been built in a cave. No windows and only about 12 tables. Had either of us been claustrophobic, we might not even have stayed. But since we aren’t and the smells and general ambience of the room were lovely, we sat down complete with menus in hand.

That evening we both had good appetites so we each ordered a primi. Mr. C. had Tagliatelle al Ragù di Cinghiale (wild boar) and I had Ravioli al Funghi e Tartufo (thick large discs of ravioli in a creamy mushroom and truffle sauce). Absolutely divine. Since we still had a bit of room left for a little “something”, we decided to share a secondi. But before I tell you about our fabulous second course, I need to describe the restaurant in a little more detail.

grill

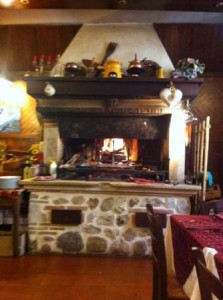
Every grilled dish is prepared by the chef/owner right in the dining room. The cooking surface (grate) is the entire width of the wood fireplace. As you dine you watch the grill chef prepare everything from bread for bruschetta to rabbit, sausages or thick fork tender steaks dressed only with extra virgin olive oil and salt. Well steak was the item that caught our eyes. We had not had beef since we left home, so a hunk of beast seemed just the right thing to order and share. Our only problem was in telling our nice waitress how we wanted it cooked. Finally we resorted to looking in our “Eating in Italy for Dummies” book and came up with “al sangue” rare, for which we received a hearty thumbs-up from the middle-age couple at the next table. (If we hadn’t realized we were the only non-locals in the restaurant by then, it sure would have become evident at this point!)

So we ordered and sat sipping local wine in happy anticipation of the arrival of our steak. When it was delivered I was amazed at not only the size but the quality of the beef. Then I sliced off a bite and went straight to heaven. As described, the steak was simply grilled and then lightly coated with olive oil and coarse salt. Magnificent!

So next time you grill a steak, try this simple preparation. Grill the steak to desired doneness. Let rest for a couple of minutes and finish with a small splash of good olive oil and coarse salt. And for a side dish, why not serve a lovely plate of grilled veggies?

One final note: as we were leaving I worked up the courage to go up to the chef and not only thank him for an excellent meal, but to ask him about the grill. The first thing I noticed was how much heat was generated from the fairly small fire that was burning at the back of the grill. I mentioned this to the chef and in excellent English he told me it was easier to work in front of the grill in the winter! Then he laughed and thanked us for coming to his restaurant. I assured him it was our pleasure. We walked out of that restaurant not only full and contented from yet another wonderful meal in Italy, but with a new and wonderful memory to share with our family and friends at home.

  • 1 red bell pepper, seeded and cut in strips
  • 1 yellow pepper, seeded and cut in strips
  • 1 yellow squash, sliced into 1/3-inch thick slices on the bias
  • 1 zucchini, sliced into 1/3-inch thick slices on the bias
  • 1 eggplant, sliced lengthwise into 1/2-inch-thick pieces, then cut in 3rds
  • 3 portabella mushrooms, stems and gills removed then cut into ¾-inch strips
  • 1 bunch asparagus, trimmed and cut in two
  • 1/4 c. plus 2 T. extra virgin olive oil
  • kosher salt
  • freshly ground black pepper
  • 4 tsp. balsamic vinegar
  • 2 garlic cloves, finely minced
  • 1 tsp. chopped fresh Italian parsley leaves
  • 1 tsp. chopped fresh basil leaves
  • 1/2 tsp. finely chopped fresh rosemary leaves

Place a grill pan over medium-high heat or bring your barbecue to medium-high heat. Brush the vegetables with 1/4 cup of the oil to coat lightly. Sprinkle with salt and pepper. Working in batches, grill the vegetables until tender and lightly charred all over, about 8 to 10 minutes for the peppers; 7 minutes for the yellow squash, zucchini, eggplant, and mushrooms; 4 minutes for the asparagus. Take the veggies off the grill and arrange on a platter.  Meanwhile, whisk the remaining 2 tablespoons of oil, balsamic vinegar, garlic, parsley, basil, and rosemary in a small bowl to blend. Add salt and pepper to taste. Drizzle the herbed olive oil mixture over the grilled vegetables. Serve warm or at room temperature.


MARINATED MOZZARELLA AND ROASTED RED PEPPERS

Well if truth be told, I never had any marinated mozzarella in Italy. But I did eat as much Mozzarella di Bufala as would be considered ethical. And truly, mozzarella made from the milk of a domestic water buffalo is just about the best cheese you could ever hope to eat. In one of the restaurants we patronized, the bufala mozzarella, tomato and basil (just a small sprinkle of basil, by the way) appetizer came with two, count them two big balls of this heavenly delight. We thought we had died and gone to heaven. Each of us had our own baseball sized serving of this culinary delight. No having to steal off the other person’s plate. (Guilty as charged!) No mozzarella envy. Just two happy people savoring this Italian delicacy.

Now that I am home and Mozzarella di Bufala is not on every menu and not available at every grocery store for a reasonable price, I need to plant my feet firmly back on solid ground. The reality is that Mozzarella di Bufala and even fresh cow’s milk mozzarella are expensive ingredients. And as such they need to be purchased and eaten in moderation. That’s when I remembered this lovely appetizer recipe.

Although the recipe calls for fresh mozzarella, the combination of ingredients creates a rich flavor and mouth feel. In other words, a small portion goes a long way.

So if you too love fresh mozzarella and want to serve an absolutely divine appetizer at your next dinner party, make a batch and set it to age in your refrigerator. Then leave it alone, except to turn it periodically of course. No little taste tests here and there to make sure it’s OK. No small sample for your best friend who happened to stop by for a cup of coffee. Not even a wee taste for your favorite postal delivery lady!

Just be patient, and your reward will come from all the compliments you receive from your guests.

  • 1 lb. fresh mozzarella cheese, cut into bite sized cubes (Mozzarella di Bufala is the best)
  • 1 small jar roasted red peppers, drained and cut into bite-size pieces (not too small)
  • 2 garlic cloves, minced
  •  2 T. minced fresh rosemary
  • 1/2 tsp. dried oregano
  • 1/4 tsp. dried thyme leaves
  • 1/4 tsp. dried basil
  • 1/4 tsp. dried marjoram
  • 1/4 tsp. crushed red pepper flakes
  • 1 tsp. kosher salt
  • freshly ground black pepper
  • 3/4 c. extra virgin olive oil (or more if you want to be able to dip bread in the seasoned oil)
  • crusty Italian baguette slices

Combine all ingredients in a covered jar (except the baguette slices, of course). Turn several times to coat each mozzarella piece. Refrigerate at least 24 hours, turning several times. Serve with baguette slices or as part of an antipasto platter.


QUESO DIP

OK, this is not an original recipe but in my opinion is the best Queso Dip ever. I tried making Queso with expensive cheeses, fresh chilies blistered over my gas stove flame, chopped onions, finely minced garlic, etc. etc. None of them turned out worth a darn. Then one day my daughter Paula told me about Velveeta’s recipe for Queso. I demurred because of my snobbish distain for processed cheeses, but I tried it anyway. Ok – all the fancy cheese and ingredients in the world aren’t worth a pickled pig’s foot compared with this ever so easy and economical version.

So next time you want an easy appetizer, give this baby a try. I promise no one will take you to task for using processed cheese. And of course, you don’t have to announce to your guests that one of the two ingredients in your fabulous dip is Velveeta. There are just some secrets a good cook keeps to themselves. Just turn on your best Mona Lisa smile, nod your head in acknowledgement of the compliments, and become suddenly very, very busy in the kitchen putting the finishing touches on the other dishes you are preparing.

  • 1 lb. Velveeta, cut into ½-inch cubes
  • 1 (10-oz.) can RO*TEL Diced Tomatoes & Green Chilies, undrained

Mix ingredients in 2-qt. microwavable bowl. Microwave on high for 5 minutes or until Velveeta is completely melted, stirring often. Serve with assorted veggies and tortilla chips.


ROASTED CAULIFLOWER WITH CUMIN AND CURRY

OLYMPUS DIGITAL CAMERA

I happen to love cauliflower. But until I discovered this way of roasting cauliflower, I could only serve it to Mr. C. either drizzled with a lovely rich cheese sauce or with “secret sauce” (mayonnaise flavored with soy sauce). So when I prepared cauliflower this way for the first time I was a little reluctant. I shouldn’t have worried in the least. Mr. C. loves roasted vegetables and both cumin and curry are two of his favorite flavors.

Besides the wonderful flavor of this dish, it is fabulous in that it can be served either hot or at room temperature. So preparing it ahead of time is no problem. Well it’s no problem if you have a safe place to keep it until you are ready to serve! Just don’t make the same mistake I’ve made in the past. Removing the cauliflower from the oven and setting it on a counter believing that there will be any left by dinner or party time is taking a very daring risk. Somehow, a goodly portion of the cauliflower always seems to mysteriously disappear. So if you make it ahead for a party, make plenty! And yes, roasted cauliflower (or any roasted vegetable for that matter) is perfect to serve as an appetizer or hors d’oeuvre. Many people are health conscience and truly appreciate when something delicious and nutritious is served along with the other offerings. (And truth be known, roasted veggies are reasonably inexpensive to serve as appetizers. I’m always trying to look out for your pocketbook.)

So next time you want to serve an old favorite in a new way, think about this cauliflower dish. I think even the discerning palate of a 6 year old could be swayed from the dark side into liking cauliflower when it is prepared this way. If not, there’s always “secret sauce”.

  • 4 T. extra virgin olive oil, divided
  • 1 T. fresh lemon juice
  • 1 tsp. ground cumin
  • ¼ tsp. curry powder
  • 1 tsp. kosher salt
  • freshly ground black pepper
  • 1 lg. cauliflower, cut into small flowerets and dried thoroughly
  • finishing salt*

Combine 3 tablespoons of the olive oil, lemon juice, cumin, curry, salt, and pepper in a medium sized bowl. Gently stir in cauliflower making sure flowerets are completely coated with oil. (It will seem like they are very lightly coated, but that is exactly what you want!) Spread out on a roasting pan and bake in a pre-heated 425 degree oven until cauliflower is starting to get tender and browned, 15-20 minutes. Pour cauliflower out onto a platter, drizzle with remaining 1 tablespoon olive oil and lightly sprinkle with a finishing salt or kosher salt and pepper.

*Finishing salt – my name for the fancy salts that can be added at the last minute to brighten the flavor of everything from veggie dishes to caramel sauce. i.e. fleur de sel (flower of salt in French) or sale di Sicilia con limone (Sicilian salt with lemon), etc.


CHEDDAR AND PORT WINE CHEESE BALL

OLYMPUS DIGITAL CAMERA

There are just those times when all I really want is a nice adult beverage and a nibble of something savory and mouth friendly. For me, there just isn’t anything better than one of Mr. Cs martinis and a couple of really good crackers spread with this cheese. And when I say good crackers, I’m not talkin’ Chicken in a Biscuit! I mean good crackers! And some of the best crackers I have ever tasted are in a new product line imported from Canada. (At least they are new to me.) The maker of my new favorite crackers is Open Nature. The three I like the best (and coincidentally the only three I have tasted so far) are Rosemary & Onion Flatbread, Rosemary Raisin Cracker Crisps, and Cranberry Cracker Crisps. They are simply astonishingly good.

So do yourself a favor and serve this wonderful cheese ball at your next soiree. Your guests will think you are a culinary goddess. (But don’t forget. You don’t have to tell anyone how easy this recipe is to prepare. After all, even the most minor of goddesses is entitled to a little secret here and there! This could be one of yours….)

  • 8 oz. cream cheese, room temperature
  • couple grinds black pepper
  • 2 c. (scant) shredded sharp cheddar cheese
  • 3 T. port – either tawny or ruby*
  • 1/2 c. dried cranberries, roughly chopped, opt.
  • 1/2 c. toasted chopped pecans

Combine cream cheese, pepper, cheddar cheese, and port in a food processor. Whirl until creamy and smooth. Stir in chopped dried cranberries. Refrigerate at least 1 hour before shaping into a ball. Wrap ball in plastic wrap and refrigerate until about an hour before ready to serve. Roll in pecans just before serving. Great with crackers and thin apple slices.

*Or for a more intense port wine flavor: In a small saucepan, boil port until it is reduced to about 3 tablespoons. Remove from heat and cool completely.

Bonus Recipe: Place room temperature cream cheese on a plate. Top with Dalmatia Fig Spread and serve with Rosemary Raisin Cracker Crisps. (And yes I know you are shocked that I didn’t make my own fig spread. I’ve tried. But I just can’t reproduce anything nearly as good as this wonderful spread that comes in a small jar with an orange “paper” lid.) You simply owe it to yourself to try this lovely combination in the near future.

SEATTLE CREAM CHEESE DOGS

Now I must admit I am not the greatest lover of the all-American hot dog! In fact, the only time I really liked them was when I was pregnant. And then, all I wanted with my daily hot dogs (sometimes still cold right out of the package) were several huge slices of super cold watermelon. I almost lived on that diet for my last two trimesters. It’s totally amazing my daughter Paula is as normal as she is. Hot dogs and watermelon? Good grief!

But then low and behold, after probably not eating more than 3 hot dogs since my pregnancy, along comes a Seattle Cream Cheese Dog about 2 years ago. Now granted, when you eat one of these babies, it’s not really about the hot dog. It’s really about the toppings.  Also, I must confess, I usually make mine with really good sausages rather than plain hot dogs. (I figure, if I am going to go to the trouble of caramelizing onions, and dressing up sauerkraut, I might as well go all the way and use a really good sausage too!) However you choose to prepare one of these Seattle street vendor classics, you are going to be in for a wonderful treat. There are just some foods that fall into the “guilty pleasure” category. And these “dogs” are definitely on my “guilty” list. And no, I am not going to tell you what other foods are on my list. You already know about my addiction to cheeseburgers. There’s only so much humiliation I can take at one time. I’m a cookbook writer and food blogger after all. I should have foods like fried ice cream with salted caramel sauce or homemade marshmallows covered in white chocolate and toasted coconut on my list. Not cheeseburgers and fancy hot dogs! But if truth be told, most of us who consider ourselves to be blessed with a sophisticated palate have a food or two we wish we didn’t like, but do! So just to make myself feel better about my guilty pleasure list, I’m going to imagine each and every one of you with a corndog in your hand. (And no, corn dogs are not on my list! In fact, I have never eaten one.) But happy day, I do actually possess some vestige of dignity after all!

  • ¼ c. butter
  • 2 large sweet onions, thinly sliced
  • 2 tsp. bacon grease
  • 1 can sauerkraut, well drained
  • 1/4 tsp. caraway seeds
  • 4-8 oz. cream cheese (amount depends on how messy you want to become)
  • 12 hot dogs or favorite sausages
  • 12 buns
  • brown mustard

Melt butter in a skillet over medium heat. Add onions, and cook slowly until the onions have softened and caramelized to a deep golden brown, about 45 minutes. Meanwhile combine the bacon grease, sauerkraut, and caraway seeds in a small saucepan. Warm gently while onions caramelize. Warm the cream cheese in the microwave while you grill the hot dogs or sausages. Also lightly grill buns on both sides. To assemble cream cheese dogs, spread mustard on one side of bun and warm cream cheese on the other. Add hot dogs or sausage, top with onions and sauerkraut and serve immediately.


GROUND BEEF SLIDERS WITH BACON JAM AND CAMBOZOLA CHEESE

If I were a person who didn’t really like to cook, first of all, I wouldn’t be a food blogger (yah think!) and I undoubtedly would sport a great deal thinner wallet. And why is that you ask? Because I love really good food. And if I couldn’t fix it for myself, well then, I would have to go out to eat more often at places like Skillet, one of Seattle’s fabulous mobile diners. And why would I eat there as often as possible? Because, they make “the burger” – featuring grass fed beef, arugula, Bacon Jam, and Cambozola cheese (cow’s milk cheese that is a combination of a French soft-ripened triple cream cheese and Italian Gorgonzola). Need I say more?

But because I do love to cook, and am an inveterate copycat, I can munch on my take of this fabulous burger (I like to serve them slider sized) any time my heart desires, and time permits, of course. (FYI: if I am serving any type of burger at a function, I usually make them slider sized. Many of the people I entertain are getting older and simply don’t require as much food as when they were younger. So for most of my guests, a smaller burger is much appreciated. After all, they can always come back for seconds! Or even thirds! )

So next time you plan a picnic dinner for family and friends, try serving sliders in place of standard sized burgers. Or if you want to offer a choice, feature a couple of Seattle’s own creations. Serve both this slider (thank you “Skillet”) along with halved Seattle Cream Cheese Dogs (my next post). I mean really, we can’t just be known for our coffee snobbery, more Birkenstock shod women than any other city in America, and grunge music; we also need to take pride in our own gourmet twists on hamburgers and hot dogs. After all, hamburgers and hot dogs represent American cuisine at it’s finest! (I do believe I just talked myself into a trip to Italy. Arrivederci!)

  • 1 lb. not-so-lean ground beef
  • ½ tsp. seasoned salt
  • freshly ground black pepper
  • 1 tsp. Worcestershire sauce
  • ½ tsp. granulated garlic
  • 1 T. grated fresh onion
  • 1 tsp. Montreal Steak Seasoning (made by McCormick)
  • Slider Buns (under Bread & Roll Recipes)
  • arugula
  • Cambozola cheese
  • Bacon Jam (under This & That Recipes)

Gently combine the ground beef, seasoned salt, pepper, Worcestershire sauce, garlic, onion, and Montreal Steak Seasoning. Don’t over-mix. Form into 2-inch patties and let rest for a few minutes. Meanwhile toast the buns in the frying pan you plan to use to cook your burgers. Set buns aside. Place pan over medium high heat. Once the pan is nice and hot, add the burgers and leave them alone. Do not try to flatten the burgers while they cook or all the lovely juices will escape. Don’t move the burgers except to flip them once the juices start to puddle on top. Do not flip again! How long you cook the second side depends on personal preference. For a rarer burger only cook for a couple of minutes. You can tell doneness by gently pressing your spatula in the center of the patty without breaking the crust. The squishier the burger, the rarer it is. Meanwhile, place some arugula on the bottom half of each bun. Add a very thin slice of cambozola cheese. When the patties are cooked, place on the cheese. Add a nice slathering of Bacon Jam to the top half of each bun and place on top of the cheese. Serve sliders immediately.


GROUND TURKEY, SAUSAGE, AND BASIL SLIDERS

So in all honesty, if given a choice between one of these sliders or a cheeseburger (my favorite food in the world), I might have to really think about which I would choose. On the one hand, cheeseburgers are as common as say, cheeseburgers. Whereas, a good ground turkey slider doesn’t just grow on every corner. So it might take me a minute or two to make my choice. And because turkey sliders aren’t as readily available, I probably would leave the cheeseburger until another day. (If of course it was a “pick either one” situation.)

Now this could not conceivably happen to me in real life. No one I know would ever be so unkind as to actually force me to make such an agonizing choice. My friends are simply too nice to even consider making such a demand of me. Plus they know I would probably crack under the pressure.  So given that I might actually consider choosing one of these sliders over a cheeseburger should be proof enough that you too should give them a try. I found this Paula Deen recipe on the internet when I was looking for a hearty appetizer to serve at one of our in-home jazz concerts. And because these sliders are just so incredibly delicious, I felt compelled to share the recipe with you. Thank you Paula! (Please note: There was no butter spread on, melted into, or otherwise abused in the making of these turkey patties.)

  • 1 (20-oz.) pkg. ground turkey
  • ½ lb. ground pork
  • 1-oz. fresh basil, finely chopped
  • 3 cloves garlic, finely minced
  • ½ tsp. kosher salt
  • freshly ground black pepper
  • 1/3 c. mayonnaise
  • 2 tsp. vegetable oil
  • Slider Buns (see recipe under Bread & Roll Recipes)
  • Roasted Red Pepper Aioli (recipe to follow)
  • mixed spring greens

In a large bowl, combine the ground turkey, pork, basil, garlic, salt, pepper, and mayonnaise. Shape the mixture into eighteen 2-inch-size patties. Pour the vegetable oil into a large skillet and place over medium heat. When the skillet is hot, add the turkey patties and cook until done all the way through, 4 to 5 minutes per side. Meanwhile, slice the slider buns and lightly toast them in a pre-heated 350 degree oven for about 7-10 minutes.  Spread both sides of the toasted buns with Roasted Red Pepper Aioli. Lay spring greens on the bottom halves of the buns. Top with turkey patties. Cover with the top halves of the buns and serve immediately.

ROASTED RED PEPPER AIOLI

  • ½ c. mayonnaise
  • 1 T. Dijon mustard
  • 1 clove garlic, finely minced
  • 1/3 c. finely chopped roasted red pepper
  • kosher salt
  • freshly ground black pepper

In a small bowl, combine the mayonnaise, mustard, garlic, and roasted red pepper. Season to taste with salt and pepper. Cover and chill.


SLIDER BUNS (REGULAR HAMBURGER BUNS TOO)

Now that spring is definitely here it’s time to think about picnics and fun food. And a slider, one of my favorites, is fun to both prepare and consume. First of all, sliders are just stinkin’ cute! Now I don’t usually go for “cute” food, but even those of you with a cynical bent have to admit that sliders are nothing if they aren’t cute! And when they taste great too, well that’s just all the better. And although Mr. C. and I don’t usually go out for happy hour (we live on an island and the local restaurants aren’t exactly notorious for being outstanding “happy hour” purveyors), we have had occasion to sample a couple of sliders that are just out of this world.

So I thought I would share two of my favorites with you over the next couple of days. And in my humble opinion, the filling of a perfect slider isn’t worth its weight in ground meat without a perfect bun. And I know, some of you think a perfect bun isn’t all that necessary. Well, too bad. It’s my blog and I am not going to leave the rest of you searching for slider buns at your local grocery store! Because, undoubtedly you will find what I did when I was in a hurry recently and decided to purchase buns rather than prepare my own. For some ungodly reason, grocery stores charge an exorbitant price for slider buns that are fully half the size of regular hamburger buns. Now, I may not be a math genius, but I know when I am being hoodwinked! Let’s see, half the ingredients, twice the price. What about this equation just does not compute? And that’s if your grocery store even deigns to carry slider buns in the first place! Now granted, the slider buns I have purchased (not from my local grocery store, I assure you) have been really good. Pricey, but good. Not as wonderful as homemade of course, but tasty none-the-less.

So next time you get a hankering for a truly fabulous slider, remember this recipe. The buns are inexpensive to make and terribly easy to prepare. If you have yet to tackle yeast bread, this recipe would be a good place to start. And because it’s just the size of your cutter that determines how small or large your buns eventually become, you can use this same recipe for regular sized burger buns too. Of course there is the old adage that “the larger the buns you consume, the larger your own buns become”, so I think personally, I’d better stick to the smaller cutter. Wish me luck on that one!

  • 1 c. warm water
  • 1 T. or 1 pkg. active dry yeast
  • ¼ c. sugar
  • 1 ¼ tsp. salt
  • 4 T. butter, room temperature, divided
  • 1 egg, room temperature
  • 3 ½ c. flour (or more)
  • vegetable oil

Combine warm water, yeast, sugar, salt, 2 tablespoons butter, and egg in the bowl of your stand mixer. Let the mixture sit for 5-10 minutes to *proof. Add enough flour to form a soft dough. Pour a very small amount of oil over the dough, form a large ball with your hands, cover the bowl with a clean tea towel, and let rise for 1-2 hours or until nearly doubled in bulk. Punch down and divide in half. Shape each half into a rough disk. Roll dough to about 1/4-inch to 1/3-inch thickness. Cut out with a 1 1/2- to 3-inch cutter, depending on whether you want slider buns or regular sized hamburger buns. Repeat with the remaining dough. You will end up with quite a bit of left over dough. Combine it into a ball and let the ball rest for about 20 minutes. Roll out again and make as many more buns as possible. Arrange on a lightly greased baking sheet about 2 to 3 inches apart. Cover with a towel and let rise until doubled in size, about 30 minutes. Melt the remaining 2 tablespoons butter; brush each bun. This will give them a soft, golden crust. Bake the buns in a pre-heated 350 degree oven for 10-12 minutes, or until they are a light golden brown. Cool on rack. Split and use with any of your favorite fillings.

Proof: After 5 or 10 minutes, the yeast should begin to form a creamy foam on the surface of the water. If there is no foam or any apparent action in the bowl, the yeast is dead. Time to start over with a new packet of yeast.

OLIVE STUFFED CHEESE BALLS

OLYMPUS DIGITAL CAMERA

Back in the first half of the 20th century, cocktail parties were much more prevalent than they are today. I don’t know exactly why that is, except that in general people today are much more aware of driving under the influence, which is a very good thing. (Not driving under the influence – heightened awareness! Just making sure you’re paying attention.) For sure there is the driving under the influence factor, but at least in our part of the country, there is the life in the west reality (people here tend to dress and entertain much more casually than back east, for example). But I personally believe the number one reason adult cocktail parties are not as popular as they once were is because starting at about the time my children were very small (late 60s and 70s), all the couples I knew were beginning to take their children with them wherever they went. I think (and I’m not a sociologist so none of what I’m espousing is grounded in fact) with the onset of more mommies working outside the home, we ladies wanted and needed to be with our children as much as possible evenings and weekends. I know that was how I felt, and I certainly wasn’t alone. But prior to that, when the majority of women were still stay at home moms, I’m sure they desperately needed to get away from their children once in awhile. (I know I would have had to, or I’d have gone mad!) So a late evening cocktail party for adults only was a perfect solution.

At the same time many women were starting to work outside the home, men were beginning to play a much more active part in their children’s lives too. So spending time with your own family and your friend’s families was becoming de rigueur.  And if it meant only being able to see friends with children in tow, so be it! And because there were children present who needed to be fed at a reasonable hour, our party style gradually changed from adult only cocktail parties to early evening family dinner gatherings. (Spaghetti was big in those days.) Now granted, we still managed to imbibe our share of adult beverages, but sophisticated affairs these were not. Just great friends, happy children with spaghetti sauce smiles and noise levels in the 120 decibels range.

And as our party style changed, so did the types of food we served. We quickly learned that one of the best ways to combat alcohol over-indulgence at a party, or at any kind of a function for that matter, was to serve so much fabulous food that booze became almost incidental. I know that sounds difficult to believe, but if you serve a variety of incredible tasting horse d’oeuvres at a party, including this recipe for Olive Stuffed Cheese Balls, people are going to continue nibbling all evening long. Sure they are still going to drink, but with enough truly wonderful food available, drinking becomes almost secondary.

I mean really, even at my ripe old age, I still remember going to parties in my twenties where the only food was a big old bag of potato chips and a couple store bought dips. Who in their right mind would have chosen chips and mediocre dip over keg beer? Not anyone I knew. But today, if presented with a beautiful table full of a variety of delicious dishes that include plenty of protein and as little salt as humanly possible (party food is intrinsically salty), people will simply eat more and drink less.

So plan your parties heavy on the food, lighter on the booze, and speak slowly and distinctly to your older guests. Some of us are still suffering the effects of all those 120 decibel evenings!

  • scant ½ lb. (2 cups) finely grated sharp cheddar cheese
  • ½ c. butter, room temperature
  • 1 c. flour (not sifted)
  • 1 tsp. paprika
  • ¼ tsp. hot sauce
  • approximately 45 small stuffed green olives that have been drained and patted dry (I use the 5-oz. jar of Lindsay brand Spanish Manzanilla Olives)

Combine cheese, butter, flour, paprika, and hot sauce in a medium mixing bowl. (Best prepared with a powerful mixer such as a KitchenAid). Using a very small scoop or your fingers, remove about a heaping teaspoon of dough and form it around each olive. Place wrapped olives on an ungreased baking sheet. Freeze firm. Place still frozen balls in a pre-heated 400 degree oven for 15 minutes, or until lightly browned. Cool and store in an airtight container in the refrigerator. Serve at room temperature.

Note: People will eat these like popcorn. I would advise a double batch!