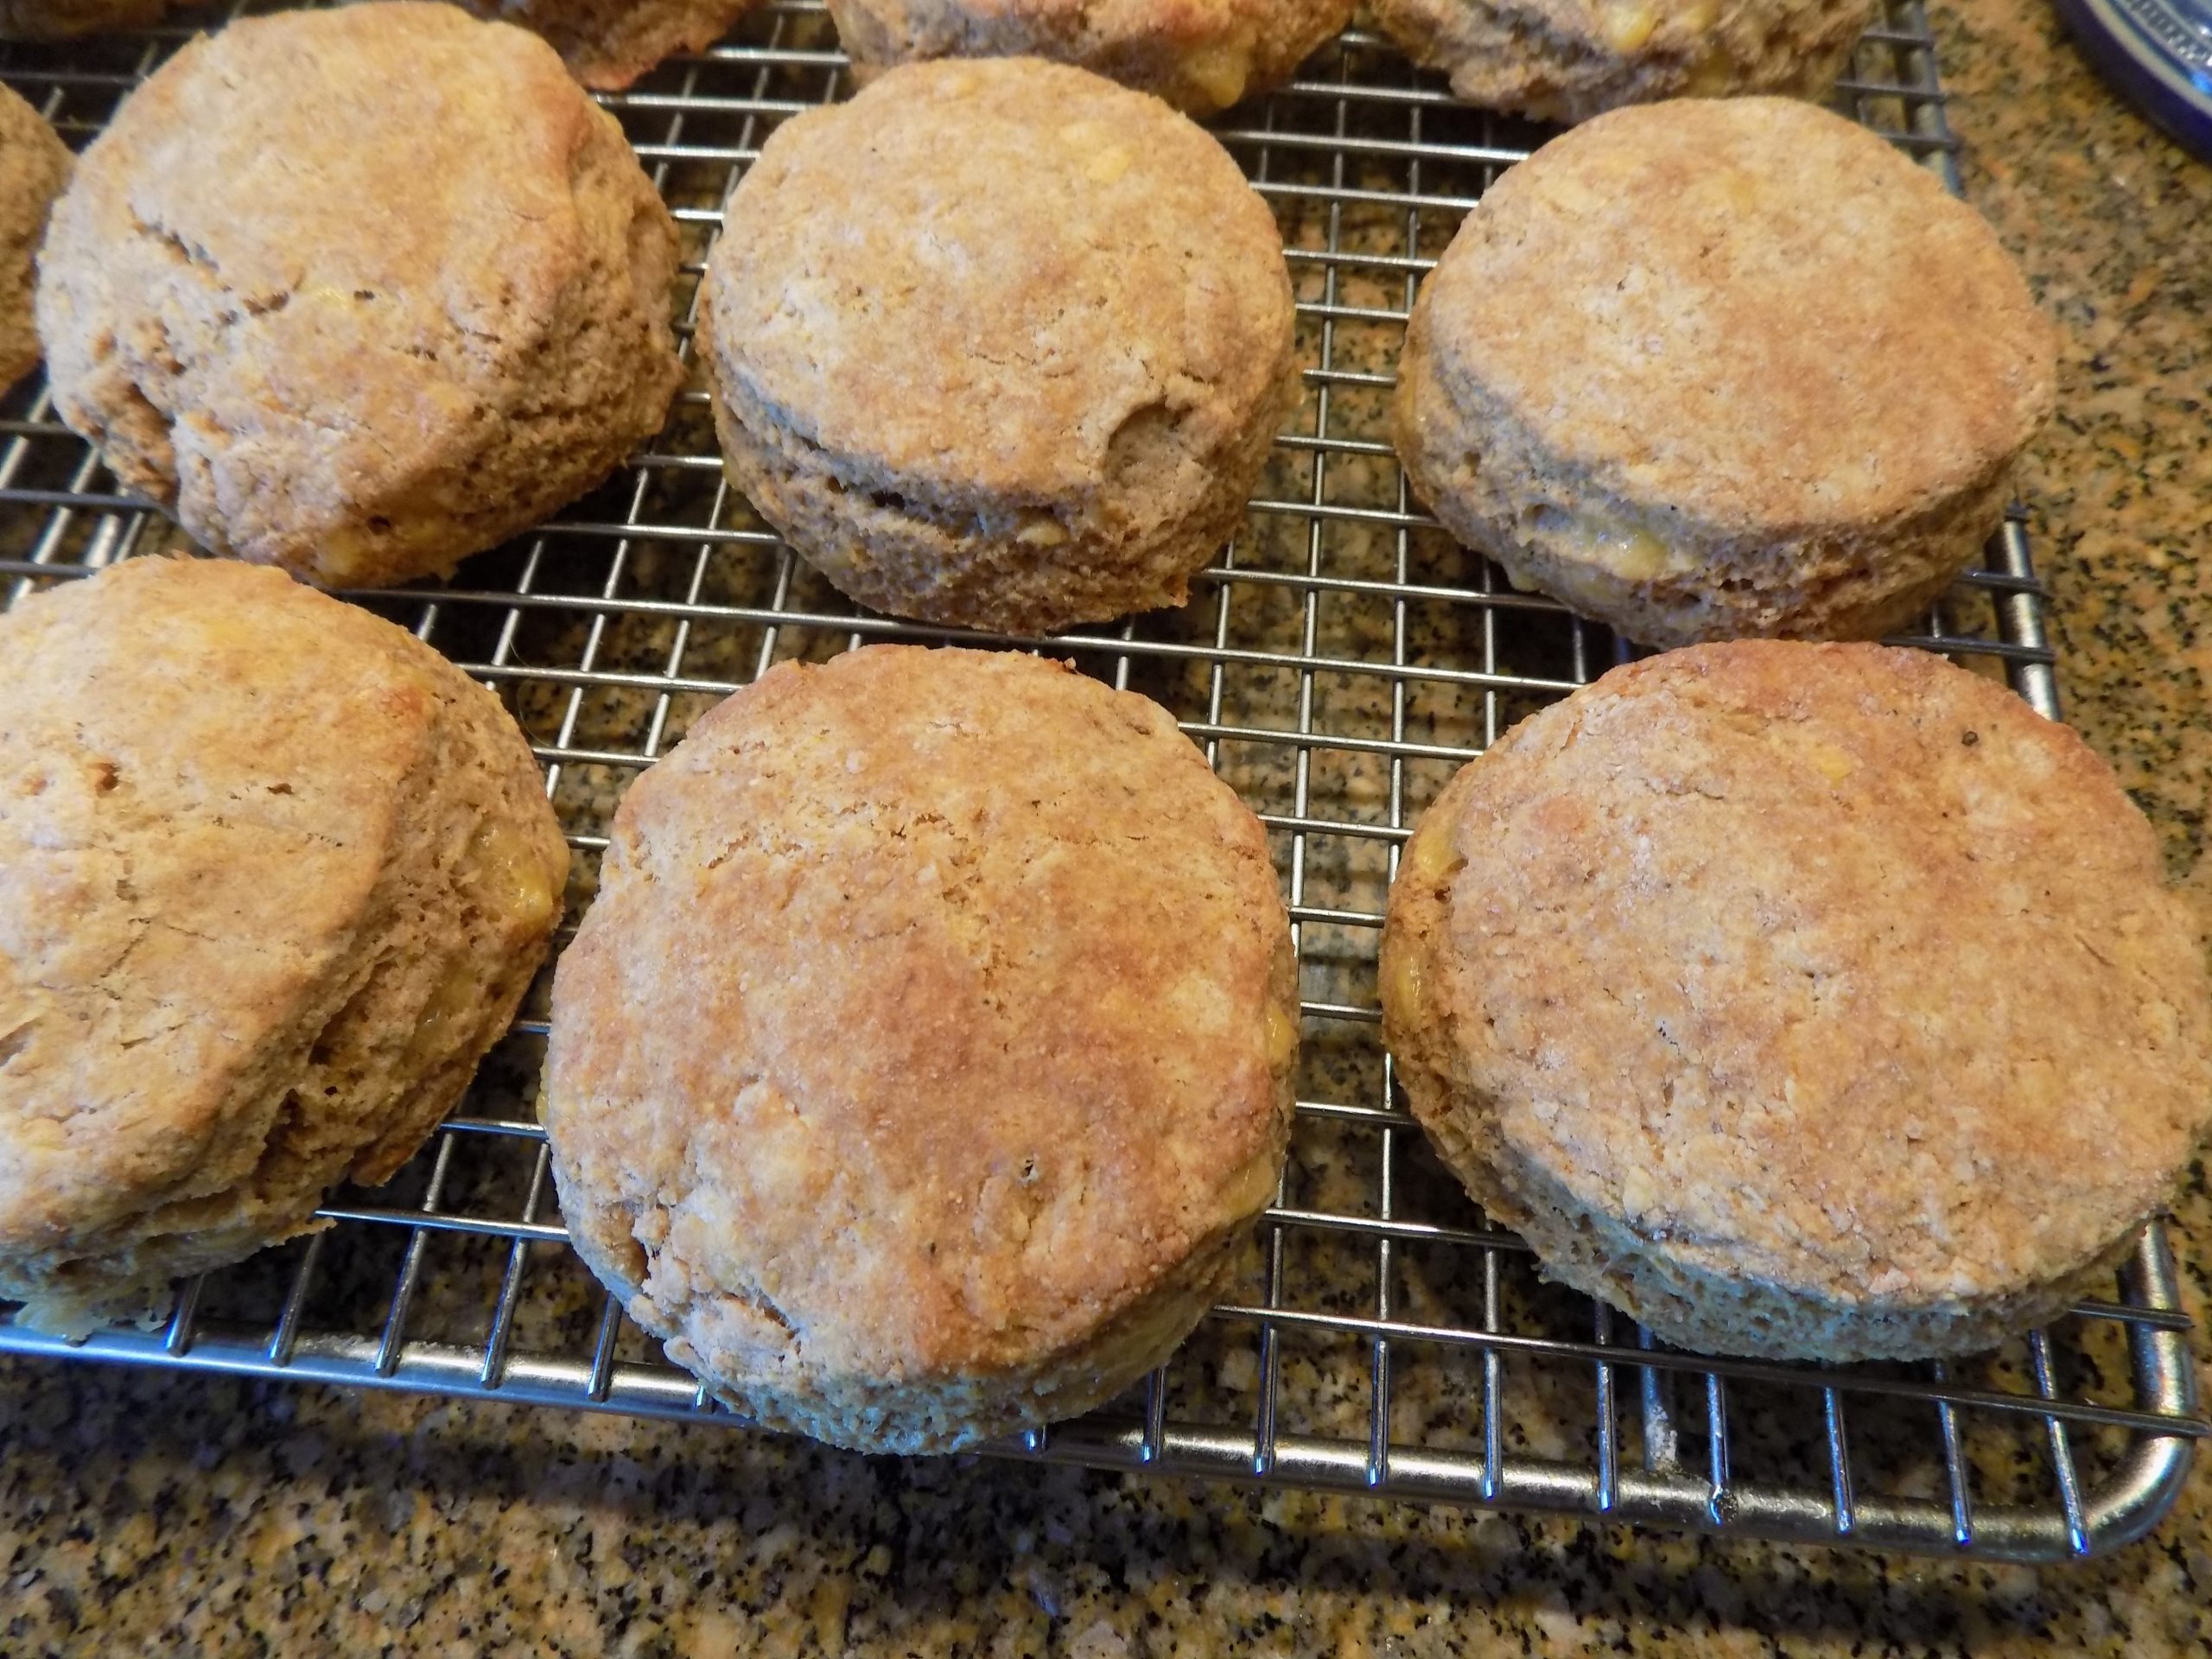
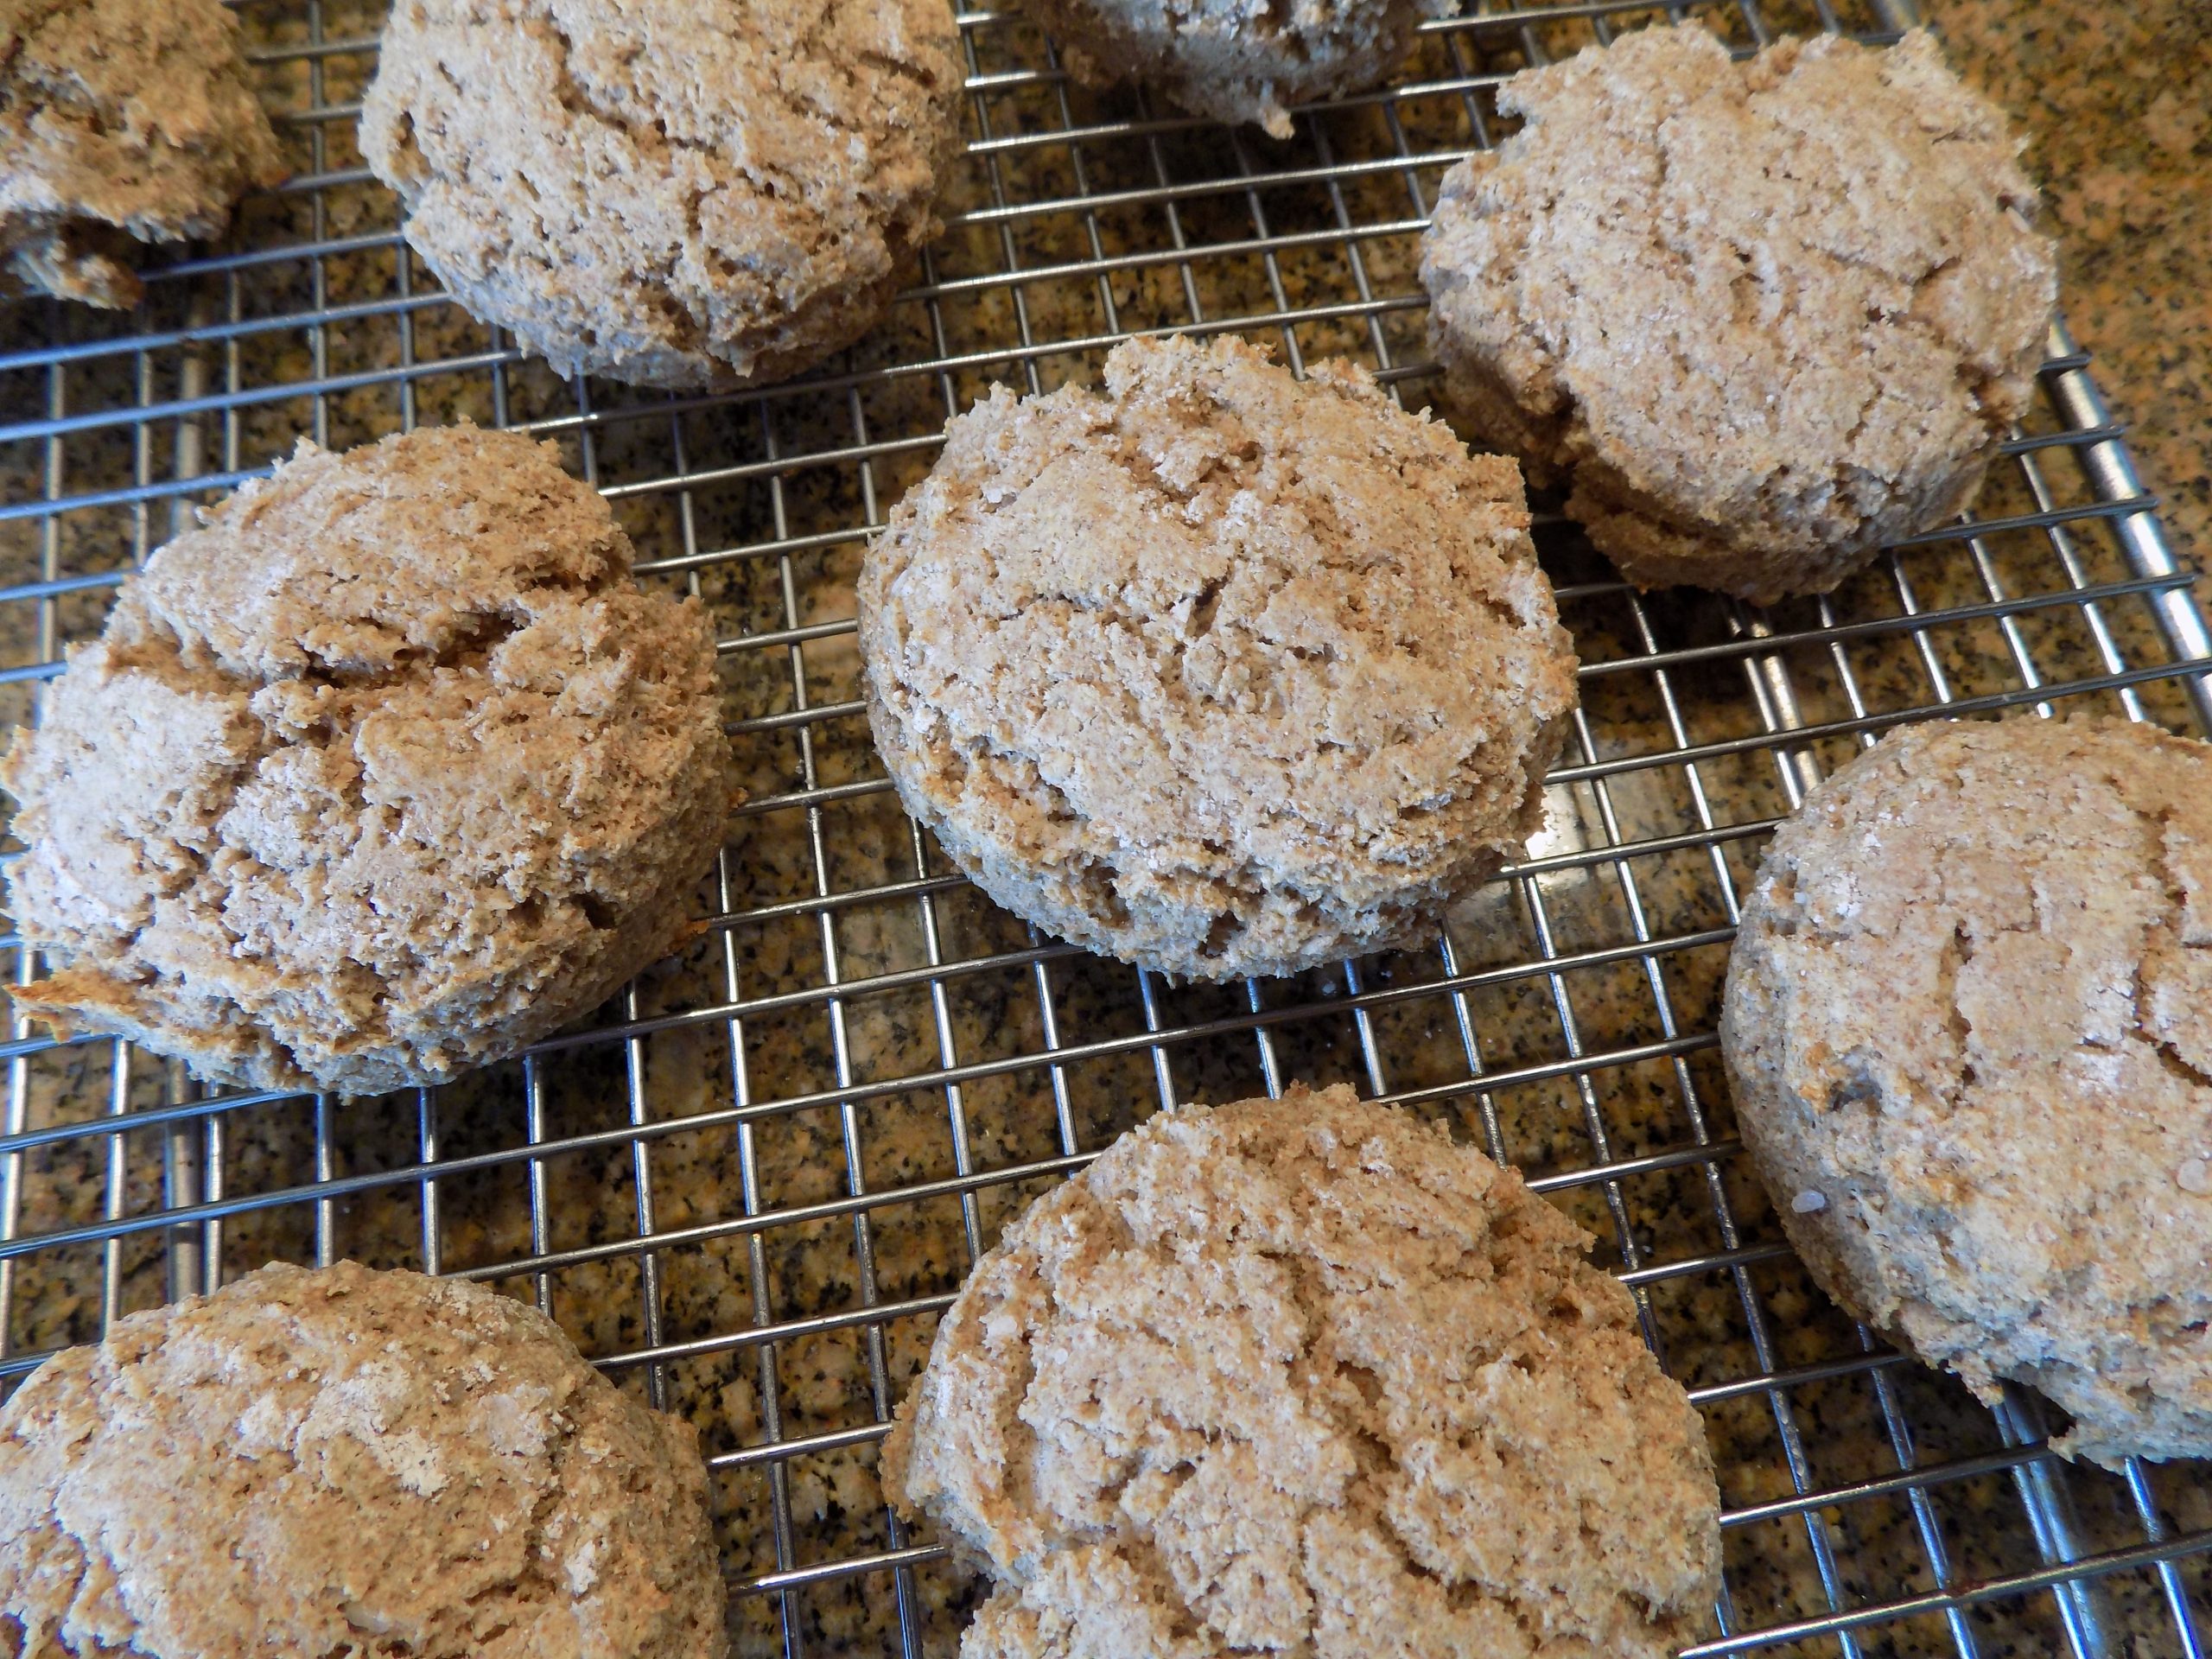
Even though I have reduced my A1C down to an almost “normal” number (getting off prednisone really did the trick), I am still trying to eat like I have type 2 diabetes. And why shouldn’t I? I’m a senior citizen and sugar has never been a required food group! And at least for me, sweet desserts have never been my problem. (I like them, but don’t have to have them every day like a certain member of my family who shall remain nameless!) But, and isn’t there always a but, rather than cookies or candy, bread has always been my downfall. And as everyone knows bread is high in carbs. And our bodies break down carbs into glucose, leading to an increase in blood sugar levels. So, still craving bread, but armed with a tiny bit of knowledge, I like to bake with whole wheat and rye flours now rather than all-purpose white flour. Of course, there are times when white flour is the only choice. But I’m always keeping in mind that whole grains are far better for us. So, when I found this recipe for whole wheat biscuits on the rachaelcooks.com site, I was eager to bake us up some biscuits for dinner.
I served the biscuits with Leftover Pork Tenderloin and Veggie Stew and they were so yummy. Of course, whole wheat flour takes a bit of getting used to. It produces a grainier mouth feel. But the flavor is lovely. And the more you eat baked goods made with whole wheat flour, the more you learn to appreciate the flavor it brings to the bread or whatever baked goods you are producing. Not to mention the nutritional benefits associated with whole grains.
So, next time you feel like making biscuits, give this recipe a try. They will be perfect any time a biscuit would make the perfect addition to a meal. Plus, they are easy to make. And isn’t that always a bonus.
So, thank you Rachael for this delightful and reasonably heathy recipe.
Well, that’s all for today. Mr. C. has a gig tonight in Bellevue. And before the gig we plan to dine at Angelo’s Italian Restaurant. I can hardly wait. Angelo’s was one of our favorite haunts when we lived in Bellevue. So, anytime I get to eat there is a walk down memory lane. Not to mention, a reason to eat more than I should. (Like I need a reason for that!) Anyway, it will be great too because we will be joined by Mark and Vicki, our dear friends and neighbors. So, great food and great company. What could be better?
Peace and love to all.
1½ c. whole wheat flour
¼ c. yellow cornmeal
2 tsp. baking powder
1 tsp. baking soda
½ tsp. kosher salt
freshly ground black pepper
2 T. granulated sugar
¼ c. grated sharp cheddar cheese
6 T. cold unsalted butter, grated
¾ c. buttermilk
In a large bowl, whisk the whole wheat flour, cornmeal, baking powder, baking soda, salt, black pepper, and sugar together. Stir in the cheese and grated butter. Add the buttermilk and stir until just combined.
Pat out the dough to about a ½-inch thickness on a floured surface. Use a biscuit cutter to cut into rounds. Re-roll the scraps and cut as many rounds as you can. Place on an ungreased baking sheet about 1-inch apart.
Bake in a pre-heated 450-degree oven for 12 minutes or until golden brown. Best enjoyed fresh and hot. (But gently microwaved and slathered in room temperature butter works mighty fine too.)
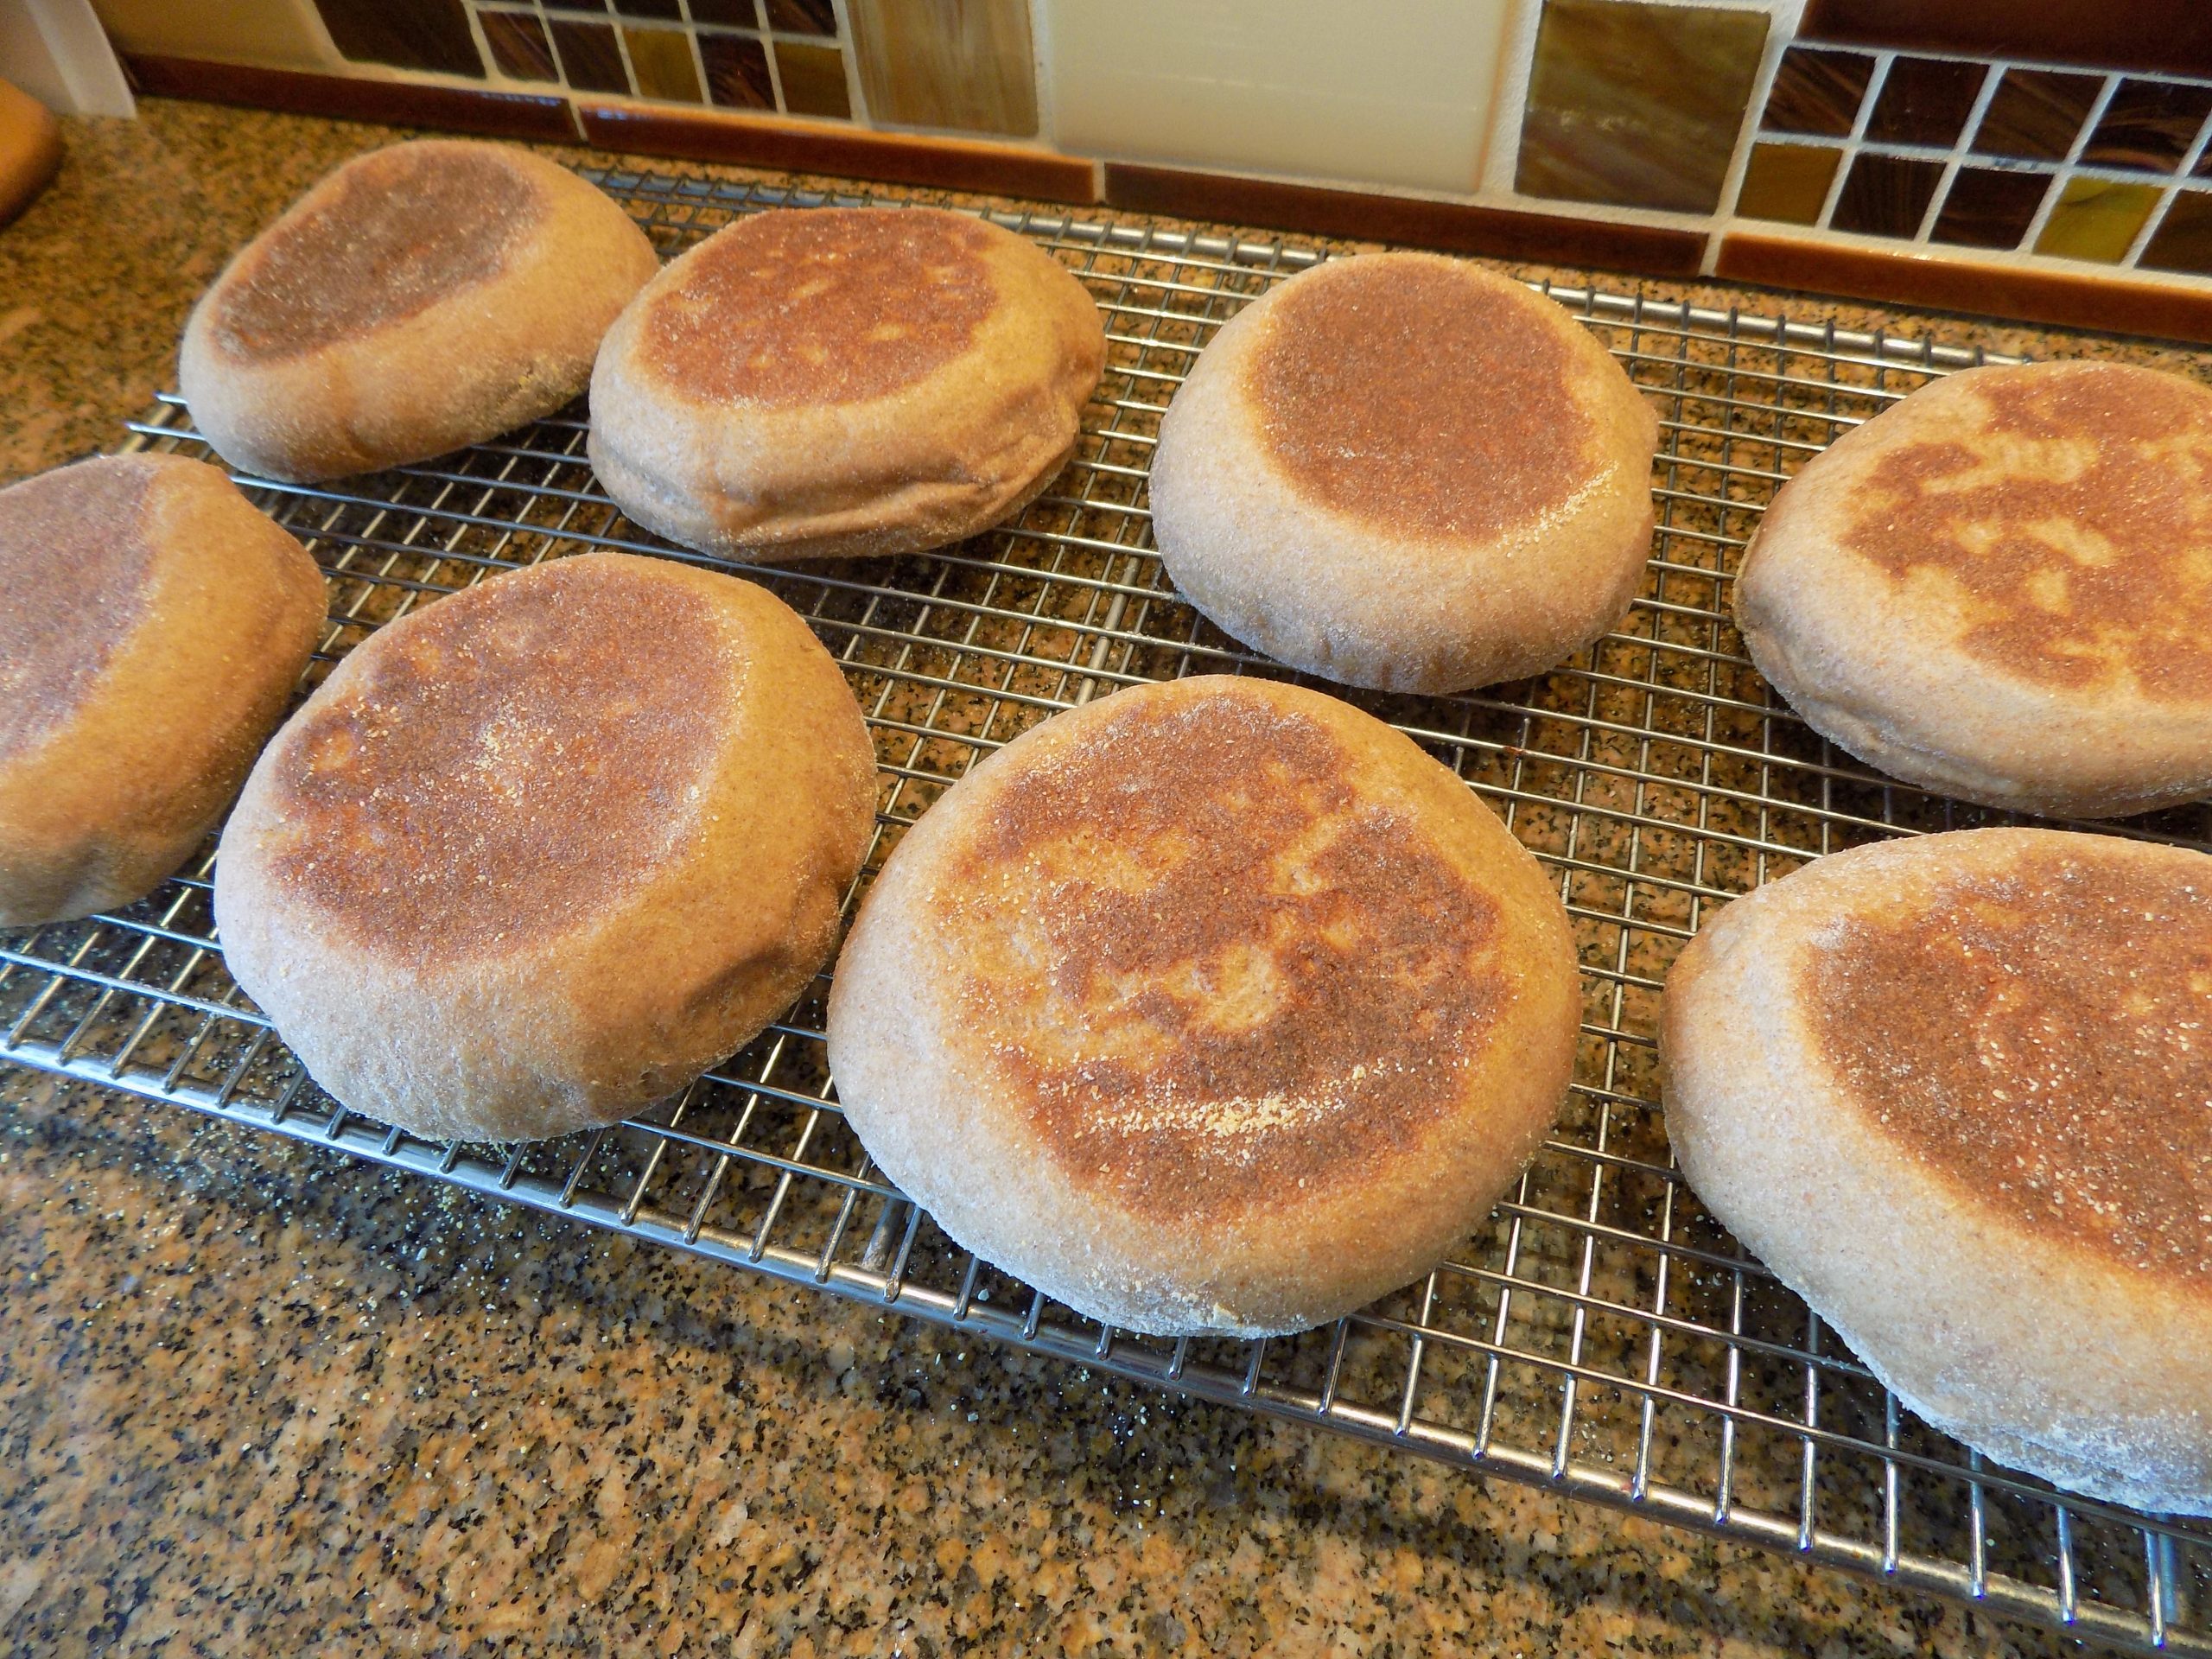
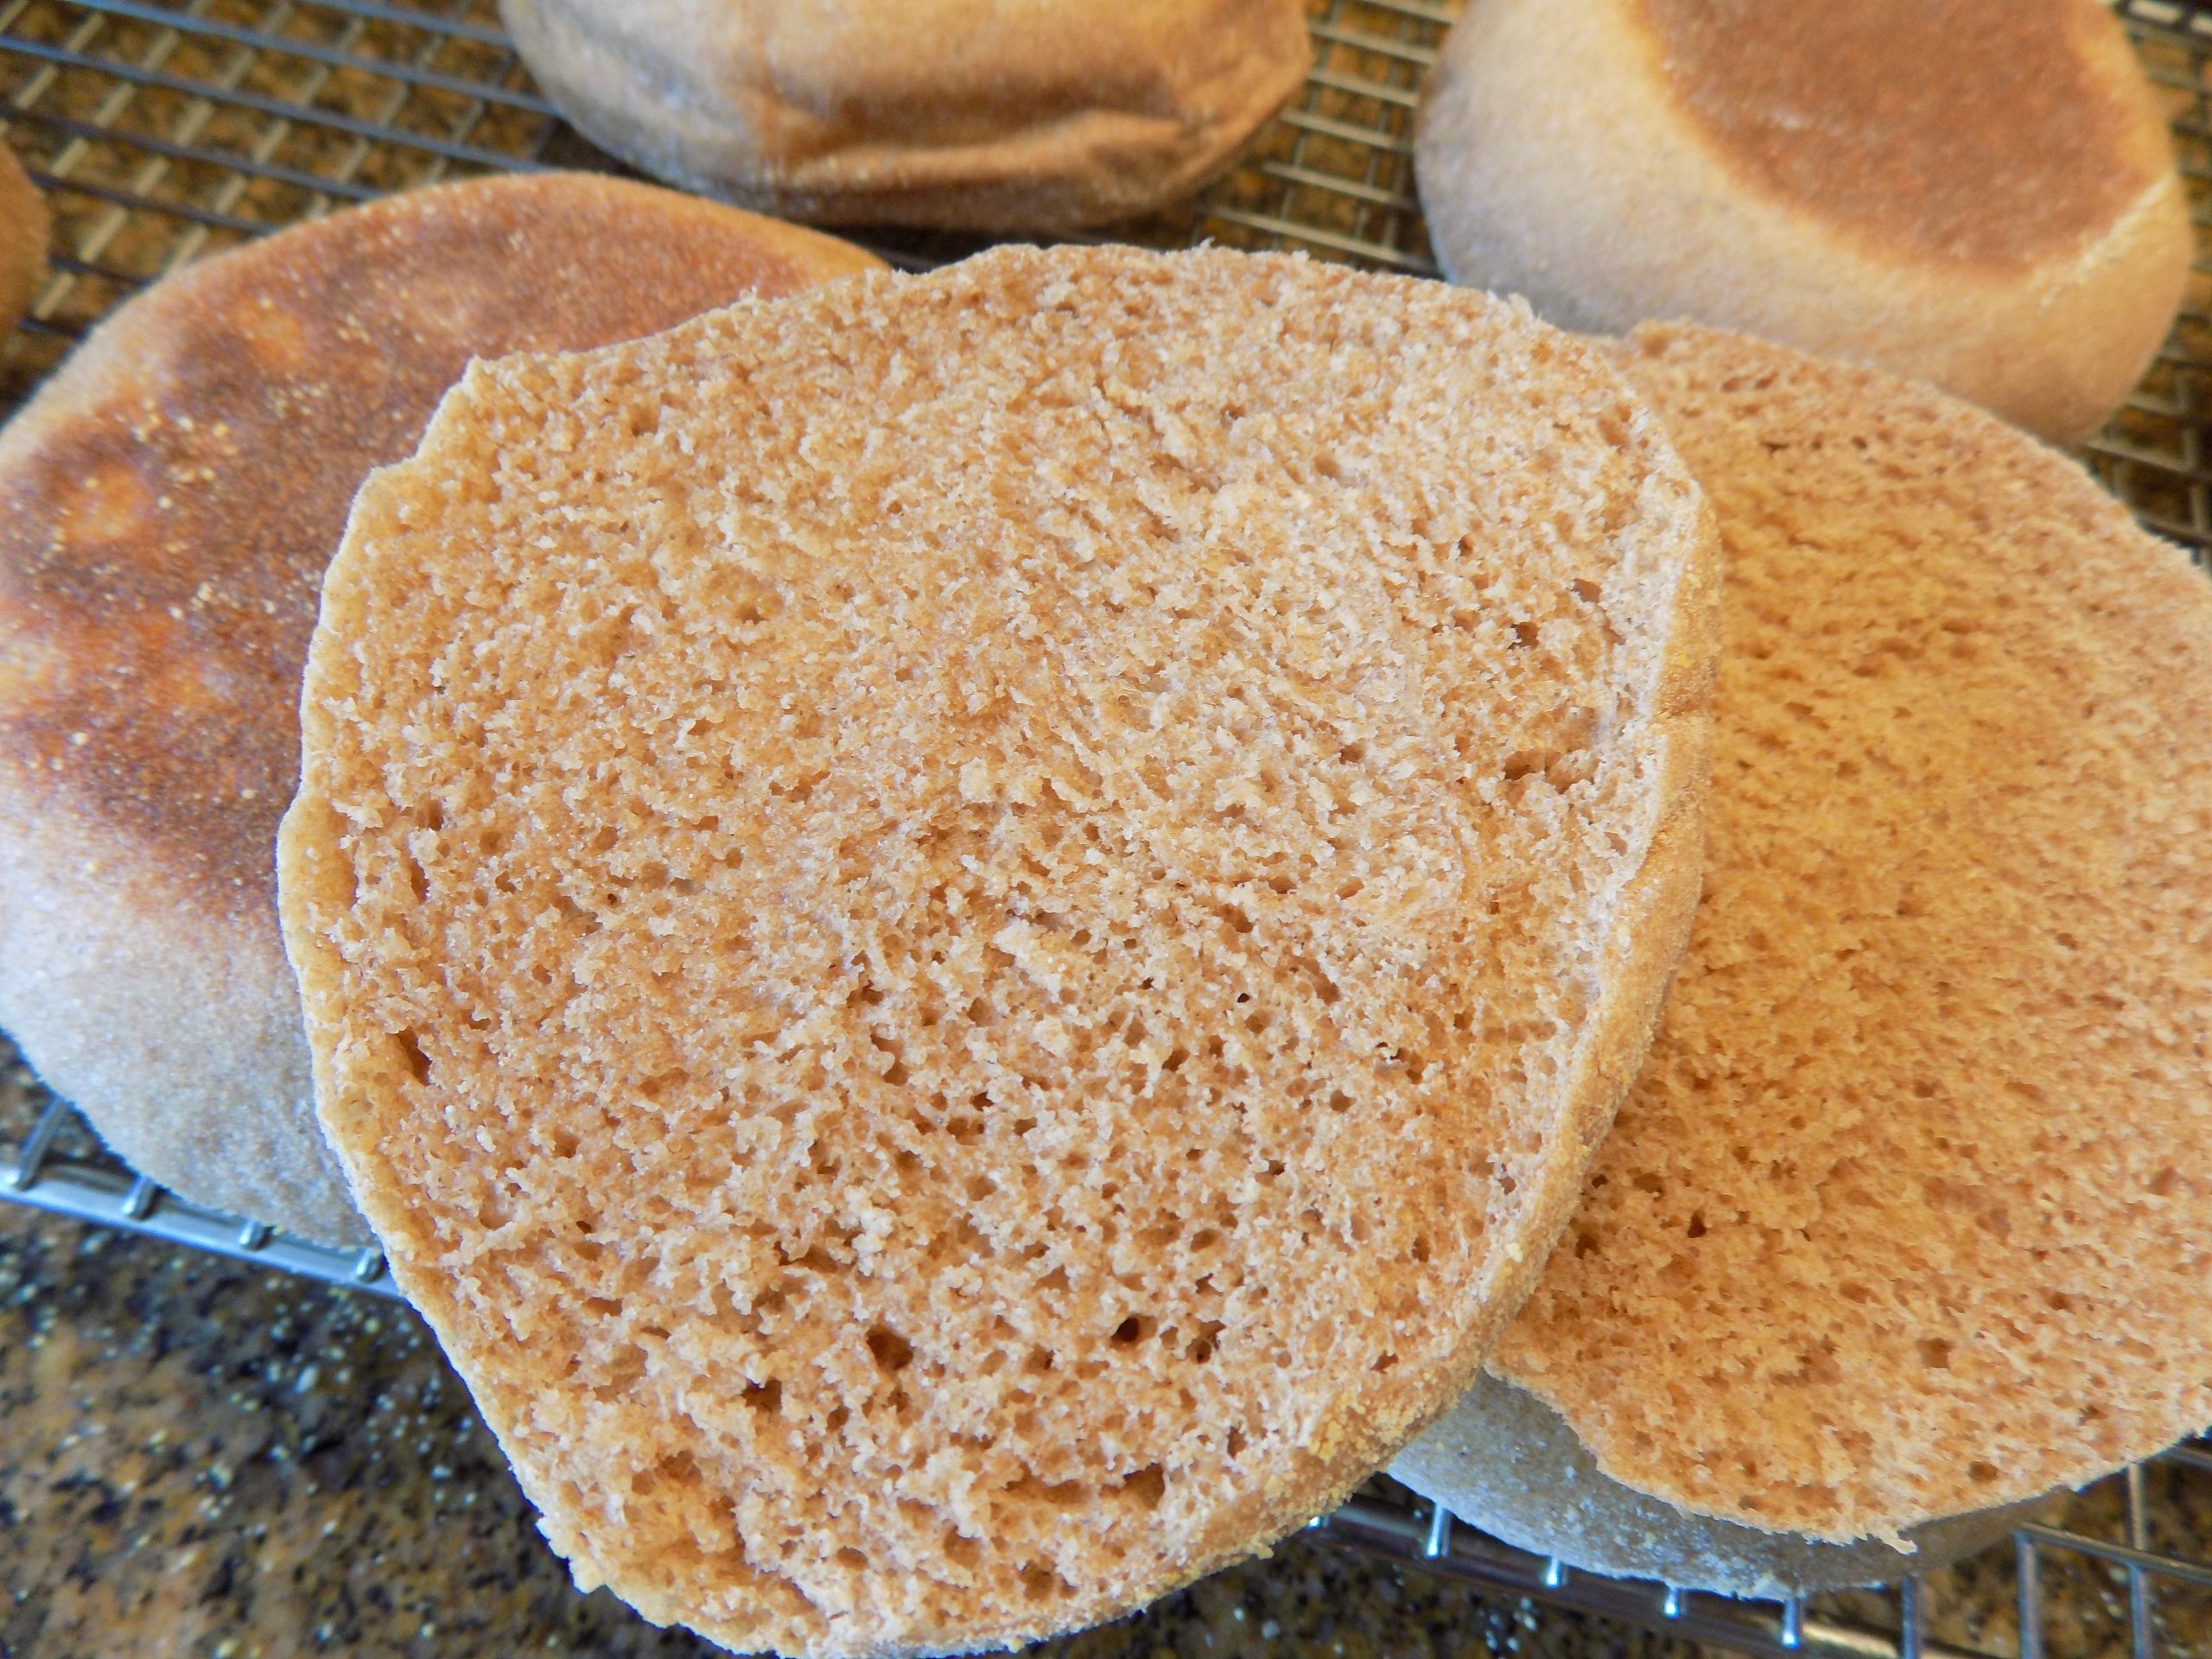
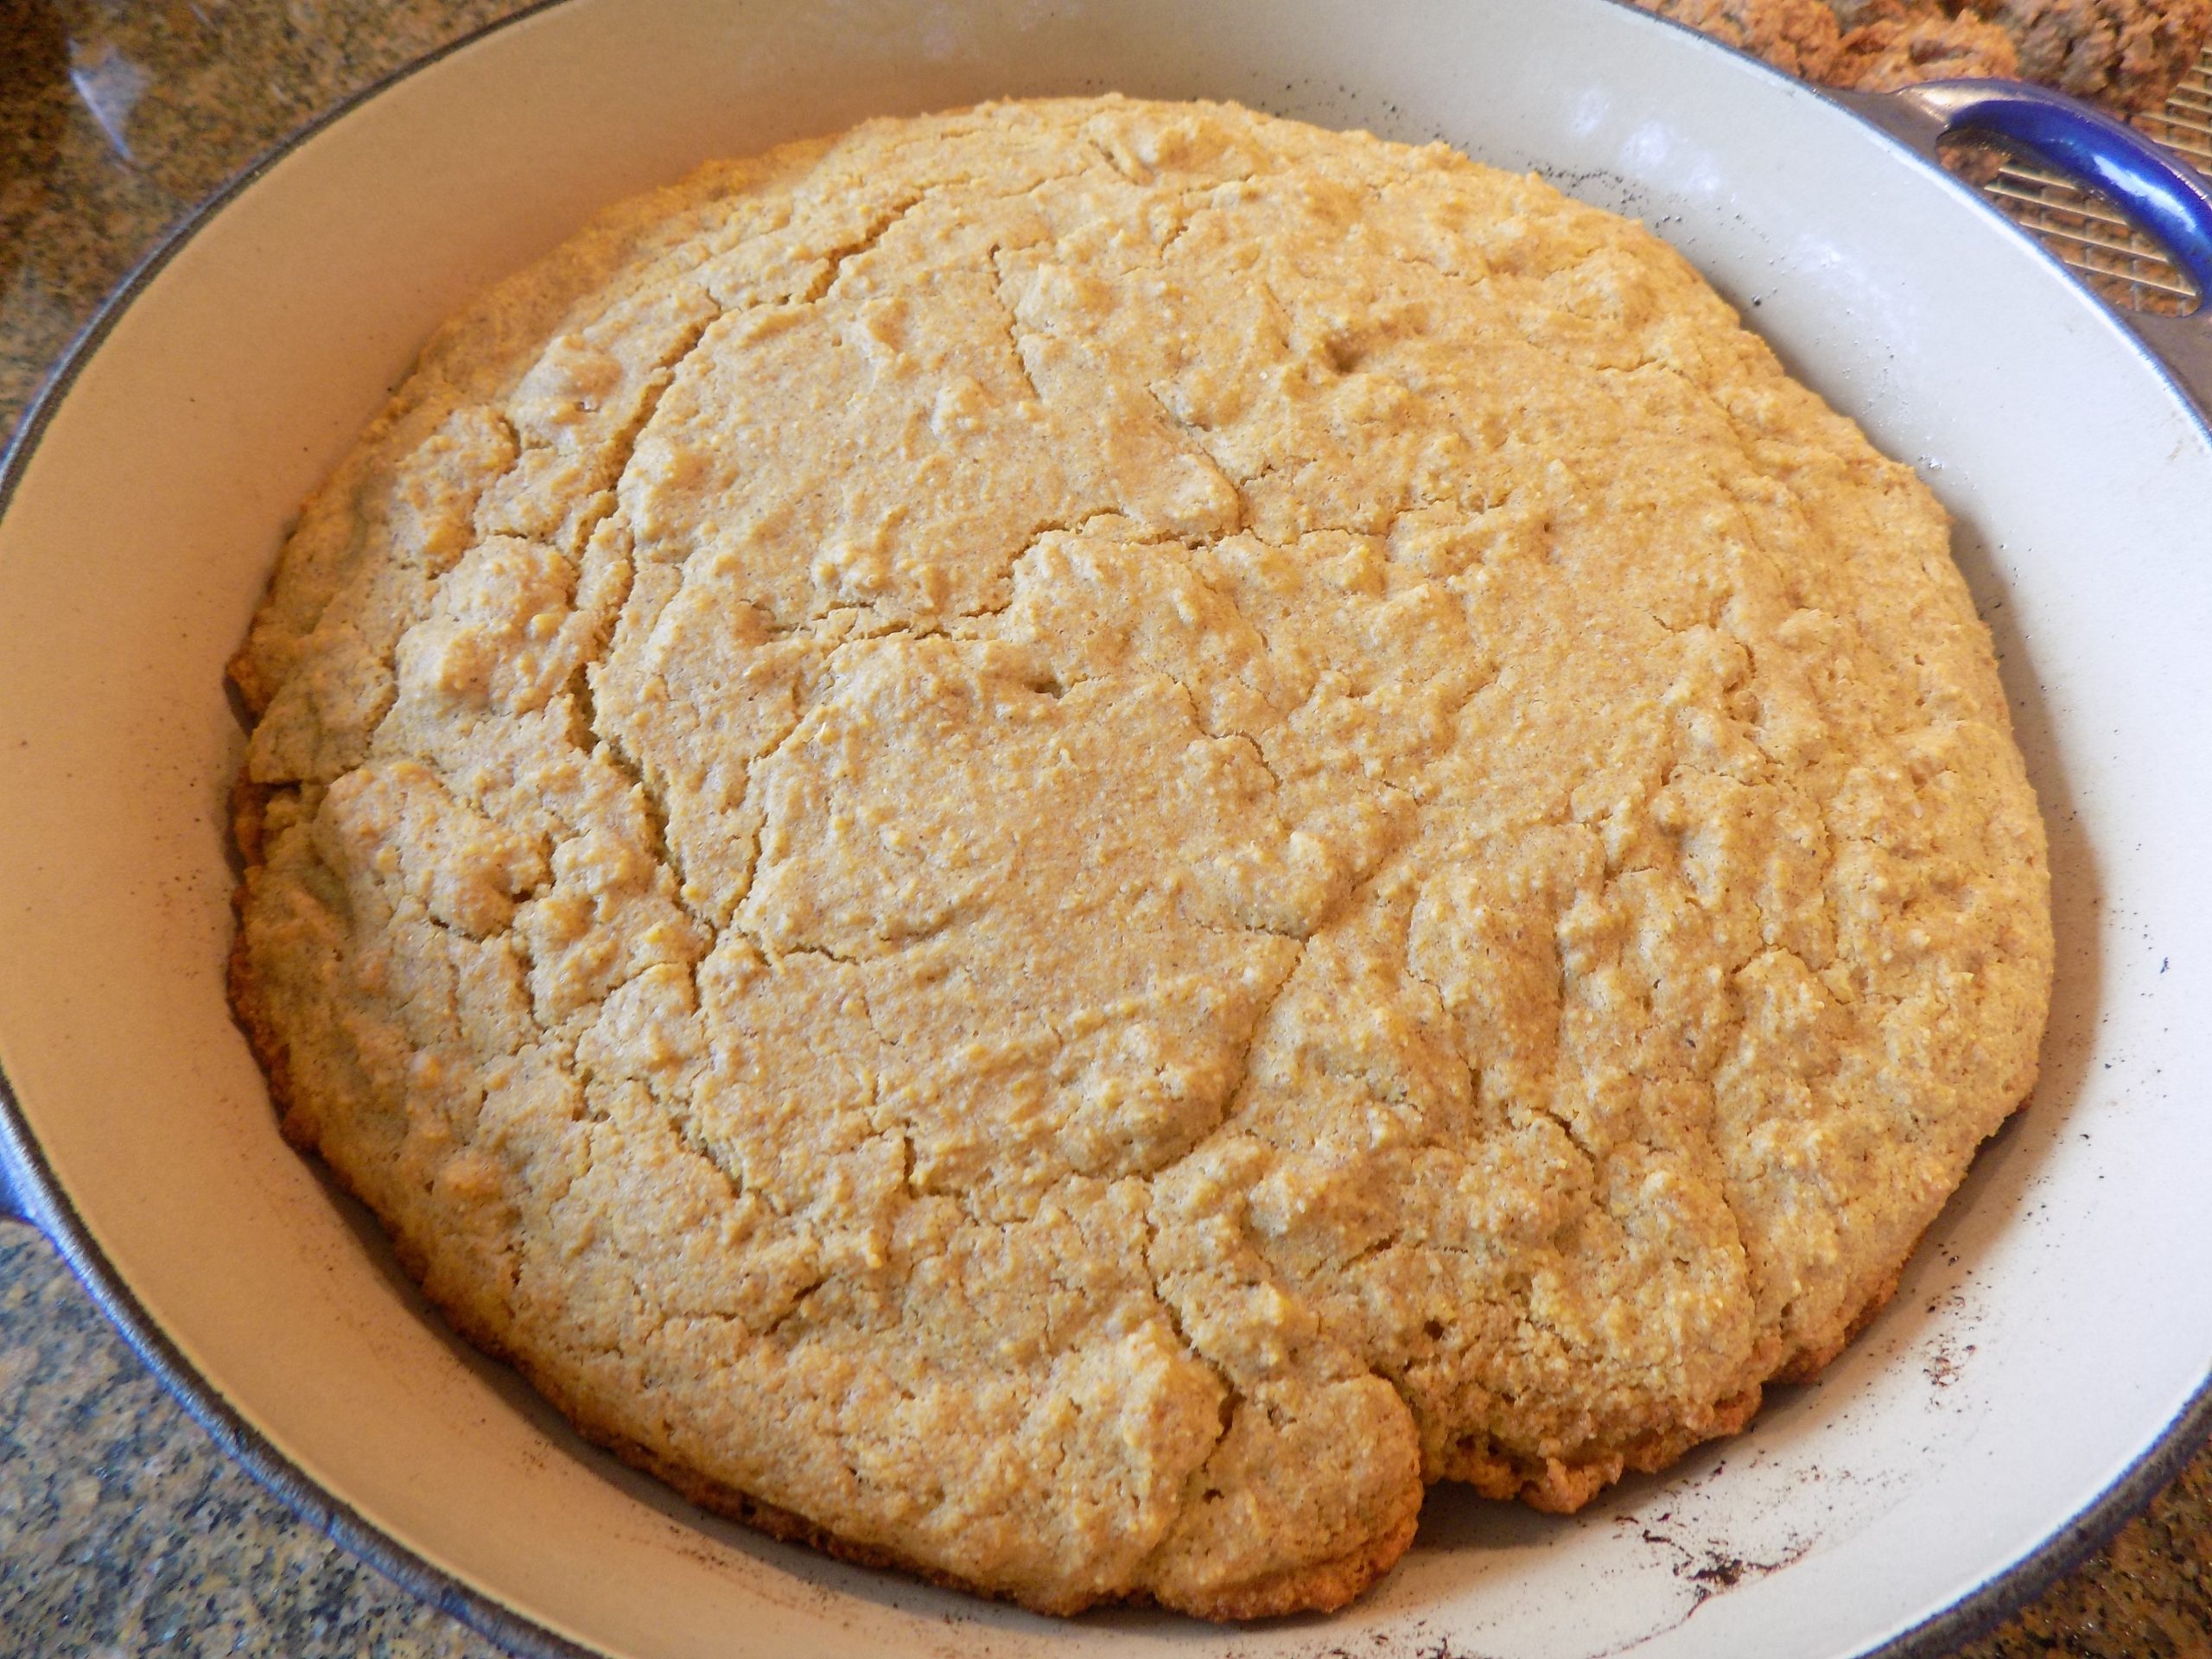
Over the years I have made many types of bread. Baguettes, boules, loaves, quick and yeast breads, rye, whole wheat, sourdough, you name it. But now that I need to monitor my carbs more closely and concentrate on upping my fiber intake, it isn’t quite as much fun to bake bread as it used to be. Until yesterday that is. Because yesterday’s bread baking adventure was not only fun, but the whole process went quickly, and the result was wonderful. But then, I have always been a sucker for sourdough bread of any kind. And I am particularly fond of English muffins. And when English muffins are built using olive oil, an egg, milk, and rye and whole wheat flours, the carb count is reasonable, and the fiber count is high enough to offset the 1 tablespoon of honey used as a sweetener.
If there is any one thing on which most experts on diabetes agree, it’s that carbs in the form of fiber (mainly in fruits, veggies, whole grains, and legumes) are better for us than any other type of carbohydrate. Our bodies are simply unable to absorb and break down fiber. So, fiber rich foods don’t cause a spike in blood sugar the way other carbohydrates can. Which in turn helps keep our blood sugar in the appropriate target range. So, all in all, lots of fiber is quite essential for our every day good health.
So, not only are these English muffins delicious; they are high in fiber and stinkin’ easy to make. And the best part, I can toast half a muffin in the morning for breakfast and not feel guilty. (I hate feeling guilty.)
So, if you too would like to build an English muffin that is easy to prepare and tastes really great, this is the recipe for you.
Well, I’m home today because we are having our yearly generator inspection. Mr. C. is off performing at the annual Anacortes Arts Festival, but someone had to stay home to greet the nice man who will be performing the checkup. Since I don’t play the piano as well as Andy, I pulled the short straw. But not to worry. Mr. C. is in two other bands performing tomorrow, so I will have plenty of time to check out the art exhibits and help a few artists line their pockets from the fruits of our labor. (My civic duty, right?) OK, I will also be in the audience to applaud the bands, because, well, I really love jazz, and these bands do jazz really, really well.
And for those of you who live in the area and have never visited the Anacortes Arts Festival, you are in for a treat. There are dozens of booths featuring high quality arts and crafts for sale, three stages offering live music, and fun food opportunities in abundance. So, don’t miss this opportunity to support your local artists, try a new dish or enjoy an old favorite, and listen to some great music.
And as always, laugh, love, and just be happy to be alive.
Peace and love to all.
½ c. sourdough discard (I used a rye flour sourdough starter)
2¼ tsp. instant yeast
1 T. honey
2 T. extra virgin olive oil, plus more for greasing the mixing bowl
1 tsp. kosher salt
1 lg. egg
¾ c. whole milk
1 T. vital wheat gluten
½ c. stone-ground rye flour
2 c. stone-ground whole wheat flour
Place the sourdough starter, yeast, honey, and 2 tablespoons olive oil in the bowl of your stand mixer. Let sit for 5 minutes until bubbles start to appear.
Add the salt, egg, whole milk, vital wheat gluten, rye flour, and most of the whole wheat flour.
Using your dough hook, mix everything together and knead for 5 minutes. Add more flour as needed to make a tacky dough.
Pour a bit of olive oil in the mixing bowl, and using your hands and a stiff plastic spatula, form the dough into a well-greased ball. Cover the bowl tightly with plastic wrap and allow dough to rise until doubled, around 1 to 1½ hours.
Line a baking sheet with parchment paper and then lightly sprinkle with cornmeal.
Place the risen dough on a lightly floured work surface and cut into 8 equal pieces. Form each piece into a ball and flatten slightly with your fingers. Place about 2-inches apart on the prepared baking sheet. Cover with a lightweight tea towel and let rise until the muffins are doubled in size, around 45 minutes.
When you are ready to cook the muffins, heat a pan (a non-stick griddle works great for this) over medium-low heat. Gently lift the muffins with a flat spatula and place them on the heated pan. (I do 4 at a time. Too many at a time makes it difficult to flip them.) Cook for 2 minutes on each side and place them back on the same baking sheet.
Bake in a pre-heated 325-degree oven for about 10 minutes or until fully cooked. (The internal temperature should be at least 200-degrees to consider the muffins fully cooked.)
Remove from oven and place on a rack. Store in an airtight container. Great slathered in butter or spread with something sweet or savory.
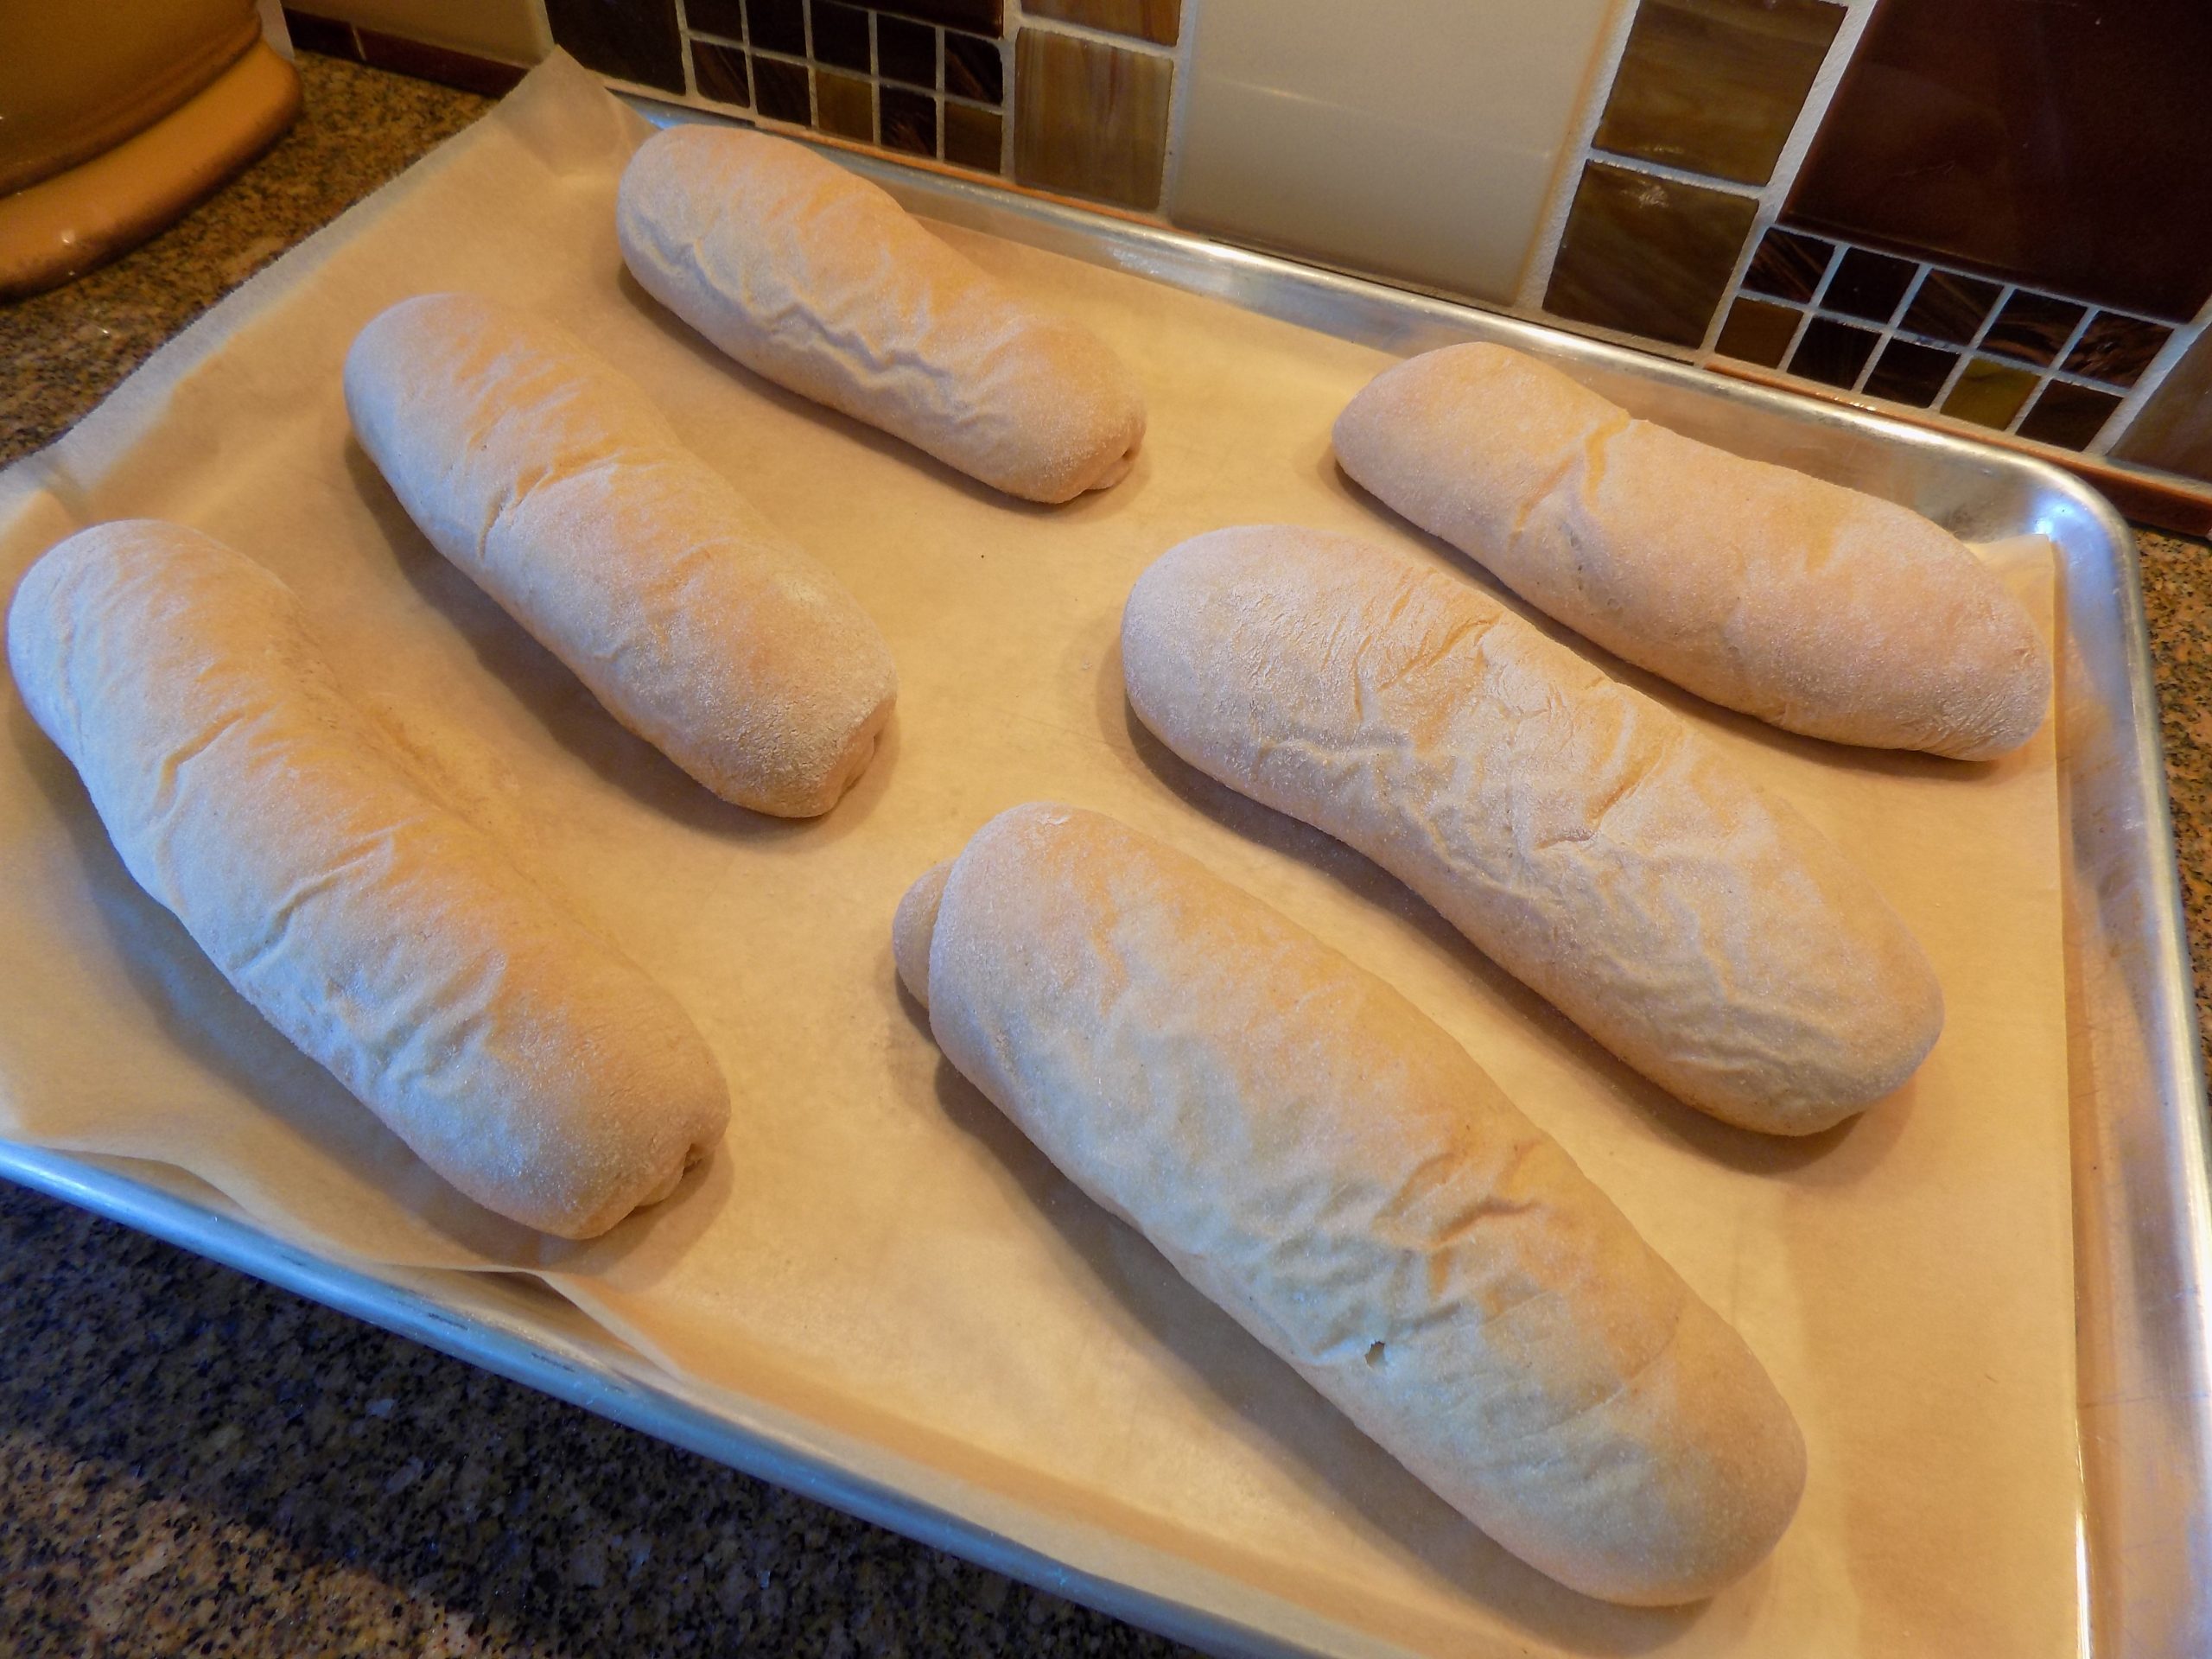
So, I know I have mentioned before that I am not a gourmet. I am just a gal who likes really great food. And I am not a food snob. I mean really, my favorite food is a bacon guacamole burger. So, that said, I definitely do not qualify for gourmet status! And for more proof positive, in addition to a truly great burger, I periodically get a yearning for a really good hotdog. Again, hardly a gourmet food. Except, and I mean this, when the hotdog is made by a specialty butcher shop. Then – all bets are off. But what I never have been able to find until yesterday, was a hotdog bun worthy of the quality hotdogs that are now available at most grocery stores. And yes, I am picky when it comes to both hamburger and hotdog buns. The buns should be tasty as well as able to contain all the meat and fillings while the juices run down my arms and off my elbows. (A condition I find usually happens when I am enjoying a really good burger or hotdog.)
So, in keeping with my new reality (whole wheat flour and reduced sugar) I modified a recipe that I found on the godairyfree.org. site.
And I have to say, this was one of the easiest bread products I have ever made. And the resulting hotdog buns were good enough to have eaten sans the hotdog. Of course, I didn’t, but the bun was just that delicious. And tender, and just the right size to keep my hotdog and extras (mayonnaise, dill pickle relish, ketchup, and old-fashioned yellow mustard) from escaping. This quick and easy to prepare bun simply made for one absolutely delicious hotdog experience.
So, if you too love a great hotdog then this is the bun for you. And sorry there is no picture of the dough made into hamburger buns. But after tasting the dough rolled into hotdog buns, I’m sure it won’t be long before I make hamburger buns. When that happens, I will edit this post and add a picture.
Until then, just trust me and make your own hamburger buns using this recipe. You will not be disappointed.
As always, have fun in your kitchen. There are so many fabulous recipes available on the internet. I can’t imagine ever going back to just having cookbooks. In fact, I haven’t looked at even one of the many cookbooks I own for such a long time it’s almost embarrassing. Because I own some really great cookbooks. Of course, some of them like my Betty Crocker cookbook are being held together with silver tape and stains from cooking incidents. But others are still in pristine condition. But I still keep them around because it’s like having good friends. You may not see them very often, but it’s reassuring to just know that they exist.
So, to all my good friends, I may have been a bit reclusive lately, but never wonder if you are still a part of my life. You absolutely are and always will be dear to my heart. I’m just getting older and slowing down a bit. Think of me like you would one of my cookbooks. On the shelf but always available when needed.
Peace and love to all.
1 c. lukewarm water
2 tsp. granulated sugar
2¼ tsp. or one pkg. instant yeast
1 tsp. fine sea salt
2 T. extra virgin olive oil, plus extra to grease the bowl
½ c. oat flour
2 T. vital wheat gluten*
2 c. whole wheat pastry flour or white whole wheat flour**
In the bowl of your stand mixer, combine the water, sugar, and yeast. Let sit and proof for about 5 minutes or until you start to see bubbles.
Add the salt, olive oil, oat flour, vital wheat gluten, and most of the whole wheat pastry flour to the yeast mixture.
Using your bread hook, knead the dough until it is soft, smooth, and elastic using as much additional flour as required.
Pour a bit of olive oil in the bowl, and using your hands and a plastic spatula, roll the dough into a lightly greased ball. Cover the bowl with a tea towel and let rise in a warm place until doubled, about 1 hour.
Lightly oil a baking sheet or line it with parchment paper.
Transfer the risen dough to a lightly floured surface and punch it down.
Cut the dough into 6 equal portions.
For hotdog buns:
On a lightly floured surface, roll out each portion into a flattened piece of dough about 5-inches long and 4-inches wide. Then tightly roll up the dough to form a cylinder. Tuck in the sides/edges and place each portion on the prepared baking sheet about 2-inches apart. Cover with a light tea towel and let rise until nearly doubled, about ½ hour.
Bake in a pre-heated 375-degree oven for 10-12 minutes or until the buns sound hollow when tapped on the bottom or until they reach 190-degrees when temperature taken with an instant-read thermometer. Do not overbake the rolls.
Remove from oven and transfer to a wire rack to cool completely before slicing.
For hamburger buns:
Shape each portion into a ball, then flatten slightly to form a bun. Transfer to the prepared baking sheet at least 2-inches apart. Cover with a light tea towel and let rise until nearly doubled, about ½ hour.
Bake in a pre-heated 375-degree oven for 10-12 minutes, or until the buns sound hollow when tapped on the bottom or until they reach 190-degrees when temperature taken with an instant-read thermometer. Do not overbake the rolls.
Remove from oven and transfer to a wire rack to cool completely before slicing.
*Vital wheat gluten
Any type of whole wheat flour (regular, pastry, or white) does not contain as much gluten as found in all-purpose flour. The protein boost provided by vital wheat gluten adds elasticity to bread dough made with whole wheat flour which results in a less dense product. So, when using any type of whole wheat flour exclusively in a recipe, a bit of vital wheat gluten is always a good idea.
**Whole wheat flour
Whole wheat pastry flour is milled from low-protein soft spring wheat, whereas regular whole wheat flour is milled from hard winter wheat.
Like regular whole wheat flour, whole wheat pastry and white whole wheat flour too are milled from whole wheat-berries. Unlike their refined counterpart (all-purpose flour), whole wheat flour is not devoid of the bran and germ making any type of whole wheat flour more nutritious than all-purpose flour. The only difference between white whole wheat or whole wheat pastry flour and regular whole wheat flour is simply in the type of wheat used. So yes, whole wheat pastry flour and white whole wheat flour are lighter in color than regular whole wheat flour. But they are not bleached. They are simply milled from a different type of wheat.
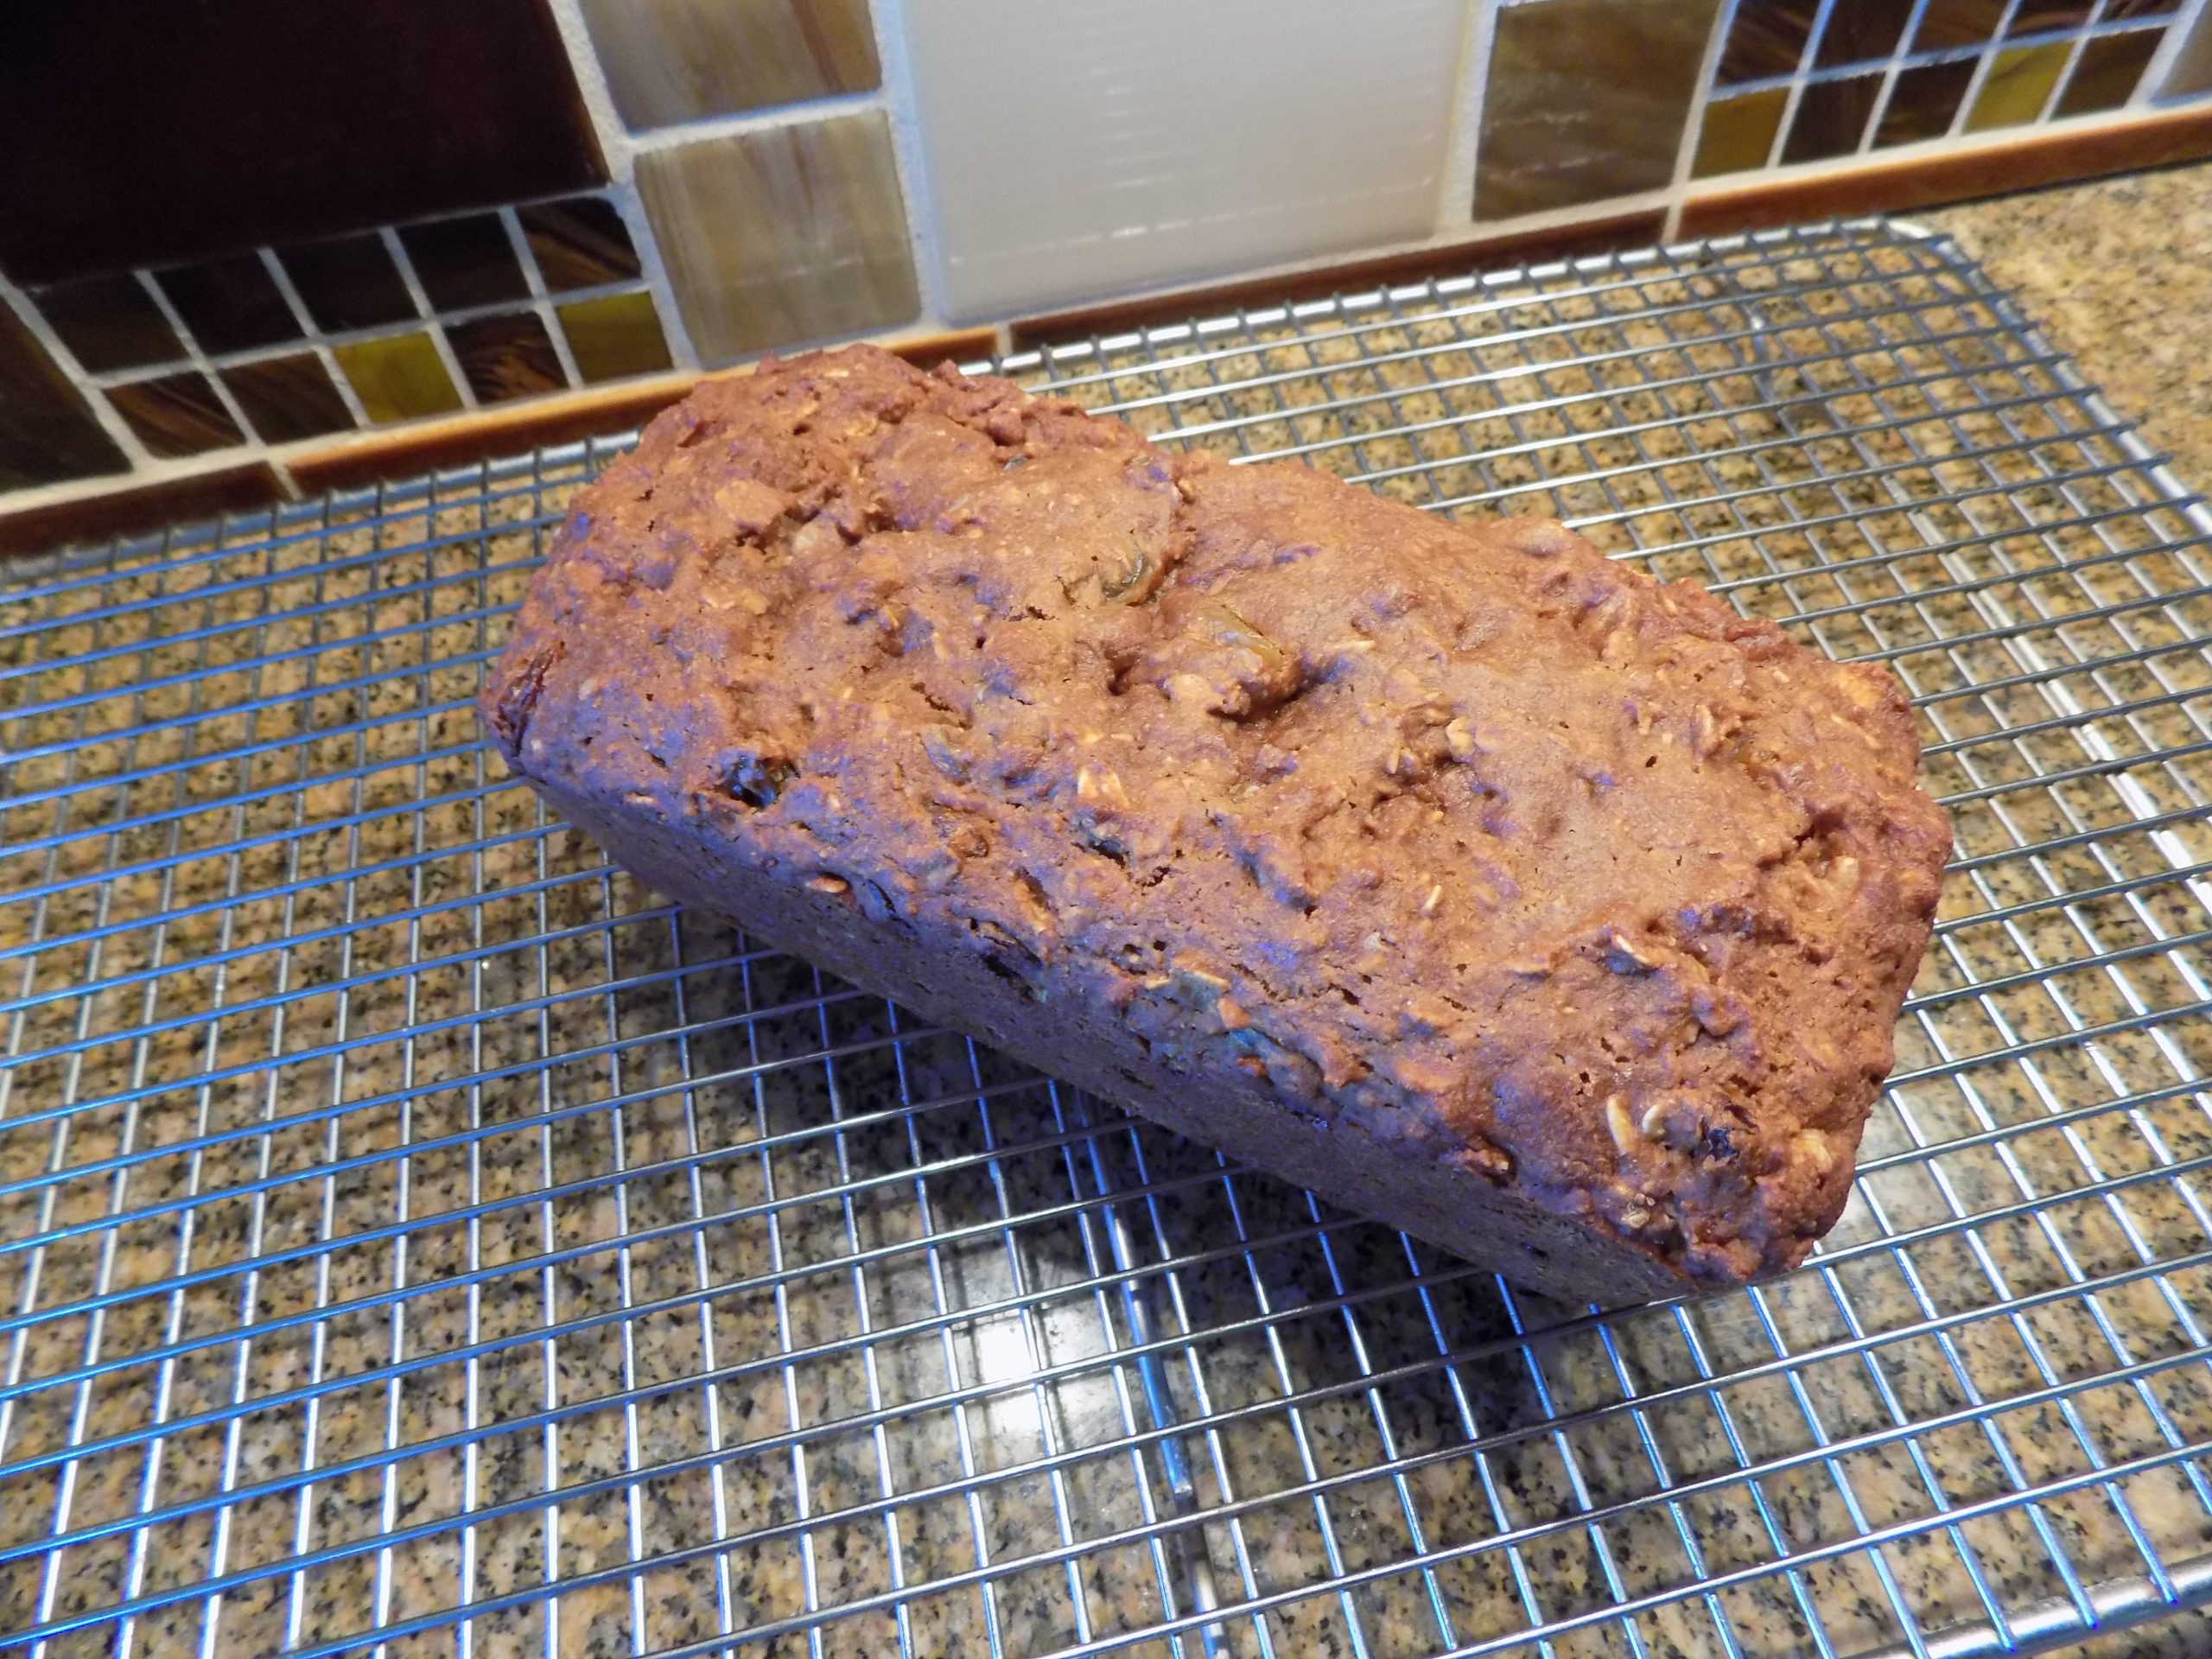
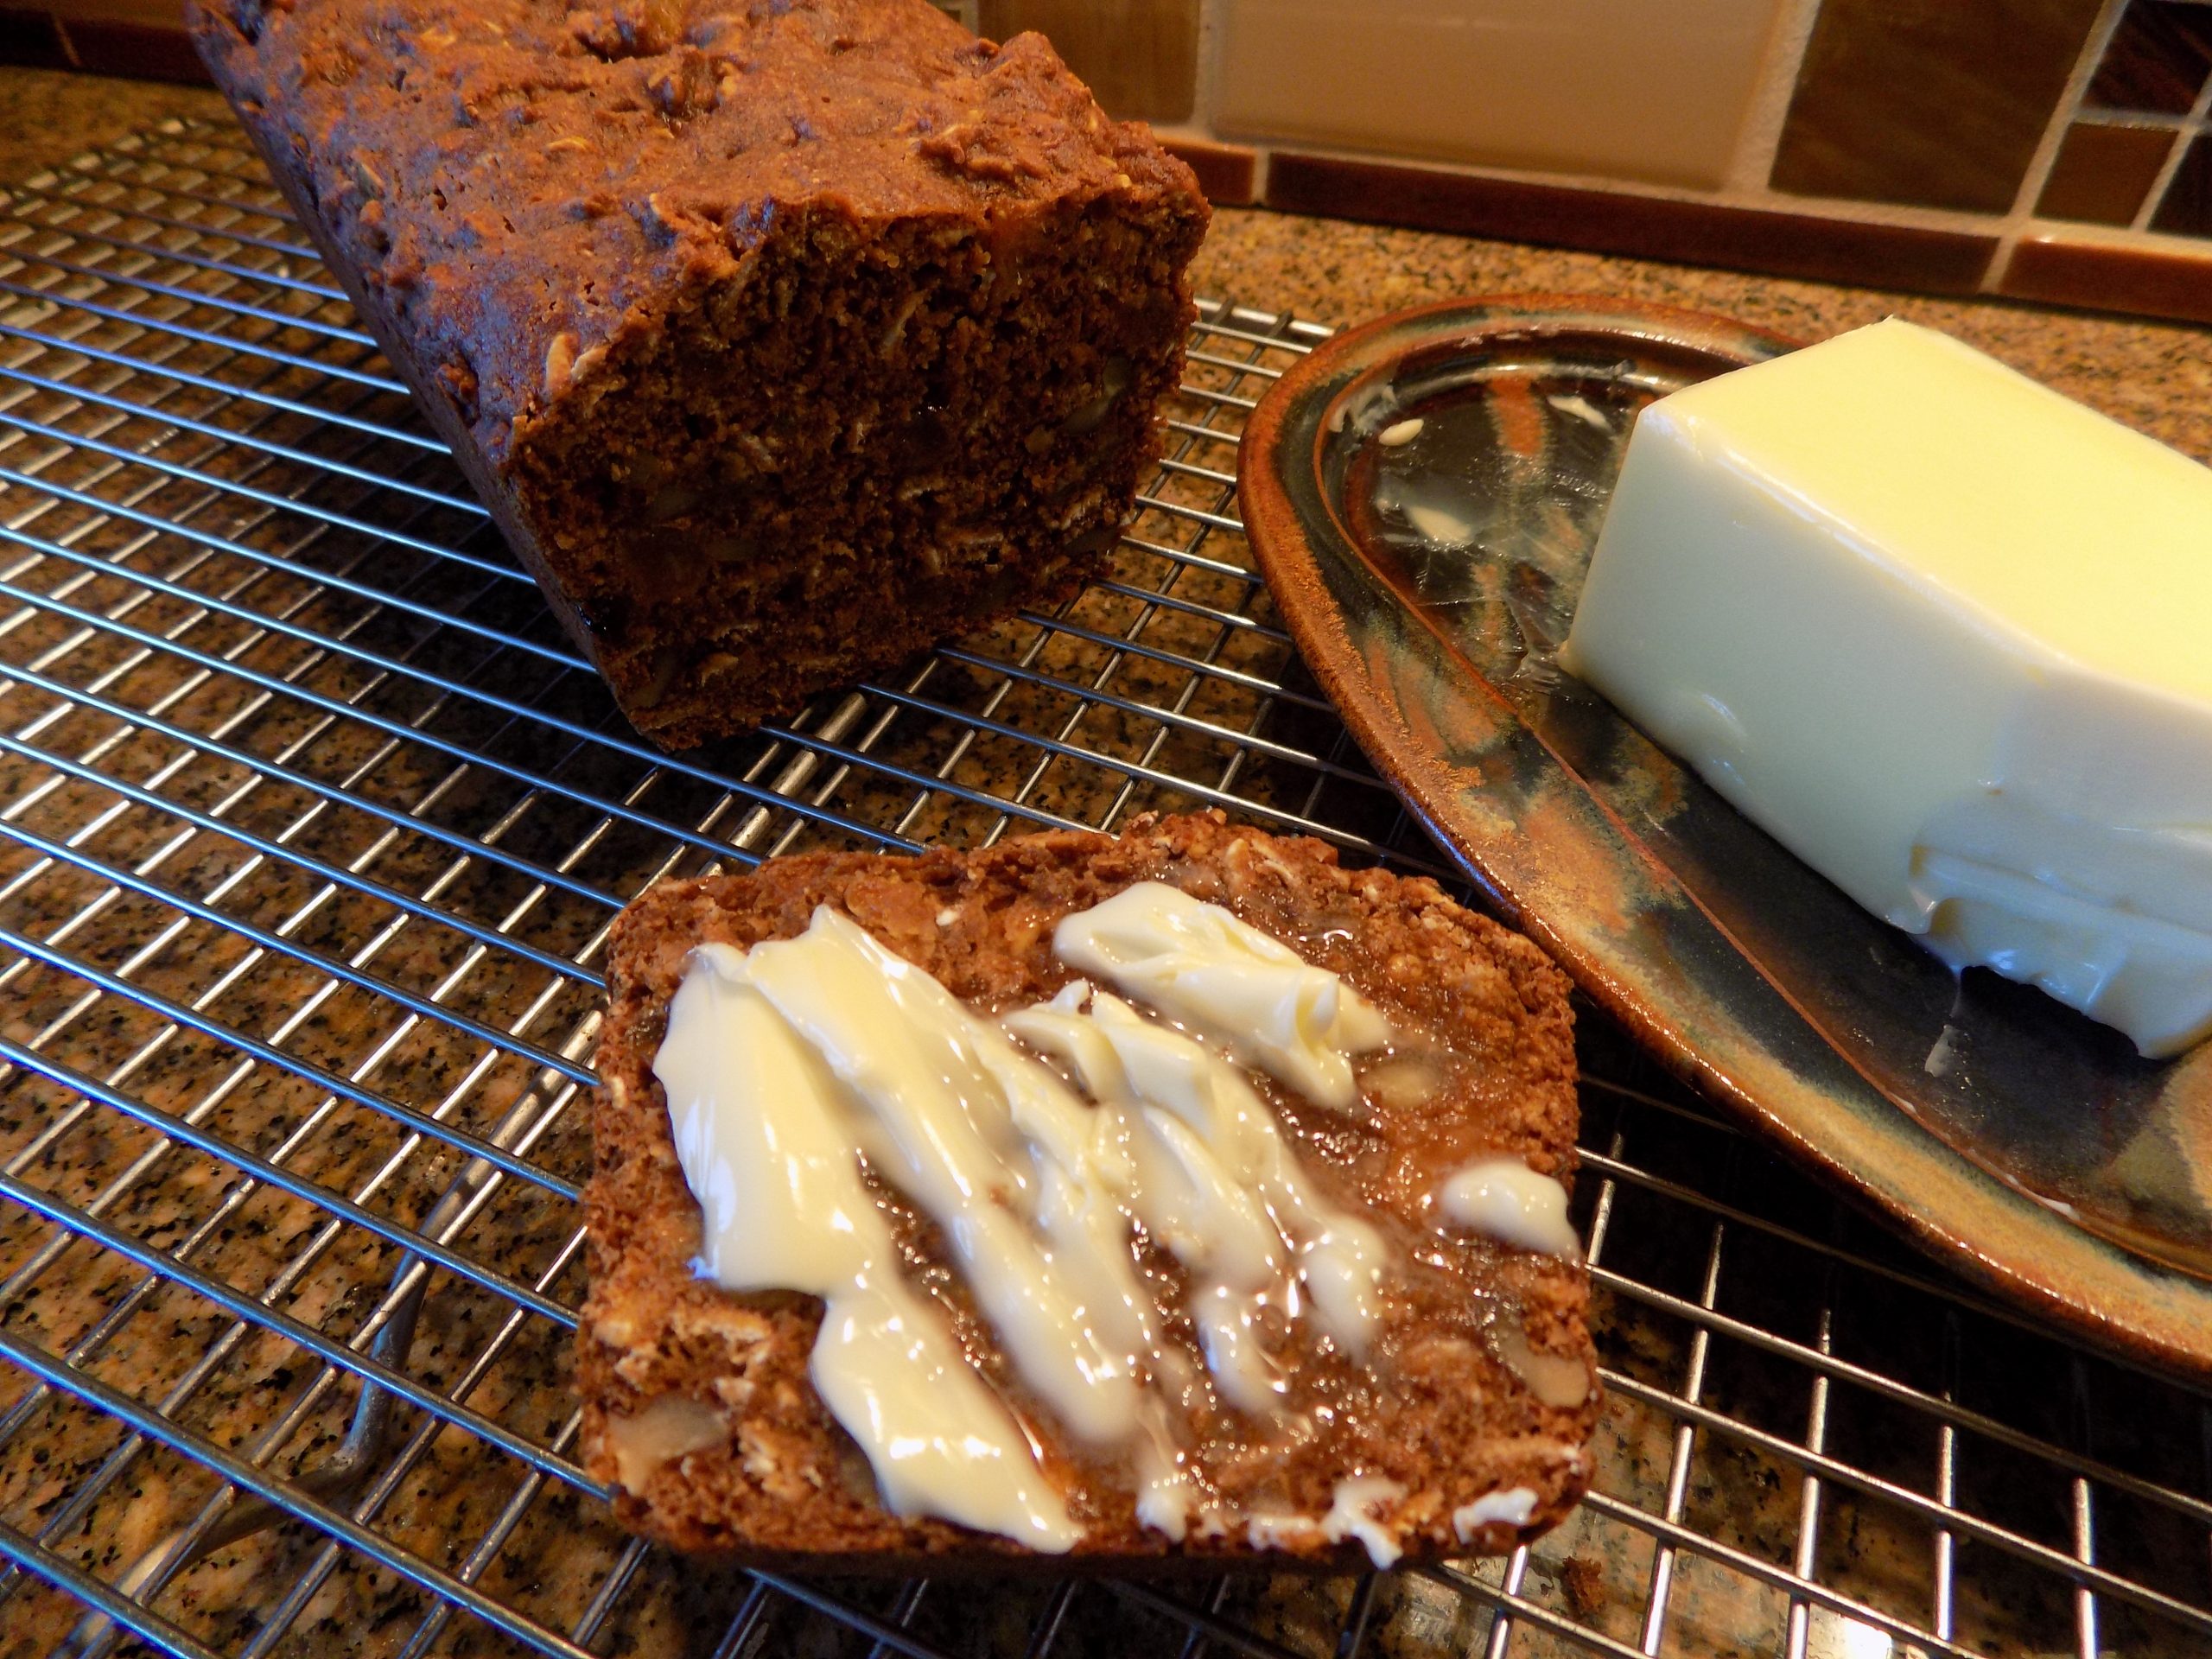
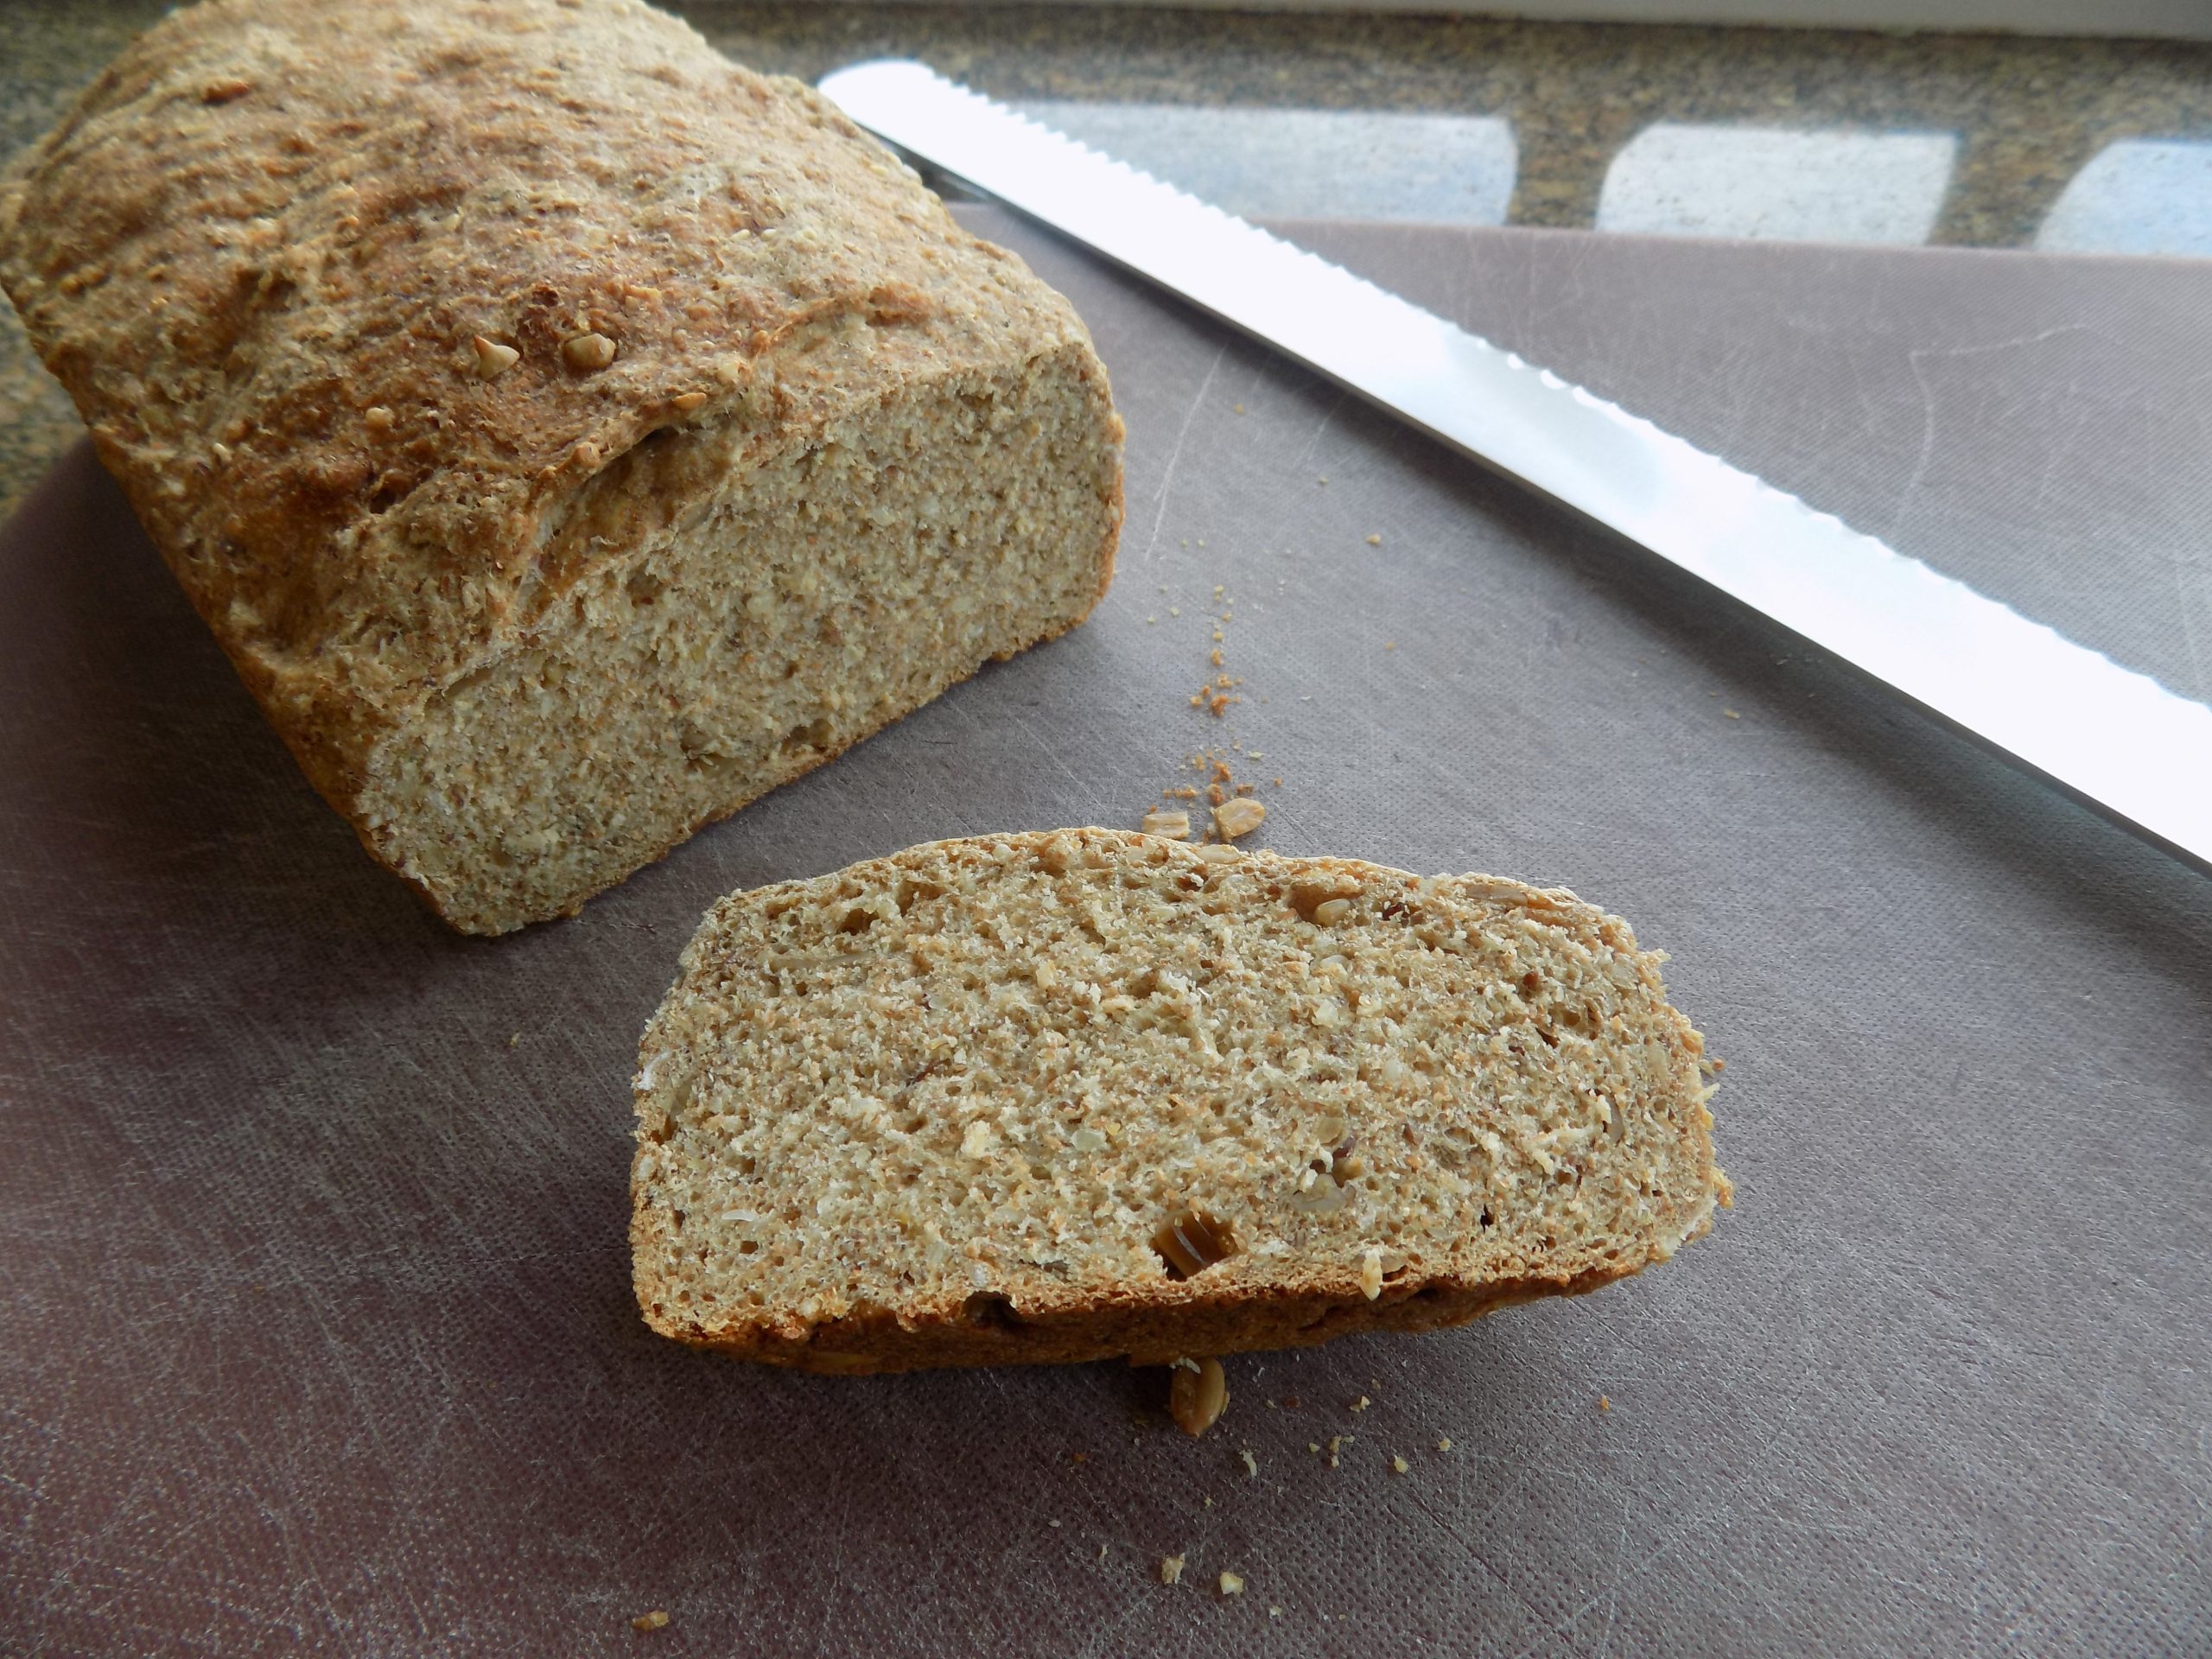
One of the two loaves I baked in my 8 x 4-inch loaf pans
If you are a Boston brown bread lover, then this recipe should be right up your alley. The only real difference in ingredients between this quick bread and Boston brown bread is in the use of rolled oats and wheat germ in place of cornmeal. And there is no steaming this bread. It goes in the oven just like any other quick bread.
In fact, this is one of the easiest breads you will ever have the pleasure of building. No mixer involved. And you only need to get one mixing bowl dirty in the process. Of course, there are measuring cups and spoons necessary for recipe integrity, but then there are always measuring implements involved in baking. Baking being the chemical changing “thing” that it is!
But truly, this is one of the easiest breads to fix. And one that your entire family will enjoy. I know this as a fact because this was my 4 children’s favorite breakfast bread. They loved it straight out of the oven or toasted the next morning. I used to make a triple batch and every bit of it was gone within 2 days.
Now I bet you are wondering where I got this recipe. And I would love to be able to provide you with that information. But I don’t have the foggiest idea. Maybe that’s because I have been making this bread since the mid-70s. And that my friends, was a long time ago. All I remember is that I added the wheat germ to the original recipe because I was adding wheat germ to any dish that I could. Meatloaf, cookies, bread, you name it. And of course, since I am now on a healthier food quest, I replaced the white flour called for in the original recipe with whole wheat pastry flour and the granulated sugar with coconut palm sugar. And as far as I can tell, there is no discernable difference in the flavor or texture of the bread. And it’s a bloody good thing, because there is no going back even though this was a fairly healthy bread to begin with!
And why I haven’t posted this recipe until now is anyone’s guess. (Actually, I thought I had already posted it, so if you stumble upon it as you peruse this site, please let me know.) (Oh, and please provide me with whatever name I gave it, or I won’t be able to find it a second time. And yes, thank you, I am feeling every one of my 78 years!)
Well, that’s it for today. It’s Friday again and I’m not quite sure how that happened so quickly. Time just seems to be passing at warp speed. I remember hearing older people talk about this very thing when I was younger. And thinking that they were crazy. Now, that I am in the category of being an “older person”, I realize I was the one who was crazy. Time really does fly by when you get older. I’ve kind of always wondered how that works. But I’m too lazy now to do the research required to prove that it actually happens. Of course, I don’t really have to do any research. Einstein got there before me. In the Special Theory of Relativity, Einstein determined that time is relative—in other words, the rate at which time passes depends on your frame of reference. So, I’ve decided that people’s point of reference changes according to their age. I’m sure if Mr. Einstein were still around, he would thank me for that little bit of extra enlightenment.
As always, take the time to have fun. Laugh a lot and often. And seek positivity in others as well as in yourself. We are only here for a very short time. Make the most of the time you have.
Peace and love to all.
1 c. whole wheat pastry flour or regular whole wheat flour
1 c. rye flour
2 T. wheat germ* or wheat bran** (your choice)
1 tsp. baking powder
1 tsp. baking soda
1 tsp. kosher salt
¼ c. coconut palm sugar (granulated sugar can be used if preferred)
1 c. rolled oats
½ c. regular molasses***
1¼ c. buttermilk
1 c. golden raisins
¾ c. chopped walnuts
Combine flours, wheat germ or bran, baking powder, baking soda, salt, coconut sugar, and rolled oats in a large mixing bowl. Gradually stir in the molasses and buttermilk. Then stir in the golden raisins and chopped walnuts. Scoop into a greased loaf pan or pans. Let stand at room temperature for 20 minutes.
Please note: Non-stick pans are best for this recipe.
Bake in a pre-heated 350-degree oven for 1 hour (single loaf pan 9×5-inch) or 40 minutes for 2 8×4-inch loaf pans. A toothpick will come out clean when stuck in the middle of a loaf when the bread is done baking.
Remove from oven and let cool for 10 or so minutes before removing from pan.
Great slathered with butter at breakfast or as a afternoon treat with coffee or tea.
*Wheat Germ
According to healthline.com “Wheat germ has excellent nutritional value as a food supplement, experts say. It’s a great source of vegetable proteins, along with fiber and healthy fats. It’s also a good source of magnesium, zinc, thiamin, folate, potassium, and phosphorus.
Wheat germ is part of a wheat kernel and is responsible for helping the plant reproduce and spawn new wheat. Although it’s removed from most processed wheat products, it is a major nutritional component of whole grain wheat.”
From thehealthsite.com “8 amazing health benefits of wheat germ:
Relieves constipation
Boosts immune system
Lowers blood sugar
If diabetics are skeptical about wheat germ, here is something to convince you otherwise. We already know that this food by product has a high content of dietary fiber. And this can help reduce postprandial blood glucose response. Making whole grains a part of your diet can even help you prevent type 2 diabetes.
Improves cardiovascular health
Reduces cancer risk
Soothes PMS symptoms and improves menstrual health
Fights obesity
Supplies your gut with prebiotics”
**Wheat Bran
According to Bob’s Red Mill “Technically speaking, the wheat kernel has three distinct parts: the germ, the bran and the endosperm. The hard exterior of the kernel is known as the wheat bran, and it is often separated from the other parts of the wheat kernel during the milling process. It’s a source of plant-based nutrients and minerals, and it has both a sweet and nutty flavor. However, wheat bran is perhaps best known as being an amazing source of fiber.”
Wheat germ, however, is richer in protein and packed with important nutrients including vitamin E, vitamin B, and fatty alcohols. In comparison, wheat bran is richer in fiber, three times that of the wheat germ and has more niacin.
***People with diabetes can eat small amounts of molasses as part of an overall healthy diet. According to the American Diabetes Association, the amount of carbohydrate consumed has a greater impact on blood sugar than does the type of carbohydrate consumed — in this case, molasses. If you choose to consume added sugar, whether from molasses or another source, the ADA advises reducing other carbohydrates in the meal so that your total carbohydrate consumption remains in check. For example, if you plan to have a dessert made with molasses after dinner, you might omit the rice or bread from the meal.
Also, from what I have read, offsetting sugar intake with high amounts of fiber is a good plan. And this bread has tons of fiber. So, as an occasional treat, this bread should be OK.
In my quest to eat healthier and stay away from white flour and sugar, I have been doing pretty well. But the main thing I miss is not sweets, it’s bread. Good old fashioned homemade bread. You know, the kind that smells wonderful as it’s baking and tastes even better when slathered in room temperature butter. Bread is totally my downfall. I simply must have bread in my life. So, after doing more research than I care to admit to, I have come to the conclusion that no two diabetic experts agree on mostly anything! Every article I read is a contradiction. Some experts say you can eat this or that, and the next article I read says just the opposite. Although almost every article I read says I can continue to eat leafy greens, fatty fish, eggs, Greek yogurt, nuts, and olive oil. Great! I love them all. But they aren’t bread!
However, another type of edible most articles reference as being good for diabetics are under the classification – whole grain. So, to my thinking, that means that stone-ground whole grain flours (oat, wheat, rye) should be OK. So, I’m going with that.
Now you realize, I am not going to sit down and eat a half loaf and think that’s OK. That would be ridiculous. But a piece of whole grain toast in the morning along with my eggs, homemade granola (lots of oats, nuts, seeds, dried fruit, etc.), fresh fruit, and Greek yogurt should be just fine.
So, as I work out new bread recipes like this one, I will keep you posted. And since I let my old sourdough starter die an honorable death a few months ago, I decided to start a new one without even a teaspoon of white flour to its name. I plan to use this sourdough starter using rye flour in all my future sourdough bread recipes.
And if it gives my other recipes as wonderful and tangy a sourdough flavor as it did with this recipe, I may give up writing this lucrative food blog and start my own bakery. Because this bread is absolutely delicious with all the tang we all so desperately need in our lives. (It must be that the local bacteria are especially fond of rye flour.) Who knows, and more importantly, who cares? It works, that all that matters.
Well, that’s it for now. It’s sunny and warm here on the island. With just enough breeze to allow us to sit outside. Which is just exactly what Mr. C. is doing. I plan to join him shortly.
Peace and love and happy summer to all.
Mr. C. enjoying our courtyard in the late afternoon sun (and shade).
1 c. rye sourdough starter, room temperature (see recipe for rye starter below)
1½ c. stone-ground dark rye flour
1 c. slightly warm water
2 tsp. active dry yeast
1½ – 2 c. stone-ground whole-wheat flour
1½ tsp. kosher salt
2 T. honey
olive oil
Day 1:
Combine room temperature starter, rye flour, and water in the bowl of your stand mixer. Cover with plastic wrap and let stand on your counter overnight.
Day 2:
Add the active dry yeast, one cup of the whole wheat flour, salt, and honey to the bowl and using your dough hook, beat the mixture until the dough comes together. Knead for several minutes until the dough is smooth and springy. Add the rest of the whole wheat flour, a tablespoon or two at a time during the kneading process as necessary to reduce excess stickiness. However, this dough should remain somewhat tacky. There should be a bit of the dough that wants to stick to the bottom of the bowl.
Pour a little oil over the dough, the using your hands and a stiff rubber spatula, roll the dough into a lightly greased ball. Cover with plastic wrap and let rise about 60-90 minutes in a warm place or until doubled in size. (When you think it has risen enough, use your finger to make a small dent in the dough near the side of the bowl. If the dent remains, the bread is ready for Baking Option 1 or 2.)
Baking option 1: Baking your bread on a baking stone or greased baking sheet
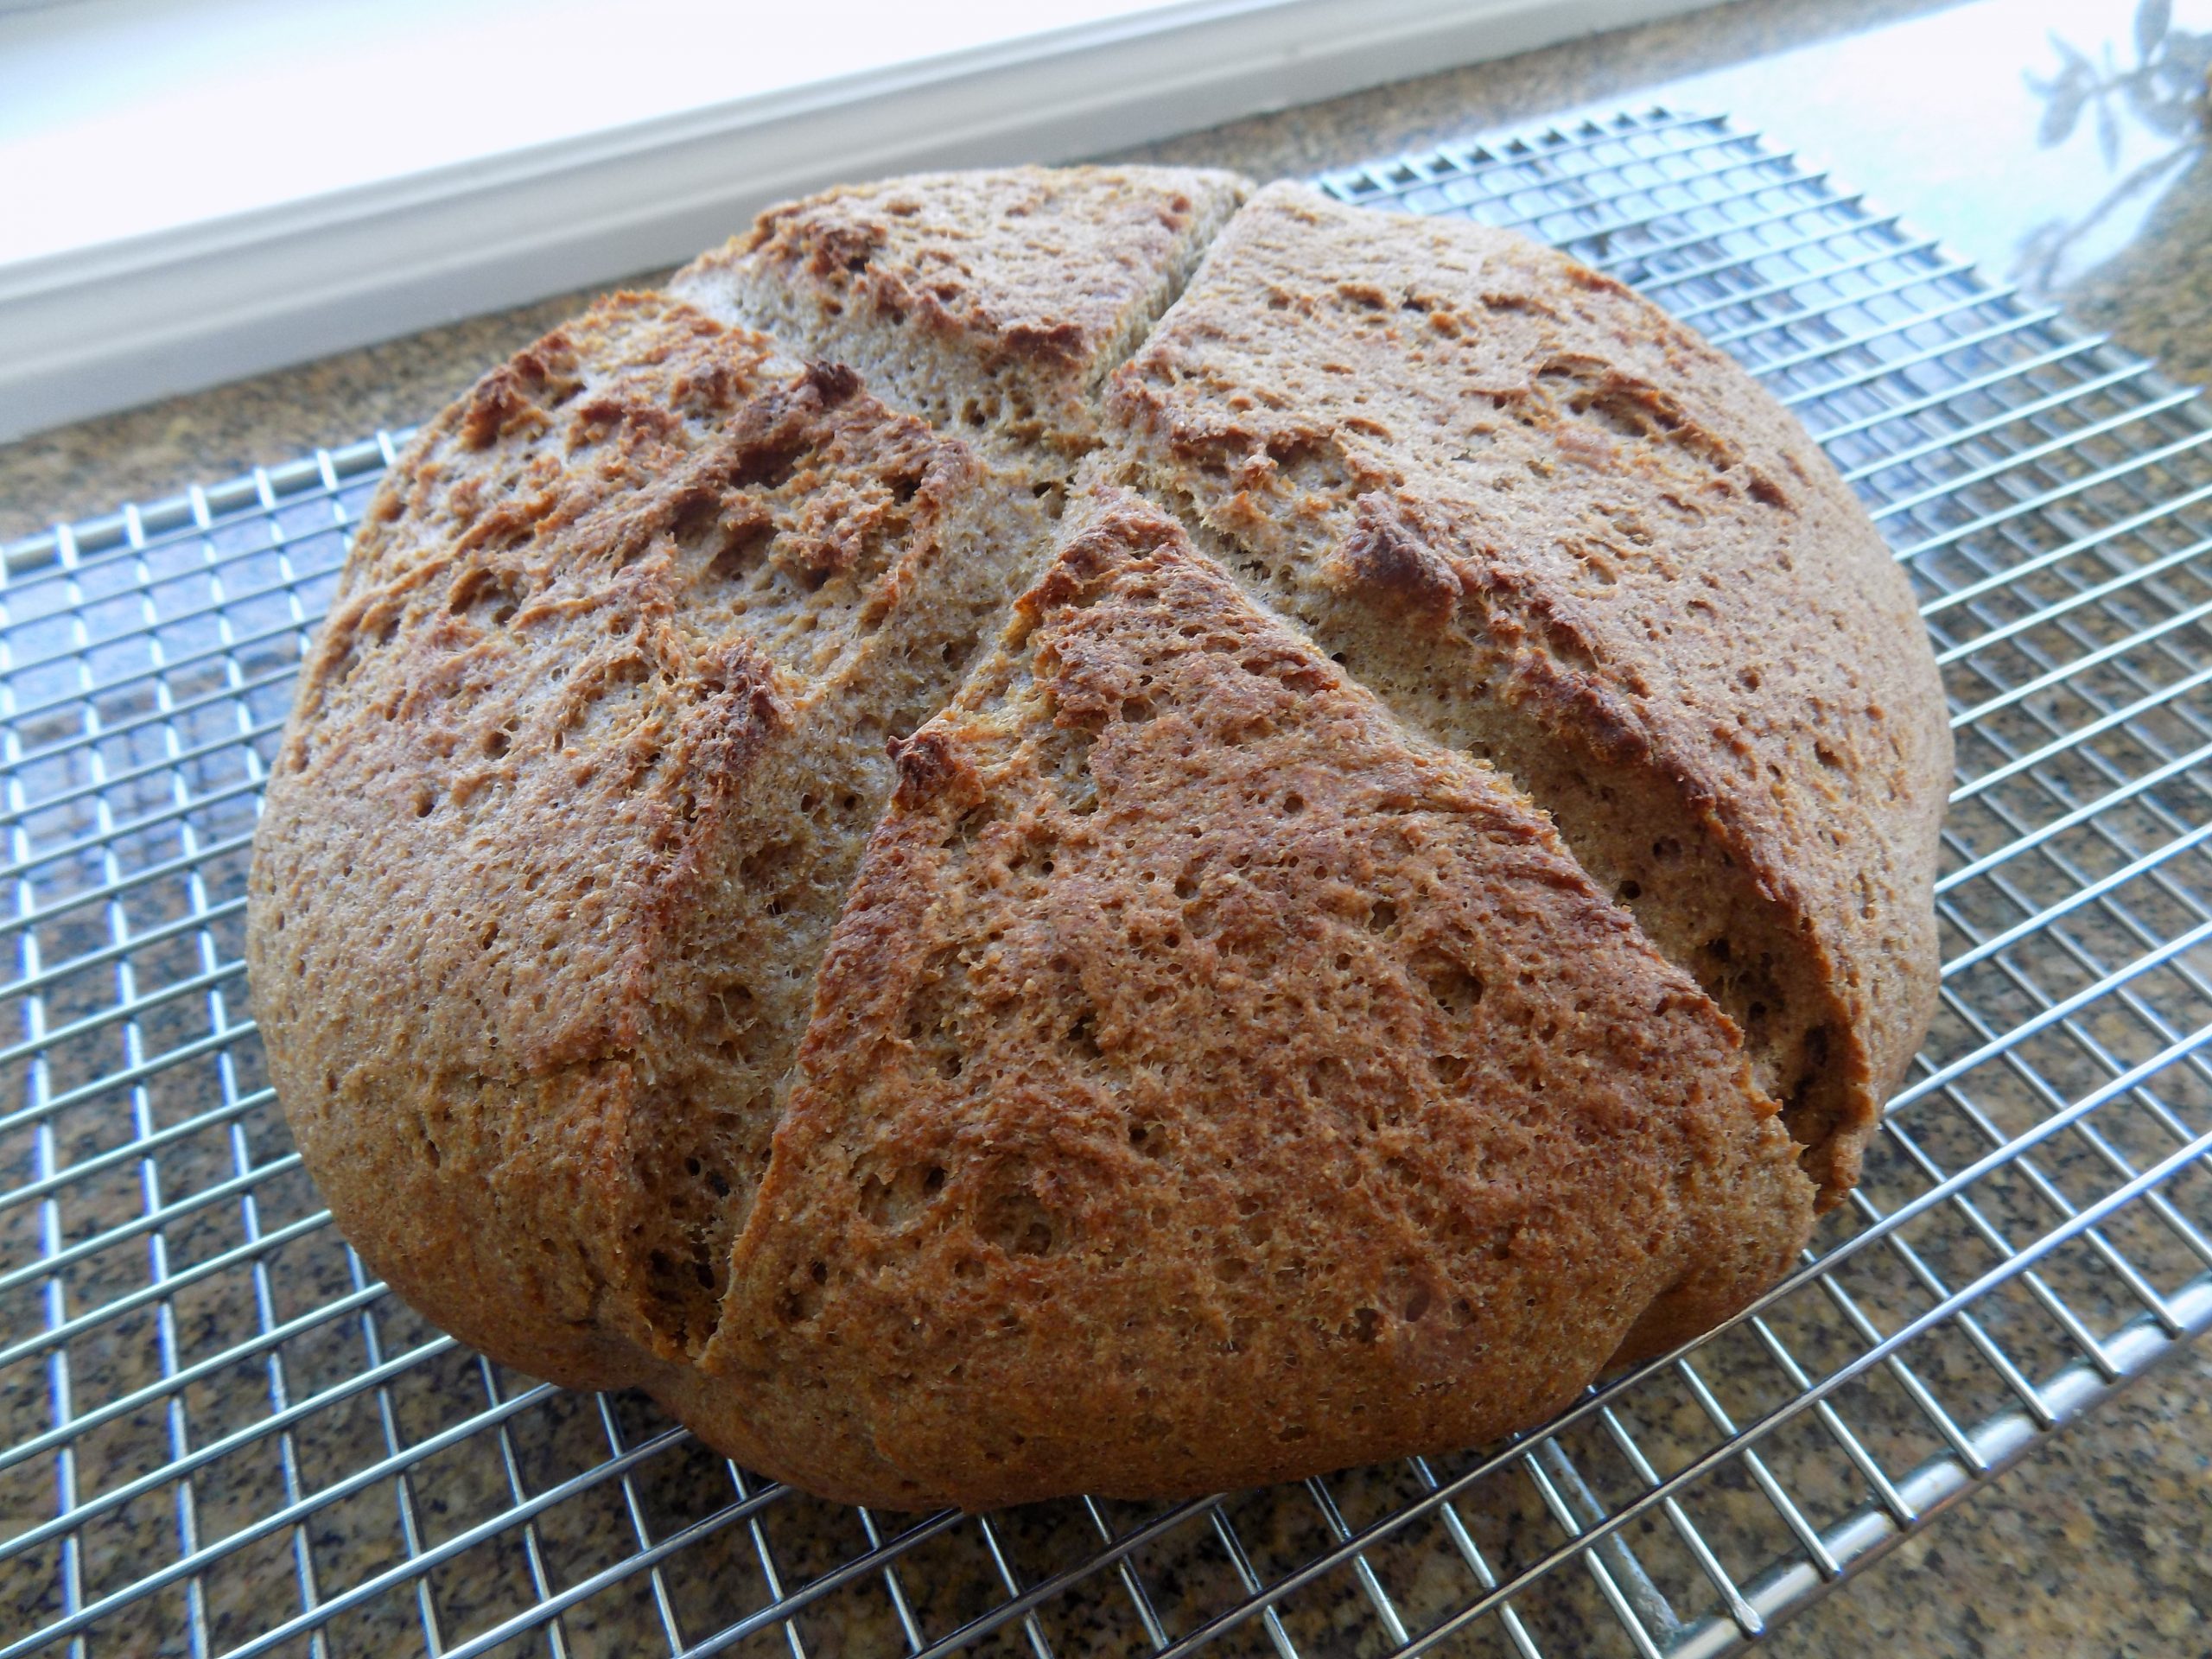
Punch down dough to release air; shape into a round loaf (boule) or an oval (batard). Place on a baking stone lightly sprinkled with flour or cornmeal or a greased baking sheet. Lightly cover with a tea towel and allow to rise about 30 minutes until almost doubled.
When ready to bake, cut 2-3 deep slashes on top of loaf. Let sit for 5 minutes, then lightly mist with water. Bake in a pre-heated 425 oven for 10 minutes. Reduce the oven heat to 400 degrees and bake another 20-25 minutes or until loaf is browned and sounds hollow when tapped on the bottom. The internal temperature of the bread should be about 205 degrees before it is removed from the oven. Let cool completely on a wire rack before slicing.
Baking option 2: Baking your bread in a clay baker (Cloche)or Dutch oven
Punch down dough to release air; shape into a round loaf (boule) and place on a rectangle of parchment paper. Lightly cover with a tea towel and allow to rise about 30 minutes until almost doubled.
Meanwhile pre-heat your oven to 425 degrees with your clay baker or Dutch oven inside. You want to heat the clay baker or Dutch oven as the oven heats.
When ready to bake, cut 2-4 deep slashes on top of boule. Let sit for 5 minutes. Carefully remove the clay baker or Dutch oven from your oven and take the lid off. Gently pick up the dough using the corners of the parchment paper. Lower the dough onto the clay baker or into the Dutch oven and replace the hot lid. Place in the oven and bake covered for 25 minutes. (I have found that if I use my clay baker, I first set it on a baking pan. It is much easier and safer to lift in and out of the oven, rather than just lifting the clay baker itself. You don’t have to do it my way, but it works well for me.) (For this recipe, I actually prefer my clay baker over my Dutch oven because the bottom doesn’t get as dark when baked on the clay baker.)
After 25 minutes carefully remove the lid and continue baking for about 15 more minutes. The internal temperature should be about 205 degrees when the bread is removed from the oven.
Carefully lift the bread off of the clay baker or out of the Dutch oven. Place on a wire rack and let cool completely before slicing.
RYE FLOUR SOURDOUGH STARTER
1½ c. water
2½ tsp. active dry yeast
2 c. rye flour
In a large glass container, dissolve the yeast in warm water. Let stand 5 minutes. Add the rye flour; stir. Cover loosely with plastic wrap. Let stand in warm place for 2 to 3 days. Stir twice each day.
The starter can be used for baking at this point or placed in the refrigerator for later use.
To use the starter, measure out desired amounts as specified in the recipe. Let refrigerated starter come to room temperature before using; this will take about 4 hours.
Replenish remaining starter with 3 parts rye flour to 2 parts water and 1 teaspoon sugar. Stir until blended. Some lumps may remain.
Cover loosely and let stand in warm place for 10 to 12 hours or overnight. Stir and store in refrigerator. If the starter is not used every week, stir in 1 teaspoon sugar to keep it active. Or replace used starter with equal parts rye flour, water, and a pinch of sugar.
Please note: This starter is a lot thicker than most sourdough starters. So, don’t be surprised if you don’t need quite as much flour as directed in other recipes.
I found the bones of this recipe on the food.com site. I modified the recipe by replacing shortening with unsalted butter and used buttermilk instead of milk. The reason I made the changes is because I grew up on a farm which included a couple of milk cows. My grandmother churned our butter and therefore we had both fabulous unsalted butter and buttermilk in abundance. So, that’s what I watched being used in biscuits by both my mom and my grandmother when I was a child.
The original recipe for rye biscuits posted on the food.com site by Chocolatl first appeared in print in 1908. Chocolatl writes “This is one of a number of historical recipes I am posting from my cookbook collection. This recipe is adapted from the Rumford Complete Cookbook. At the time this recipe was first published, ovens did not have heat regulators, so recipes specified only “hot,” “moderate” or “slow/cool” temperatures. This recipe is also unusual in that it calls for a small egg. Rumford Baking Powder is still being made, by the same company that makes Clabber Girl.”
Since lard was the most common form of shortening until around 1911, I would have thought lard would have been called for in the original recipe. And I’m sure lard would be great in this recipe, but I don’t always have lard on hand. And I’m willing to bet you don’t either.
So, I question the use of “shortening” and “regular milk” in the original recipe. Plus, if you churned your own butter, like many women did in 1908, I bet using the buttermilk to make biscuits was a great way of getting rid of it. I know we always had a small pitcher of buttermilk in our refrigerator. And none of us kids were eager to drink it. In fact, we wouldn’t touch the stuff! So, let there be buttermilk biscuits. (We ate a lot of baking powder biscuits when I was a kid.) (I am not complaining!)
OK, I’ve told you about the ingredients, and why I made the changes I did, now I need to tell you how amazingly easy these biscuits are to prepare, and how fantastic they taste. They are one of the best tasting biscuits I have ever eaten. And they use whole grain rye flour, only a small amount of fat, and absolutely no sugar. Praise God!
For more information about rye flour, see below.
So, if you too love biscuits and are trying to stay away from white flour, sugar, and a lot of fat, these are the biscuits for you. And just so you know, these biscuits are great warmed up and served alongside your breakfast bacon and eggs.
As always, peace and love to all.
2 c. whole grain rye flour – I use Bluebird Grain Farms (Winthrop, Washington) organic Heritage Rye Flour
½ tsp. kosher salt
4 tsp. baking powder
2 T. cold unsalted butter, cut into tiny pieces
1 sm. egg
¾ c. buttermilk
Whisk the flour, baking powder, and salt together. Add the butter and “mix” it in by pinching the small butter pieces between your fingers until most of the butter is smushed into the flour. (Or until you can’t stand playing with your food any longer!)
Whisk the egg and buttermilk together then pour it over the flour mixture. Mix just until combined.
Roll out on a lightly floured board and cut into 8-10 biscuit shapes. Place on a lightly greased baking sheet. Or do what I do. Using a #16 (scant ¼ cup) ice cream scoop, drop level balls of dough on your lightly greased baking sheet. (You should get 10 balls.) Then using a small water glass dipped in a bit of flour, flatten the biscuits slightly.
Bake in a pre-heated 425-degree oven until the bottom of each biscuit is nicely browned, about 15 minutes. Don’t over-bake. Remove from oven and transfer to a wire rack.
Great right out of the oven or lightly warmed in your microwave or toaster oven. Perfect spread with butter and jam or my personal favorite – peanut butter.
The benefits of using rye flour (besides the flavor of course)
Rye contains a myriad of core vitamins and minerals such as potassium and manganese. Moreover, rye has a lower gluten content than wheat, which makes baked goods containing rye flour ideal for those who want to lower the gluten content in the baked goods they consume. In addition, products made with rye flour also make you feel fuller and have less of an impact on blood sugar levels than when white flour is used.
For example, rye bread has a lower glycemic index (48) than wheat bread (70). As you know, the lower the index, the better it is for your health. Because, after the consumption of lower glycemic index food, there is less of a chance of a rapid increase in your blood glucose level. This is especially beneficial for diabetic and obese individuals.
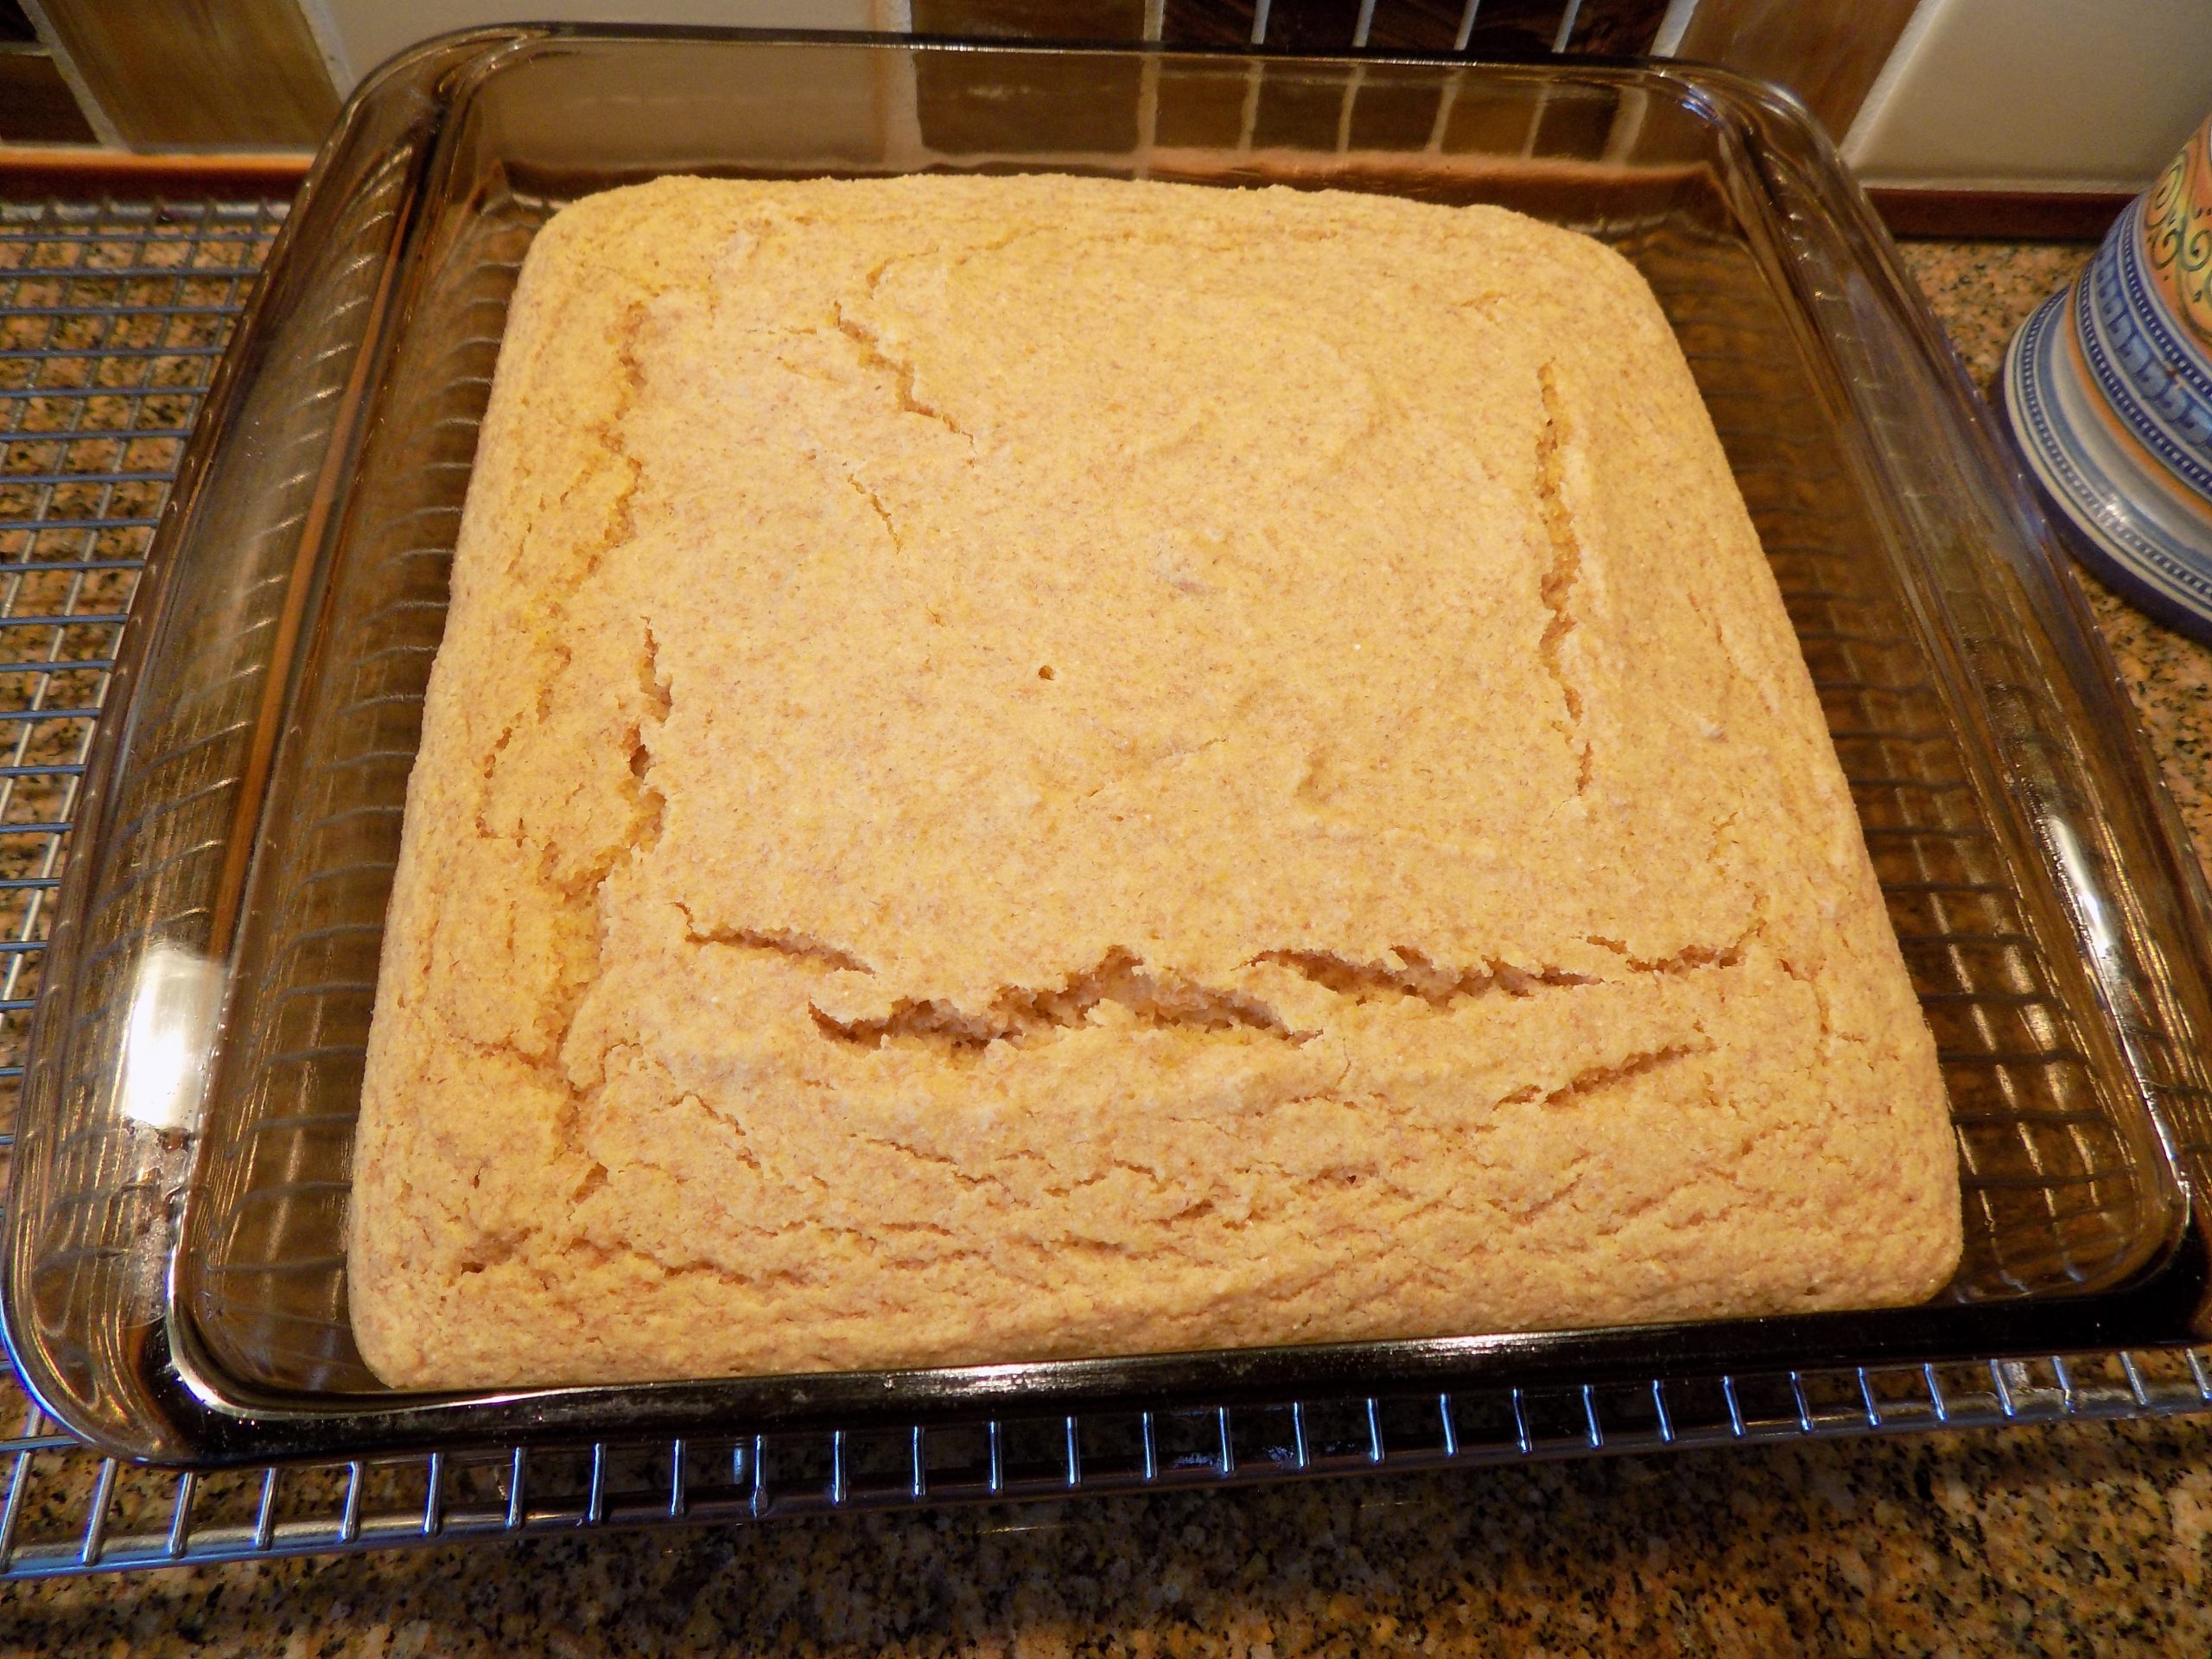
Well, by now you are probably tired of me posting cornbread recipes. But cornbread like this one, I can consume in moderation when paired with other foods that are high in fiber and protein.
So, the other night when I served ribs and salad along with this cornbread, I was fine. And this recipe that contains no added sugar and features rye flour, produces a cornbread that is just about as perfect for my restricted diet as cornbread can get. And it tastes absolutely great. Moist and savory, without the slightest hint of depravation. So, thank you kneadingconference.com for the bones of this recipe. I made a few changes because they worked better for me. But the main concept was all on Amy.
Now granted, this cornbread is not low in calories. But calories are not my greatest concern. My personal gremlins are sugar and white flour. So, anytime I can create a bread or goody with no white flour and a no or dramatically reduced sugar content, I am a happy camper. Especially if the recipe can also be of profit to my readers. Because as I am quickly learning, I am not alone in my quest to eat healthier and learn how to embrace life within the confines of necessary dietary restrictions.
But don’t get me wrong. I refuse to eat junk. And over the last few months I have prepared enough recipes using “alternative ingredients” to feed a family of four for a week. And some of it has gone in our yard waste barrel. Products like monk fruit sweetener when used 1 to 1 in place of granulated sugar, in my humble opinion, is horrible. Too, too sweet with a bitter aftertaste. However, when used in very small quantities, monk fruit sweetener is just fine.
So, as I continue to experiment with alternative ingredients, I will share the recipes that work with you. The dishes that I wouldn’t even feed to certain radical, greedy, and depraved politicians and journalists, I will continue to, in all good conscience, personally place in our yard waste barrel! Where incidentally, these forgettable dishes truly belong! (Right along with the aforementioned politicians and journalists I dare say!)
As always, peace and love to all. (With the exception of the aforementioned politicians and journalists, that is!)
2 c. fine to medium ground cornmeal
1 c. rye flour
1 T. baking powder
1/2 tsp. baking soda
1 tsp. kosher salt
1/2 c. (1 stick) + 1 T. unsalted butter, divided
3/4 c. whole milk
1/2 c. buttermilk
1/2 c. sour cream
2 eggs
Place a 10-inch cast iron or oven proof skillet in your oven. Pre-heat the oven (plus pan) to 425-degrees. While the oven is doing its magic, whisk the cornmeal, rye flour, baking powder, baking soda, and salt together in a small bowl.
In a large glass mixing bowl, melt the 1 stick of butter in your microwave. Then whisk in the whole milk, buttermilk, sour cream, and eggs. Stir the dry ingredients into the wet ingredients just until blended.
Let the batter rest for 15 minutes. (This is an important step. Time allows the flours to absorb the liquids.)
Carefully remove the hot pan from the oven. Allow the remaining 1 tablespoon of butter to melt in the hot pan. Using a heat proof implement, coat the pan with the melted butter.
Scoop the thick batter into the pan and level the batter off as best you can.
Bake for about 25 minutes or until the cornbread feels set to the touch and cracks appear on the surface.
OK, I am without a doubt, a member of the vast horde who truly love bread. One of those people for whom the term “daily bread” has a literal meaning. Because not a day goes by that my taste buds don’t insist upon a piece of toast or half an English muffin or bagel with breakfast. Or a couple of baguette slices with soup, or at the very least, SOME KIND OF BREAD LIKE PRODUCT somewhere along the way during the day! Face it, I’m hooked. So, there is no way I want to live the rest of my life bread free. But life has thrown me a hard ball, and I must adjust.
So, being the cantankerous (derived from contentious plus rancorous) old stinker that I am, I’ve decided to fight for my rights. And in doing so, I’m going to take you right along with me. (Now, aren’t you the lucky one!) Because what is life without the things that bring us the most pleasure. And for me, bread is one of those things! Period. End of report.
Yesterday I baked bread using the slammed together recipe you find below. I threw in every healthy ingredient I could think of, used only whole wheat flour, and sweetened the whole mess with monk fruit sweetener. And the bread turned out just fine. It has a nice nutty flavor, great texture, and perfect for my morning toasted bread fix.
So, if you too are trying to eat healthier, but like me refuse to give up the kinds of food you love, give this bread recipe a try.
As always, have fun in your kitchen. But as with all of us, there comes a time when better judgement must prevail. I’ve never been one to deny myself good food, but if I want to keep staying healthy, I need to adapt some of my favorite recipes to accommodate the changes happening to my body. And boy oh boy are they happening at a rapid rate! And time seems to be going by so darn quickly. These days a year seems to go by in, like, 6-7 months! Maybe I just missed the memo that informed us that days were being shortened and time sped up. If so, I must have been in the kitchen. Probably baking cookies. As the old saying goes “if life throws you lemons, make lemonade”. If I shouldn’t eat white flour or sugar any longer, bring on the whole wheat flour and the monk fruit sweetener!
Peace and love to all.
1½ c. warm water
⅓ c. powdered milk
1 T. instant yeast
2 T. extra virgin olive oil, plus more for greasing the bowl
2 T. monk fruit sweetener (I like the “golden” type)
1 tsp. kosher salt
3 T. vital wheat gluten
1 c. old-fashioned oats
2 T. wheat germ
2 T. flaxseed meal
¼ c. sunflower seeds
2 T. sesame seeds
2¾ – 3 c. whole wheat flour
Mix the warm water, powdered milk, yeast, and olive oil together in the bowl of your stand mixer. Let sit for 5 minutes. Add the monk fruit sweetener, salt, vital wheat gluten, oats, wheat germ, flaxseed meal, sunflower seeds, sesame seeds, and most of the whole wheat flour. Using your dough hook, knead the dough until it holds together, but is still a bit tacky to the touch.
Pour a bit of olive oil in the bowl, and using your hands and a stiff rubber spatula, form the dough into a greased ball. Cover with plastic wrap and let sit for about 90 minutes or until roughly doubled in size.
Punch down and shape the dough into a loaf (or 2 loaves), then place in 1 greased 9 × 5-inch or 2 – 7.5 x 3.5-inch loaf pan or pans. Pat the dough into the corners of the pan(s) and flatten the top(s) as much as possible.
Loosely cover the dough with plastic wrap that has been lightly coated with cooking spray (greased side down). Let rise for 90 minutes or until the dough has risen a bit. At this point, pre-heat your oven to 375-degrees. (This should give your oven plenty of time to pre-heat as your bread finishes rising.)
Bake for 40-50 minutes (9 x 5-inch loaf) or about 30 minutes (7.5 x 3.5-inch loaves) or until the bread is nicely browned and registers at least 200-degrees on an instant read thermometer.
Remove from oven and tip the loaf or loaves out onto a cooling rack. Let cool completely before slicing. Store in an airtight container.
We love cornbread. That’s why you will find several cornbread recipes on this site. All are delicious, but all, until this recipe, contain unbleached white flour.
In my attempt to cook healthier, I still wanted to serve cornbread with the chili I had planned for dinner last evening. Because, truly, I can’t even begin to think about serving chili without cornbread.
So, yesterday, my exploratory food mission for the day was to find a recipe for cornbread that contained only whole wheat flour and monk fruit sweetener. And I also wanted to use olive oil instead of butter or some other type of veggie oil. Yadada yadada!
Whereas usually I find a plethora of recipes for any given combination of ingredients, I couldn’t find a single cornbread recipe that contained only whole wheat flour, used monk fruit sweetener, and called for olive oil. OK, there were a few that had all three of those ingredients, but they also included white flour, or brown sugar, or both. So, that left me no choice. I had to come up with a recipe ALL BY MYSELF!
So, I came up with the recipe you find below. And low and behold, the cornbread was edible. (Actually, a great deal more than just edible.) In fact, it was pretty darn tasty. And the texture was fabulous.
So, if you too are endeavoring to up your healthy cooking game, I suggest you give this recipe a try. The cornbread was absolutely perfect served with my healthy Ground Beef and Black Bean Chili. A delicious combination, if I do say so myself.
As always, think healthy, eat healthy, and help those around you stay healthy too. As cooks, we can make a huge difference in our family members health. Serving lots of veggies beautifully prepared. Reducing the amount of sugar wherever possible and encouraging good eating habits can do a lot to prevent problems in the future. Of course, all of us as we get older find ourselves with diminished abilities. Goes with the territory. Now, where was I going with this thought again? I have no idea.
Peace and love to all.
1 c. buttermilk
¼ c. extra virgin olive oil
¼ c. milk
2 lg. eggs
1 c. whole wheat flour
1 c. cornmeal
2 T. monk fruit sweetener (I use the “golden” monk fruit sweetener)
2 tsp. baking powder
¾ tsp. kosher salt
Grease an 8- or 9-inch baking dish with nonstick cooking or baking spray.
In a medium sized mixing bowl, whisk the buttermilk, olive oil, milk, and eggs together.
In a small mixing bowl, whisk the whole wheat flour, cornmeal, monk fruit sweetener, baking powder, and salt together.
Add the dry ingredients to the wet ingredients. Stir together just until combined. Don’t overmix. Pour batter into prepared pan.
Bake in a pre-heated 400-degree oven for 20-22 minutes or until light golden brown and a pick inserted into the center comes out clean.
Remove from oven and serve warm or at room temperature.
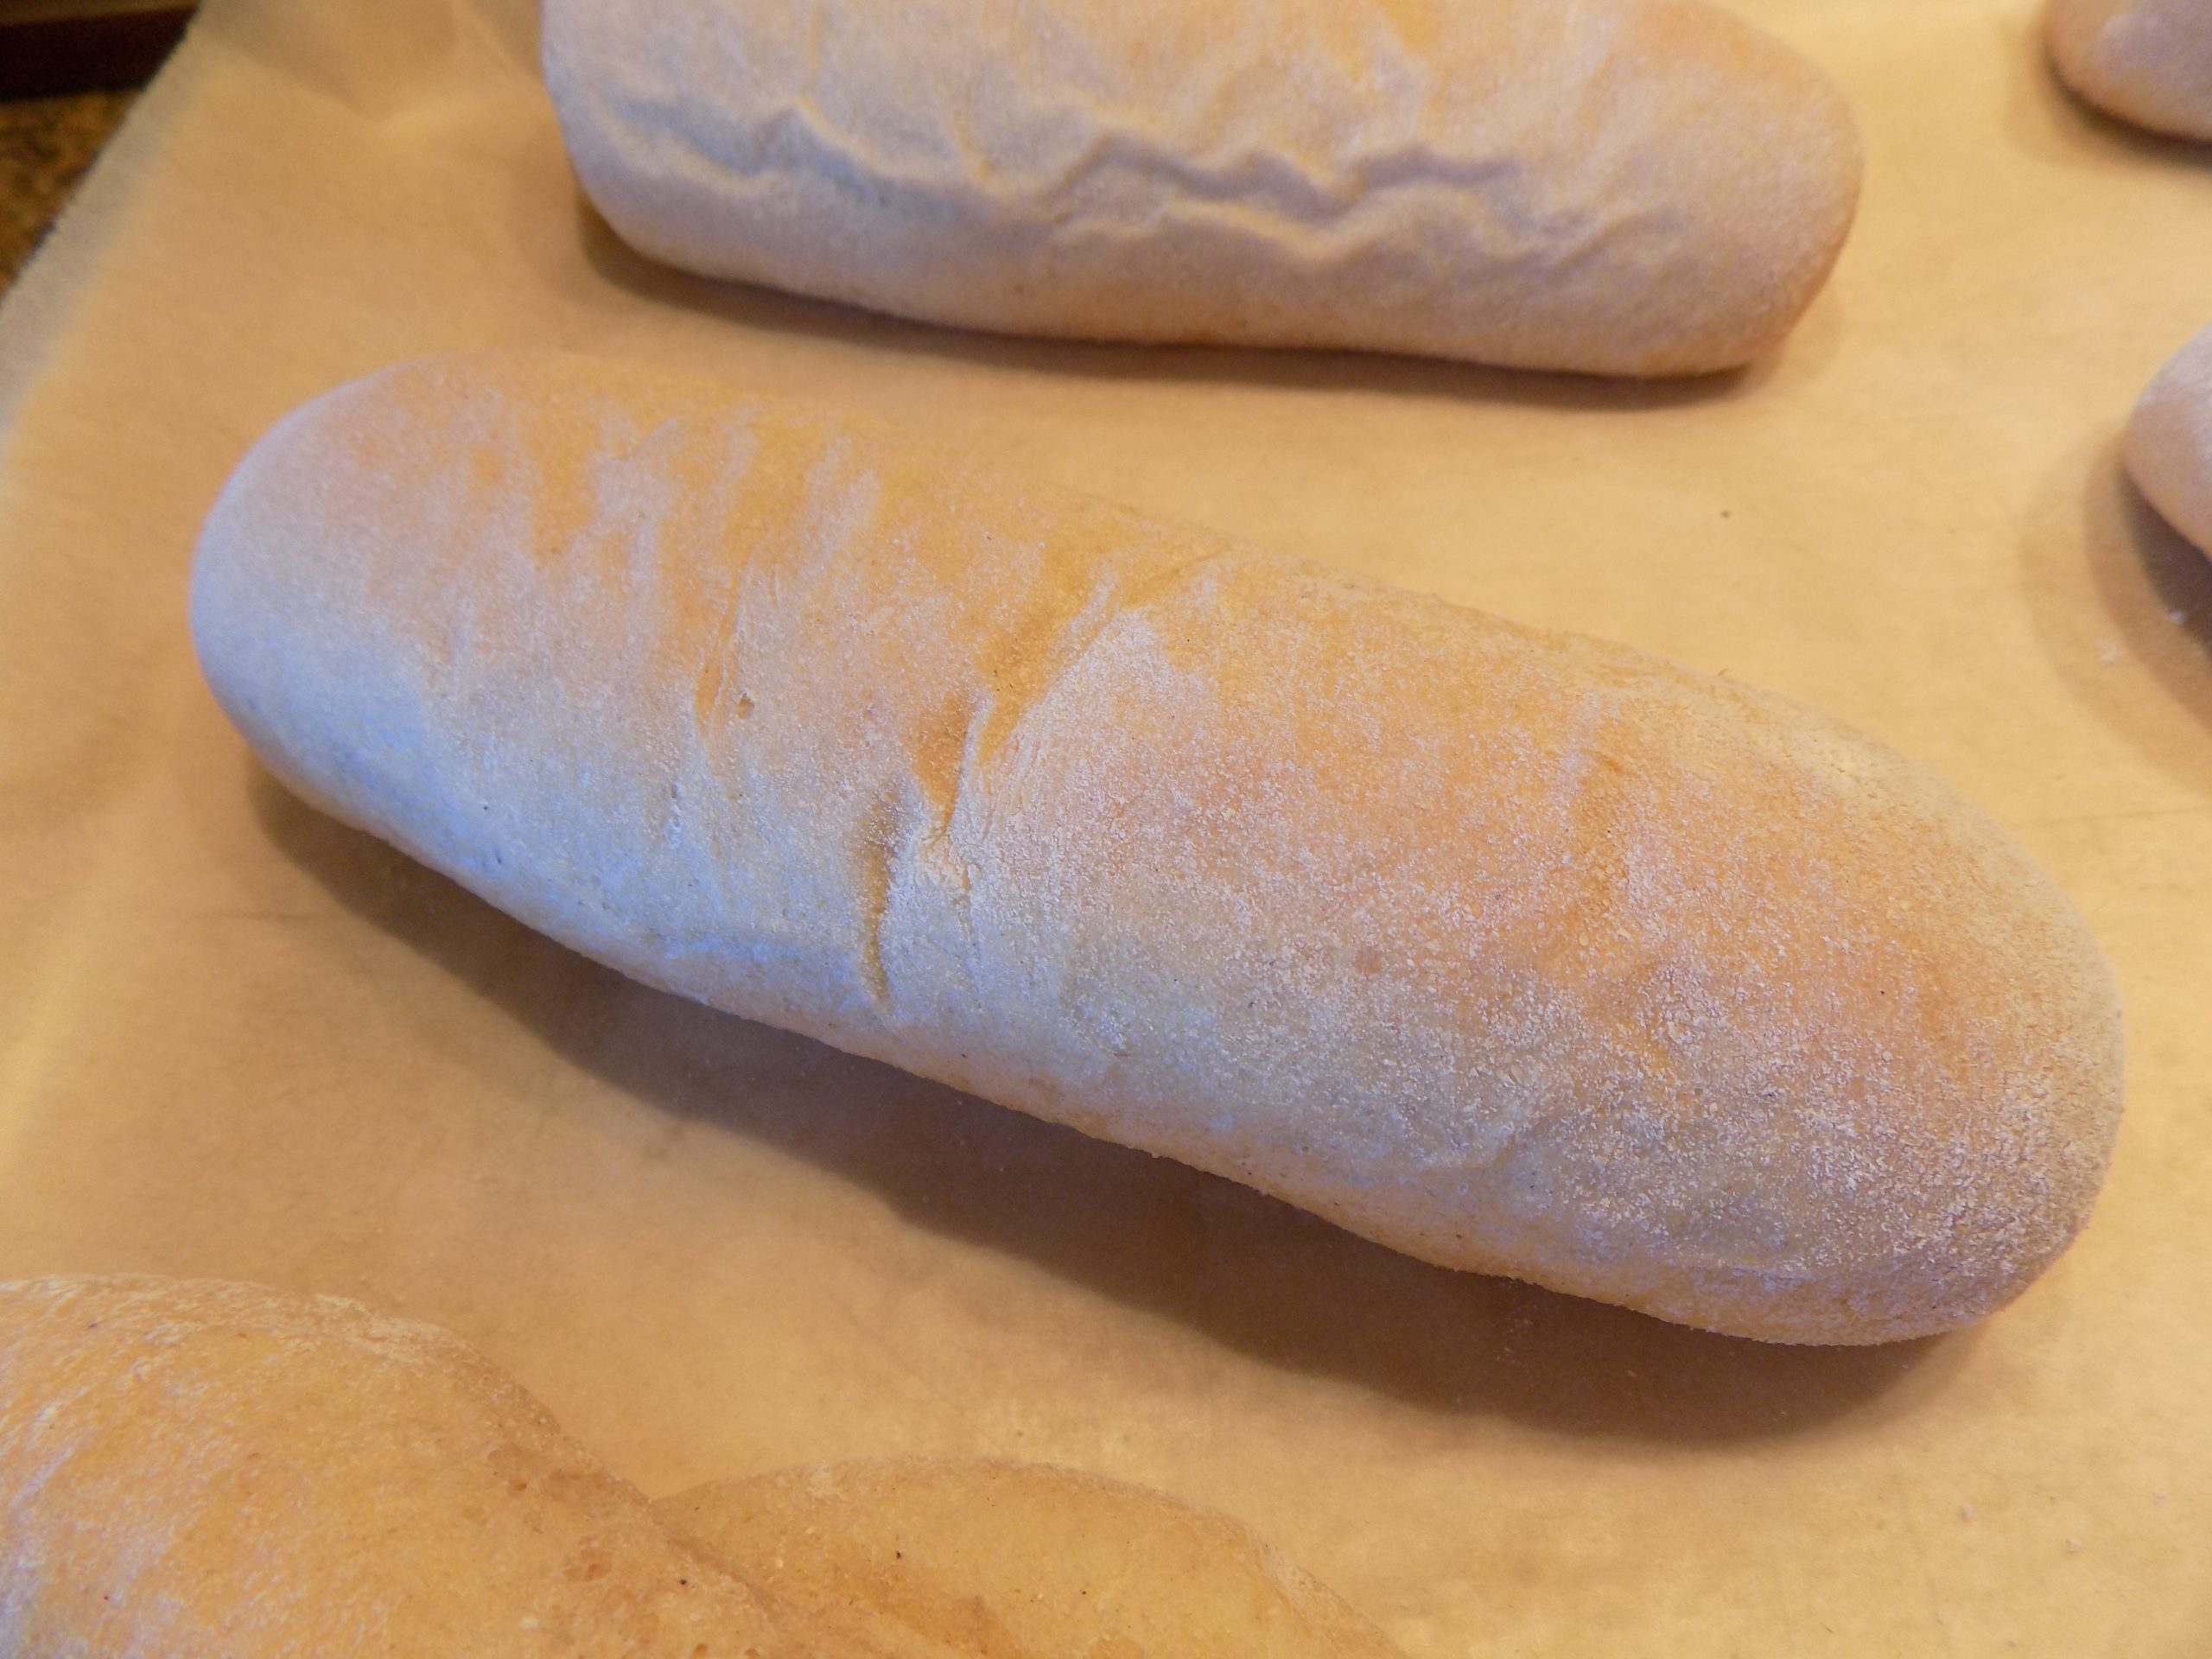
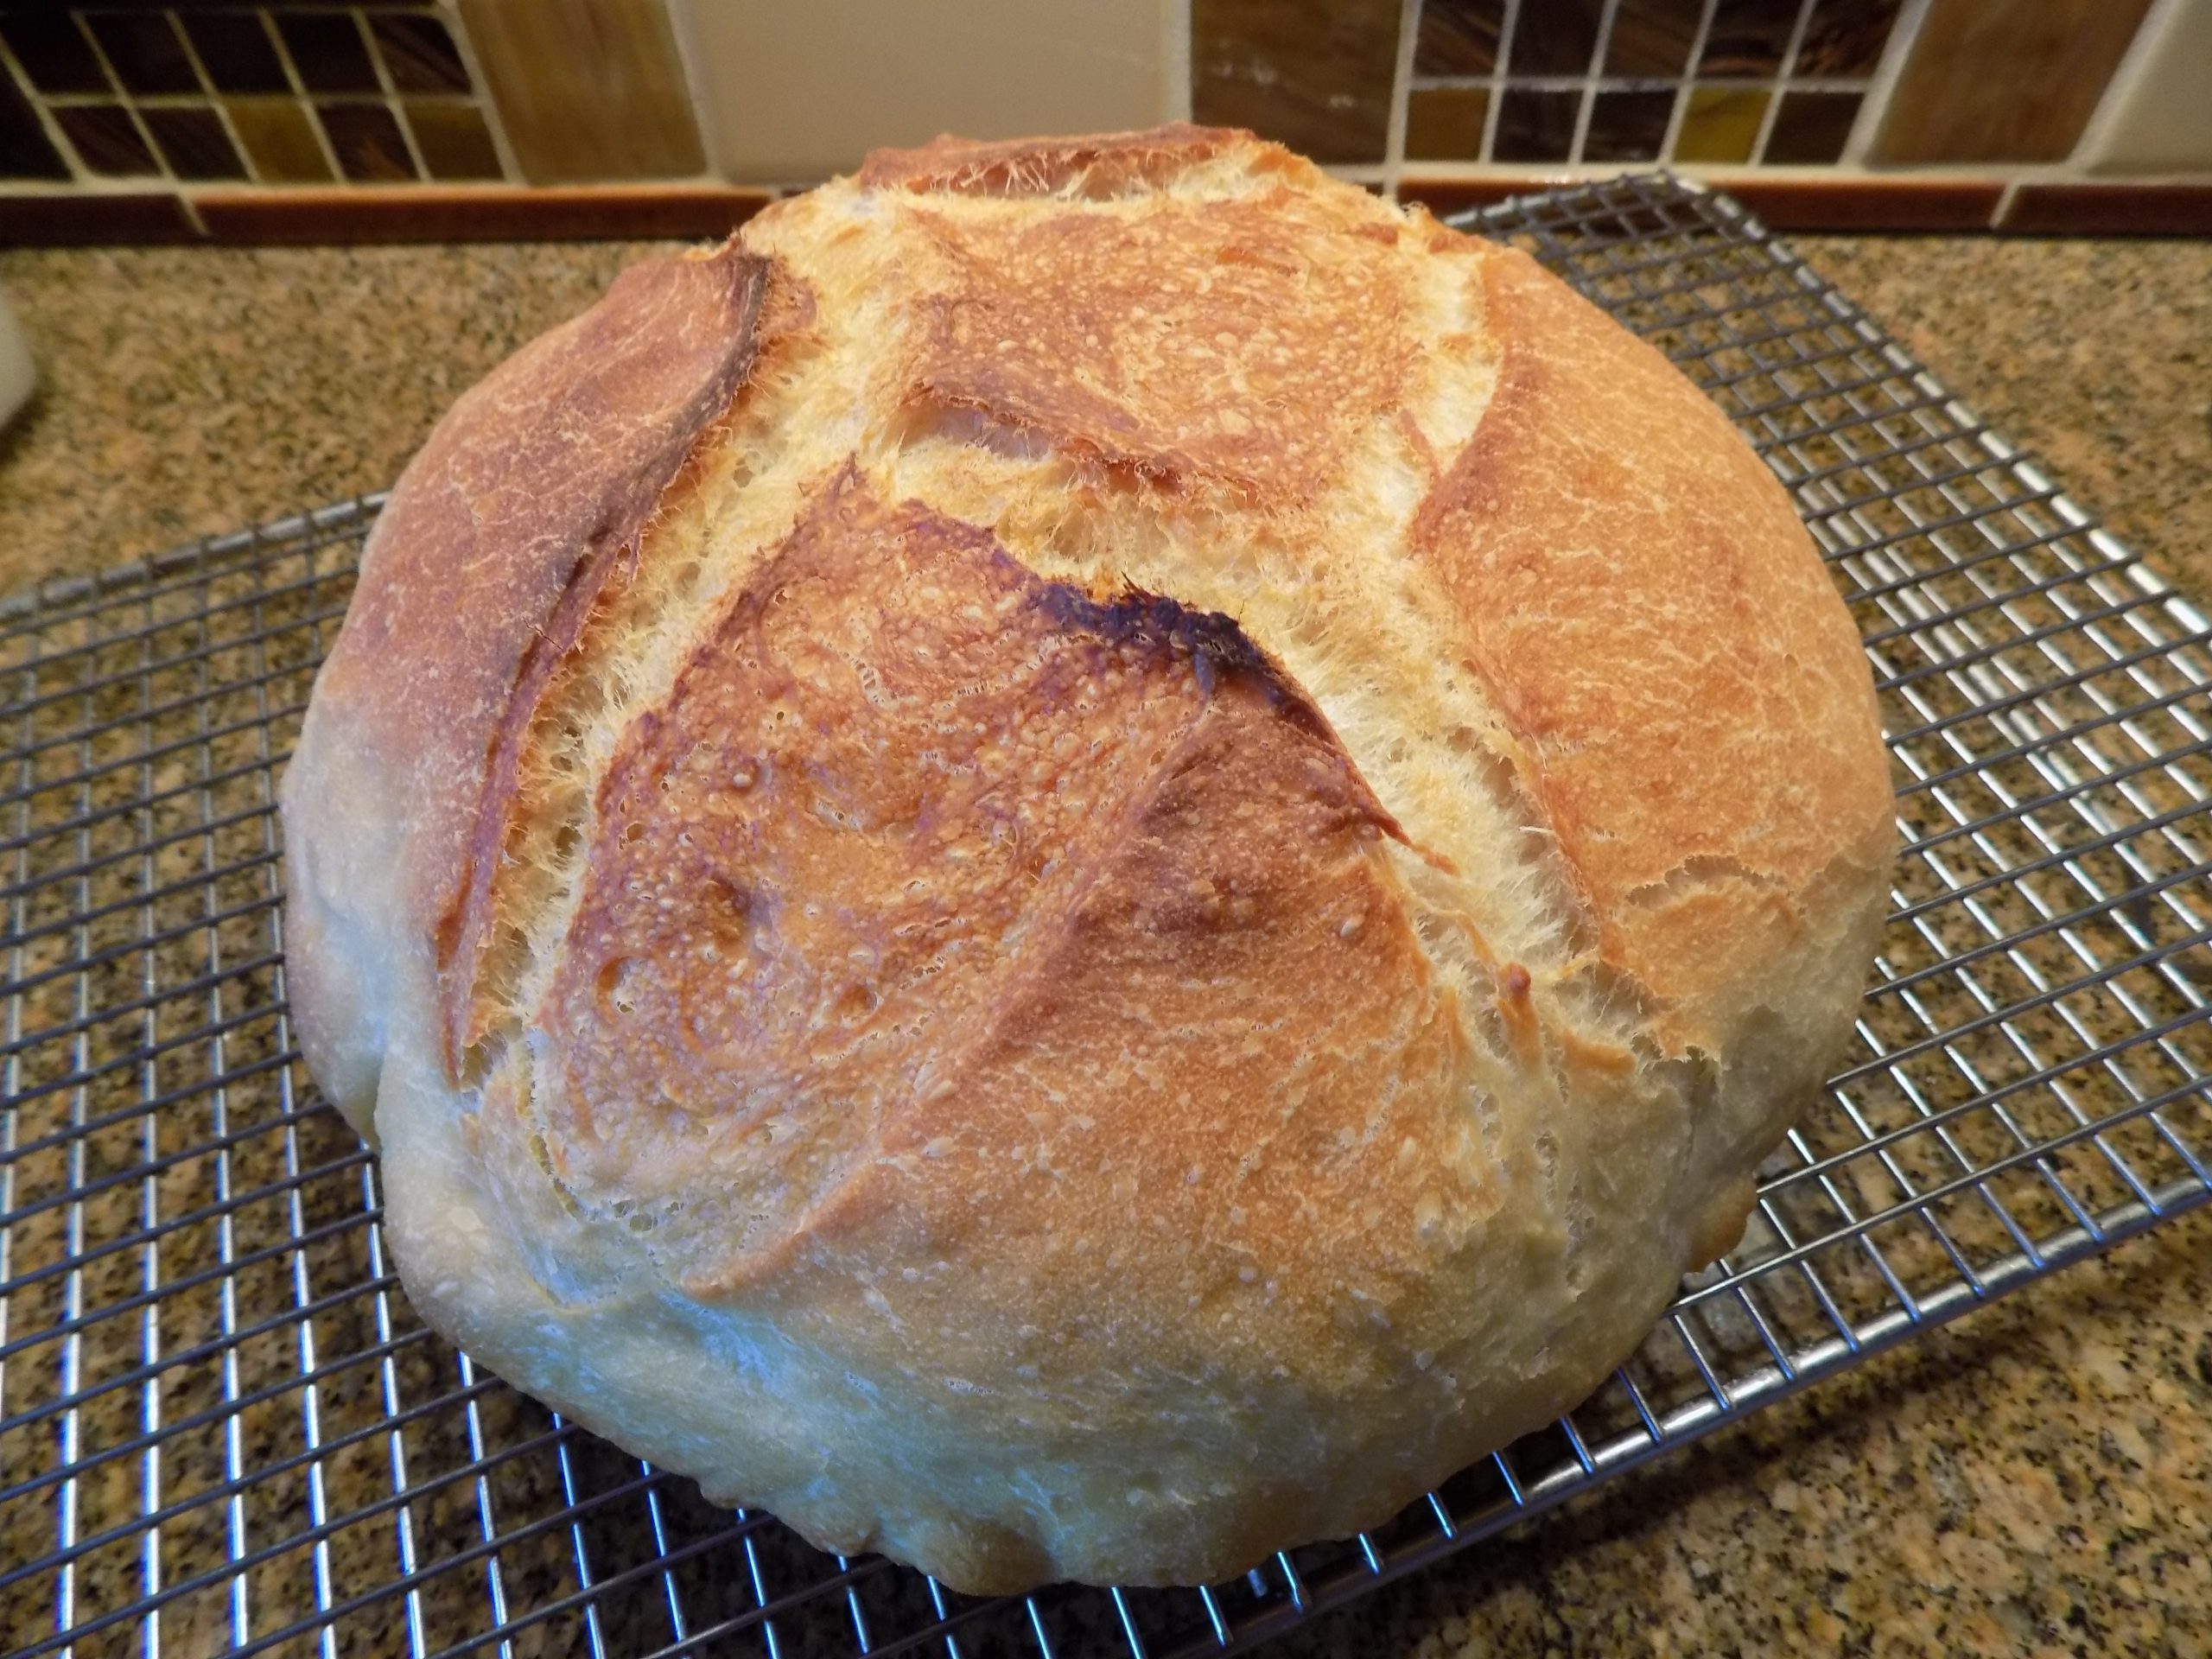
OK folks, bread baking can’t get much easier than this. So, if you have been holding off baking bread that looks and tastes like it came from a fancy bakery, there is no time like the present to put on an apron and have at it! And I know, this bread could contain one less ingredient if the recipe didn’t call for added yeast. But I believe I have mentioned before that I hardly ever plan-ahead on the type of bread I am going to bake. It’s more of a spontaneous result of realizing while I am making breakfast that we are almost out of bread. See how that works. Running low on bread equals, get your tush in gear and make more! Simple. OK, in my own defense, I do think ahead sometimes. But not nearly as often as I would like. Thus, the added yeast in this recipe. (I never claimed to be a kitchen goddess. But I do qualify for a B+ on consistent behavior. Pavlov would be so proud.)
Anyway – this recipe makes a really great loaf of bread. Perfect for sandwiches, smothered with Garlic Herb Butter (see recipe below) as an accompaniment for Italian food or soup, made into crostini, as the base for bruschetta, or any time a lovely slice of bread is warranted. This recipe basically produces an all-around, delicious, lightly flavored, firm textured, chewy crusted sourdough bread. And super easy to build.
Well, that’s it for today. As usual I have a protagonist to accompany as (in this case) he unravels the mystery of who killed Cock Robin? Not really Cock Robin. But you catch my drift!
Plus, I’m making meat loaf for dinner. And I still haven’t figured out what side dish to serve. Also, salad or veggie? Sometimes it boggles my mind how many choices I make each day that are mostly insignificant in the grand scheme of things. Will my dinner choices have any impact on world peace, for example? Of course not. Will my choices affect our continued good health? You bet your bippy my choices make a difference! So, no pressure Patti! But make the right choices.
And yes, I know. Preparing the menu for every stinkin’ meal, every stinkin’ day takes a lot of thoughtful decision making. But good, healthy food can make all the difference in the world to your family when it comes time to sit down together and share a meal.
So, keep preparing delicious, healthy food for the enjoyment of every person at table. Your reward will be the smile on their face(s). And the knowledge that you are not alone! Every meal planner around the world shares the same predicament!
Peace and love to all.
1½ c. warm water
¾ c. sourdough starter discard, room temperature
2 tsp. active dry yeast
1½ tsp. kosher salt
4 – 4½ c. bread flour, or as much as needed
extra virgin olive oil
Place the warm water, sourdough starter, and yeast in the bowl of your stand mixer. Let sit for 5 minutes. Add the salt and 1½ cups of the bread flour. Mix together with your bread hook. Let sit for 5 minutes.
Add enough remaining bread flour to make a soft, elastic dough. Dough should ball up around the bread hook, leaving just a bit stuck to the bottom of the bowl. The dough should be a bit sticky, but not tacky. Pour a bit of oil in the bowl and using your hands and a stiff rubber spatula, form the dough into a ball, completely greased with the oil.
Cover with plastic wrap and allow to rise until doubled in volume, 60-90 minutes. Punch down once during this rising.
Cover a cookie sheet with a rectangle of parchment paper. Use enough parchment paper to allow for lifting the dough into a Dutch oven or clay baker (bread cloche). Gently shape the dough into a ball but avoid kneading. Place the dough ball on the parchment paper. Cover with the same piece of plastic wrap that has been sprayed with cooking spray. Place in a warm, draft free spot for an hour.
In the last half hour of rising, preheat oven to 500 degrees. Place your clay baker or Dutch oven on the middle rack of the oven at the same time you turn it on. You want your clay baker or Dutch oven to get hot right along with the oven.
Once the oven comes to temperature, slash an “X” on the top of the dough. (Don’t use too much force or you will deflate the bread.) Just let the weight of the knife do the work.
Remove the Dutch oven or clay baker from the oven being very careful not to burn yourself. Carefully, using the sides of the parchment paper, lower the dough into the hot Dutch oven or clay baker. Cover the Dutch oven or clay baker and place in the oven.
Bake covered for 30 minutes, then uncover and allow to finish baking. Total baking time is about 35-40 minutes. (Mine is perfect after a total of 35 minutes.) The top should be dark golden brown. The internal temperature should reach at least 205 degrees.
Remove from oven and carefully lift the parchment paper and bread out of the clay baker or Dutch oven onto a wire rack to cool. Cool completely before slicing.
Please note: A trick I use to make lifting my clay baker in and out of the oven, is to place it on a low sided baking sheet before it ever goes into the oven. It’s much easier to lift a baking sheet in and out of the oven than a clay baker. Much less likely to burn yourself. Dutch ovens – no problem. They have nice handles made for the purpose.
Also, if you don’t own a clay baker or a Dutch oven, simply bake the bread as is. It may take longer to bake then the time given above, so to be certain, take the breads temperature to make sure it is done to perfection.
GARLIC HERB BUTTER
½ c. (1 stick) unsalted butter, room temp.
2 garlic cloves, finely minced
2 tsp. chopped flat-leaf parsley
½ tsp. Italian seasoning
¼ tsp. dried oregano
¼ tsp. kosher salt
freshly ground black pepper
Mush all together and serve at room temperature. Let people slather the butter on themselves, or place sliced bread on a baking sheet and spread liberally with the butter mixture. Bake in a pre-heated 375-degree oven for 8-10 minutes or until the bread is crusty around the edges and the butter topping is very hot. Serve either piping hot or at room temperature.