Category Archives: BREAD, ROLL, AND MUFFIN RECIPES

OVERNIGHT WHOLE-WHEAT, SEED, AND ONION ROLLS

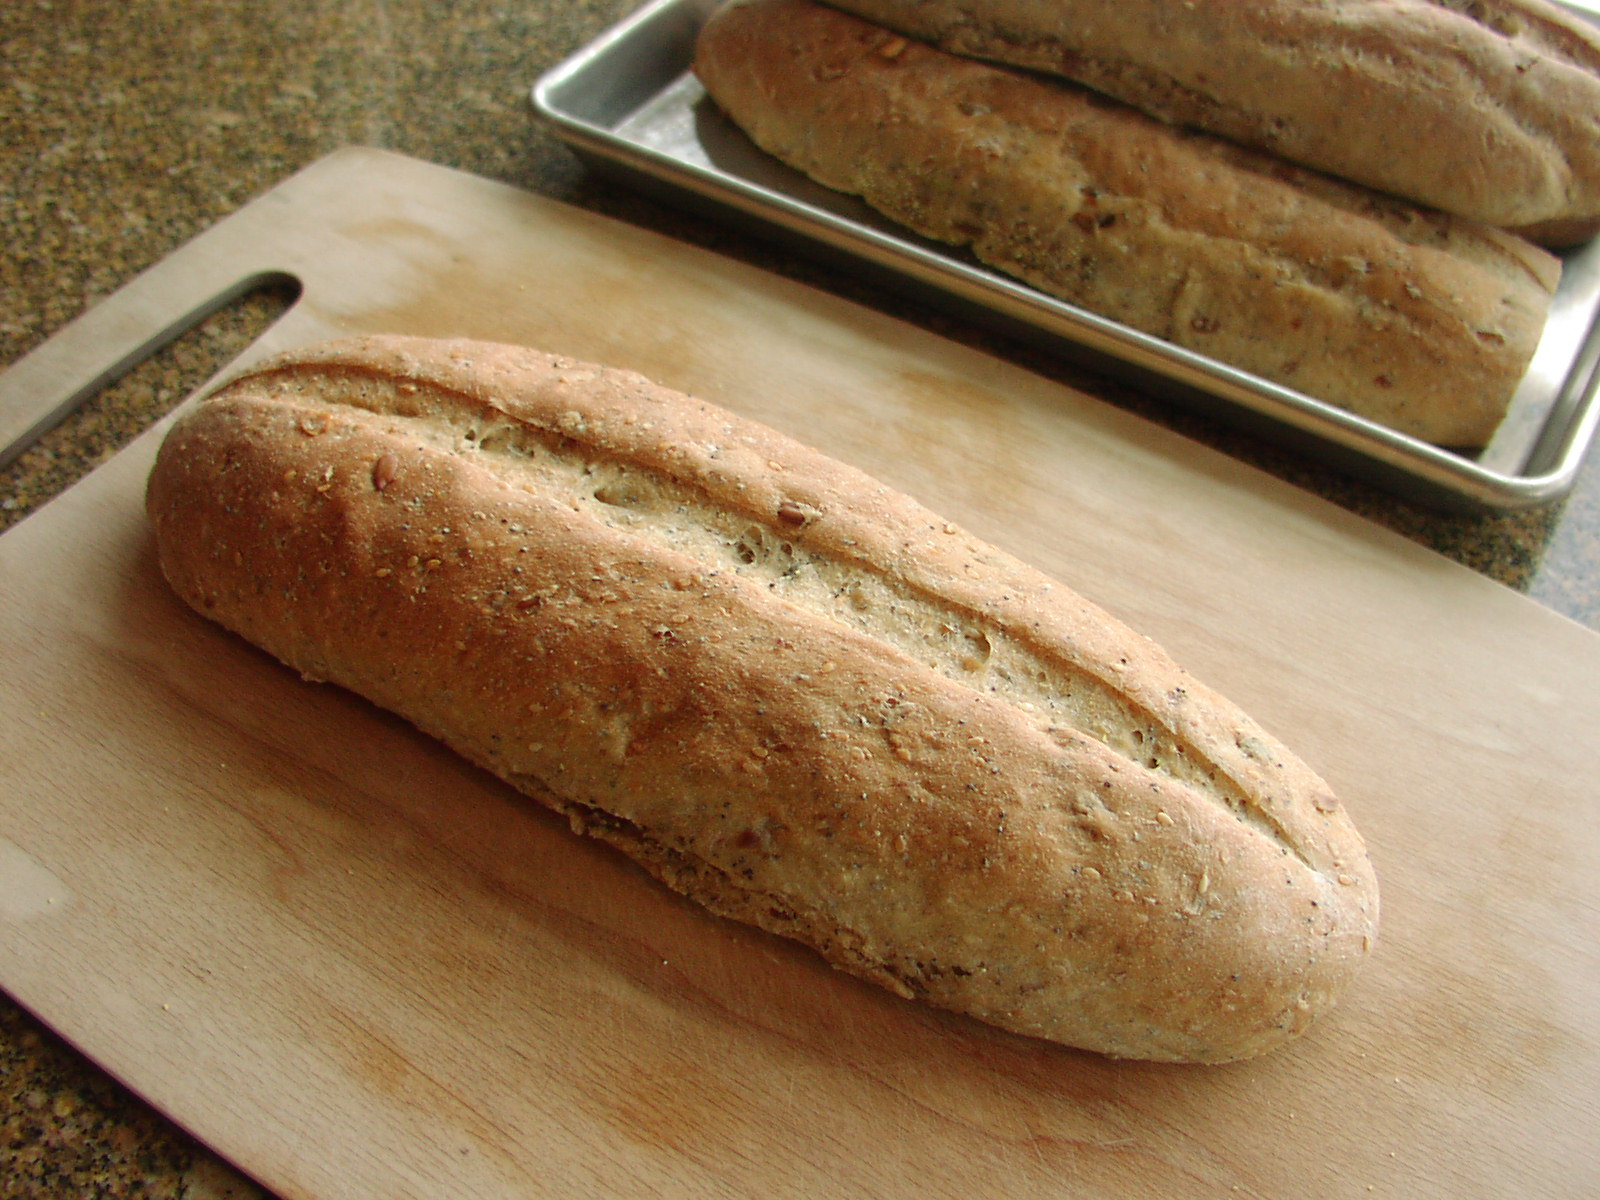
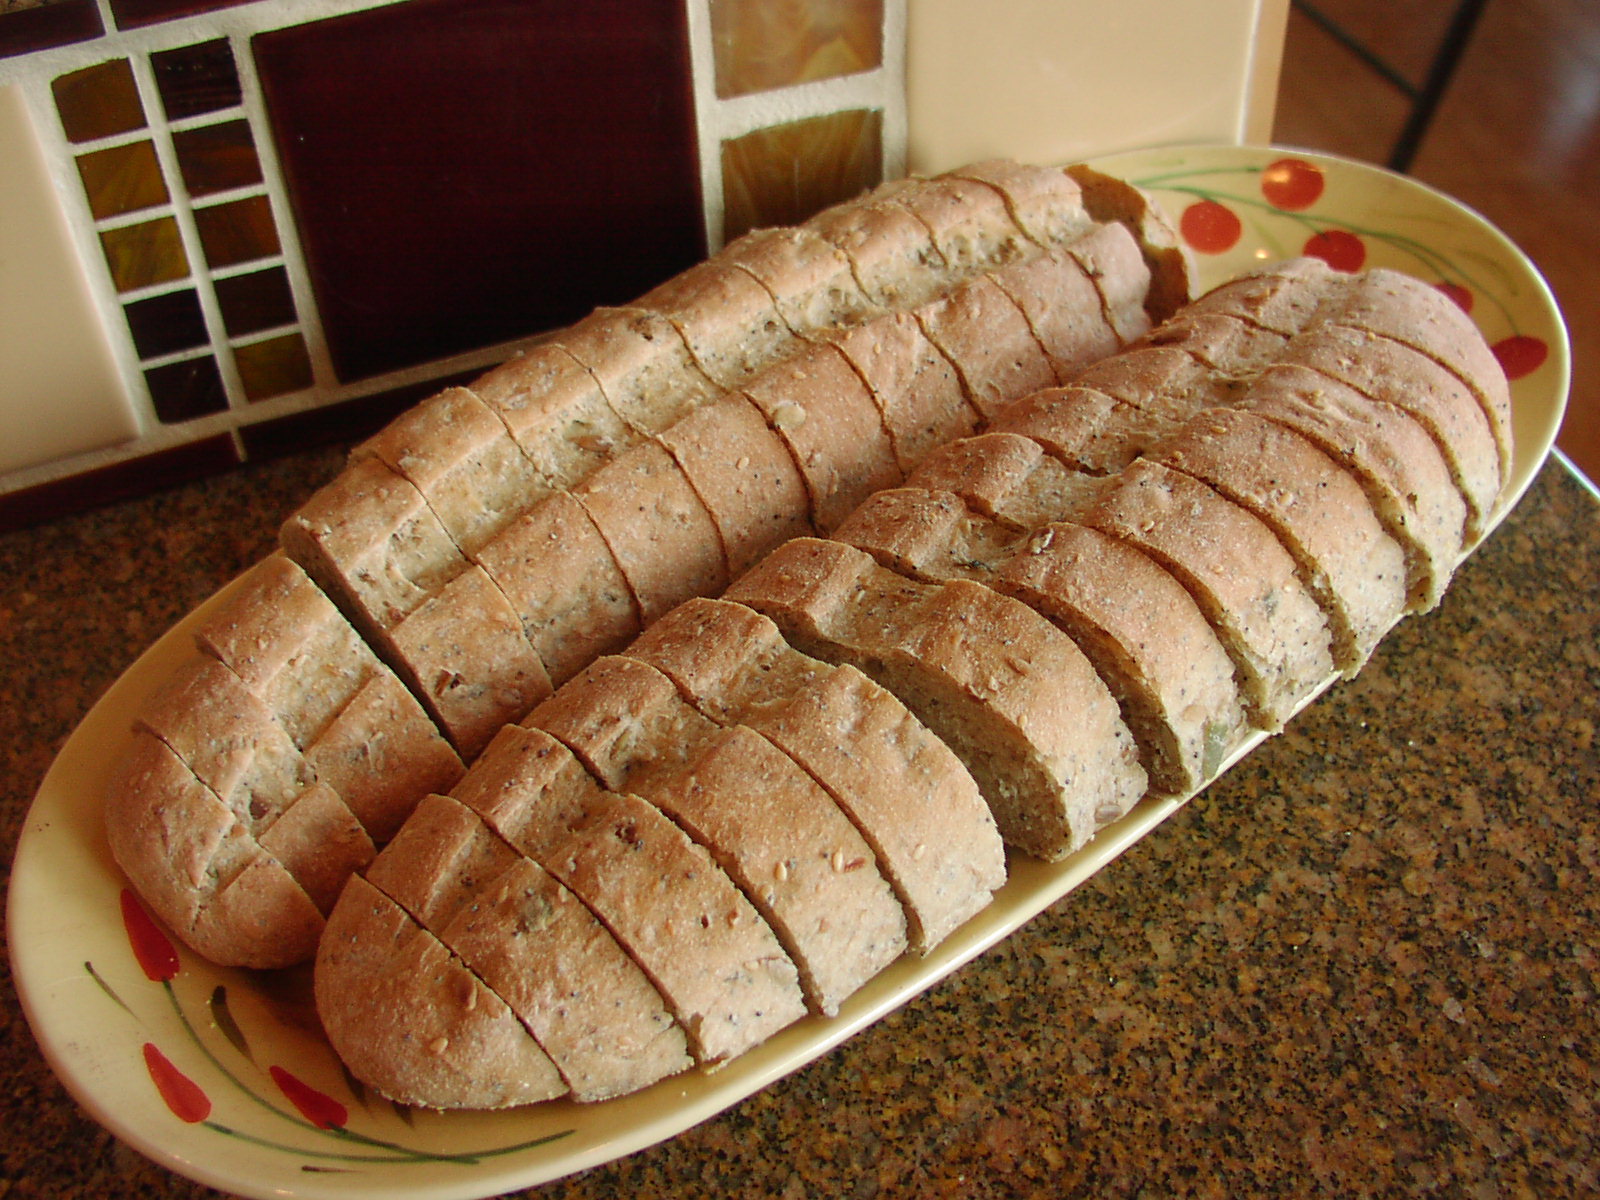
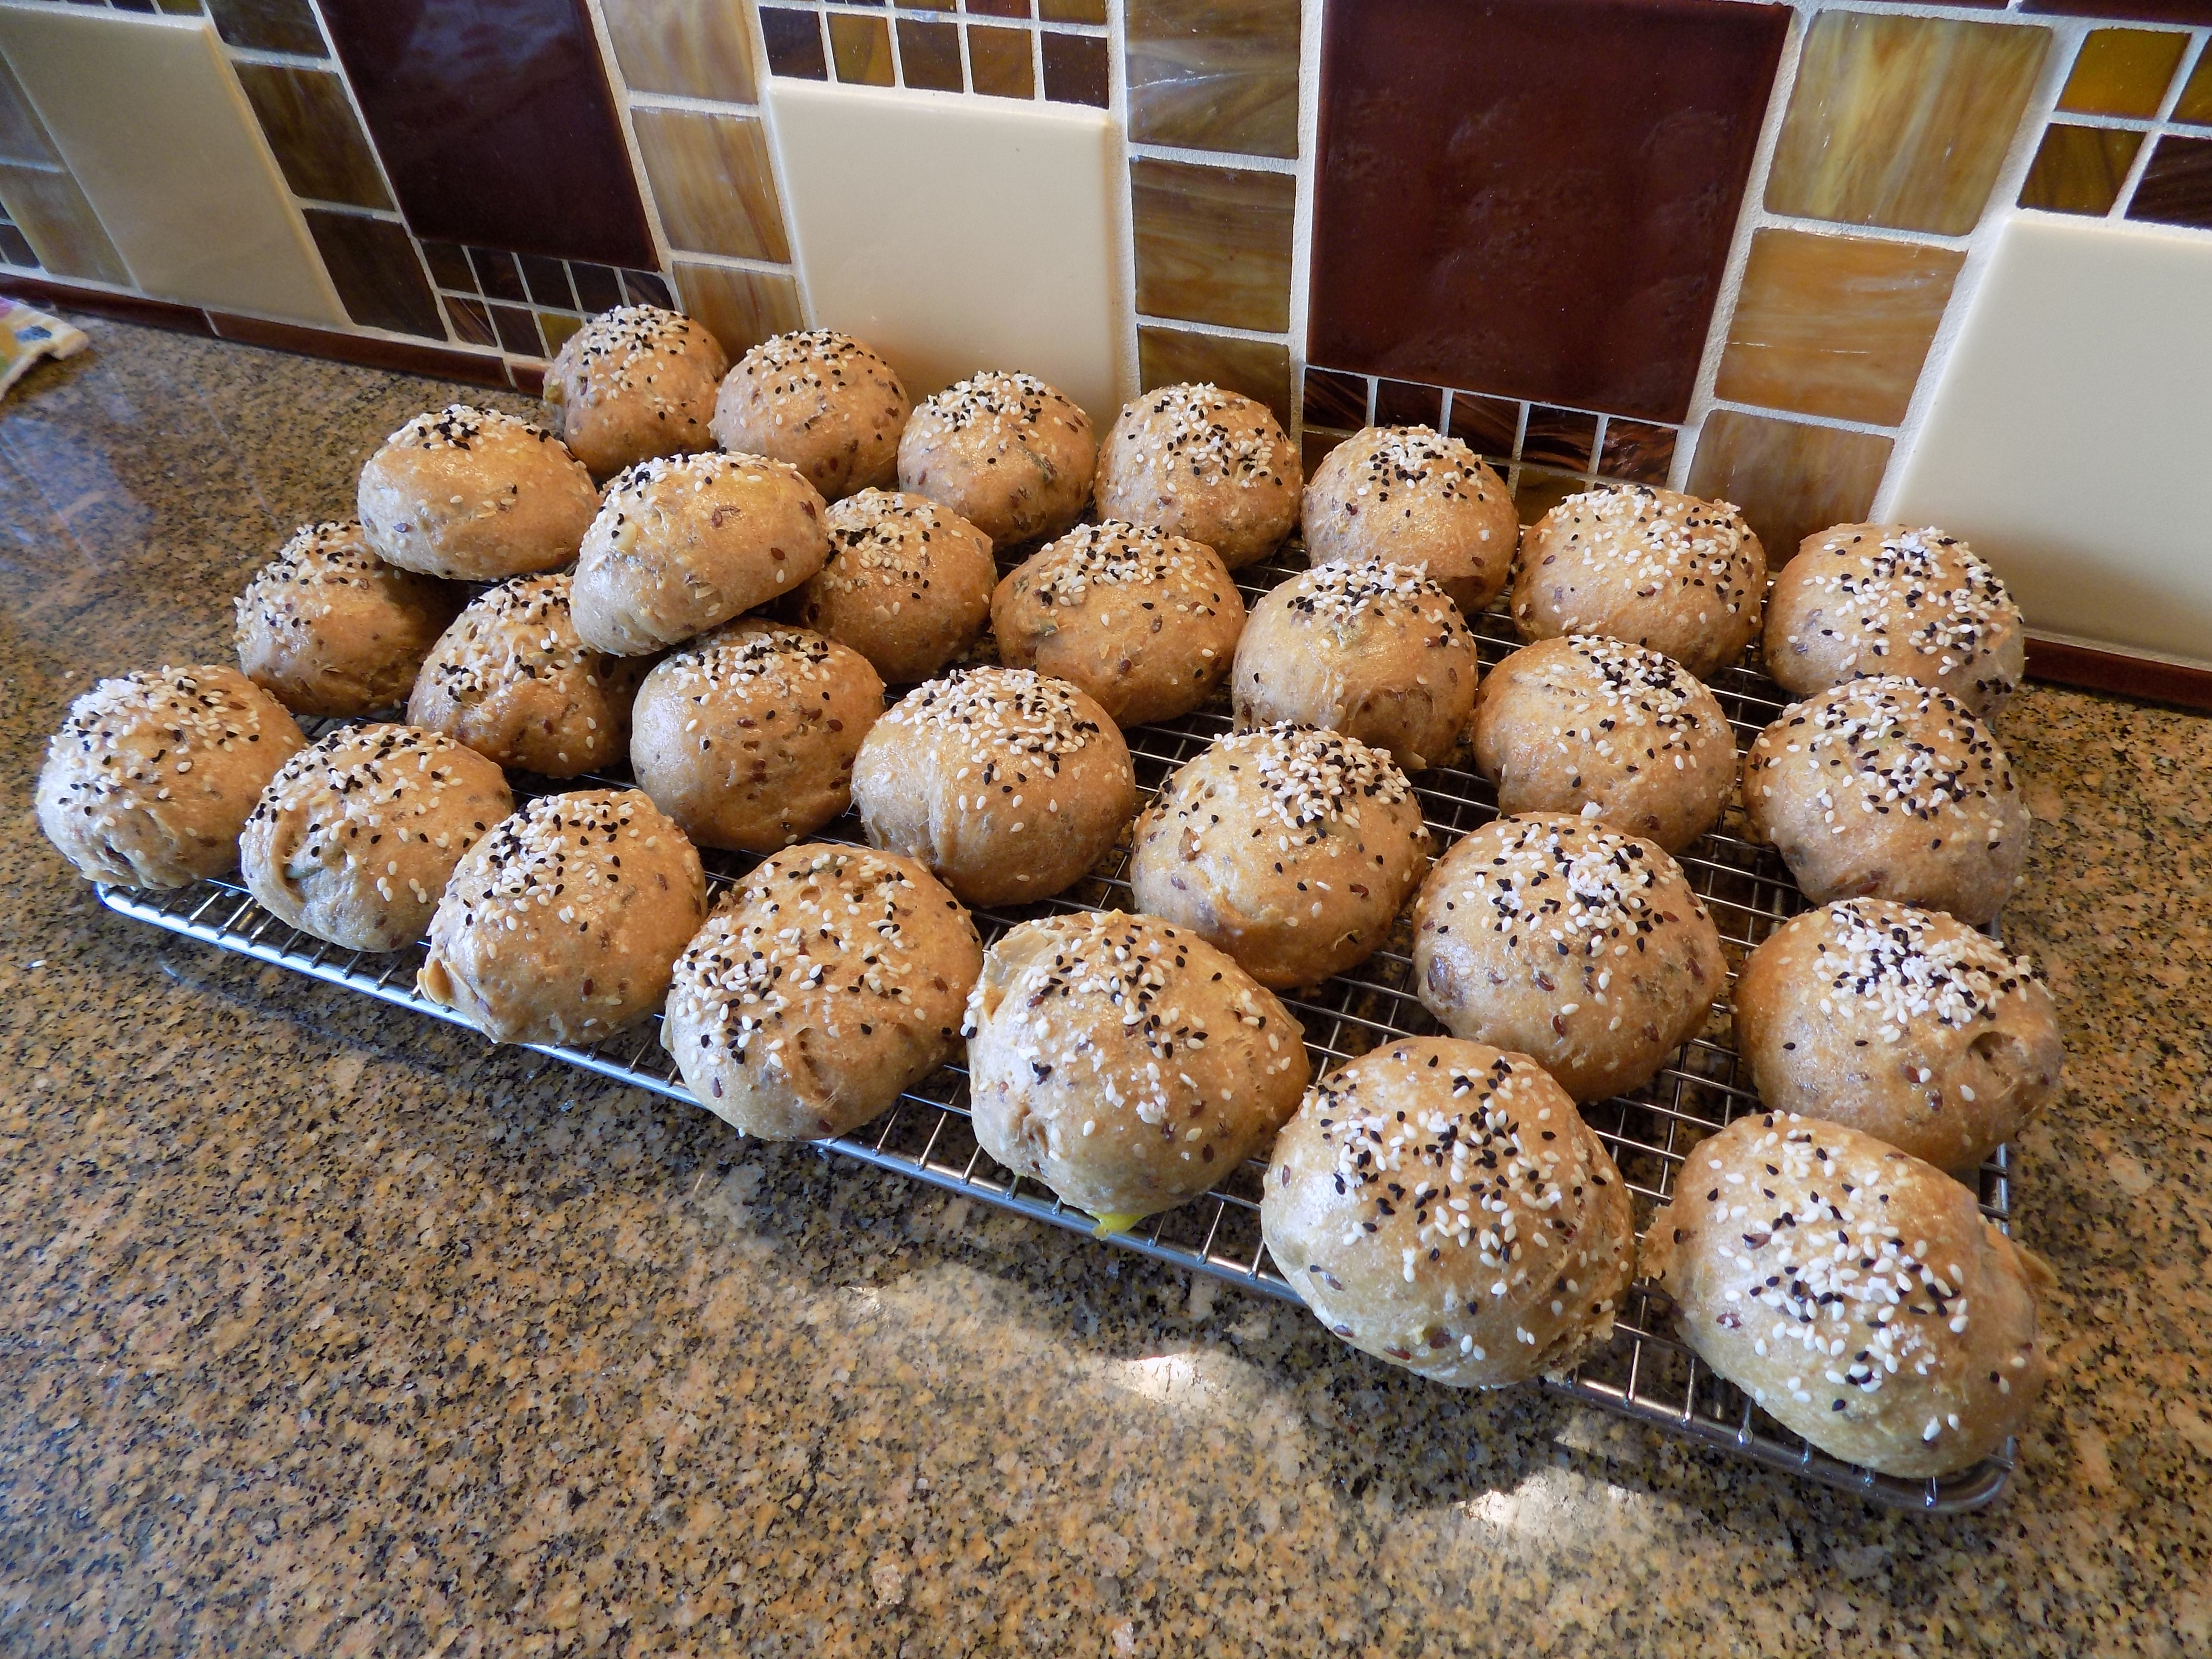
So, the first thing you need to know is that this bread takes 3 days to prepare. OK, not 3 full days, but you need to start 2 days in advance. Allow me to explain. The first day you place some of the seeds in a bowl, add water, cover, and place on your counter overnight. This step – 5 minutes max, unless of course you have trouble locating one of the seeds, then – well – you’re on your own time! The second day you make the dough and let it rest in your refrigerator overnight. The third day you shape the rolls, allow them to rise, add a topping, and plop them in the oven. So technically 3 days. But actually no more work time than any other yeast bread. And what do you get for your time and effort? Well you get about 32 perfectly delicious, soft, and healthy dinner rolls.

Now I know I’ve already told you how I feel about sitting down to a fine dinner in a restaurant or a holiday or special occasion dinner at home without bread or rolls. But for those of you who haven’t heard me rant on the subject, suffice it to say, I think it’s barbaric! In other countries, it’s almost illegal to have even an everyday meal without some kind of bread being at least offered. So my question is – where did America go wrong? (Oh God, I could expand on this subject until the cows come home. But in the name of common sense and good manners, I will refrain from any political discourse at this time.)  

Anyway, for a recent pre-concert meal in our home, I planned to serve three different sauces to go on rice. What I needed was a roll that would complement each of the sauces but yet have a presence of its own. So I thought a hearty roll featuring onion, different grains, and seeds would be perfect. Through much research, I came up with this recipe which is a compilation of several internet recipes and a couple of my own standards. Fortunately the result was well received. In other words, our guests very much enjoyed the rolls.

So next time you plan a special dinner for your family and/or friends, I would invite you to give these rolls a try. But unless you know your guests very well, I would refrain from talking politics. Nothing spoils a meal faster than some fool who disagrees with your well thought out and accurate point of view!

  • ¼ c. sunflower seeds
  • ¼ c. pumpkin (pepita) seeds
  • 2 T. flax seeds
  • 1 c. room temperature water
  • 1 T. dark molasses
  • 2 tsp. active dry yeast
  • 1½ c. cold water
  • 2 c. unbleached bread flour
  • 2½ tsp. kosher salt
  • ¼ c. sesame seeds
  • 1 T. poppy seeds
  • 3 T. dehydrated chopped onion
  • 2 eggs
  • ¼ c. extra virgin olive oil + more for greasing the mixer bowl
  • 1 c. spelt flour
  • 2 c. whole-wheat flour, plus more as needed 
  • Topping:
  • 1 small egg, beaten
  • 1 T. sesame seeds
  • 1 tsp. nigella seeds* or black sesame seeds
  • coarse sea or kosher salt, for sprinkling, opt.

Place the sunflower, pumpkin, and flax seeds in a small bowl; add room temperature water. Cover with plastic wrap and allow to stand on the counter overnight. The next day, rinse the seeds with cool water and drain well. Set aside.

Pour the molasses, yeast, and cold water into the bowl of a stand mixer; stir to dissolve. Whisk in the 2 cups bread flour to obtain a batter-like consistency. Cover bowl with plastic wrap and leave at room temperature until mixture looks active, about 30 minutes. Add the drained soaked seeds, salt, sesame seeds, poppy seeds, and dehydrated onion. Use your dough hook to stir the seed mixture into the yeast mixture. Then add the eggs, olive oil, spelt flour, and whole-wheat flour. Knead the dough until smooth, about 4 to 5 minutes. Sparingly add additional flour if needed. (Dough should be a bit sticky.)

Pour a small amount of olive oil over the dough, and using your hands, roll the dough into a ball. Make sure the entire ball is lightly greased. Cover the bowl with plastic wrap and refrigerate overnight for a slow, cool rise**.

The next day, remove the dough from the refrigerator and allow to sit at room temperature for about 90 minutes. Form the dough into small balls and place 2-inches apart on a parchment lined baking sheet. Cover dough balls loosely with plastic wrap and place in a warm spot until balls have doubled in size, about 1 hour.

Uncover and brush top of balls lightly with beaten egg. Mix together the sesame and nigella seeds. Sprinkle mixture over each ball, then sprinkle very lightly with sea or kosher salt. Bake in a pre-heated 375 degree oven for 15 to 20 minutes, or until lightly browned. Cool on a rack.

Please note: If ever in doubt that your bread is fully baked, take its temperature. The ideal average bread temperature is 200 degrees F.

*Nigella seeds are used as a spice in East Indian and Middle Eastern cuisines. The black seeds taste like a combination of onion, black pepper, and oregano.

**If you wish to skip this step, leave dough to rise in the bowl covered with plastic wrap until doubled, about 1 hour. Then proceed from the sentence beginning “form dough into small balls……..”

GARLIC BREAD

There are only a few type of people who can turn down a piece of hot garlic bread straight out of the oven. You know the type. Among them, those who have strict and healthy eating habits, or consider food just a means to keep their body alive, or those infuriating few who can even forsake Cheetos. (In my estimation, no one should be that well-disciplined. It simply can’t lead to mental stability.) So unfortunately, or fortunately (depends on how you look at it) I don’t happen to fall in any of the types who can show restraint when it comes to garlic bread (or Cheetos, for that matter)! For me, garlic bread is like a siren call that lures me away from healthy eating and onto the path of pleasurable indulgence followed by guilty regret.

So now that I have completely bummed you out, I’m going to tell you how wonderful this garlic bread tastes. And no, I am not going to tell you this bread is good for you. I am not going to lie to you, because my mother told me not to lie to people. But I will tell you it is worth going a little out of your nutritional comfort zone if offered a piece. It literally screams “Italian” and as we all know, if it’s Italian, by definition it’s going to be amazing. (I recently did the “who were your ancestors” thing, and it turns out I am 100% European, but only about 1% Italian. Nearly broke my heart.)

So, there is nothing more to say about this bread except that you must make it sometime in the near future. It goes well with almost any pasta dish, soup, salad, or entrée. In other words, it’s versatile. Plus it’s easy to prepare. Now if it were only low calorie, it would be the perfect food. A girl can dream, right???

  • ¼ c. (½ stick) unsalted butter, room temperature
  • ¼ c. extra virgin olive oil
  • 3-4 garlic cloves, finely minced
  • 1 T. chopped flat-leaf parsley
  • ¾ tsp. dried oregano
  • ¼ tsp. Italian seasoning
  • ¼ tsp. kosher salt
  • freshly ground black pepper
  • 1 long crusty baguette, cut in diagonal slices

Melt the butter in a medium sauté pan. Add the olive oil, garlic, parsley, oregano, salt, and pepper all at once. Stir for 5 seconds and remove from heat.

Place the bread slices on a baking sheet and spread liberally with the butter mixture. Bake in a pre-heated 375 degree oven for 4-6 minutes or until the bread is crusty around the edges and the butter topping is very hot. Serve either piping hot or at room temperature.


GF BLUEBERRY CREAM CHEESE MUFFINS

OK, I’ve said it before and I’ll say it again – I am not a muffin lover. But, and isn’t there always a but, these muffins are delicious. My friend Peggy described them as having a consistency reminiscent of angel food cake, but not quite as soft. And the nice little crunch provided by the sprinkling sugar just adds to the overall appeal. And blueberries, who doesn’t love blueberries? One of those guilty pleasures that is actually really, really good for you. Did I mention that these babies are really, really tasty?

Now the original recipe I found on Mel’s Kitchen website did not call for GF flour. But my friend Marsha, who suffers from celiac disease, turned me on to Cup4Cup, her favorite GF flour. She uses it in place of regular flour with amazing results. So I decided for my JazzVox brunch yesterday, I would give Cup4Cup a go in this recipe. And of course what usually happens when I think I am doing the right thing like offering up a GF dish, I read the very next day that I am playing into the hands of people who may be harming themselves by adopting a GF lifestyle. (I really can’t win!) 

According to Peter Green, MD, director of the Celiac Disease Center at Columbia University, “The gluten-free diet is a trendy diet. It will save someone’s life if they have celiac disease, but its role in the general public is nonexistent. Many people who go on a gluten-free diet do so for “bogus reasons.”

So now what do I do? Throw the muffins out as not to pander to someone’s uninformed idea of what is good for them? Or do I simply serve the muffins knowing that they are delicious and who the heck cares anyway if they are made from something other than wheat flour? I tell you – it ain’t easy keeping up with everyone’s food allergies, likes and dislikes, vegetarianism, veganism, etc. etc. It’s like checking out alternate facts! What the heck is an alternate fact anyway? Isn’t a fact a fact? Has the dictionary definition (a thing that is indisputable) changed over the last 3 weeks? Should I start preparing alternate recipes in case we happen to find ourselves in an alternate universe? A universe without basil, for example. (God forbid!)  

Anyway, the thing to know is that these muffins are wonderful. They are easy to prepare, and regardless of whether or not you use GF flour or “the real thing”, you are going to be very happy with me for turning you on to this recipe. Enjoy the muffins my friends and thank you Mel for this amazing recipe.

  • 8 oz. (1 pkg.) cream cheese, room temperature
  • 4 T. (½ stick) unsalted butter, room temperature
  • 1½ c. granulated sugar
  • 2 lg. eggs
  • 1 tsp. vanilla extract
  • 2 c. Cup4Cup GF flour (or your favorite GF flour or if necessary, regular unbleached flour)
  • 1 tsp. baking powder
  • ¼ tsp. baking soda
  • ¼ tsp. fine sea salt  
  • ½ c. buttermilk
  • 2 c. fresh blueberries
  • sprinkling sugar, opt.

Cream the cream cheese, butter, and sugar together until light and fluffy. Add the eggs, vanilla, and buttermilk; mix until well-combined. In a separate bowl, whisk together the flour, baking powder, baking soda, and salt. Add the dry ingredients to the cream cheese mixture and mix just until combined. Do not over-mix. Gently stir in the blueberries.

Using a medium sized ice cream scoop, plop dough into 2 – 12 cup paper lined muffin tins. Top each muffin with a light sprinkling of sprinkling sugar. Bake in a pre-heated 350 degree oven for 14-16 minutes or until the tops spring back lightly to the touch and the bottoms are a nice golden brown. Don’t overbake.  

Remove the muffins to a wire rack to cool completely. Store in a covered container at room temp. or in the refrigerator for several days.

Thanks to the Mel’s Kitchen website for this delicious recipe. Makes 24 muffins.   

KRENDL (RUSSIAN CHRISTMAS BREAD)

I dearly love being invited to a dinner party where everyone is asked to bring a dish to compliment a theme, be it ethnic or as a side to a particular main dish, or to include a particular ingredient, etc. I love this type of invitation because it often forces me to search the web. (Like I need a dinner party invitation to search out new and exciting dishes to share with you!)

Anyway, I was recently invited as a guest of a guest (my dear friend Vicky) to be her date. (Her husband and mine were gigging together during the dinner hour. So I was basically Mark’s replacement at table.)

The dinner was being hosted by Eric and Eliza and labeled as “Goose Fest”. But in reality, it was to celebrate Russian Christmas. Eliza is of Russian decent and apparently many Russians celebrate Christmas Day on January 7 in the Gregorian calendar, which corresponds to December 25 in the Julian calendar. The dinner party was actually on the 14th, but what’s a few days here and there among friends?

Anyway, one of the suggestions Vicki offered me for my contribution was Krendl. Never heard of it, but when has that ever stopped me. So off to web recipe land I ventured. And this incredible bread is the result.

I changed Barbara Rolek’s recipe just a bit, but not enough to hardly notice. So thank you Barbara for what is now one of my favorite sweet breads. (And no, I am not going to wait until next Christmas to make this bread again. In fact, I am going to make it for our next JazzVox pre-concert meal.)

This bread fulfills all of the basic desires I have when it comes to sweet breads. The dough is pleasantly sweet, the filling is full of fruit (think raisins in cinnamon rolls, for example), and the glaze is perfect. There is even a slight crunch to this bread from the sliced almonds. What more could you ask??

So if you love rich and tender bread, a filling resembling a fruit compote, and thin sweet almond flavored glaze, this is the bread for you. But please don’t wait until next Christmas to make this fabulous delicacy. It would be perfect served at an Easter brunch, to accompany coffee and tea at a book club meeting, or as a special treat to leave in your break room at work, to mention just a few examples.

And to make things a little different than what you usually experience when building a filled sweet bread, the filling is made before the dough is even started. Fun, eh?

Wonder why? I leave that for you to figure out my friends.

So get out your yeast and give this recipe a try. Just be advised that this bread is going to serve about 2 dozen people. The good news is that it feeds a lot of people and also freezes well. The bad news is that you are not going to be able to stop eating it. You’re just going to have to trust me on this. I speak from way too much experience.

Filling:

  • 1 c. sweet white wine (I use Muscato) or apple juice
  • 1 lg. apple, peeled and chopped
  • 2/3 c. finely chopped dried apples
  • ½ c. finely chopped dried apricots
  • ½ c. chopped pitted dried prunes
  • 1/3 c. golden raisins
  • 2 T. butter
  • 1 T. sugar
  • ¼ tsp. almond extract

In a large saucepan, combine wine, apple, dried fruits, butter, and sugar. Bring to a boil. Reduce heat and simmer uncovered for 25-30 minutes or until a jam-like consistency is obtained. Stir periodically. When desired thickness is reached, remove from heat and stir in almond extract. Cool to room temperature while you make the dough. Spread on dough as explained below.

Bread Dough:

  • 1 pkg. or 1 scant T. active dry yeast
  • 5 T. granulated sugar, divided
  • ¾ c. warm whole milk
  • ¼ c. (½ stick) unsalted butter + 3 T., room temperature
  • 2 lg. egg yolks
  • 1½ tsp. vanilla extract
  • 3 c. unbleached all-purpose flour
  • ½ tsp. kosher salt
  • vegetable oil
  • ½ tsp. ground cinnamon

In the bowl of your stand mixer, dissolve the yeast and 3 tablespoons of the granulated sugar in warm milk. Let proof for about 10 minutes. After allowing the mixture to proof, add the ¼ cup butter, egg yolks, vanilla, 1½ cups of the flour, and salt; mix with your dough hook on medium speed until smooth. Stir in enough remaining flour to form a soft dough (dough will be slightly tacky). Knead until smooth and elastic, about 4-6 minutes. Pour a tiny bit of oil over dough and form into a ball. Cover with plastic wrap and let rise in a warm place until doubled, about 75 minutes.

Punch down dough. Turn onto a lightly floured surface; roll into a 32×10-in. rectangle. Melt remaining 3 tablespoons of butter; brush over dough to within 1-inch of edges. Mix cinnamon and remaining 2 tablespoons of sugar; sprinkle over top. Spread with cooled fruit mixture. Roll up jelly-roll style, starting with a long side; pinch seam and ends to seal.

Place on a parchment paper lined baking sheet, seam side down. Form into a pretzel shape. (Forming the dough may make the parchment paper go all wonky, but persevere. Remember, you are dealing with paper and a piece of dough and you are the boss. Now’s the time to allow the latent bully side of your personality come to full fruition!) Cover the dough with plastic wrap or a tea towel; let rise in a warm place for 30-40 minutes or until almost doubled.

Bake in a pre-heated 350 degree oven for 40-45 minutes or until golden brown. Remove from pan to a wire rack. Spoon glaze over surface while the bread is still slightly warm. Quickly decorate with sliced almonds. (The glaze will start to harden as soon as it is spooned onto the bread.) Allow glaze to set before serving.

Glaze:

  • 1 c. powdered sugar, or more as needed
  • 2 tsp. milk
  • 1/8 tsp. almond extract
  • 2-3 tsp. warm water, or more as needed
  • ¼ c. sliced almonds

Whisk the powdered sugar, milk, almond extract, and warm water together. Add additional powdered sugar or warm water to reach desired consistency. (Glaze should be fairly thick, but not so thick that it doesn’t flow slowly and evenly when spooned onto the warm bread.)


FROSTED MAPLE PECAN SCONES

dscn0208

One of my fondest childhood memories is of the after school treats I adored when I was in 4th and 5th grade. A small store occupied a part of the block just across from my elementary school.  And every afternoon after school I would walk across the street to the store and buy a maple bar. Then I would lovingly carry it to my bus stop and wait for my bus to take me home. And ever since, I have been passionate about the taste of maple.

As an adult, I mostly worked in downtown Seattle or downtown Bellevue. And on every street corner (or so it seemed) there was a Starbucks coffee shop. I didn’t much care for the coffee (I was a Torrefazione fan until they were purchased by – who else? – Starbucks. And no the coffee is not the same anymore!) Anyway, at the time, maple scones were one of the breakfast items that Starbucks offered.  And when I felt I needed a treat, I would buy a scone and eat it at my desk. (A maple scone and a cup of Torrefazione coffee – breakfast of champions I tell you.)

Then, to my dismay, Starbucks stopped making maple scones. I have to say, that was the final straw. Not only did they deprive me of my favorite coffee, they stopped making my favorite breakfast treat. I was devastated! But never being one to let a mega corporation ruin my life, I decided to make my own scones. And I tried. But they were never quite right. (I think the missing ingredient was the ground up oats.) So for several years I went without my beloved maple scones.

Then just before Christmas, I got a wild hair to try once again. So I looked on line and found the basis for this recipe on the Food.com website. I baked up a batch and low and behold, the universe was once again aligned along the right path.

So if you too were fans of Starbuck’s maple scones, I can hardly wait for you to give these a try. They are truly amazing. As far as Starbucks – I never go there anymore, unless of course, it’s a coffee emergency. Then all bets are off!

Scones:

  • ¾ c. oats
  • 1¾ c. unbleached all-purpose flour
  • ¼ c. packed light-brown sugar
  • ¼ c. granulated sugar
  • 2½ tsp. baking powder
  • ¼ tsp. baking soda
  • ½ tsp. salt
  • ½ c. heavy cream
  • 1 lg. egg, room temperature
  • 1 tsp. real maple extract
  • ¾ tsp. real vanilla extract
  • 10 T. cold unsalted butter
  • 1 c. chopped toasted pecans, divided

In a food processor, pulse oats until ground into a coarse flour, about 1 – 2 minutes. Pour oats into a large mixing bowl along with the all-purpose flour, brown sugar, granulated sugar, baking powder, baking soda, and salt. Whisk well to combine.

Using a box grater, grate cold butter and mix into the flour mixture until it resembles coarse meal. (I use a regular table knife for this action.) Stir in 2/3 cup of the pecans.

In a small mixing bowl whisk together the heavy cream, egg, maple extract, and vanilla extract. Pour cream mixture into flour mixture and stir until evenly moistened and the dough starts to come together in large clumps. Gently knead mixture in bowl by hand several times until it forms a ball.

Scoop onto a lightly floured surface and gently shape into an 8-inch square. Cut into 8 equal squares. Cut each square diagonally. (You will end up with 16 small triangles.)  Transfer to a parchment paper lined baking sheet.

Bake in a preheated 425 degree oven until set and golden brown on the bottom, about 13-15 minutes. (Don’t overbake.) Cool on a wire rack until just warm to the touch; spoon glaze over scones and sprinkle with remaining 1/3 cup pecans. Allow glaze to set before storing in an airtight container.

Glaze:

  • 1 c. powdered sugar, or more as needed
  • 1 T. heavy cream, or more as needed
  • 1 T. whole milk
  • 1½ tsp. maple extract, or more to taste

Whisk together all glaze ingredients in a small mixing bowl until well combined. Thin with additional cream as needed, 1 tsp at a time. Or add more powdered sugar a tablespoon at a time.


CARIBBEAN CORNBREAD

OLYMPUS DIGITAL CAMERA

When I was a child, my grandmother would make cornbread once in a while. I loved it. Of course it was liberally spread with home churned butter, so what’s not to like, right? But this was very plain cornbread and definitely not sweet. (Well it wasn’t sweet until my grandmother poured maple syrup all over it, that is.) And all my adult life, I baked cornbread for my family too. And if it had any sugar in at all, it was only a very small amount.

But in researching a cornbread to serve with other Caribbean dishes, I found most of the recipes to contain a fair amount of sugar, including this wonderful recipe from Blanchard’s Restaurant on Anguilla Island, British West Indies. But compared with other recipes I perused, even with the crushed pineapple, there was less sugar than in most.

Now something you should know – I don’t like canned pineapple. (Don’t much care for fresh pineapple either, if truth be told!) But this recipe received such good reviews, I just had to give it a try. And oh am I glad I did. You really can’t taste the pineapple, but it adds not only sweetness, but moisture and texture to the final product which is very desirable in a good cornbread. I served the cornbread to guests, and everyone loved it. In fact one of the guests told me it was the best cornbread she ever tasted and asked if she could take some home. Which of course she did.

Now that I have tasted this cornbread, regardless of the fact that it contains sugar and pineapple, it is now the house brand, so to speak. It is just too good to be true. Plus it freezes beautifully, so you can make it ahead, and freeze it until needed. (I suggest a double batch, because you are going to want more of this even before you finish the first pan.)

So go Caribbean on your family and friends, and fix them some of this cornbread to go along with Caribbean Pork Stew over basmati rice. (The stew recipe and rice recipe are on the site already.) Your family and friends will love you for it. And for dessert, vanilla ice cream topped with Caribbean Rum-Raisin Ice Cream Sauce – also on this site. And regardless of what you learned as a child, play with your food. Don’t like pork in your stew, use chicken. Don’t like basmati rice, use brown rice. Don’t like rum, forget the whole meal and go to McDonalds. (Just kidding.) Serve the ice cream with a chocolate sauce instead. People in the Caribbean like chocolate too, or so I’m told. Will let you know when I return from Belize.

  • 1 c. unbleached all-purpose flour
  • 1 c. cornmeal
  • 2 T. baking powder (yes tablespoons!)
  • 1 tsp. kosher salt
  • 1 c. (2 sticks) butter, room temperature
  • ¾ c. sugar
  • 4 eggs, room temperature
  • 1½ c. canned cream-style corn
  • ½ c. canned crushed pineapple, drained
  • 1 cup shredded Monterey Jack cheese or cheddar cheese

In a medium bowl, whisk together flour, cornmeal, baking powder and salt; set aside. Using an electric mixer, cream the butter and sugar until light and fluffy. Add eggs, one at a time, beating well after each addition. Add corn, pineapple, and cheese; mix to blend. On low speed, add flour mixture and mix until well blended.

Pour batter into a butter and floured 9-inch glass* baking pan. Bake in a pre-heated 325 oven for 1 hour or until golden brown around the edges and a tester inserted in the center comes out clean.

*You can use a metal pan but glass works better. If you have to use metal, bake at 350 degrees and start watching after 45 minutes.

WHOLE WHEAT AND SEED BAGUETTES

OLYMPUS DIGITAL CAMERA

OLYMPUS DIGITAL CAMERA

OK, you may yell at me all you want because I know I have been away from my blog for way too long! But first I was sick with this nasty cold/flu that’s going around. Then I had JazzVox concert food to prepare, then I went on vacation, and then when I got home last Wednesday, I was hit over the head with home owner’s association minutia. (Please note. This is probably the best advice I will ever share with you. Under no circumstance should you ever accept the position of president of your home owner’s association. It’s a thankless job that can only lead to sleepless nights, hair loss, and an inordinate fondness for adult beverages.) You’ve been warned. Now – on to a very pleasant topic – bread.

This recipe calls for 4 types of seeds. Using all of the seeds is not necessary. Any combination will work. You don’t like poppy seeds – don’t use them! You like other types of seeds like flax, by all means add them to the mix. Just whatever you do – make this amazing bread adapted from a recipe by Martha Rose Shulman. It is just wonderful. Of course, there are a couple of basic ingredients missing from this bread recipe. Yep, you’re right. No sugar and no oil. But if you are like me, that isn’t going to bother you in the least. 

So next time you get an urge to bake bread, give this recipe a try. You will be so glad you did. And when you realize how much money you saved by baking your own healthy “specialty” style bread, you might even remember to thank me. Better yet, put a good word in for me with my neighbors. That old adage attributed to John Lydgate – “you can please some of the people all of the time, you can please all of the people some of the time, but you can’t please all of the people all of the time” is never more true than for decisions made by the board of a homeowner’s association. Of course Oscar Wilde had it right too. “No good deed goes unpunished.” Enjoy the bread recipe. 

  • 1 c. water
  • 3 T. sunflower seeds
  • 3 T. sesame seeds
  • 2 T. pumpkin seeds
  • 1 T. poppy seeds  
  • ¼ c. rolled oats
  • scant T. active dry yeast (or one pkg.)
  • 1½ c. bread flour
  • 1 c. lukewarm water
  • 1¼ c. whole wheat flour (if more flour is required, add additional white bread flour)
  • 1½ tsp. kosher salt
  • olive oil
  • corn meal

In a small bowl containing the 1 cup water, set the seeds and rolled oats to soak covered with plastic wrap. Place in the refrigerator overnight.

The next day, in the bowl of your stand mixer, combine the yeast, bread flour, and the lukewarm water; mix together until well combined. Cover with plastic wrap and leave to ferment at room temperature for two hours or until doubled in volume. Remove the seeds and oats from the refrigerator, drain and set aside to come to room temperature.

After the yeast mixture has doubled in size, add the drained seed mixture, the whole-wheat flour, and the salt. Start mixing on medium speed. If the dough is too dry, add a small amount of additional water. If the dough is still sticking to the bottom of the bowl, add additional bread flour just until the bottom of the bowl is dry. Then, continue mixing the dough until it is elastic, about 5 minutes. Form the dough into a ball and pour a small amount of olive oil down the side of the bowl. Using your hands, lift the dough from the bottom of the bowl and coat with the oil. Cover the bowl with plastic wrap and set in a warm area to rise for 1 hour. Meanwhile, lightly sprinkle a baking sheet with cornmeal and set aside.

After the dough has rested for an hour, punch down and divide in half. Set halves on prepared baking sheet, cover with plastic wrap, and let rest for 15 minutes. Then, using your hands, form each half into an elongated, 12-14 inch loaf and place back on the prepared pan. (To shape the dough, I pick up each piece, holding the dough with both hands, then I squeeze the dough up and down its length until I have the desired size I need. Then I finesse it a bit once I have it back on the pan. (A little additional shaping here and there until it is roughly symmetrical.) Then cover the baguettes with a tea towel and place in a warm spot for one hour.

After 30 minutes, place a pan of water on the bottom rack of your oven. Set the other rack in the middle of the oven. Pre-heat oven to 450 degrees.

After your dough has rested for an hour, remove the tea towel, and using a very sharp knife, make an ½-inch deep cut down the length of the loaves from one end to the other.

Place pan on the middle rack of the oven and bake for a total of 30 to 35 minutes, or until the loaf is dark brown and sounds hollow when you tap the bottom. 10 minutes into the baking time, carefully remove the pan of water.

After the loaves come out of the oven, transfer them to a wire rack to cool completely for at least 45 minutes before slicing. Or prepare a day ahead and keep wrapped in a kitchen towel until needed. Slice and serve with room temperature butter. Or for the most amazing breakfast treat, slice thick pieces of bread, toast, slather with butter, and top with jam. (The best!) 


CHEDDAR AND CHIVE BUTTERMILK BISCUITS

OLYMPUS DIGITAL CAMERA

There is nothing as delicious as a biscuit right out of the oven. Smothered in room temperature butter, there really is nothing finer. And this adaptation of one of Ina Garten’s recipes makes some of the best biscuits I have ever tasted. The combination of cheddar cheese and fresh chives is just amazing. And these biscuits are really easy to make. And there’s no fancy rolling them out, cutting them with a biscuit cutter, smooshing the remaining dough back together, rolling it out, cutting out more biscuits, etc. etc. You just plop the dough on a floured surface, pat the dough out, and cut it into 8 rectangular pieces with a sharp knife. Then drop the biscuits on a parchment paper lined baking sheet and bake them until they are lightly browned. Absolutely fool proof. And the greatest part. They are perfect for breakfast, lunch, or dinner. A fun story about biscuits.

In a former life I had a father-in-law who loved to make breakfast. His wife was an excellent cook, and she prepared the other 2 meals each day, but breakfast was always my father-in-law’s responsibility. And when we visited, he and I had a running “battle” over who made the better biscuits. Because in his world, biscuits were always a part of breakfast. So when at their home, he would allow me to make the morning biscuits every other day. Well it became a running joke. Because regardless of who made the biscuits that morning, they were always the best biscuits any of us had ever tasted. Of course there was always a lot of kibitzing while the biscuits were being made, but that was half the fun. And of course, the end result was biscuits! Every morning! Yum!   

So if you too are a biscuit lover, please try this recipe. And thank you again Ina for “the bones” of yet another wonderful recipe. You are my hero!

  • 2 c. + 1 T.  unbleached all-purpose flour, plus more as needed
  • 1 T. baking powder
  • 1½ tsp. kosher salt
  • 12 T. (1½ sticks) cold unsalted butter, diced
  • ½ c. cold buttermilk
  • 2 lg. eggs, divided
  • ¼ c. chopped fresh chives
  • 1 c. grated extra-sharp cheddar
  • 1 T. milk or water

Place the 2 cups of flour, baking powder, and salt in the bowl of an electric mixer fitted with the paddle attachment. With the mixer on low, add the butter and mix until the butter is the size of peas.

Combine the buttermilk and one of the eggs in a small bowl and beat lightly with a fork. With the mixer still on low, quickly add the buttermilk mixture to the flour and mix only until moistened. In a small bowl, mix the chives with the remaining 1 tablespoon flour. Add the cheddar and loosely coat the cheese with the flour. With the mixer still on low, add the cheese/chive mixture to the dough. Mix only until roughly combined.

Dump out onto a well-floured board and knead lightly about 6 times. Roll the dough into a rectangle 10 by 5 inches. With a sharp, floured knife, cut the dough lengthwise in half and then across in quarters, making 8 rough rectangles. Transfer to a sheet pan lined with parchment paper. Whisk together the remaining egg and the milk. Brush the tops with the egg/milk mixture. (If you like, you can add a little grated cheddar also.) Bake in a pre-heated 425 degree oven for 20 to 25 minutes, or until the tops are browned and the biscuits are cooked through. Serve hot or warm.


HERB AND GARLIC FOCACCIA

OLYMPUS DIGITAL CAMERA

When I want to serve really good bread to guests, I usually make it myself. And I know, that sounds rather conceited on my part, but it really isn’t my conceit showing. It’s my thrifty side coming to the fore. Because as much as I adore the people who come to our home for JazzVox concerts (anywhere from 25-40 any given concert), I’m simply not ready to spend $10 just for bread! Especially when I can build the bread myself for a fraction of the cost! Plus, if truth be known, I really like to bake bread.

So for our last concert, I fixed this new focaccia recipe adapted from the Inspired Taste website. Now in all honesty, I never got to taste the bread. Neither did Mr. C. But from what I was told, it was wonderful! (It sure looked good and smelled like Italian heaven.) People were still asking for the bread long after it was gone. (That’s always a sure sign the bread is good!) And the best part, it had been darned easy to build. And for someone who had 7 people to fix breakfast for and 41 people to feed a full meal to at 2:00 in the afternoon, I didn’t have any extra time the morning of the concert to fuss with an involved bread recipe. (And yes I am well aware of the fact that I am crazy. You need not feel obligated to remind me of this rather obvious character flaw!) But in my defense, I really did have everything under control. And having a really easy bread recipe picked out, was absolutely necessary to the success of my master plan. And yes, for these events I have a strategy mapped out that would make a NASA project planner envious! Complete with spreadsheets, timetables, and check-off lists. (Got to at my age! Just sayin’!)

So, next time you want a simple and tasty bread, remember this recipe. It makes a lot of focaccia, but it freezes beautifully. I hope you get a chance to try this wonderful focaccia. I know I’m going to be making it in the near future. But this time, I’m not going to share it with anyone. Well – maybe Mr. C. Oh, alright. If you happen to be around, I’ll let you try it too. But only one piece and for sure, you aren’t going to be taking any home with you! Well, maybe just one piece…..

  • 1 c. extra virgin olive oil, plus a small amount for greasing the dough  
  • 2 T. chopped fresh thyme or 2 tsp. dried thyme
  • 2 T. chopped fresh rosemary or 2 tsp. dried rosemary
  • pinch kosher salt
  • freshly ground black pepper
  • tiny pinch crushed red pepper flakes
  • 4 garlic cloves, minced
  • 2 c. warm water
  • scant 2 T. active dry yeast or 2 envelopes
  • ½ tsp. sugar
  • 5 c. unbleached all-purpose flour
  • 2 tsp. kosher salt
  • coarse ground sea salt or kosher salt

Combine the olive oil, thyme, rosemary, salt, pepper, and crushed red pepper flakes in a small saucepan. Place over low heat and cook, stirring occasionally for 3 minutes or until aromatic. Add the garlic and cook for 1 minute. Remove from heat and set aside to cool.  

In the bowl of your stand mixer, combine the warm water, yeast, and sugar. Stir a few times then let sit for 5 minutes. Add 2 cups of the flour and a ½ cup of the cooled olive oil mixture. Stir until all the flour has moistened. Let sit for another 5 minutes.

Add the remaining 3 cups of flour and the kosher salt. Once the dough comes together, knead the dough until smooth adding additional flour if necessary. Pour a small amount of olive oil over the dough, and turn until the whole ball of dough is lightly greased. Cover with plastic wrap or a clean tea-towel and let rise for 1 hour in a warm place.

Use 4 tablespoons of the remaining olive oil mixture to oil 2 – 9 x 13-inch rimmed baking sheets or 1 – 18 x 13-inch rimmed baking sheet.

Transfer dough to the baking sheet(s) then press it down into the pan(s). Use your fingers to dimple the dough, then drizzle the top with the remaining olive oil mixture. Add a very light sprinkling of coarse ground sea or kosher salt. Let the dough rise for 20 minutes until it puffs slightly. Bake in a pre-heated 450 degree oven for 15 to 20 minutes or until a light golden brown. Remove from the oven and transfer to a cooling rack. When cool, cut into desired size pieces. No butter or olive oil  dipping sauce required. (In my estimation.)


APPLE AND PECAN STREUSEL MUFFINS

OLYMPUS DIGITAL CAMERA

I think I have already mentioned that I am not really a muffin person. Maybe it’s because muffins are often too sweet. Well then, I can’t begin to explain why this recipe from Southern Living magazine caught my eye. But for some unknown reason, I thought these muffins would be wonderful for the Christmas day brunch I was planning for Mr. Cs family. And when I am right, I am right!

These muffins are absolutely delicious. They are however, a pain in the derrière to get out of the pan! You have to have the patience of a saint, the determination of a 2 year old, and enough will power not to throw the muffins, including the pan, off your back porch! (That thought actually crossed my mind at one point!)

But once they are out of the pan – perfection. The cake part of the muffin itself is tender and moist. But it’s the topping that really sends your whole mouth into “OMG” mode. And yes, I did consider using muffin papers. But I felt then, and I still feel that too much of the muffin would remain on the paper. And I really hate seeing my family and friends chewing on paper!

So if you too love apples, pecans, and streusel – this is the muffin for you. Just don’t wait until next Christmas. This is a muffin for all occasions.

Muffins:

  • 1 c. unsalted butter, room temperature
  • ¾ c. granulated sugar
  • ¾ c. firmly packed light brown sugar
  • 2 lg. eggs, room temperature
  • 2 c. unbleached all-purpose flour
  • 1 tsp. baking powder
  • ¼ tsp. baking soda
  • ¼ tsp. fine grained salt
  • ½ tsp. ground cinnamon
  • 1 c. sour cream
  • 1 c. chopped toasted pecans
  • 1 c. peeled and finely chopped Granny Smith apple
  • 1 T. vanilla extract
  • vegetable cooking spray

Beat the butter with an electric mixer until creamy. Gradually add granulated sugar and brown sugar, beating until light and fluffy. Add eggs, 1 at a time, beating at low speed after each addition, just until blended.

Whisk together the flour, baking powder, baking soda, salt, and cinnamon in a small bowl. Add to butter mixture alternately with sour cream, beginning and ending with flour mixture. Beat at low speed just until blended after each addition. Stir in pecans, apples, and vanilla.

Spoon batter into well-greased (with cooking spray) muffin pans, filling only three-fourths full. (I actually use a fairly large ice cream scoop.) Sprinkle about 1 tablespoon Pecan Streusel (recipe below) over each muffin. Makes roughly 22 muffins.

Bake in a pre-heated 350 degree oven for 20 to 22 minutes, or until a wooden pick inserted in center comes out clean. Cool in pans on wire racks for 5 minutes before removing (good luck) to wire racks. Cool completely and store in an airtight container.

Note: As stated above, the muffins are not easy to remove from the tins. If you don’t already have non-stick muffin pans, now is a good time to buy a couple. In fact, after making these muffins I decided I too need new muffin pans. Meet you at Bed, Bath and Beyond!

Pecan Streusel:

  • ½ c. firmly packed brown sugar
  • 2 T. unbleached all-purpose flour
  • 1 tsp. ground cinnamon
  • 1 c. chopped toasted pecans
  • 2 T. butter, melted

Stir the brown sugar, flour, and cinnamon together in a small bowl. Stir in pecans and melted butter until crumbly.