I have to preface
my remarks about this recipe by saying that I love cornbread. And that I really
haven’t tasted any cornbread that I found inedible. Of course I like some better
than others. But in general I’m not terribly fussy. I like them all. That’s why
this is not the first cornbread recipe to appear on this site. This is merely
one of my favorites. So I hope you enjoy it too. The flavor is wonderful and
the texture is moist and tender. And you don’t even need to involve your mixer in
the preparation. Just 2 bowls, measuring cups, measuring spoons, a whisk, and your
trusty rubber spatula. Easy as can be.
So next time you serve soup, stew, or chili, whip up a batch of this yummy bread as an accompaniment. Your status as kitchen wizard will not be threatened. In fact, it might even be enhanced. Happy baking!
1 c. unbleached all-purpose flour
⅔ c. medium grained yellow cornmeal
¼ c. granulated sugar
2 T. light brown sugar, packed
1 T. baking powder
½ tsp. kosher salt
pinch cayenne pepper
¼ c. vegetable oil
1 c. sour cream
1 (14.75 oz.) can creamed corn
3 lg. eggs
fleur de sel or other flaky salt
In a medium sized
bowl, whisk together the flour, cornmeal, granulated sugar, brown sugar, baking
powder, kosher salt, and pinch of cayenne.
In a large bowl,
stir together the oil, sour cream, creamed corn, and eggs until well combined.
Stir the dry ingredients into the wet, just until combined.
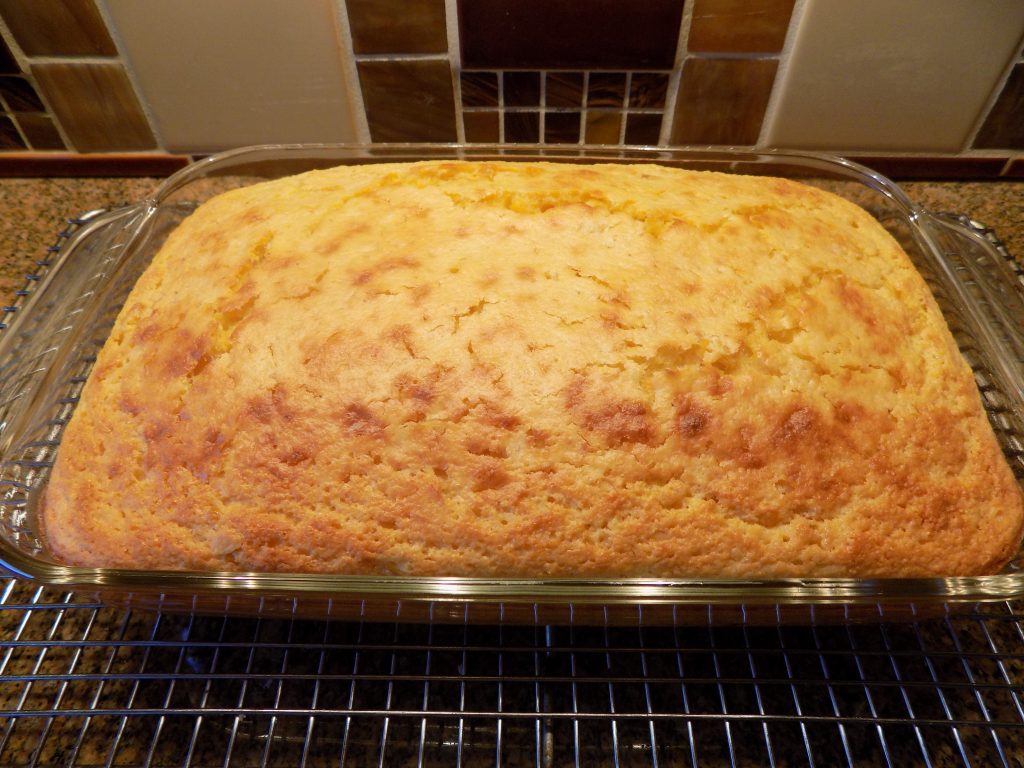
Pour the mixture
into a lightly greased 11×7-inch Pyrex pan or 10-inch cast iron skillet. Lightly
sprinkle with fleur de sel.
Bake in a
pre-heated 425 degree oven for 35-40 minutes or until tester comes out clean.
Remove from oven and let cool at least 10 minutes before serving.
As
we hunker down to wait and see where the coronavirus crisis eventually leads us,
we at Chez Carr are taking every precaution. We are staying home as ordered, we
are not going to stores unnecessarily, and above all, we are trying to stay
positive. We are also continuing to eat well and stay on course with our habit
of enjoying an adult beverage before dinner. And for me that means either a
very dry Tanqueray martini or a gin gimlet.
But
the other evening I decided to fix this very simple old standby for dinner. And
as far as I’m concerned, chili, cornbread, and dark beer are simply meant for
each other. So no before dinner drink for this gal. Just a bottle of cold beer
on the dinner table to go perfectly with my meal.
Now I only mention the beer because I want to remind everyone to stay committed to good health and to living life to the fullest even during this stressful time. David Brooks in his recent column entitled “Embrace the Uncertainty!” began with these immortal words “Screw this virus”. And ended his column with this sage bit of advice by writing “Airport rules apply. If you want a beer at 9 a.m., go for it.” So dear readers I will keep this recipe preface short. Keep cooking good food for yourself and your family. Keep positive. (Negativity is not going to help you stay healthy, either physically or mentally.) Keep helping those less fortunate than yourselves by donating money to food banks, cultural organizations, etc. if you are able. And stay up to date on how best to ride this storm. Reliable information from informed sources is our best hope. Peace and love to all.
1 T. olive oil
1 med. yellow onion, diced
1 green pepper, diced
3 garlic cloves, finely minced
1 lb. lean ground beef
3 T. chili powder
1 T. dried parsley
1 tsp. cumin
1/8 tsp. cayenne pepper
1 bay leaf
1 tsp. kosher salt
freshly ground black pepper
1 T. granulated sugar
¼ c. tomato paste
1 c. beef broth
1 (28 oz.) can diced tomatoes (Italian if possible)
1 (16 oz.) can chili beans (I like the black bean chili beans best)
Pour
the olive oil into a large covered soup pot and place over medium-high heat.
Add the onion. Cook for 5 minutes, stirring occasionally. Add the green pepper
and cook for 2 minutes. Add the garlic and cook for 1 minute.
Add
the ground beef to the pot. Break it apart with a wooden spoon. Cook for 6-7
minutes, or until the beef is browned, stirring occasionally.
Add
the chili powder, parsley, cumin, cayenne pepper, bay leaf, salt, pepper, sugar,
tomato paste, beef broth, diced tomatoes (with their juice), and canned chili beans.
Bring
to a low boil. Reduce the heat (low to medium-low) to gently simmer the chili,
cover, and cook for 30 minutes, stirring occasionally. Adjust seasoning before
serving piping hot.
Sour cream and grated sharp cheddar cheese are great toppings for this chili. And I like to serve Southern Cornbread (see recipe below) as an accompaniment.
SOUTHERN CORNBREAD
1 c. unbleached all-purpose flour
⅔ c. medium grained yellow cornmeal
¼ c. granulated sugar
2 T. light brown sugar, packed
1 T. baking powder
½ tsp. kosher salt
pinch cayenne pepper
¼ c. vegetable oil
1 c. sour cream
1 (14.75 oz.) can creamed corn
3 lg. eggs
fleur de sel or other flaky salt
In a medium sized
bowl, whisk together the flour, cornmeal, granulated sugar, brown sugar, baking
powder, kosher salt, and pinch of cayenne.
In a large bowl,
stir together the oil, sour cream, creamed corn, and eggs until well combined.
Stir the dry ingredients into the wet, just until combined.
Pour the mixture
into a lightly greased 11×7-inch Pyrex pan or 10-inch cast iron skillet. Lightly
sprinkle with fleur de sel.
Bake in a
pre-heated 425 degree oven for 35-40 minutes or until tester comes out clean.
Remove from oven and let cool at least 10 minutes before serving.
I
love banana bread, but I hate bananas. And even though I used to eat them
regularly, the last few years I have given myself permission to leave them in
the grocery store where they belong. And just because I already have a
wonderful banana bread recipe on this site, doesn’t mean that another recipe
wouldn’t be nice to have too. Especially if the new recipe contains malted milk
powder, which this recipe just happens to include.
Now,
do I like this recipe better than my old recipe? Not necessarily. It’s just a
little bit richer and moister. And I find that a plus in its favor. But either
recipe makes for some very good eating. And isn’t that what this blog is all about?
So
if you too enjoy banana bread, and happen to want to try one that is just a
tiny bit different, give this baby a try. But truly, you really can’t go wrong
with either recipe on this site. They are both perfect with breakfast or as an
afternoon treat with a hot cup of coffee or tea. And if you refrigerate the
loaf, it will happily stay fresh and delicious for several days.
Happy baking dear friends. And stay healthy. I’ve got lots more recipes I want to pass your way. So stick around.
½ c. unsalted butter, room temp.
¾ c. granulated sugar
¼ c. light brown sugar
2 lg. eggs
1½ tsp. vanilla extract
1½ c. bread flour
2 T. malted milk powder
1 tsp. baking soda
½ tsp. kosher salt
1 rounded c. mashed ripe banana (I used 3 medium sized bananas)
¾ c. toasted chopped walnuts
½ c. sour cream
2 T. coarse sugar (sometimes called decorating sugar)
Cream
butter and sugars until light and fluffy. Add the eggs and vanilla.
Whisk
the flour, malted milk powder, baking soda, and salt together.
Add
the dry ingredients, then bananas, nuts, and finally the sour cream. Mix well.
Pour
batter into a buttered 9×15-inch loaf pan or 2 prepared 7½ x 3½-inch loaf pans. Sprinkle
on the coarse sugar.
Bake
in a pre-heated 350 degree oven for 50-60 minutes, or for smaller pans, about 40-45
minutes. Remove from oven and let cool in the pan for about 10 minutes. Then
turn out onto wire racks to cool completely before slicing or storing.
Please note: If you have old aluminum pans that are rusting, maybe
you should consider getting some new loaf pans. Mr. C. finally asked me to
replace my old pans because he didn’t want to consume any more rust. OK, I get
that. I don’t think I even noticed anymore because I had been using those same
pans for 50 odd years.
So
I went on line and purchased a two pack of Stellar James Martin 1 lb. non-stick
Loaf Tin Pans.
Now
you know this is a non-advertising site. But these are the best loaf pans I
have ever used. They are the perfect size for us, because recipes that make
enough batter for 1 9×15-inch loaf pan is just the perfect amount for 2 of
these little darlings. They measure 7½ x 3½ x 2¾ inches. And I have always
enjoyed using the smaller pans for everything from meat loaf to quick bread.
For us, 1 loaf can be consumed while the other loaf can be tucked away in our
freezer for some later date when it’s obvious to both of us that we deserve a
treat.
Before
Christmas every year, I bake quick breads to give to friends and neighbors. Just
as a little something special to go with their morning coffee during this
hectic holiday season. And this year I decided to make a sweet potato bread.
Now
something you should know. I love sweet potatoes. I like them cooked with both savory
and sweet ingredients. But the best way for me to eat them is mashed up, with
lots of sugar and spices, in the form of pie. I could eat sweet potato pie
three times a week and be a very happy camper. Granted, a lot heavier than I already
am, but there would always be a smile on my face. Well, maybe not after having
just been to see my doctor, but the rest of the time for sure. But being
smarter than to do that to my body, I confine my sweet potato pie cravings to
once or twice a year.
But
when it came time to decide which quick bread to gift this year, visions of
sweet potato pie drifted into my psyche. Would it be possible to create a sweet
potato bread that contained all the ingredients I associate with sweet potato
pie? Could I guarantee that the bread would remain moist even if it sat around
for a few days? Could I keep from eating all the bread that I planned to share
with others? (That was really the main question.)
So
I jumped on the computer, did a few searches for a sweet potato bread recipe,
and came up with this glommed together version. Now when you read the
ingredients, I’m sure one of the first things you will notice is the 2
tablespoons of bourbon. And if you are at all familiar with my recipes, you
will be saying to yourself – self, she’s at it again – there’s bourbon in this
bread! And of course, you would be correct. There is indeed bourbon in this
recipe, and for a very good reason. Bourbon is a fantastic ingredient because
it pairs well with spices. It seems to bring out the best in them. For many, the flavor of bourbon hints of vanilla, caramel,
honey, butterscotch, apple, pear, figs, raisins, dates, nutmeg, cloves, and
cinnamon. So the use of a bit of bourbon in this recipe only makes sense. If
you choose not to use bourbon, just substitute it with water. Not a problem.
I hope you enjoy this recipe and think about gifting a loaf to a friend. And it doesn’t have to be just at Christmas time. Homemade goodies received any time of year are a treat. But save a loaf for yourself. For all you do, you deserve a treat too. And I can’t think of a better way to treat yourself than to sit down with a nice cup of coffee or tea, a slice of this bread, and a good book. Happy New Year everyone. And peace and love to all.
2½ c. unbleached all-purpose flour, plus more for dusting the pan
½ c. whole wheat pastry flour
1½ tsp. salt
2 tsp. baking soda
1 tsp. baking powder
2 tsp. ground cinnamon
2 tsp. freshly ground nutmeg
½ tsp. allspice
½ tsp. ground cloves
2 c. sweet potato flesh, scooped from 2-3 medium sized roasted sweet potatoes (see recipe for roasting sweet potatoes below)
1⅓ c. granulated sugar
2/3 c. packed light brown sugar
1 c. unsalted butter (2 sticks), melted, plus more for coating the pans
4 lg. eggs, room temperature
2 tsp. vanilla extract
2 T. bourbon
1 c. whole milk
1 c. pecans, toasted and coarsely chopped
¼ c. demerara sugar, or more as needed
Coat
2 9x5x3-inch loaf pans or 5 small loaf pans with butter and flour. Set
aside.
Whisk
the flours, salt, baking soda, baking powder, cinnamon, nutmeg, allspice, and
cloves together in a medium bowl; set aside.
In
the bowl of your stand mixer fitted with a paddle attachment, mix the mashed
sweet potato, granulated sugar, and brown sugar on medium speed until well
combined, about 1 minute. Add the melted butter and mix on low speed until
smooth. Add the eggs 1 at a time, mixing until fully incorporated, then mix in
the vanilla and bourbon.
Stop
the mixer and scrape down the sides of the bowl with a rubber spatula. On low
speed add half of the flour mixture, then half of the milk. Repeat with the
remaining flour mixture and milk, mixing just until combined, about 1 minute.
Remove the bowl from the mixer and fold in the pecans.
Pour
the batter into the prepared pans, smooth the top, and evenly sprinkle with the
demerara sugar.
Bake
in a pre-heated 350 degree oven until a cake tester inserted into the center
comes out clean, about 55 to 60 minutes. (30 minutes baking time (or so) for
the mini pans.)
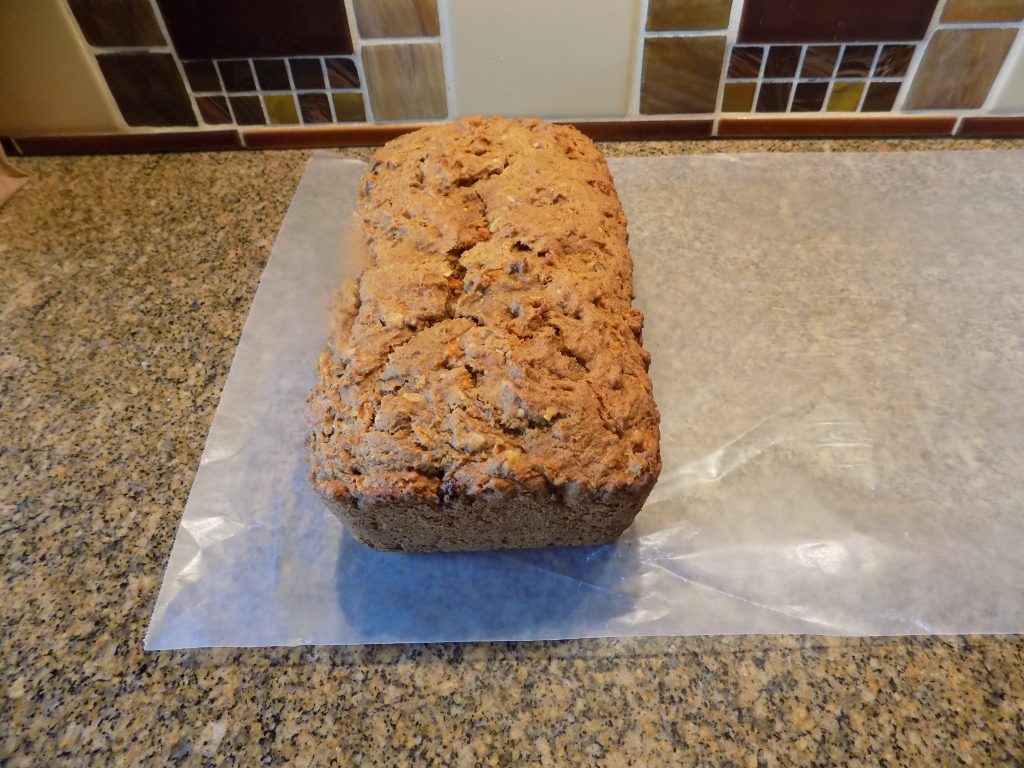
Remove
breads from oven and allow to cool in the pans for 15 minutes, then turn out
onto a wire rack to cool completely. If you are giving the mini breads as
gifts, and have used the disposable aluminum pans, just leave the breads in the
pans.
How to bake sweet potatoes for this
recipe:
Wash
and dry 3 medium, dark skinned sweet potatoes (may be labeled as yams at your
grocery store). Make about 3 slits on the top of each potato. Place on a baking
sheet. Bake in a pre-heated 400 degree oven for 60-75 minutes or until tender. Remove
from oven and cool to touch or for really easy peeling, refrigerate the cooked
sweet potatoes overnight. Remove the peels and mash with a fork.
True
confession time. I could eat carrot cake with cream cheese frosting every day
of my life if weight and remaining healthy were not a concern. But since they
are, I probably only bake a carrot cake once a year. But when I do – watch out
baby. Because carrot cake is good 3 times a day – for breakfast, lunch, and
dinner. And I really can’t stop myself. I like carrot cake that much!
So
when I was preparing food for our last trailer trip, I thought a healthy
(emphasis on healthy) quick bread would be nice to have along. Quick breads
(think banana bread) are perfect with breakfast, for an elevenses snack with a
cup of coffee, or even for dessert. So then, what quick bread to fix? And for
whatever reason, I thought about how much I love carrot cake. Which then naturally
led me to – why not a carrot bread?
Now
I had never thought about a carrot bread before, much less tasted one (that I can
remember), but the idea of a carrot quick bread was like a revelation. Maybe
all those lovely carrot cake ingredients could be magically transformed into
something I could enjoy more often than once a year! Then, I couldn’t imagine
that someone out there wasn’t already several steps ahead of me in developing a
recipe. So I went on line. And I found a recipe on the An Oregon Cottage web
site that was almost what I was looking for. So I started with Jami’s recipe
and added my own special touches. And I came up with the recipe I am sharing
with you today. (Is that applause I hear coming from your computer?)
So
to make a long story short, we cut into this bread for breakfast one morning
while on our trip, and there was much rejoicing in the Carr trailer with our
first bite.
Now
understand, this carrot bread is never going to take the place of carrot cake with
its moist and delicious texture and cream cheese frosting to die for. Never in
a million years. However, not wanting either of us to die any time in the near
future mandates a change in our way of thinking about food. And I’m thinking
this bread is a pretty darn good way to enjoy the wonderful flavor of carrot
cake without having the little devil that lives on my left shoulder applauding
my lack of self-control, while the little angel who sits on my other shoulder
weeps uncontrollably into a soggy Kleenex!
So if you love carrot cake, and happen to be looking for a quick bread with lots of carrot cake flavor, that’s easy to prepare, and contains considerably less carbohydrates than “the real thing”, this recipe is for you. And yes, you can add a bit of frosting or glaze to the top of this delicious bread. But you’re not going to get a recipe from me. I have enough to deal with from my own little devil. I don’t need yours hounding me too! (Enjoy the recipe and love and peace to all.)
1
c. whole wheat flour
1
c. whole wheat pastry flour*
2
tsp. baking powder
¾
tsp. baking soda
½
tsp. kosher salt
1½
tsp. ground cinnamon
¼
tsp. ground ginger
¼
tsp. allspice
¼
tsp. ground nutmeg
½
c. sour cream
½
c. real maple syrup
¼
c. (½ stick) unsalted butter, melted
1
lg. egg
2½
c. shredded carrots
¼
c. golden raisins
¼
c. shredded coconut
½ c. chopped walnuts or pecans
cooking spray
Whisk
the flours, baking powder, baking soda, salt, cinnamon, ginger, allspice, and
nutmeg together in a large bowl.
In
a small bowl whisk together the sour cream, maple syrup, melted and cooled butter,
and egg. Pour the sour cream mixture over the dry ingredients and mix just
until just combined. Fold in the carrots along with the golden raisins,
coconut, and walnuts. (The dough will be very thick.)
Spread
the dough evenly into a large loaf pan or two smaller loaf pans that have been
coated with cooking spray. Level off the tops with an offset spatula.
Bake
in a pre-heated 350 degree oven for 50 to 65 minutes (depending on the size of
your pan or pans) or until a toothpick inserted in the center comes out clean.
Cool
in the pan(s) for 10 minutes and then turn out onto a metal rack to cool
completely.
Just after I formed the dough into torpedo shapes and placed them in a buttered 9×13-inch pan. A 30 minute rest/rise is the next step.
Just after I slathered the hot-out-of-the-oven rolls with melted butter and sprinkled them lightly with fleur de sel.
I
love bread. Always have, always will. And for me the best part of a lot of restaurant
meals is the warm bread brought out just after the server has taken our order.
Yum. And so I like to serve some type of bread when I have company. Of course,
some meals don’t warrant bread or rolls, but those that do, and I have the time
needed to bake, I give it a go. And with this recipe that takes much less time
than most roll recipes, it’s a snap for me to have rolls on the table in the
blink of an eye. (Well, it takes longer than that, but not much!)
And
these babies are delicious. And with a stand mixer, the ease of preparation
makes me feel almost guilty for taking any credit at all. I mean really. Dump a
few ingredients in the mixer bowl, set the thing on go, and add enough flour
until the bowl is practically clean. How hard is that?
Of course it did take some talent to form the dough into 18 even hunks. But I can almost do that in my sleep because of lots of years of practice. But then again, you only get good at doing something by performing the act over and over. It’s just like that decades old question. How do you get to Carnegie Hall? Answer – practice, practice, practice! How do you make a good dinner roll? Use this recipe and (you guessed it) practice, practice, practice. Enjoy.
4
c. unbleached all-purpose flour, or more if needed
2
pkgs. or 2 T. rapid rise or instant
yeast
¼
c. granulated sugar
1
lg. egg, room temperature
1
tsp. kosher salt
1½
c. whole milk
6
T. unsalted butter, melted, divided
fleur de sel or kosher salt, for topping
Combine
3½ cups of the flour, yeast, sugar, egg, and the 1 teaspoon of kosher salt in the
bowl of your stand mixer fitted with the dough hook. Heat milk until warm. (Remember,
it can’t be too warm or the heat will kill the yeast.)
Add
the warm milk and 4 tablespoons of the melted butter to the flour mixture.
Knead 2 minutes at medium speed, scraping bowl occasionally if needed. Add enough
additional flour until the dough pulls away from the sides and bottom of the
bowl while kneading. Cover with a clean towel or plastic wrap and let rise for
30 minutes. Punch down the dough.
Divide
the dough into 18 torpedo shaped pieces. (Don’t worry if the sizes are not
perfectly equal. But do make them as consistent as possible.) Place in a lightly
buttered 9×13-inch pan. (I use a glass Pyrex pan.) Cover with plastic wrap and let
rise in a warm place until doubled in size, about 30 minutes.
Bake
in a preheated 375 degree oven for about 20 minutes or until golden brown. (An
instant read thermometer should register between 185 to 190 degrees when they
are done.) Remove from oven and brush with the remaining 2 tablespoons of melted
butter while the rolls are still warm. Lightly sprinkle with fleur de sel. Serve
warm or at room temperature with lots of room temperature butter.
Every
year at Christmas time, there are a few of us who live in the same neighborhood
that exchange a little something sweet with each other. We dearly treasure
these people, so of course I treat them like I would if they were family
members. That means I experiment on them just like I would if we were related.
Now
sometimes my “experiments” turn out better than I expected. Other times, not so
much. This year, I gifted these dear friends with a version of an eggnog bread
that I read about on the On Sutton Place food site. I changed a couple of things
here and there, but the essence of the recipe remained true to the original. And
I am very pleased to announce, that in my humble estimation, this bread recipe is
a winner.
The
bread is ever so tender, moist, and the flavor is absolutely lovely. So even
though Christmas has come and gone, or as they say in the common vernacular ‘so
yesterday’, I’m providing you with this recipe as an early Christmas present for
next year! This bread is simply that delicious. It is definitely gift worthy,
even if the one gifted is just you!
So before eggnog no longer appears in your local grocery store dairy case, bake a batch, freeze 2 of the loaves, and every 4 months or so, take one out of the freezer and make an otherwise uneventful weekend breakfast a special occasion. Cheers!
½
c. (1 stick) unsalted butter, room temp.
1
c. granulated sugar
2 eggs, room temperature
1½
c. eggnog (not the low fat
variety)
1 tsp. vanilla extract
1 tsp. VS cognac*
1
tsp. dark rum*
2¼
c. unbleached all-purpose flour
1 small pkg. (3.4-oz.) instant
vanilla pudding mix
2 tsp. baking powder
½
tsp. salt
½ tsp. ground nutmeg
¼ tsp. cinnamon
Butter
and flour 3 small loaf pans. Set aside until needed.
In
the bowl of your stand mixer, whip the butter and sugar until light and fluffy.
Add the eggs and beat until combined. In a glass measuring bowl, whisk the
eggnog, vanilla, cognac, and dark rum together.
In
another bowl, whisk the flour, pudding mix, baking powder, salt, nutmeg, and
cinnamon together.
Add
the dry ingredients and eggnog mixture to the butter mixture in 3 batches,
mixing well after each addition. The batter will be thick. Divide the batter evenly into the prepared
pans.
Bake
in a pre-heated 350 degree oven for 25-35 minutes or until a toothpick inserted
into the middle of each loaf comes out clean. Do not overbake.
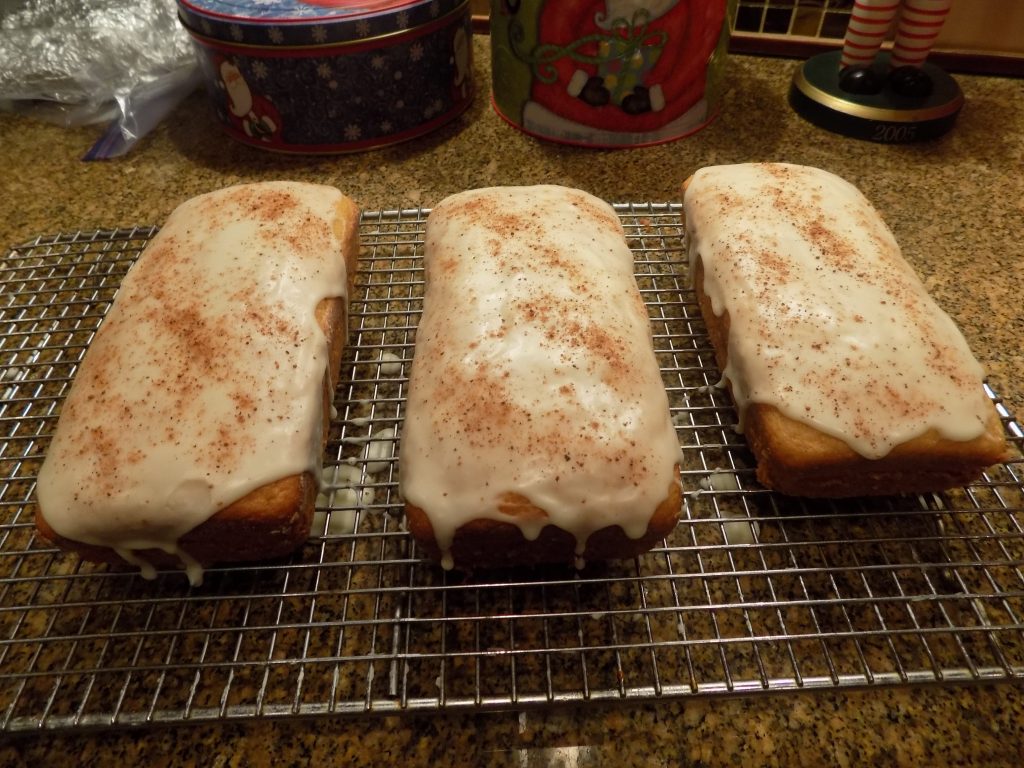
Remove from oven and cool in pans for 5 minutes before turning out onto racks to cool completely. Or, if you are giving the loaves as gifts, and have used disposable aluminum pans, they can remain in their pans.
Cognac Glaze
1
c. powdered sugar, or more as needed
1
T. eggnog, or more as needed
1 tsp.
cognac, dark rum, or bourbon (whichever you use in the bread batter)
freshly grated nutmeg, opt.
Whisk
the powdered sugar, eggnog, and cognac together to form a pourable, but not
runny mixture. If your glaze is too thin, add a little more powdered sugar. If
it’s too thick, add a tiny bit more milk. Drizzle glaze over cooled loaves. Sprinkle lightly with freshly grated nutmeg. Let set
completely before wrapping each loaf in wax paper and aluminum foil. Store at
room temperature.
*Or you can use all cognac, dark rum, or bourbon. All work well in this recipe.
It has been a tradition in our family since my children were very young, to enjoy cinnamon rolls with our Christmas morning breakfast. (And it’s a fine tradition I have to say!) Of course it’s one more thing for Mrs. Santa to do on Christmas Eve. But I’ve been making these rolls for so long, they practically throw themselves together. And never being one of those people who has a favorite cinnamon roll topping, I sometimes make sticky buns and other times it’s frosted rolls. I love them both ways, so it’s a dozen of one or a dozen of the other. (I think that’s how the saying goes!) Anyway, this year I decided to make Sticky Buns. And for the life of me, I have no idea why I haven’t previously posted this recipe. Perhaps it has something to do with PCSD – Post Christmas Sleeping Disorder (my need for at least a solid 12 hours of sleep each night between Christmas night and New Year’s Eve). But regardless of the reason, I am not going to let any more time pass without providing you with my recipe for these yummy cinnamon rolls.
I believe the original recipe came out of my Betty Crocker cookbook. I would verify that belief, but I’m pretty sure the cookbook pages would self-destruct if I tried to pry them apart. I am certain however that I made a couple of ingredient changes a while back. I substituted butter for shortening, and bread flour for all-purpose flour. (Got to stay up to date with the ever changing world of nutrition. BTW – it’s once again OK to eat up to 3 eggs and 70g of beef daily! Well, that is, until “they” change “their” minds again!) But back to cinnamon rolls.
So do yourself a favor, and bake a batch of these rolls for your family or friends. And no, you do not have to wait until next Christmas! These babies are delightful any old day of the year. But beware. They are addicting. And yes, if you are a lot more organized than I am, which isn’t difficult I might add, you can make these rolls ahead and freeze them until needed. Happy New Year.
STICKY BUNS
Dough recipe:
¾
c. scalded, room temperature whole milk (see how to scald milk below)
1
pkg. or 1 scant tablespoon active dry yeast
¼
c. room temperature water
¼
c. granulated sugar
¾
tsp. salt
1
egg
¼
c. (½ stick) unsalted butter, room temp.
3½
c. bread flour
veggie
oil
2
T. unsalted butter, melted
½
c. packed brown sugar
2-3
tsp. ground cinnamon
½ c. golden raisins
In the bowl of your stand mixer, dissolve the yeast in the room temperature water. Add the sugar. Let sit for 10 minutes. (The yeast should foam up a bit during this time.) Add the cooled milk to the yeast mixture along with the salt, egg, butter, and half of the flour. Mix until smooth. Add enough of the remaining flour to form a soft, but not sticky ball. Knead for about 5 minutes.
Pour
a small amount of oil over the dough and roll into a ball with your hands. Cover
the bowl with plastic wrap and allow to rise until doubled in size, about 90
minutes. Punch down and let rise again for 30 minutes. While the dough is rising, make the sticky
part.
When
the dough is ready, roll into a 15 x 9-inch rectangle. Spread the dough with
the melted butter. Sprinkle the brown sugar over the butter, then sprinkle evenly
with the cinnamon and golden raisins. Roll up tightly, beginning at one of the
wide ends. Slice into 12 rolls (about 1-inch slices.) Place slices in the
baking pan over the “sticky part”. Cover with plastic wrap or a tea towel and
let rise until doubled, about 45 minutes.
Bake
in a pre-heated 375 degree oven for 25-30 minutes. Remove from oven and
immediately turn upside down over a tray or aluminum foil. Let pan stay over
the rolls a minute or so to allow the “sticky stuff” to run down over the
rolls. Anything remaining in the pan can be removed and spread over the rolls.
Serve warm.
If you make ahead, allow to cool completely and cover with foil and store on your counter. When you are ready to serve, heat the rolls gently in your oven or microwave. Don’t expect any leftovers!
Sticky Topping:
1/3
c. unsalted butter
½
c. packed brown sugar
1
T. corn syrup
½
c. chopped pecans or walnuts
Melt the butter in a small saucepan. Stir in the brown sugar and corn syrup. Pour in to a buttered 9 x 13-inch pan (glass preferred). Sprinkle with pecan pieces. Set aside.
CREAM CHEESE FROSTING TOPPED CINNAMON ROLLS
Dough recipe:
¾
c. scalded, room temperature whole milk (see how to scald milk below)
1
pkg. or 1 scant tablespoon active dry yeast
¼
c. room temperature water
¼
c. granulated sugar
¾
tsp. salt
1
egg
¼
c. (½ stick) unsalted butter, room temp.
3½
c. bread flour
veggie
oil
2
T. unsalted butter, melted
½
c. packed brown sugar
2-3
tsp. ground cinnamon
½
c. golden raisins
½ c. chopped pecans or walnuts
In
the bowl of your stand mixer, dissolve the yeast in the room temperature water.
Add the sugar. Let sit for 10 minutes. (The yeast should foam up a bit during
this time.) Add the cooled milk to the yeast mixture along with the salt, egg,
butter, and half of the flour. Mix until smooth. Add enough of the remaining
flour to form a soft, but not sticky ball. Knead for about 5 minutes.
Pour a small amount of oil over the dough and roll into a ball with your hands. Cover the bowl with plastic wrap and allow to rise until doubled in size, about 90 minutes. Punch down and let rise again for 30 minutes.
When
the dough is ready, roll into a 15 x 9-inch rectangle. Spread the dough with
the melted butter. Sprinkle the brown sugar over the butter, then sprinkle evenly
with the cinnamon and golden raisins. Roll up tightly, beginning at one of the
wide ends. Slice into 12 pieces (about 1-inch slices). Place in a buttered 9 x
13-inch pan (glass preferred). Cover
with plastic wrap or a tea towel and let rise until doubled, about 45 minutes.
Bake
in a pre-heated 375 degree oven for 25-30 minutes. Remove from oven, place on a
cooling rack, and allow to cool completely before slathering with the frosting.
Sprinkle the pecans evenly over the frosting.
Cover with foil and store on your counter. When you are ready to serve, heat the rolls gently in your oven or microwave. (You don’t want to warm them too much or too fast. You don’t want the frosting to melt completely. It may melt a little. Not such a bad thing!) As with the Sticky Buns, don’t expect any leftovers!
Brown Sugar and Cinnamon Cream Cheese
Frosting:
½ c. (1 stick) unsalted butter, room temperature
8 oz. cream cheese, room
temperature
2 T. brown sugar
1 tsp. vanilla
pinch salt
¼ tsp. ground cinnamon
3½ c. powdered sugar or more
if needed
Cream butter, cream cheese,
and brown sugar together until light and fluffy. Add the vanilla, salt, cinnamon,
and enough powdered sugar to make a firm but not stiff consistency. Beat until
smooth and easy to spread.
*How to and why is it necessary to scald
milk:
In a small pan, heat the milk to just below the boiling point (180 degrees). (Milk will have just begun to simmer at this point, and will give off steam while small bubbles form at the edge of the pan.) Remove from heat. The temperature of the milk at this point is actually higher than the temperature at which milk is pasteurized (161 degrees). Milk actually needs to be scalded for this recipe to help the dough rise up better and produce a firmer, lighter textured roll. For the scientific reasons behind scalding milk, consult the internet.
As I sit at my desk writing this preface, I see grey skies, grey water, and leaves on deciduous trees in shades anywhere from rusty red to a lovely golden yellow. The leaves are beautiful, the grey – not so much! All of which however serve to remind me that it is fall, with winter just around the corner. But the one redeeming feature that makes enduring these upcoming soggy and dark months semi passable for me, is that I get to prepare soups and stews. Because I truly love to both cook and eat these hot and savory dishes. Especially when accompanied by a lovely piece or two of homemade bread. So knowing that everyone seems to love comfort food especially during the dreary months, I decided to share with you one of my favorite bread recipes. This recipe is both easy to prepare and absolutely delicious.
I have been making this bread since my children were very young. In fact, when I made this bread, or any kind of bread for that matter for an extended family dinner gathering, my son Sven would fill up on the bread, generously spread with soft butter I might add, and totally ignore the rest of the dishes I was serving. (Except dessert, of course!) But those were wonderful times, and an occasional dinner of just bread didn’t seem to hurt my son or anyone else in the least.
This recipe is straight out of my then new Stone-Buhr Kitchens 1971 cookbook entitled Cooking with Gourmet Grains. Still one of my favorite cookbooks BTW. (OK, I did reduce the amount of sugar, but that is the only change I made.)
So next time you decide to serve soup or stew, give this incredibly delicious bread a try. After all, most soups and stews take a fairly long time to cook. So while your soup or stew is happily burbling away on the stove, you could be making a loaf or two of this bread! Now wouldn’t that thrill your family and friends? After all, “Nothing says lovin’ like something from the oven”! Quote from the Pillsbury Doughboy (aka Poppin’ Fresh). Actually, at 42 years old, the Pillsbury Doughboy should now be referred to as the Pillsbury Doughman. But I’ll never win that argument with the makers of advertisements, so I might as well leave that subject unassailed! Enjoy the bread.
¼ c. barely warm water
1 pkg. or 1 T. active dry yeast
1 T. sugar
1 c. lg. curd cottage cheese
1 T. dehydrated onion
1 T. unsalted butter
1 tsp. kosher salt
¼ tsp. baking soda
2 tsp. dill seed
1 lg. egg
2¼ – 2½ c. unbleached all-purpose flour
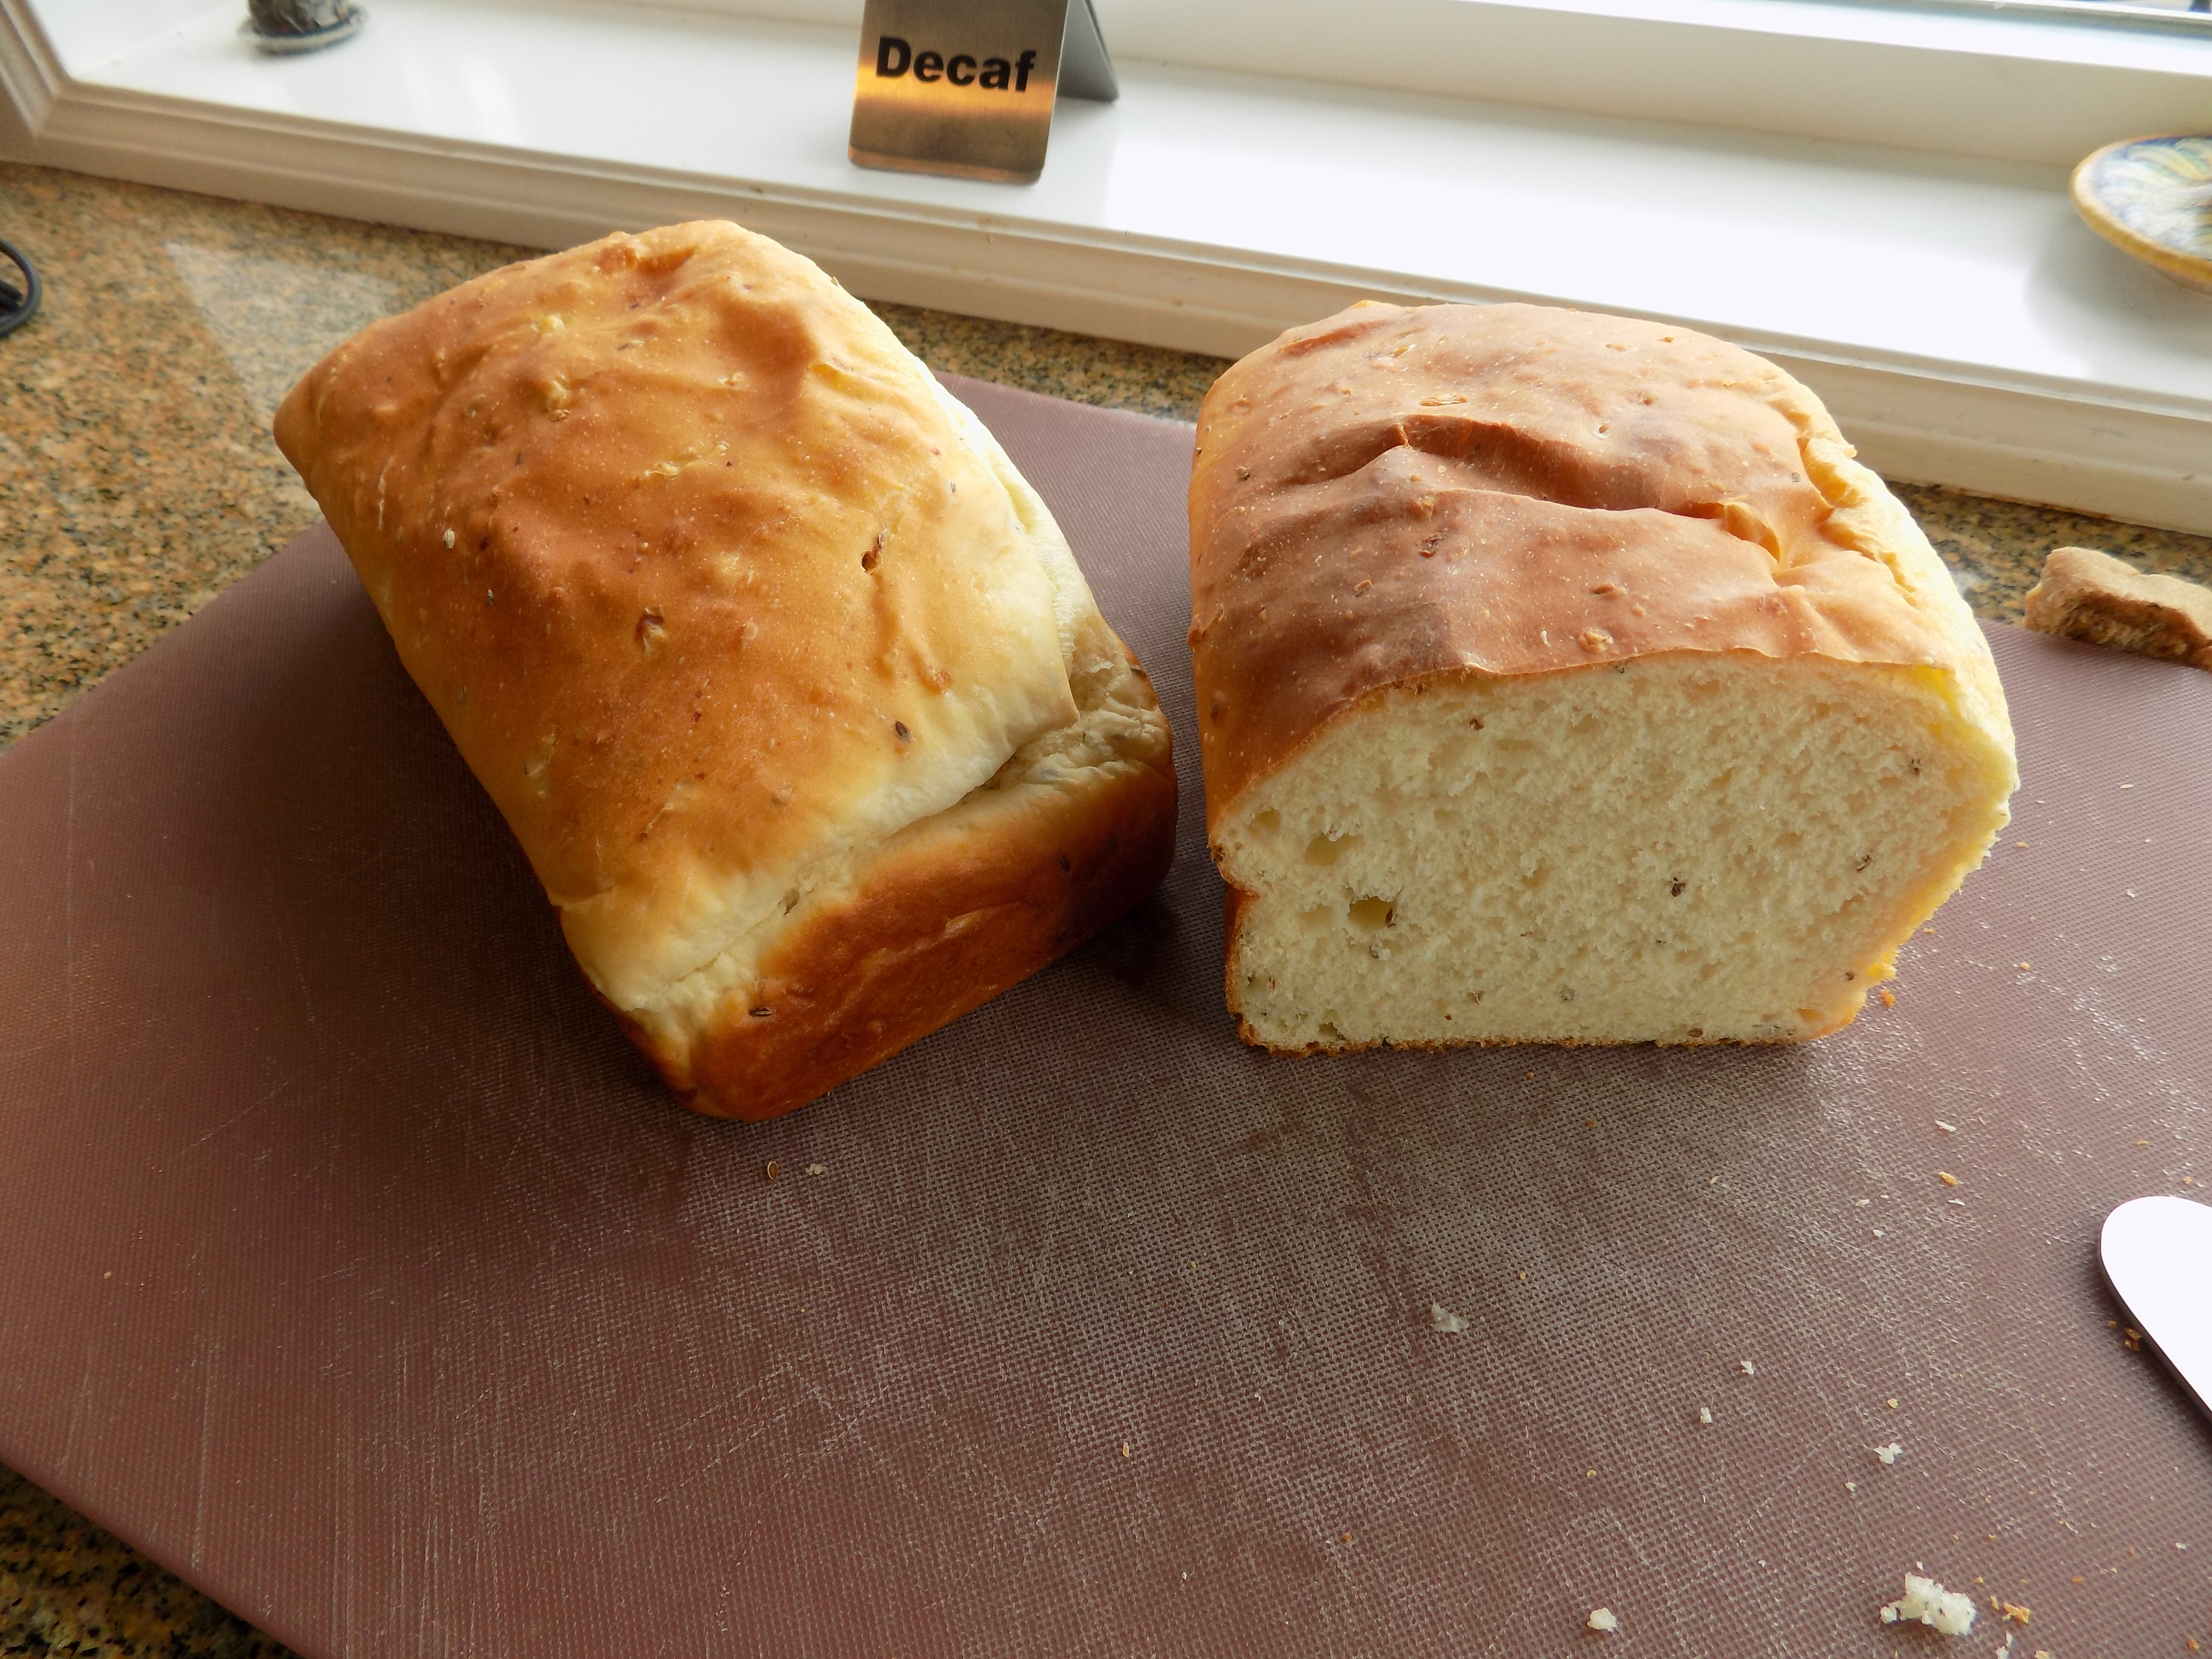
Pour water into the mixing bowl of your stand mixer. Sprinkle with yeast and sugar. Allow to sit for 10 minutes.
Meanwhile, heat the cottage cheese to lukewarm and stir in the onion, butter, salt, baking soda, and dill seed. When the mixture is cool to the touch, add the egg. Add the cottage cheeses mixture to the yeast mixture; blend with your dough hook.
Add enough flour to make a stiff batter. Knead for a couple of minutes. Cover the bowl with plastic wrap and let rise until doubled, 50-60 minutes. Punch down and turn into a well-greased 1½ qt. casserole dish or loaf pan. (When making a double batch, I divide the batter between 3 loaf pans. Makes for nice sized loaves.) Cover and let rise in a warm place for 30-40 minutes or until almost doubled.
Bake in a pre-heated 350 degree oven for 35-45 minutes or until the internal temperature reaches about 200 degrees. (You may need to place a piece of aluminum foil over the bread for the last 10-15 minutes to prevent the top crust from getting too brown.)
Remove bread from casserole or loaf pan; cool on a wire rack. Serve at room temperature with lots of soft butter.
And yes, this is yet another zucchini recipe! (I’m on a roll, and at this point, there’s no stopping me. At least until friends stop gifting me with home grown zucchini!) But even if I didn’t have zucchini in both my refrigerators, and a couple of cupboards in my unheated garage, I would want you to have this recipe. This zucchini bread is simply that good. And very easy to prepare.
The back story: A few years ago at a Labor Day family campout, daughter Ursala brought several loaves of this zucchini bread to share with her dear mother, Mr. C, her siblings and family, and the rest of our extended community. Well (and I’m still not proud of myself for this), it got time to pack up and leave, and one of the things that “left” was an absconded loaf of this delicious bread. I just walked over to her camp site and “lifted” one of the loaves. (What kind of mother does that?)
Now anyone who has the good fortune of being acquainted with my darling Ursala, knows that she would have gladly given me a loaf, had I but asked. But I was desperate! I absolutely had to have a loaf of this bread to take home.
Well the upshot is that, a) she knew immediately who had taken the bread, b) she was happy that I liked her bread so much, and c) SHE SENT ME THE RECIPE!
So dear readers, if someone gives you home grown zucchini, or you have to drive to your local grocery store to procure a zucchini or two, please make this delicious bread at your earliest convenience. It is just lovely.
Thanks again for the recipe my dearest Ursala. I love you to the moon!
2 c. unbleached all-purpose flour
1 c. whole wheat flour
1 tsp. salt
1 tsp. soda
¼ tsp. baking powder
2 tsp. ground cinnamon
¼ c. sesame seeds
¼ c. sunflower seeds
¾ c. chopped walnuts
3 eggs
1 c. vegetable oil
1½ c. granulated sugar
½ c. brown sugar
2 c. packed grated zucchini (skin on)
2 tsp. vanilla
In a medium sized bowl, whisk together the flours, salt, soda, baking powder, and ground cinnamon. Stir in the sesame seeds, sunflower seeds, and walnuts.
In a large mixing bowl, whisk together the eggs, oil, and sugars. Stir in the grated zucchini and vanilla. Add the flour mixture and stir until just combined.
Pour into 2 or 3 lightly greased loaf pans. Bake in a pre-heated 350 degree oven for 45-60 minutes (depending on how many pans you use) until a pick comes out clean when inserted into the middle of each loaf.
Remove from oven and let rest for 10 minutes before carefully removing from pans onto a wire rack. Cool completely before cutting.
Note: Believe it or not, this bread is best after it’s been frozen for a couple of days or longer. Of course you can eat it the same day it’s baked, but I’m tellin’ you true, it’s better after its spent some quality time with your ice cream!