Author Archives: Patti

HEALTHIER PEANUT BUTTER OAT BARS WITH DARK CHOCOLATE CHIPS    

And yes, another natural peanut butter based, oat, and chocolate chip cookie recipe. (I recently published my recipe for GF Peanut Butter Oat chocolate chip coconut Cookies on this site.) And these cookies are not that much different except that this recipe is not gluten free and it’s a bar cookie. I love bar cookies. The older I get, the easier I want to make life for myself. And I thought you might find that to also be true for yourself.

So, when I looked for a healthy bar cookie recipe, this delightful ingredient assembly from the heynutritianlady.com site jumped out at me. I did add salted peanuts to the mix and changed up the prep instructions a bit, but other than that the recipe remains true to the original. And the fact that this recipe is very quick and easy to prepare didn’t hurt either.

So, enough said. The bar cookies are very good. And I can eat one without feeling guilty, which for anyone who is trying to bring their A1C numbers down, is a wonderful thing.

I am fortunate. My numbers are almost normal again since I stopped taking prednisone. But even so, I am going to continue eating like I have diabetes because, well, I’m no longer a spring chicken. I have advanced to the plucky old bird category. And as such, I need to continue paying close attention to what I put in my mouth. And for a foodie like myself, it ain’t easy. But nothing worthwhile has ever been easy. So, why should growing old be any different!

I have had such a wonderful life. I’ve never experienced hunger or had to worry about a roof over my head or how I was going to pay the electric bill. Of course, times were lean when I was younger, but there were opportunities galore when I was in my twenties. I can’t say the same for young adults who are starting out today. Things are different now. And the way our democracy is headed, I’m actually glad I’m old. I don’t like the direction in which our country is headed. Or the complete disregard some of our government leaders show for ethical behavior or empathy for one’s fellow man. Who allowed these spoiled toddlers, in the guise of men and women old enough to know better, to ever attain enough significance as to be able to display such hateful and narcissistic behavior as we are witnessing in our country today? And why aren’t more people incensed by this caustic and erratic behavior? I know if any one of these people were my kid, they’d be hearing from me on a daily basis. And it wouldn’t be to tell them they were doing a great job! I would be letting them know I was mortified by what they were doing, saying, and exemplifying! And that there would be no more Christmas goodie packages until they cleaned up their act! Period! And BTW, GO TO YOUR ROOM!!   

How did we ever get to this place? Were most of us just too busy living our wonderful lives to notice what was happening to our world? If that is the case, then I have no one to blame but myself. Because I sure didn’t see it coming. I was simply content to happily drift along and assume that all was perfectly fine because I lived in this wonderful democratic country. Well, that may not always be the case.

So, if you too are bothered by what is happening in our country, please vote in every election that comes along. For most of us, the only way we can truly make a difference, is by casting our ballot for individuals who have the greater good for everyone uppermost in their political agenda.

Peace and love to all.

1 c. natural creamy peanut butter 

½ c. coconut palm sugar

2 tsp. vanilla extract

½ c. whole milk    

1 c. whole wheat pastry flour

1 tsp.  baking soda

¼ tsp. kosher salt

1 c. rolled oats  

¾ c. dark chocolate chips

½ c. salted peanuts  

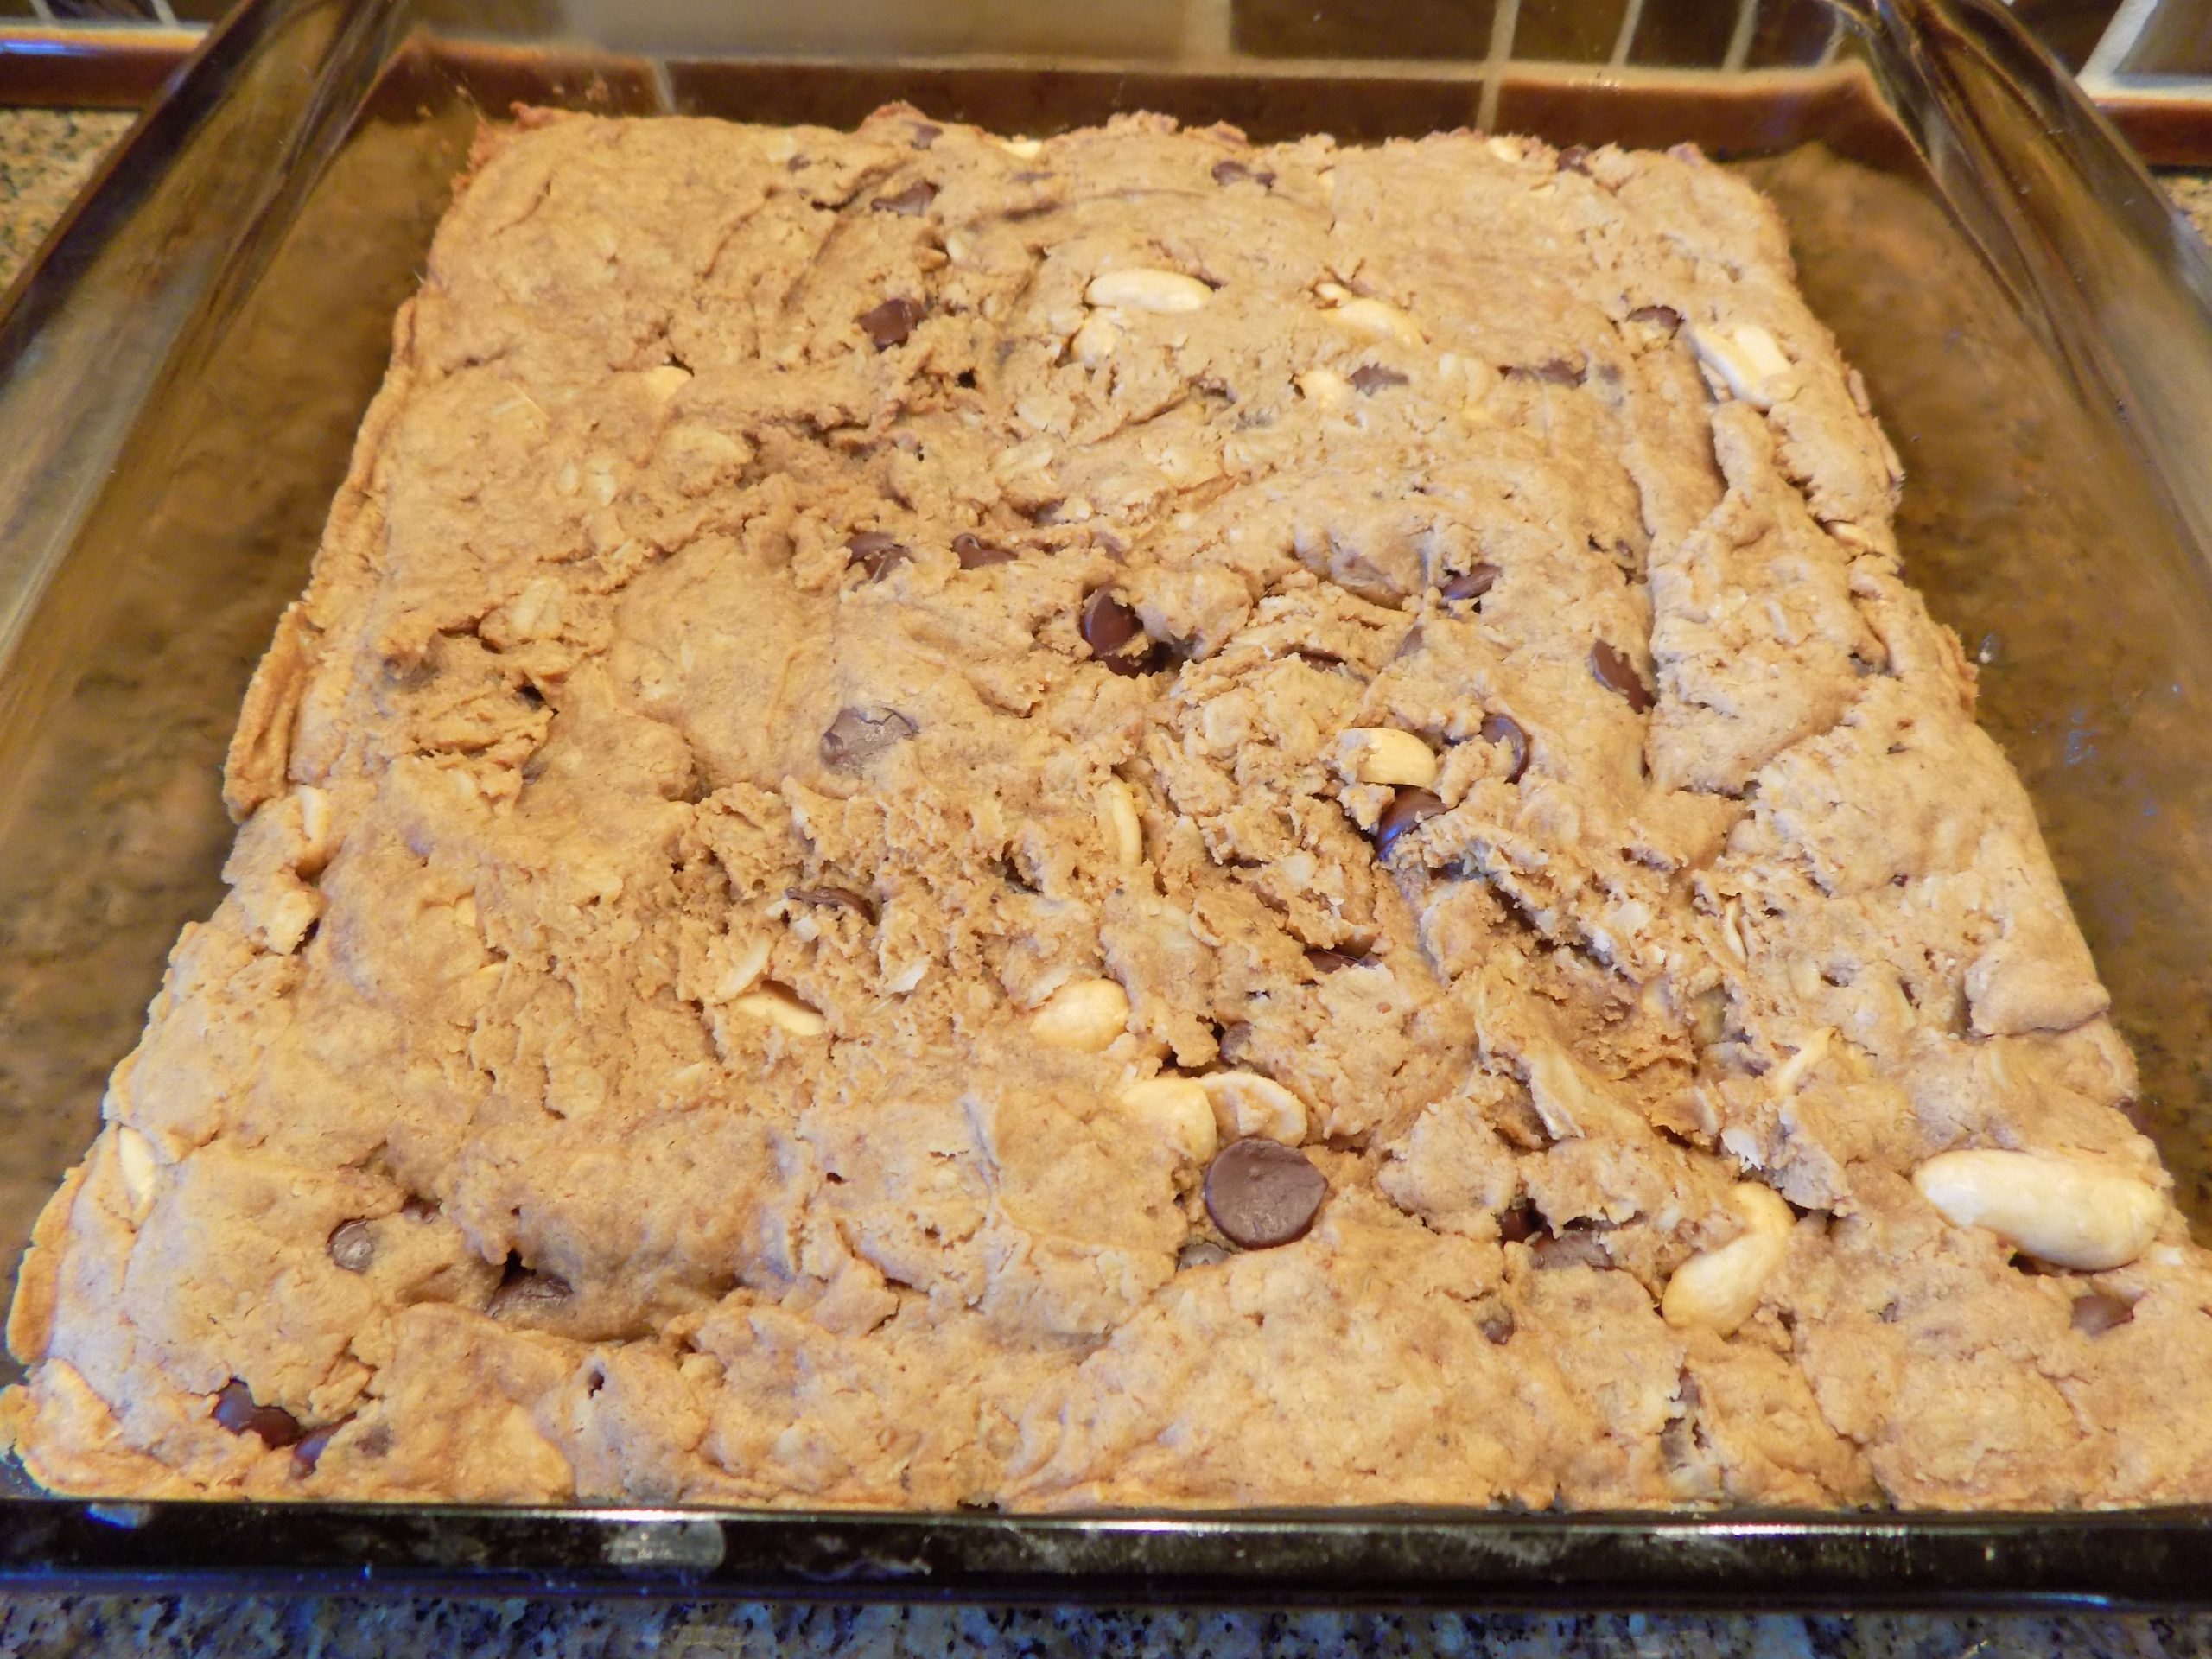
Butter a 9×9-inch baking dish. (Glass is best.)   

Mix the peanut butter, coconut sugar, vanilla, and milk together in the bowl of your stand mixer.

In a separate bowl, whisk the flour, baking soda, and salt together. Add the rolled oats, chocolate chips, and peanuts.

Pour over the peanut butter mixture and mix all together just until thoroughly combined.  

Scoop and press the dough into the prepared baking dish.     

Bake in a pre-heated 350-degree oven for about 15 minutes or until the bars are lightly golden on top and set. Don’t over-bake.

Remove from oven and allow to cool completely before cutting into squares.


CURRIED CHICKEN, BROWN BASMATI RICE, AND MUSHROOM CASSEROLE

Last evening, I served this very simple to prepare casserole for dinner. Our dear friend and neighbor Vicki joined us for the occasion. She was by herself because her husband Mark was down in Nashville recording some of his original songs in a professional studio accompanied by session musicians and backup singers. What fun is that! Anyway, I wanted to serve a dish that was easy to prepare and contained fairly healthy ingredients including brown basmati rice. Because I had special ordered brown basmati rice and was eager to use it again after my first recipe (Mediterranean Brown Basmati Rice Salad) had worked out so well.

Well, you know the old saying about best laid plans. Well, mine sure went asunder. Because for the life of me, I couldn’t find the brown basmati rice in my pantry. Apparently, I had tucked it in a place I was sure to find it. Wrong! I searched for 10 minutes before I threw my hands in the air, declared myself a freaking idiot, and used white balsamic rice in place of its brown relative. I was so mad at myself. But I couldn’t keep looking because Mr. C. had a rehearsal last evening, so I had to get the casserole in the oven by a certain time. And being late to rehearsal because his scatter-brained wife couldn’t find a certain ingredient was simply not a good enough excuse. Plus, what husband would want to admit to their wife’s disorganization (and that’s a kind word for it) in front of a bunch of fellow musicians! Even though, or maybe because, they are all friends and would nod their heads in an understanding and sympathetic way. I simply could not subject Mr. C. to that kind of genuine commiseration at my expense!

Anyway, I used white basmati rice, and all was well. The casserole was delicious, and it was on the table in time for the three of us to enjoy a leisurely dinner together.

And in case you were wondering, I did find the brown basmati rice. In fact, I walked straight to it after dinner. And yes, I had put it just where it belonged.

I have decided that this type of thing is just going to be part of my life from now on. I can’t ski any longer. I can’t hike any more. I can still walk up a hill, but I can’t come back down. (My knees are shot!) And Mr. C. more often than not, has to supply the last word in my sentences. I can’t hear or see like I used too. But I still know when the sun’s over the yardarm, even when there is no clock in sight.

And I can still laugh at myself. Which believe it or not, is the best medicine for wending your way through the intricacies of aging. Better laughter than tears is my new life motto.

So, as always, laugh rather than cry, be positive rather than negative, and always cut yourself some slack. Most of us are harder on ourselves than we are on others. Most of us would rather give than receive. But I have recently given myself permission to accept what I can’t change, change what I can, and say “to hell” with all the rest!

Peace and love to all.

1 T. extra virgin olive oil

1 T. unsalted butter

1 lb. boneless skinless chicken thighs, cut into small bite-sized pieces  

¼ tsp. fine sea salt

freshly ground black pepper

½ med. onion, chopped

6-8 oz. button mushrooms, sliced

1 lg. clove garlic, minced

3 T. dry sherry 

1 c. water

2 rounded tsp. chicken base (I use Better Than Bouillon Chicken Base) 

⅓ c. sour cream

2 T. milk or half & half

2 tsp. curry powder, or more to taste

¼ tsp. turmeric

¼ tsp. garam masala  

½ c. uncooked brown basmati rice, rinsed

Heat the olive oil and butter in a large sauté pan over medium heat.  Season the chicken pieces with the fine sea salt and pepper. Brown the chicken pieces and remove to a small bowl. (The chicken doesn’t have to be cooked through, only browned.)

In the same sauté pan add the onion and mushrooms; cook until the onion is translucent, and the mushroom slices are brown. Add the garlic; cook 30 seconds more. Remove to the same bowl with the chicken.  

Add the dry sherry to the pan to deglaze it, scraping up the browned bits from the bottom. Allow the sherry to reduce completely then add the water and chicken base and remove from heat. Stir in the sour cream, milk, curry powder, turmeric, and garam masala. Add the chicken and veggies back to the pan along with the rice. Pour the whole mess into a lightly buttered covered baking dish.  

Bake, covered, in a pre-heated 375-degree oven for 45 minutes or until the rice is tender.

Remove from oven and let sit for about 5 minutes before serving. Great served with a bit of chutney on the side and a simple green salad.


CREAMY CUCUMBER DILL SALAD

How can it be that I forgot one of my favorite salads from my childhood? How could that possibly have happened? Because when my grandmother made this salad (or a close approximation) I would end up licking the bowl. Every – single – time! And it took me until I was 78 years old to remember this salad? What gives with that!? I can only speculate that it’s because I have been a busy adult. (My story and I’m sticking to it!) Plus, I already have similar cucumber salads posted on this site.

But what makes this recipe so important now, is that I have been remembering a lot about my maternal grandparents lately. Their kindness and thoughtfulness and consideration for everyone and everything around them. Not because it was required of them, but because that was just the way they were raised. And the way they chose to live their lives.  

They were both third generation immigrants from Strasbourg, which is a lovely city in the Grand Est region, formerly Alsace, in Northeastern France. It’s also the formal seat of the European Parliament and sits near the German border, with culture and architecture blending German and French influences. So, although my grandfather’s last name was Kléber (yes, a direct descendent of Jean-Baptiste Kléber, a French General under Napoleon) he and my grandmother both spoke German. And my grandmother cooked like any good German immigrant was taught to cook.         

I guess thinking about my grandparents made me remember this salad. Also, because once again, I was looking for a cucumber salad recipe that would take me just minutes to prepare.

What I found were several recipes for German Cucumber Salad. Although I already have a German cucumber salad on this site, (and it’s very good I might add), it still isn’t quite like the salad I so loved as a child. And in truth, none of the recipes I found seemed to be exactly as I remembered. Because I remember onion in my grandmother’s salad. And quite a bit of vinegar. So, I glommed a couple of German cucumber salad recipes together, added some yellow onion, more vinegar than reasonable, and this is the result. And OMG, this salad is as good as I remembered. Perfect amount of vinegar, just enough salt, and a perfect use for English cucumbers. And fast and easy to prepare.

Of course, my grandmother didn’t use English cucumbers. She had a huge garden, but I don’t think English cucumber seeds were available in those days. (There were two houses on our property. My dad, mom, 2 brothers and I lived in the bigger house. And my grandparents lived in the other house.) And, if I remember correctly, to make her veggies go farther to feed us hungry folk, she let her cucumbers get really, really large before they were picked. I do remember several times when the cucumbers were very bitter, mainly I think because they were so big. I ate the salad regardless. (I have always liked veggies.) But English cucumbers are rarely bitter. So, I pretty much stick to them these days. And I’m sure grandma would approve. Even as frugal as she was.

What I know this college educated, soft spoken, avid reader, kitty and garden loving lady would not have approved of however, was the current situation the United States of America finds itself in. She would be so saddened by what is happening in Washington DC these days. As of course most of us are. And although she and my grandfather were never rich (monetarily), they were always happy with each other and the world around them. And to my mind these two people exemplified the true meaning of being a Christian. They didn’t judge others. They didn’t feel superior because of their race. They didn’t put people down. They didn’t decide what was best for others regardless of how they might have felt about the situation themselves. Rather they spent their lives lifting people up. Accepting people for who they were. And always showing love and compassion towards everyone. In their humble way, they were very special people. And I was blessed to have them in my life. I can still see my twinkle eyed grandfather hooking up a wagon behind his tractor to give me and my two brothers a hayride. I never saw this wonderful gentle man without a smile on his face.

Anyway, give this salad a try. It is so very delicious. And so very easy to prepare.

Peace and love to all.

2 T. finely minced yellow onion

¼ c. sour cream

4 tsp. white vinegar, or more to taste

½ tsp. dill weed

1/8 tsp. granulated sugar

¼ tsp. kosher salt, or more to taste

freshly ground black pepper

1 English cucumber, semi peeled and thinly sliced

Whisk the onion, sour cream, white (plain old) vinegar, dill weed, sugar, salt, and pepper together in a small salad bowl. Add the sliced cucumbers, stir so that every bit of every cucumber slice is coated with the dressing, and refrigerate until ready to serve.


CHICKEN POT PIE(S) WITH A WHOLE WHEAT TOP CRUST

Most of the time when we make a Costco run, we come home with either fresh seafood or a rotisserie chicken. So, on our last Costco procurement adventure, we decided we were more in the mood for chicken than fish. (Easier for me too.) And like others, I sometimes wondered if a Costco rotisserie chicken was a healthy choice. But apparently Dr. Oz (I have never watched his show, but I do know who he is) told viewers recently that “Costco birds are some of the healthiest processed foods out there—and removing the skins makes them even healthier.”

So, who am I to argue with a doctor who is renowned for showing disdain for science and evidence-based medicine. Because I can be just as stubborn as the next gal when it comes to believing what I want to hear. Anyway, I figure eating a Costco chicken every 3 months or so is probably not doing our bodies too much harm. Even if Dr. Oz says it’s OK to eat them!

After enjoying the chicken that same evening, I was left with most of a Costco chicken staring at me every time I opened the refrigerator door. So, I decided to use the leftover meat to make chicken pot pie. And keeping to my new-found determination to use whole wheat flour as much as possible, I found this crust recipe on the livelytable.com site. And this recipe makes for one fabulous pie crust. Very tasty, crisp, and flakey. Just like good pie crust should taste. And perfect for pot pie.

However, I wouldn’t go so far as to recommend it for regular pies like lemon meringue or even a berry pie. Too much wheat flavor for any pie that requires a delicately flavored crust. But for pot pies or quiches, this recipe is perfect. And so easy to make. Food processors are wonderful kitchen tools. Not perfect for everything that requires mixing, but perfect for preparing this pie crust. Now, about the filling.

This filling is quite plain. Nothing fancy about it, easy to prepare, and the type of food your entire family will enjoy.

So, enough said about this dish. It’s Sunday and the last 3 days have been hectic to the max and I am beat. So, it’s going to be a very lazy day for me. Book in hands, reading glasses firmly affixed to my face, and ice water on a small table right next to my favorite wing back chair. In other words, a perfect opportunity for Mr. Sandman to come a visiting.  

I used to feel that sleeping was such a waste of time. Even at night. (I was much younger when I felt this way.) Now, I think a good night’s sleep is heaven on earth. And an occasional nap my simple reward for living a full and rich life.

May you too live a full and rich life.

And as always, peace and love to all.

Pot Pie Crust

2 c. whole wheat pastry flour (I like Bob’s Red Mill)

1 tsp. fine sea salt  

¾ c. (1½ sticks) cold unsalted butter, cubed

up to ½ cup ice cold water

In the bowl of a food processor, pulse flour and salt together. And cubed butter. Pulse until pea-sized pieces form.

Add 5 tablespoons of water to the food processor. Pulse and continue to add water until a dough ball is just formed. (I ended up using 7 tablespoons of water.)

For individual pot pies:

Fill 4 (5-inch wide and 2½-inch deep) Corning Ware French White casserole bowls with the chicken mixture. Or use whatever oven proof containers you have. Turn the dough out onto a lightly floured surface. Cut the ball of dough in fourths. Roll out each piece of dough into about a 7-inch circle. (Or circles about 2-inches wider than the top of the baking dishes you will be using.) This will allow about an inch of dough to hang over the sides. Place the pie crusts on top of the filled dishes and cut at least 4 slits in the pastry. Make sure the slits go completely through the pastry allowing steam to escape.

Place the pot pies on a baking sheet just in case there is any leakage. Believe me if you don’t set the pies on a baking sheet, you might just have filling spilling onto the bottom of your oven. Not something you want! Your crust may also fall off a bit because of all the butter. Not to worry. The fallen bits will still bake beautifully and taste divine.

Place the baking sheet and pot pies in a pre-heated 375-degree oven for 45 minutes or until the crust is nicely browned.  

Remove from oven and cool at least 12 minutes before serving.  

For 1 (9-inch) deep dish pot pie:  

Fill a deep-dish pie plate with the chicken mixture. Turn the dough out onto a lightly floured surface. Make 1 large ball. Cut the ball in thirds. Roll 2 thirds of the dough to a thickness of just less than a quarter inch. Top the filled pie plate and crimp the edges as desired.

Place your pie pan on a rimmed baking sheet. Cut at least 6 slits in the pastry. Make sure the slits go completely through the pastry or the steam will exit out the sides and make a mess on your baking sheet.  

Place the baking sheet and pie pan in a pre-heated 375-degree oven for 45-50 minutes or until the crust is nicely browned.  

Remove from oven and cool at least 12 minutes before serving. The longer the cooked pot pie sets, the thicker the filling will become.

If you aren’t going to use the remaining pie dough within a couple of days, throw it in your freezer.

Hint: the remaining crust makes for a great rustic fruit tart. Granted it will make a very small tart, but perfect for 2 people. See my recipe for Rustic Peach Tart as an example.

Chicken Filling  

¼ c. (½ stick) unsalted butter

½ lg. onion, diced

1 med. carrot, diced

1½ c. diced button mushrooms

1 lg. celery stalk, diced

2 lg. garlic cloves, minced

⅓ c. dry white wine 

2 c. water, divided

1 T. chicken base (I use Better Than Bouillon Chicken base) 

½ c. whole milk  

1 tsp. dried thyme

½ tsp. seasoned salt

freshly ground black pepper

¼ c. arrowroot starch*

1 c. uncooked frozen petite peas 

3-4 c. diced cooked chicken (I used rotisserie chicken from Costco because who can beat the price? Plus, it’s a good way to use up some of the chicken. Or more often than not, I use rotisserie chicken from Costco because I’m just plain lazy!)

Melt the butter in a medium pot over medium-low heat. Add the onion, carrot, mushrooms, and celery; sauté on low heat until the veggies are softened and slightly browned. Approximately 15 minutes. Add the garlic and cook for 1 minute.

Add the wine and cook until all the liquid is gone.

Add 1½ cups of the water, chicken base, milk, thyme, seasoned salt, and black pepper. Simmer, stirring frequently, for 10 minutes.

Meanwhile whisk the remaining ½ cup water and arrowroot starch together. Add the arrowroot slurry to the pot and stir constantly just until the mixture thickens, about 1 minute. Remove from heat and stir in the peas and diced cooked chicken.  

*Arrowroot starch

According to The Spruce Eats, “Arrowroot is a white, flavorless powder most often used to thicken sauces, soups, and other foods like fruit pie fillings. It is comprised of starches extracted from various tropical tubers, including Maranta arundinacea, the arrowroot plant. Arrowroot powder is similar in use to cornstarch and has twice the thickening power of wheat flour. It is neutral in flavor and adds a glossy finish to foods. Arrowroot is gluten-free, vegan, paleo-friendly, and also has a very long shelf life.”

According to Webmd.com, “Arrowroot’s low glycemic index and high concentration of potassium have been shown to help people with diabetes.” 

DILLY BUTTERMILK DRESSING OR DIP  

I always make my own salad dressings and dips. Even when we are in our trailer. I used to buy dressing for our trailer trips, but they just weren’t as good as homemade, plus they contained all kinds of weird ingredients. And yes, OK, bottled dressings do last for months when refrigerated, and it is easier just to grab a bottle out of the fridge than to juice a lemon or mince a clove of garlic. But considering that you can build a dressing to go specifically with whatever salad you feel like serving and save money at the same time, I feel no consideration should be given at all to which way you should proceed. Homemade dressings taste better, are cheaper, contain less chemicals, and can be built to order. Enough said!

So, the other evening when I planned to serve us a big old chef salad for dinner, I decided to try this dressing recipe from the onceuponachef.com site. I love this site BTW because I think that Jenn is a wonderful cook, and I know I can count on her recipes to be fabulous. I often make a change or two here and there, but then, that’s just what I do. (I simply can’t help myself!)

Anyway, this dressing turned out to be perfect on the chef salad. And I loved the dill. At first, I was a bit hesitant to use as much dried dill weed as directed. But it was the perfect amount. I did use only 1 garlic clove instead of 2, but that’s just because I prefer a subtle garlic flavor. Which brings me to a point of interest when it comes to fresh garlic.

Garlic is a potent ingredient. So, a little bit goes a long way. Garlic cloves are made up of small cells, each of which is filled with a pungent, sulfur-based liquid. The finer you chop a garlic clove, the greater amount of juice you release. And the more juice, the hotter the flavor. So, roughly chopping a garlic clove produces a much milder garlic flavor than grating the same size garlic clove with a microplane. I do both. For most recipes I mince garlic. If I am in a hurry or want a stronger garlic presence, I use my microplane. But in any case, I do not use that stuff that comes in a jar. (For more information on garlic than you ever wanted to know, go to my recipe for Tahini Lemon Salad Dressing.)

Well, there’s not much more to say about this dressing except that it is very easy to prepare and can also be used as a wonderful dip for crudité (pieces of raw vegetables such as celery or carrot sticks served as an hors d’oeuvre). (Don’t you just love cultured words such as crudité and hors d’oeuvre for something as unsophisticated as cut up celery and carrots before dinner?)

So, if you will please excuse this bibliophile, I am off to peruse the latest tome by Barack Obama.

Peace and love to all.   

Oh, I almost forgot to tell you about my latest “ah ha” moment when it comes to green salads. We love romaine and other lettuce greens, but they don’t have as much crunch as we would like. So, just a couple slices of green or red cabbage cut into very thin strips does the trick. And for my husband, the none-lover of cruciferous vegetables, he doesn’t even notice the cabbage. Yea me!

½ c. sour cream

½ c. buttermilk

¼ c. mayonnaise

2 tsp. fresh lemon juice

1 garlic clove, finely minced

1 tsp. kosher salt

freshly ground black pepper

1½ tsp. dried dill weed

¼ c. finely chopped fresh chives

couple dashes hot sauce, optional (I use Frank’s RedHot)

Whisk all together and store in a covered container in your fridge.


GRANOLA WITH ALMONDS, COCONUT, DRIED CHERRIES AND BLUEBERRIES

OK, yet another granola recipe that worked. I say “that worked” because sometimes my granola experiments are less than delicious. Way less than delicious. Take my last one before this one for example.

It included so many healthy ingredients that it tasted like sawdust with a few nuts thrown in for encouragement. Needless to say, that recipe did not make it on this site. One of my never to be repeated, drop it off the face of the earth, do not make this again, what were you thinking kind of recipe that you will never know about. Unless of course I feel compelled to relate another failure I experienced in my kitchen. And yes, I do have monumental debacles every so often. But those washouts often lead to a learning experience. And I did learn one valuable lesson. There is a huge difference between pepitas and dried pumpkin seeds.  

Pepitas are delicious and when just a few are added to granola, everything is just fine. And in salads and seed breads they are divine. But the pumpkin seeds I added to the batch of granola that shall forever remain unpublished, were so dry they tasted just like I imagine fodder tastes. Dried hay. And just to clarify, pepitas and pumpkin seeds are two different things.

Pepitas are harvested from styrian or oil seed pumpkins and the seeds do not have hulls. Any other variety of pumpkin produces a hulled seed that’s fibrous and less tender. Now maybe I just got a bad batch of pumpkin seeds that I used in my second to the latest batch of granola. There is always that possibility. But you know the old saying – fool me once shame on you, fool me twice, shame on me. And I intend to remain without shame! At least when it comes to pumpkin seeds!

But this batch was perfect. Lots of oats, almonds, coconut, and dried fruit. Just the way I like granola. And I like granola a lot.

So, although I have several recipes for granola on this site, I feel there is always room for one more. Because variety is the spice of life. And I want my life to be spicy.

As always, have fun cooking up a storm. Try new recipes. Try new ethnic cuisines. And don’t be afraid of an occasional failure. No one can produce a winning dish every single time. It truly isn’t possible. Plus, every other cook would hate that person. And who wants that?

Peace and love to all.  

½ c. pure maple syrup

½ c. extra virgin olive oil

2 tsp. vanilla

½ tsp. almond extract

1 tsp. kosher salt

1 tsp. cinnamon

8 c. old-fashioned rolled oats

3 c. roughly chopped almonds   

1 c. unsweetened flaked coconut

2 c. roughly chopped unsweetened dried cherries

1 c. dried blueberries

Preheat oven to 300-degrees.

In a large mixing bowl, whisk the maple syrup, olive oil, vanilla, almond extract, salt, and cinnamon together. Then stir in the oats. Spread mixture on a rimmed baking sheet or sheets in an even layer and bake for 25 minutes. (Don’t wash the mixing bowl.)

After 25 minutes, add the chopped almonds and coconut. Bake for an additional 20 minutes or until the oats are a light golden brown.

Remove from oven and transfer the granola back to the large bowl and add the dried cherries and blueberries tossing to combine.

Allow to cool completely before storing in an airtight container.


OVEN ROASTED HERB AND GARLIC CRUSTED RACK OF LAMB  

We love rack of lamb, but there are just those times when the last thing I want to do is spend a lot of time in the kitchen. Luckily, those days don’t happen very often. But when they do, I am so glad I have a simple recipe like this one to produce an entrée that tastes like I have been busy for hours in the kitchen. And now, you too have the simplest possible way to serve up rack of lamb that is both family and company worthy. No chopping of garlic, shallots, or any of the other usual suspects. Just a bit of trimming some of the fat before slathering with olive oil and sprinkling with granulated garlic, salt, pepper, and a couple of dried herbs. Easy peasy.  

So, I’m not going to bore you with any more glowing testimonial about this recipe except to tell you that rack of lamb fixed this way is truly delicious. And could not be easier to prepare. My work here is done!

As always, have fun in your kitchen. But when you need a day off, don’t hesitate to take one. Everyone needs a break from their usual routine. And cooks are no exception. So, don’t beat yourself up when you need to step away from your stove and let someone else have the pleasure of cooking for you. If, for whatever reason, that isn’t possible for you, then try to mix things up a bit. Serve a simple grilled sandwich for dinner accompanied by potato chips. Or serve bacon and eggs. Or a big old plate of nachos. Something different that your family will probably find fun and provide you with a bit of a change. Whatever is necessary to take some of the pressure off you even for one evening.

It truly is hard work deciding what to fix for dinner every stinkin’ night. And then to follow up by actually making the dinner happen. I know. I’m right there with you! So, if you need a well-deserved break, don’t hesitate to take one!

As ever – peace and love to all.

1 (8-rib) frenched rack of lamb, trimmed of all but a thin layer of fat

1 T. extra virgin olive oil

1 tsp. kosher salt

freshly ground black pepper

1 tsp. granulated garlic

½ tsp. dried rosemary

¼ tsp. dried thyme

An hour before you start roasting the lamb, line a rimmed baking sheet with foil. 

Place the trimmed rack of lamb on the prepared baking sheet, fat side up. Score the remaining fat by making small shallow slits, 1-inch apart. 

Liberally slather both sides of the lamb with olive oil. Combine the salt, pepper, granulated garlic, dried rosemary, and dried thyme together in a small dish. Sprinkle on both sides of the rack. Allow the meat to rest on the counter for about an hour and come to room temperature. 

Roast the meat in a preheated 425-degree oven for 25-30 minutes or until an instant-read thermometer inserted into the thickest part (and not touching the bone) reads 125-135 degrees. (The internal temperature will rise about 5-degrees while it rests.) (Providing an exact time to roast the meat is difficult to state when giving directions because there is so much difference in the size of the racks offered in meat shops and grocery stores. Using an internal temperature thermometer is really the only way to get it right. As a guide – take the rack out of the oven when it reaches 125-degrees for rare and 135-degrees for medium rare.)   

Remove the lamb from the oven. Transfer it to a cutting board. Cover with foil and allow to rest for 10 minutes.

To cut the rack into individual ribs, turn it upside down, locate where the bones are, and carefully cut between them using a sharp knife. Serve immediately. 


SOURDOUGH WHOLE WHEAT AND RYE FLOUR ENGLISH MUFFINS (added yeast)

Over the years I have made many types of bread. Baguettes, boules, loaves, quick and yeast breads, rye, whole wheat, sourdough, you name it. But now that I need to monitor my carbs more closely and concentrate on upping my fiber intake, it isn’t quite as much fun to bake bread as it used to be. Until yesterday that is. Because yesterday’s bread baking adventure was not only fun, but the whole process went quickly, and the result was wonderful. But then, I have always been a sucker for sourdough bread of any kind. And I am particularly fond of English muffins. And when English muffins are built using olive oil, an egg, milk, and rye and whole wheat flours, the carb count is reasonable, and the fiber count is high enough to offset the 1 tablespoon of honey used as a sweetener.

If there is any one thing on which most experts on diabetes agree, it’s that carbs in the form of fiber (mainly in fruits, veggies, whole grains, and legumes) are better for us than any other type of carbohydrate. Our bodies are simply unable to absorb and break down fiber. So, fiber rich foods don’t cause a spike in blood sugar the way other carbohydrates can. Which in turn helps keep our blood sugar in the appropriate target range. So, all in all, lots of fiber is quite essential for our every day good health.

So, not only are these English muffins delicious; they are high in fiber and stinkin’ easy to make. And the best part, I can toast half a muffin in the morning for breakfast and not feel guilty. (I hate feeling guilty.)

So, if you too would like to build an English muffin that is easy to prepare and tastes really great, this is the recipe for you.

Well, I’m home today because we are having our yearly generator inspection. Mr. C. is off performing at the annual Anacortes Arts Festival, but someone had to stay home to greet the nice man who will be performing the checkup. Since I don’t play the piano as well as Andy, I pulled the short straw. But not to worry. Mr. C. is in two other bands performing tomorrow, so I will have plenty of time to check out the art exhibits and help a few artists line their pockets from the fruits of our labor. (My civic duty, right?) OK, I will also be in the audience to applaud the bands, because, well, I really love jazz, and these bands do jazz really, really well.

And for those of you who live in the area and have never visited the Anacortes Arts Festival, you are in for a treat. There are dozens of booths featuring high quality arts and crafts for sale, three stages offering live music, and fun food opportunities in abundance. So, don’t miss this opportunity to support your local artists, try a new dish or enjoy an old favorite, and listen to some great music.

And as always, laugh, love, and just be happy to be alive.

Peace and love to all.

½ c. sourdough discard (I used a rye flour sourdough starter)

2¼ tsp. instant yeast

1 T. honey 

2 T. extra virgin olive oil, plus more for greasing the mixing bowl

1 tsp. kosher salt

1 lg. egg

¾ c. whole milk

1 T. vital wheat gluten

½ c. stone-ground rye flour

2 c. stone-ground whole wheat flour

Place the sourdough starter, yeast, honey, and 2 tablespoons olive oil in the bowl of your stand mixer. Let sit for 5 minutes until bubbles start to appear.

Add the salt, egg, whole milk, vital wheat gluten, rye flour, and most of the whole wheat flour.     

Using your dough hook, mix everything together and knead for 5 minutes. Add more flour as needed to make a tacky dough.  

Pour a bit of olive oil in the mixing bowl, and using your hands and a stiff plastic spatula, form the dough into a well-greased ball. Cover the bowl tightly with plastic wrap and allow dough to rise until doubled, around 1 to 1½ hours.

Line a baking sheet with parchment paper and then lightly sprinkle with cornmeal.

Place the risen dough on a lightly floured work surface and cut into 8 equal pieces. Form each piece into a ball and flatten slightly with your fingers. Place about 2-inches apart on the prepared baking sheet. Cover with a lightweight tea towel and let rise until the muffins are doubled in size, around 45 minutes.

When you are ready to cook the muffins, heat a pan (a non-stick griddle works great for this) over medium-low heat. Gently lift the muffins with a flat spatula and place them on the heated pan. (I do 4 at a time. Too many at a time makes it difficult to flip them.) Cook for 2 minutes on each side and place them back on the same baking sheet.

Bake in a pre-heated 325-degree oven for about 10 minutes or until fully cooked. (The internal temperature should be at least 200-degrees to consider the muffins fully cooked.)  

Remove from oven and place on a rack. Store in an airtight container. Great slathered in butter or spread with something sweet or savory.


CORN AND BLACK BEAN SALAD WITH A SRIRACHA LIME DRESSING

For me, summer salads are much more fun to prepare than winter salads. And I know, there are no official rules governing the time of year any given salad can be served. I mean, salads aren’t like shoes for example, where good etiquette simply shouts that white dress shoes should never be worn after Labor Day. (Who even wears dress shoes anymore?)  Anyway, all things considered, I should be able to serve any old kind of salad any old time I please. But the reality is that I associate potato salad, pasta salads, and fresh fruit salads, for example, with summer picnics. And a salad with a spring mix of greens, apples, dried cherries, and pecans with a creamy maple syrup and shallot dressing reminds me of something I would serve at a winter holiday meal. Not as a salad to go with hamburgers or smoked ribs.

But then there are salads like this one that can be served year-round. And are still plenty of fun to make. Maybe not the salad you would want to serve for Thanksgiving or Christmas, but on a bleak winter evening, it would be perfect.

I guess what I am taking a very long time to say, in my own very wordy way, is that this salad is great any time of year. And it’s fun to make. Because you can practically throw any fresh or cooked veggie into the mix. And with the delicious sriracha dressing, this salad is a treat for your taste buds. Plus, and here I go again on my nutritional soap box, with all the veggies and black beans, it’s a fairly healthy salad too. OK, not as healthy as say, kale dressed with only olive oil and vinegar. But a whole heck of a lot more fun for your mouth.

So, if you too like salads that are creamy, crunchy, and very tasty, give this salad a try. I mean really. There are avocados in this salad. What more could you want?

So, have fun in your kitchen and make more salads. They are generally good for us and the best way I know of to get more veggies into our diets.  

And as always, peace and love to all.

Sriracha Lime Dressing

1 T. fresh lime juice (lemon juice in a pinch)

1 garlic clove, grated

½ c. mayonnaise

¼ c. sour cream

¼ tsp. kosher salt

freshly ground black pepper

2 tsp. sriracha, or more to taste

Whisk all ingredients together in a large salad bowl. Taste and adjust seasoning.

Salad Ingredients

1 (15-oz.) can black beans, rinsed and drained

kernels from 2 cooked ears of corn or 1 (15-oz.) can corn, drained

⅓ c. finely chopped red onion

½ c. diced celery

½ orange, red, or yellow bell pepper, diced

1 c. halved black olives

½ c. sliced pimento stuffed green olives

1 c. halved cherry or grape tomatoes

In the same bowl with the dressing, stir in the black beans, corn, red onion, celery, bell pepper, black olives, and green olives. Gently stir in the tomatoes and diced avocado. Cover and refrigerate until ready to serve.

This salad is best if made ahead a couple hours before serving. Great the next day too.  


SMASHED CUCUMBER SALAD  

And now for something completely different. (This recipe is for all you Monty Python fans out there, and of course, for cucumber lovers everywhere.)

I found this recipe from Chef John one day when I was trying to find yet another way to use the triple pack of English cucumbers we had just purchased at Costco. I knew I could always build a traditional Greek salad, Sunomono salad, or a sliced cucumber salad with a sour cream or Greek yogurt, dill, and red onion dressing. (Recipes on this site BTW.) But I wanted a cucumber salad that was just a bit different for a change. So, I went on an exploratory mission. And this is what I found.

This salad immediately appealed to me because I love rice vinegar, soy sauce, and sesame oil in combination. Plus, I trust Chef John’s recipes. So, in my naivety, I assumed this was a new type of salad invented by Chef John. (I obviously don’t get out often enough.) Because now that I have done some additional research, I’ve learned that smashing cucumbers is an ancient Chinese practice. And pairing a spicy dressing with the coolness of the lowly cucumber is also found in Middle Eastern and various European cuisines. Who knew? Not me, that’s for darn sure.

Anyway, now that I do know, there is no stopping me. Not only is preparing a smashed cucumber salad a quick and easy accompaniment to all kinds of entrées, it allows one to relieve any frustrations one might be feeling at the time by whacking the hell out of a vegetable. Therefore, I see no downsides to this dish. And the fact that one article about smashed cucumber salad called it “all the rage” I find very comforting too. Frankly, I can’t think of any better way to exhibit rage in a socially acceptable manner than by preparing this salad.    

So, if you too would like to serve a quick and easy, but uniquely delicious salad, while at the same time relieving stress, this is the recipe for you.

As always, stay happy and healthy.

Peace and love to all.

1 English cucumber, washed and both ends removed

¾ tsp. kosher salt

½ tsp. granulated sugar

1 clove garlic, finely crushed or grated

1 T. rice vinegar

1 tsp. soy sauce

1 tsp. toasted sesame oil

tiny pinch crushed red pepper flakes

1 T. toasted sesame seeds, opt. garnish

Wrap the cucumber in plastic wrap to minimize splattering. Place on a work surface and pound with a flat object (like a meat pounder) until cucumbers crack and are slightly flattened. Remove from plastic.

Cut cucumbers in half lengthwise. Then cut into 1 to 1½ -inch wide pieces. (The chunks should not all be the same size.) Transfer to a strainer set over a bowl.

Sprinkle cucumber with salt and sugar; mix until well combined. Refrigerate the bowl and strainer for 30 to 60 minutes to allow cucumber pieces to release some of their liquid into the bowl.

Whisk the garlic, rice vinegar, soy sauce, sesame oil, and red pepper flakes together in a medium sized salad bowl. Transfer drained unrinsed cucumbers into the bowl with dressing. Toss to coat.

Cover and refrigerate for about 30 minutes to allow flavors to mingle. Stir again before serving and garnish with sesame seeds.

Please note: This salad is wonderful the next day too. So, it’s fine to make it a day ahead.