Author Archives: Patti

CREAMY PARMESAN AND GARLIC PASTA WITH HAM AND PEAS  

I never quite know what to do with leftover ham. OK, I can always build soup, or use it in a quiche, or just fry it up for breakfast. But sometimes I am in the mood for pasta. (Sometimes! Now that’s an understatement if I ever made one! Because I am ALWAYS in the mood for pasta!) Anyway, the other evening I had a pasta craving, but was totally aware that in our refrigerator, a hunk of ham was languishing and really needed to be eaten. And not just any ham, but a small chunk of Black Forest ham. My favorite.

So, with a little angel on one shoulder lecturing me to not be wasteful, and a red, demon-like character with small horns protruding from his head, an arrowhead pointed tail, and a pitchfork in his hand yammering in my other ear that I should ignore my conscience, I went online for inspiration. And I found this recipe on the damndelicious.net site. And that’s what this dish turned out to be. Damned Delicious! And, ever so easy and quick to prepare. So, many thanks to Chungah for this great recipe.

Not only did I use up the ham, I got my pasta fix too. A win/win situation. And, I now have a perfect way to serve leftover ham. Because as we all know – the holidays are on their way. And I don’t know about you, but after working several days setting a menu, doing the grocery shopping, preparing the dishes, serving the food, and then doing the cleanup after hosting an event, I’m one pooped gal. And not for just that one day. I’m bushed for a couple days thereafter. But somehow, we still need to eat during my recuperative period. And frankly, this dish is so easy to make that I’m already planning to use the leftover ham from either Christmas dinner or another meal I plan to serve sometime around that time for just this dish.

So, if you too plan to serve ham during the holidays, don’t forget this recipe. Because the KISS principal is always in vogue. Keep It Simple Sister (or Sir). And truly, I don’t have any doubts that you will find this recipe a snap to prepare. And that everyone in your family will enjoy eating this dish. The flavor is fairly mild, so even the youngest at table should have no problem gobbling it down.  

Peace and love to all.

2 T. unsalted butter

2 cloves garlic, minced

2 T. unbleached all-purpose flour

1 c. chicken broth

½ tsp. dried thyme

¼ tsp. dried basil

pinch seasoned salt

freshly ground black pepper

¼ c. half and half

¼ c. freshly grated Parmesan

½ c. frozen petite peas
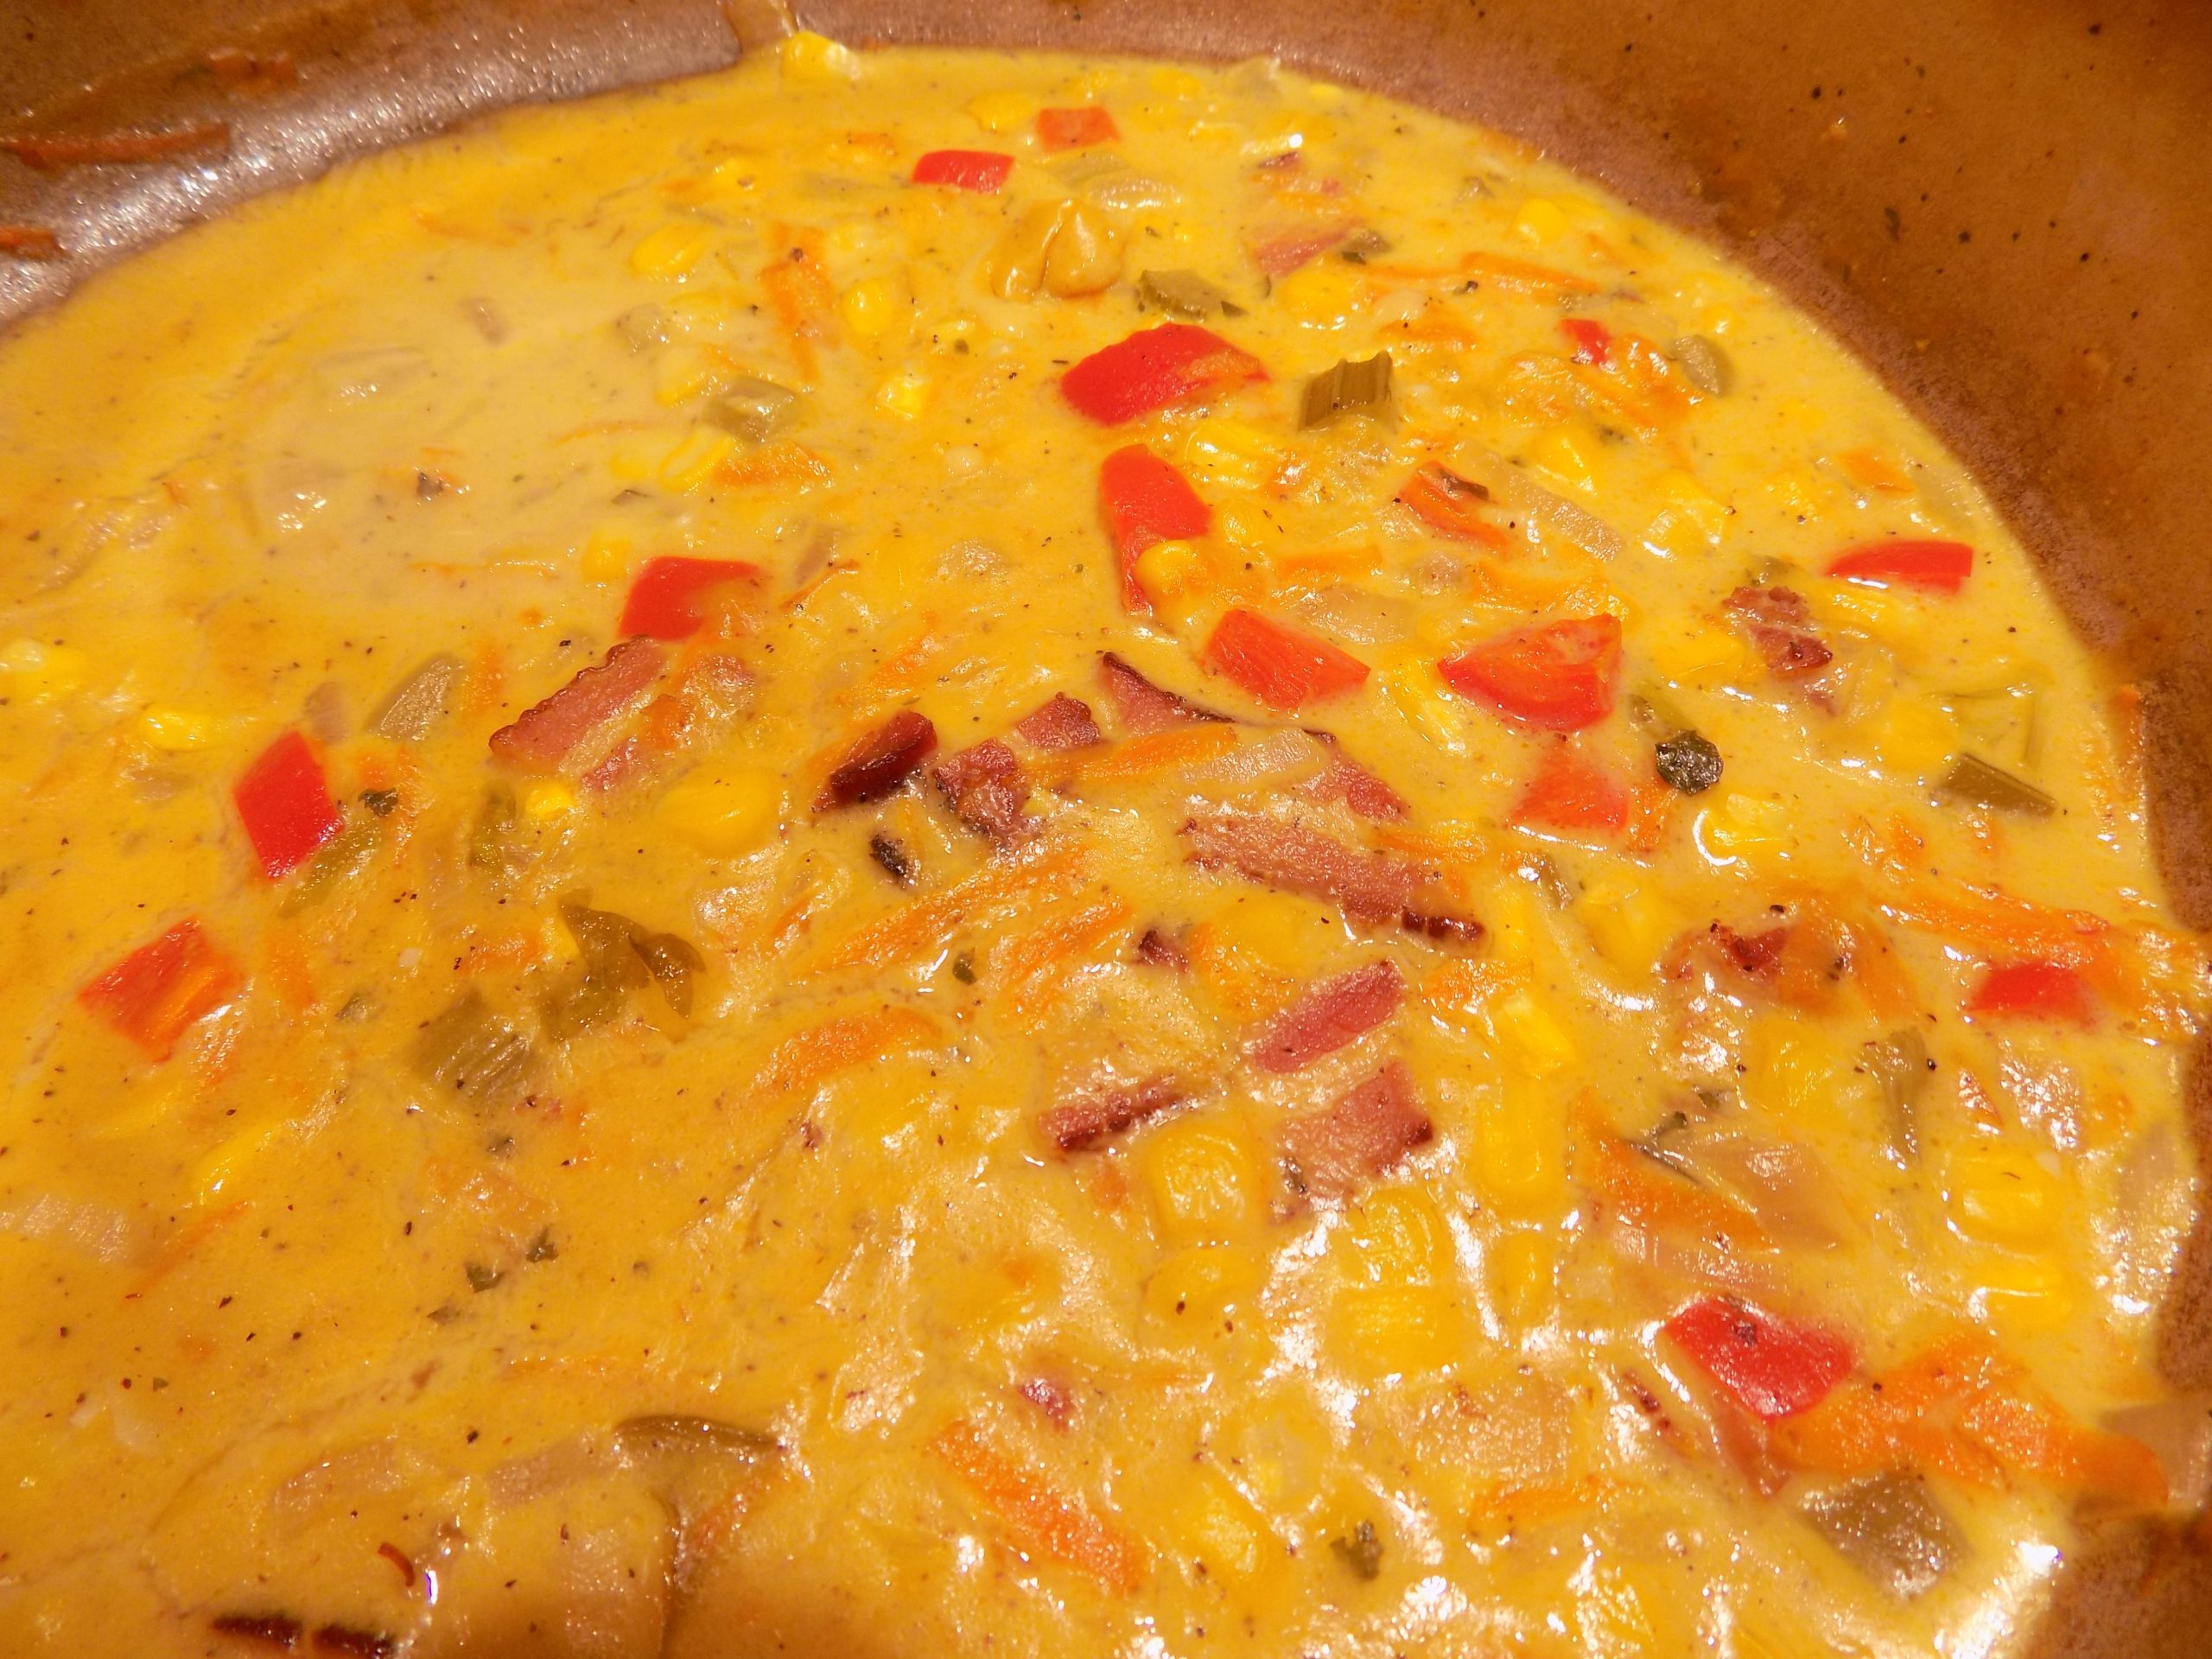
1 c. diced ham

4 oz. spaghetti broken in thirds, cooked al dente (save some of the cooking water)

Melt the butter in a skillet over medium heat. Add the garlic and cook for 1 minute. Whisk in the flour until it and the garlic are both a light golden brown, about 2 minutes.

Gradually whisk in the chicken broth, dried thyme, dried basil, seasoned salt, and pepper. Cook, whisking constantly, until well blended, about 1-2 minutes.

Stir in the half and half and Parmesan and cook until slightly thickened, about 1-2 minutes. If the mixture is too thick, add some of the pasta cooking water until desired thickness is obtained. Taste and adjust seasoning.

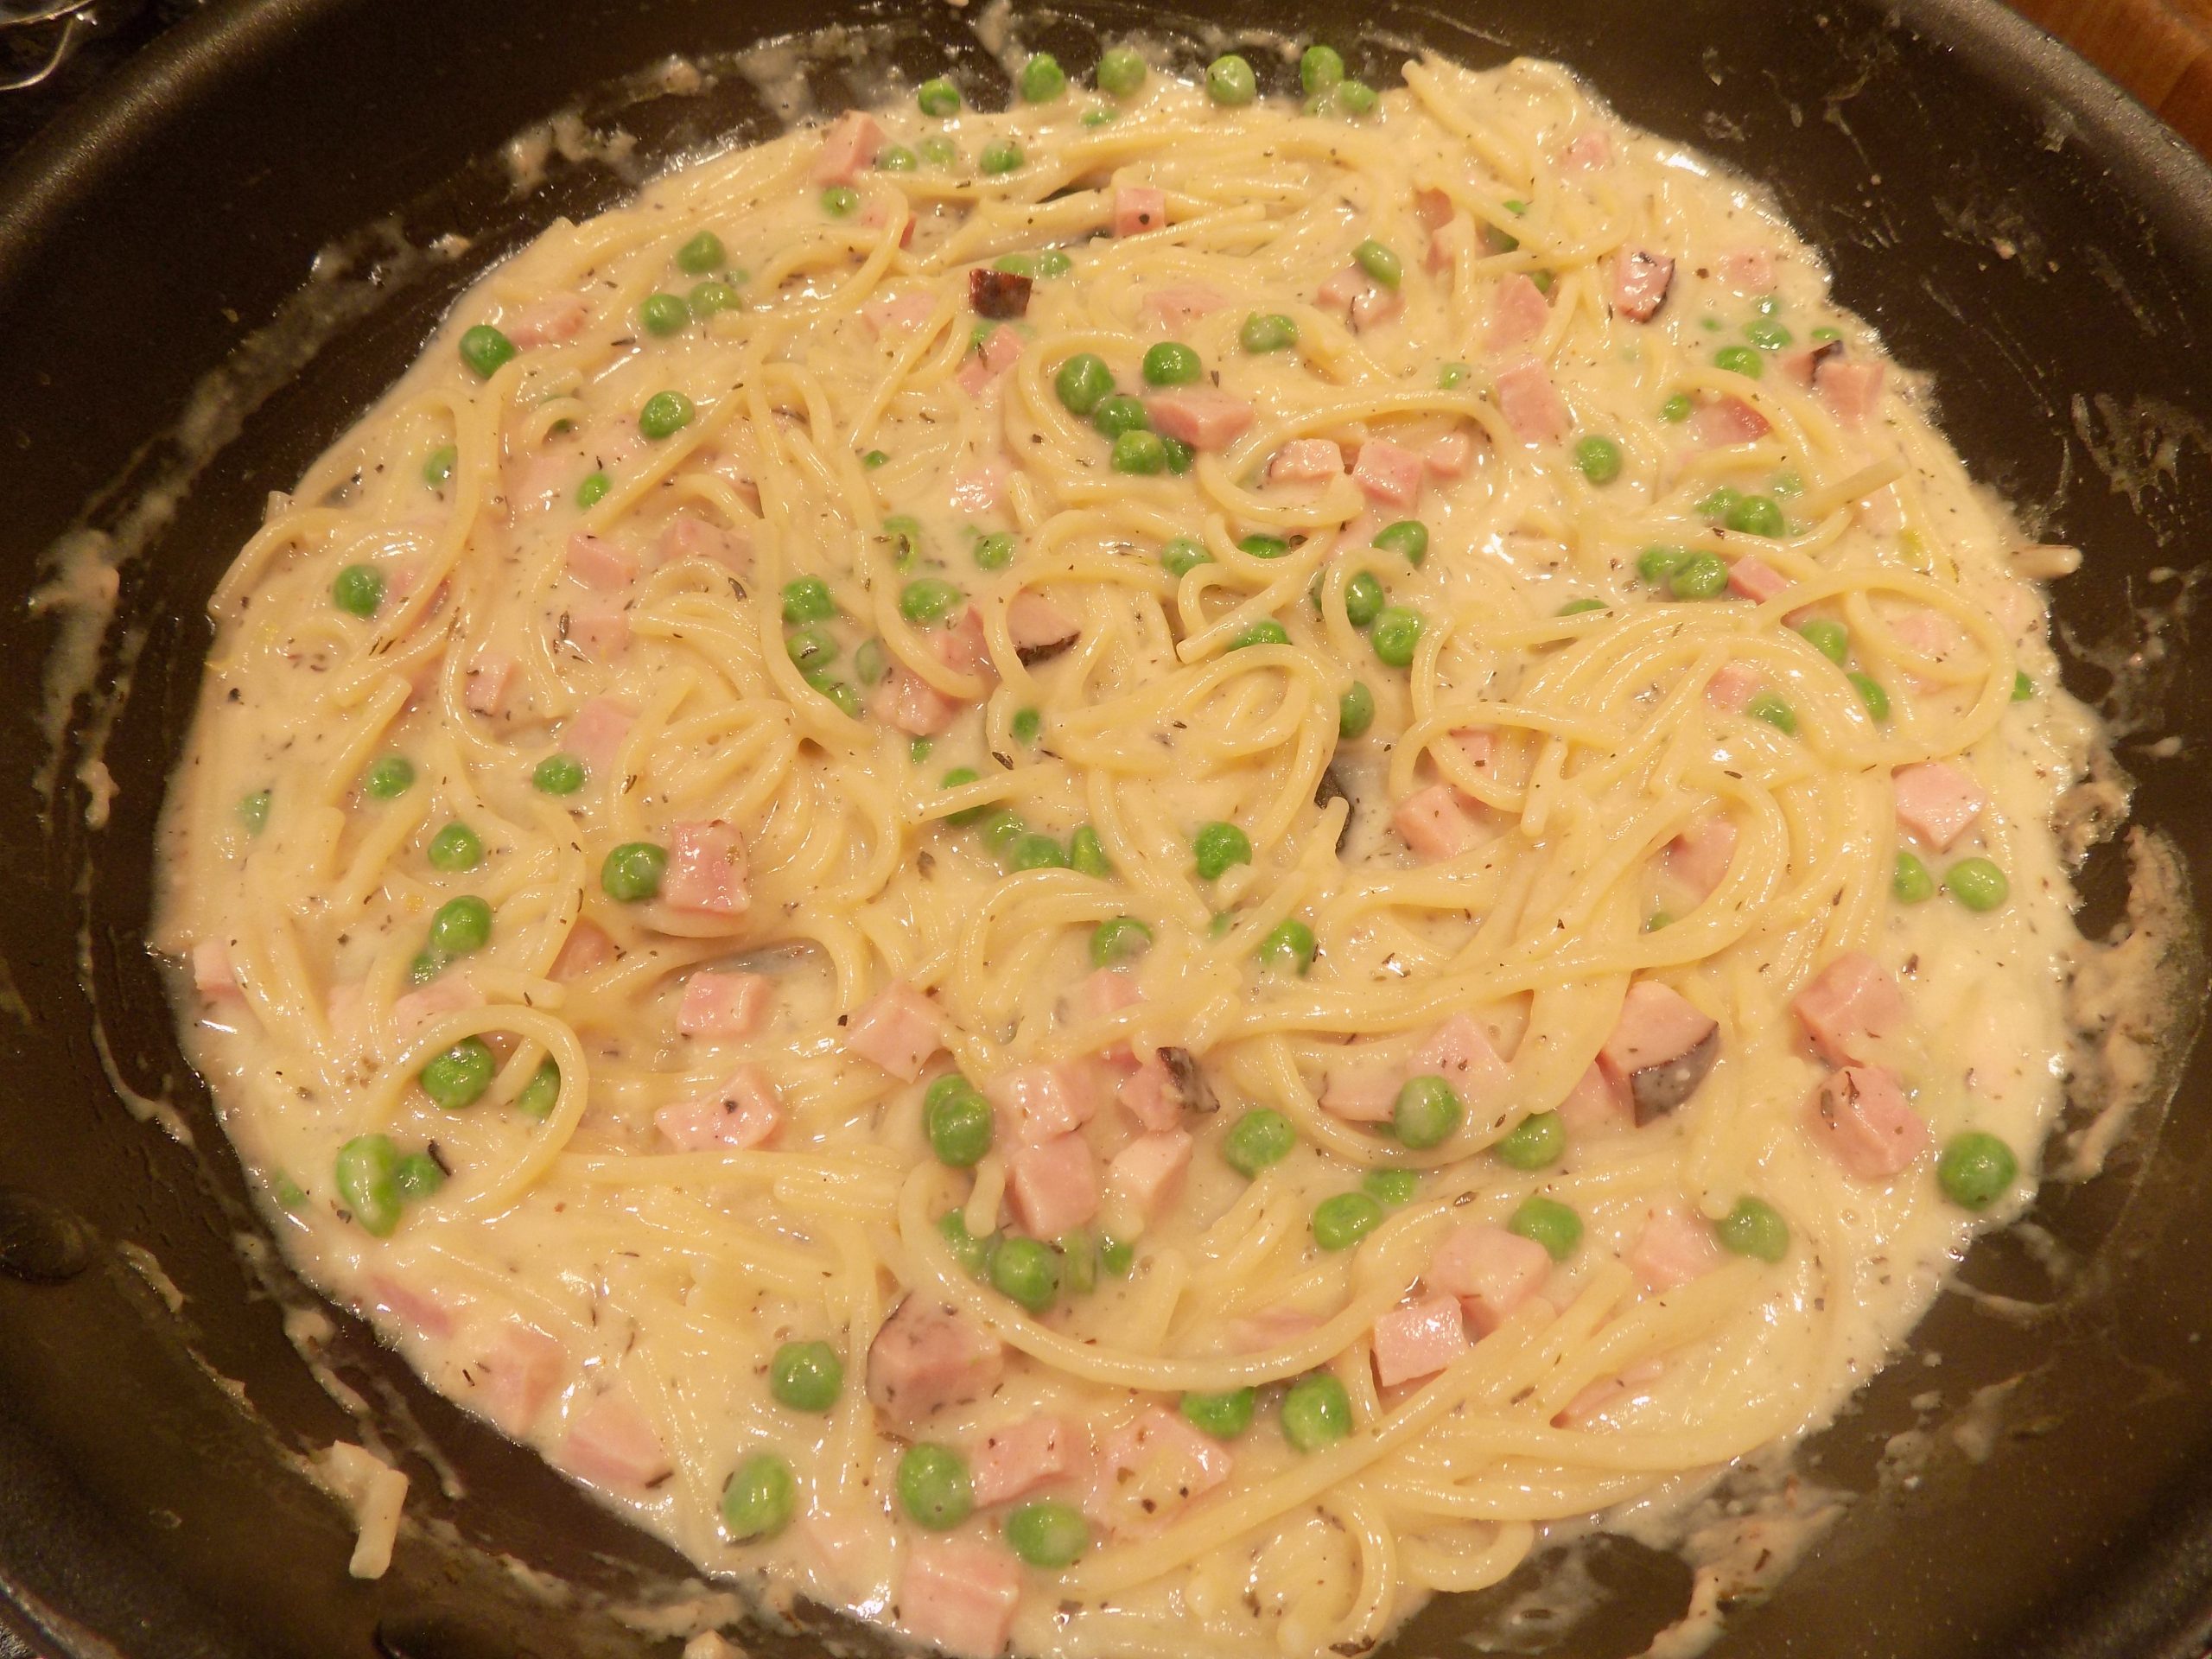
Stir in the peas and cook for 1 minute. Then add the ham and al dente spaghetti. Toss to combine. Serve immediately.


1950s THEMED COCKTAIL PARTY MENU

Clockwise from just left of the candles – Pastrami Roll Ups, Deviled Eggs, Smoked Salmon Canapés, Layered Salad, Creamy Curry Dip with Crudité (barely visible), Cheddar Pecan Crackers (top of triple tray), Savory Cream Cheese and Minced Olive Ball, Onion Dip, and Southern Pimento Cheese Stuffed Celery

Mr. C. and I recently hosted a 70th birthday celebration for our dear friend Mark. I knew I wanted it to be a cocktail party, but I also knew that appetizers alone have a tendency to become a bit cloying after a while. So, I decided to offer a plain soup for those who needed a break from all the richness that is inherent with most hors d’oeuvres, spreads, dips, and canapés. And having the soup available was absolutely the right call. I’d even go so far as to say it was brilliant. (But that would be way too conceited for me to actually brag about. So, just suffice it to say, it was an excellent choice!)  

My quandary from the beginning was to figure out a theme. Then it struck me. Mark had been born in the 50s along with my husband and several other people who would be attending the party. And since I had been helping my mother make party food in the 50s, I already had an idea about the kind of food that was popular then, so, why not celebrate not only Mark, but the whole darn decade!

And I must say, it was such a fun party to plan. And even more fun to execute. Plus, most of the items I decided to serve were recipes already posted on this site. Better and better.

So, what you find below is the menu. Every item in bold print is a recipe already on this site. If not in bold print, it’s a recipe that you will find at the bottom of this post or the item was provided by Vicki, Mark’s wife.

I served the regular appetizers and Vicki’s layered salad on the dining room table. The soup, meatballs, and stuffed mushrooms I served in the kitchen.  (Sorry no picture.) The soup I kept warm in my crockpot. The stuffed mushrooms and Swedish meatballs stayed warm on my warming tray.

And having the food in two different locations worked really well. If nothing else, it got people moving around. And since not everyone knew each other, it was a great way for people to find themselves in a different area of the house with a new group of interesting folks with which to get into interesting conversations.

You know, the secret to a good party is not the food. Or the booze. It’s the people. And if you are blessed with great people in your life, then throwing a party is easy. Just invite them. They will come. And they will bring along their experiences, insights, interests, and a myriad of fantastic qualities that have led them to who they are today. And in this complex world that seems to many of us completely out of control, it is just wonderful to surround yourself with captivating people. I felt blessed just to have these amazing guests in my home. Plus, now I have another good memory. For how long, well that’s completely out of my hands. But for now, the remembrance is still with me, and I am savoring every blinking moment of it. May you too make memories that cause you to smile.

Again – happy birthday Mark. And cheers for many more birthdays to come.

And as always, peace and love to all.

1950s Cocktail Party Menu:

Bacon & Parmesan Stuffed Mushrooms

Cheddar Pecan Crackers  

Creamy Curry Dip with Crudité  

Deviled Eggs  

Layered Salad (Mark’s wife Vicki made the salad)

Onion Dip w/Tim’s thick potato chips  

Pastrami Roll-Ups (see recipe below)  

Savory Cream Cheese and Minced Olives Ball w/Ritz crackers  

Savory Ham and Dried Whole Pea Soup  

Smoked Salmon Spread Canapés

Southern Pimento Cheese Stuffed Celery  

Swedish Meatballs  

Birthday Cake – Chocolate Raspberry (Vicki’s masterpiece)

PASTRAMI ROLL UPS

1 (8-oz.) pkg. cream cheese, room temp

1 tsp. cream style horseradish, or more to taste

½ lb. deli pastrami, very thinly sliced

dill pickles, cut into very thin julienne strips, and blotted dry with a paper towel

Combine cream cheese and horseradish. Lay the pastrami out on a cutting board or clean countertop. (Depending on the thickness of the meat, use 1 or 2 slices.)

Spread a medium amount of the cream cheese mixture on pastrami.

Lay a strip of pickle along the bottom, then roll the meat into a tight pinwheel or log.

Wrap in plastic wrap and refrigerate.

When ready to serve, cut into ¾-inch pieces, secure with a wooden pick, and serve on a pretty plate or platter.

SAVORY CREAM CHEESE AND MINCED OLIVES BALL

There are just certain foods that bring back pleasant memories. And this is one of those special foods.

Somewhere along the line years and years ago, I was introduced to this mixture of softened cream cheese and olives used as a filling for sandwiches. Where and when that was is (I’m sure) firmly nestled in the archive’s region of my brain and therefore only able to be accessed at certain times. And my brain’s archive visitor hours appear to be getting shorter and further apart as I continue to pile on the years. So, unfortunately, today does not seem to be one of the times when my brain archive access is available! (Much to my displeasure!)

Anyway, suffice it to say I have been making this spread for decades. And why I am only getting around to sharing this treasure with you now is anyone’s guess. Although, hosting a 1950’s themed birthday party for our dear friend Mark was the impetus for digging up recipes from that era. And cream cheese balls seemed to have been all the rage at the time. And frankly, they still should be all the rage, because they are fabulous. At least this one is!

Now, I hope you understand that I didn’t actually attend cocktail parties in the 50’s. Even I’m not THAT old! (Mark didn’t attend in the 50’s either. He just happened to be born in the 50’s.) But I did start making several of the appetizers that were popular in the 50’s when I was hosting cocktail parties in the 60’s and 70’s. So, it was fairly easy to come up with a menu for the party. So, my next post will be entitled – 1950’s COCKTAIL PARTY RECIPES. (In case you too get a wild hair to throw a 1950’s theme party. This could save you a bunch of time.) But, back to this recipe.

Not only is this spread delicious; it is also very easy to prepare. Simple, everyday ingredients, and a creamy texture that is irresistible.

Well, that’s it for today. It’s sunny and bright outside and Mt. Baker and several other of the peaks along the Cascade Crest are showing off their new snow. It’s just a glorious day to be alive.

Peace and love to all.

Mt. Baker
Various peaks across from our home

And sorry about no picture of the spread. I have a picture on my camera, but for some reason I can’t transfer it to my computer. User error, I’m sure. But if and when I can make the transfer work, I will edit this post to include the work of art. (Don’t hold your breath!)

1 (8-oz.) pkg. cream cheese, room temp.

1 T. sour cream

½ tsp. Worcestershire sauce

1/8 tsp. granulated garlic

scant 1/8 tsp. granulated onion

freshly ground black pepper (not too much)

1 (4.25 oz.) can chopped black olives

¼ c. minced pimento stuffed green olives, plus a few slices for garnish

Using a fork, combine the cream cheese and sour cream in a mixing bowl until no lumps remain. Then stir in the W sauce, granulated garlic, granulated onion, black pepper, chopped black olives, and minced green olives. Form mixture into a mound on a pretty plate. Decorate with a few slices of stuffed green olives. Cover loosely, and refrigerate for at least 3 hours, or until firm, but better overnight.

Bring to room temperature before serving with crackers or stuffing into celery. Or spread liberally on toasted bagels. Now that’s a tasty treat!  


SIDECAR COCKTAIL

And yes, it has been a while since I posted a new adult beverage recipe. But in one of my internet searches, I came across this recipe. And I printed the recipe out for Mr. C. This was quite a long time ago, so I haven’t a clue where I stumbled upon this amazing mixture of ingredients. But if you know me at all, for me to qualify a drink by stating that it is amazing, you know it must be just that! Because I am a martini girl with an occasional foray into margarita world. And even then, it must be one of Mr. C’s margaritas. Because all the rest are just not going to hold up to any kind of scrutiny! (And yes, I am very, very spoiled!)

But the other evening, Mr. C. told me I really should take a sip of this new to us cocktail. If I hadn’t had a martini already in hand, I would have stolen, yes stolen, the drink from him. It was that good!

Now of course, there is a caveat regarding this drink. You need to use really good booze. And no bottled lemon juice. You need the real thing for this drink. Period! (Actually, you should be using the real thing ALL THE TIME.) But you already know that! Right?!

The moon is shining in on me as I write. The mid-term elections are over. And I have decided to accept whatever outcome is declared. I will continue to believe in the goodness of most people. And the ability for intelligent people to understand that not all people are created equal. Which BTW, was very hard for me to understand when I was younger. Because I am no Einstein! I thought if people just worked harder, they too could achieve their goals. What I didn’t understand is that not everyone has goals. Or has the time, money, intelligence, or inclination to set goals. Some people are just too busy putting food on the table and cloths on their children’s back. Their only “goal” is to survive.

And now, at my ripe old age, I care more about the welfare of these people then I ever expected to feel. How can any person working 2-3 jobs at minimum wage set lofty goals for themselves? They just need to make ends meet. And why is that so hard for some who were blessed with intelligence, decent values ingrained from childhood, and a standard of living 98% of the world envies, not care about others who are not as blessed. It boggles my mind.

But I can’t change the world. But I can help people think by the words I write and the opinions I express. If I help only one person stop and think about someone less fortunate than themselves, showing pity rather than disdain, I will consider myself a success!

Peace and love to all.

2 oz. Armagnac or VSOP Cognac

1 oz. Cointreau

¾ oz. fresh lemon juice

superfine or granulated sugar, to coat the rim of the cocktail glass, opt.

lemon twist, for garnish, opt.  

Prepare cocktail glass by making a slit in a lemon wedge and running the cut edge around the rim of the glass. Then dip the rim in a saucer of sugar to create a thin crust. Chill the glass until needed.

Combine Armagnac, Cointreau, and lemon juice in a cocktail shaker filled with ice. Shake well until chilled, about 10 seconds. Strain into prepared glass and garnish with a twist of lemon peel. Add ice if you like your cocktail cold.


CHEESY SOUP WITH BACON, CORN, AND RED BELL PEPPER

OK, this cheesy soup isn’t all that much different from my Bacon, Corn, and Cheese Soup recipe. But it’s unlike enough to warrant its own blog post. Both recipes make for good eating and are very easy to prepare. And best of all, absolutely perfect for this time of year.

I don’t know where you live, but here in Northwest Washington, it’s getting cold. And wet. And frankly, I’m just not feeling quite ready for cold wet weather. But it truly is a relief not to be breathing wildfire smoke like we were plagued with in September and most of October. So, as the old saying goes – “pick your poison” Toxic air or cold and rain! Neither option is perfect. But since we have zero control over the weather anyway, the best thing I know of to relieve the doldrums when cold, wet, dark, and dreary days become a reality, is to build comfort food. And in my humble opinion, soup is the quintessential comfort food.

There is just something about soup. First of all, in the colder months it’s usually served hot. And usually, soup is very simple to prepare. And often, even better warmed up the next day! How can that not be a totally cool thing!

So, my advice to you, if you too suffer from prolonged exposure to dark, cold, and wet days, is to make soup. The warmth alone feels like a big old hug for your insides. And the happiness experienced by your taste buds is bound to result in the release of endorphins. And as we all know, our bodies produce endorphins to help relieve pain, reduce stress, and improve mood. So, I say – go for it. Put on a pot of soup and let everyone at table reap the benefits.

I know I have been worrying too much lately about the future of our country. And I’m sure some of you share my concern. But I had a stern talk with myself as I was drifting off to sleep last night. There isn’t a bloody thing I can do about most of what is happening. But I can remain (or try to remain) positive. And work towards being a good example for others. Goodness and kindness are still a huge part of our culture. We need to remember how many wonderful people are out there just trying to live a good life and not hurt anyone in the process. I need to concentrate on these people and not the few who are demonstrating hate. This is my plan for myself in the immediate future. That and making soup more often!

Peace and love to all.

8 slices lean bacon, diced

1 med. onion, chopped

1 carrot, grated

1 c. diced celery

2 garlic cloves, finely minced

4 c. chicken stock

1 c. milk

2 tsp. Worcestershire sauce

1 squirt hot sauce

¼ c. flour

1 T. dried parsley

freshly ground black pepper

3 c. fresh or frozen corn

1 c. finely chopped red bell pepper

3 c. grated sharp cheddar cheese

In a medium sized saucepan, fry the bacon until crisp. Remove bacon from pan and set aside.

Add the chopped onion, carrot, and celery to the pan. Sauté until the onion is golden. Add the garlic and cook for 1 minute.

In a bowl, whisk together the chicken stock, milk, Worcestershire sauce, hot sauce, flour, parsley, and black pepper. Add to onion mixture and bring to a boil over medium heat whisking the entire time.

Reduce heat and simmer for about 5 minutes. Add the corn, red bell pepper, and reserved bacon. Cook an additional 5 minutes.

Just before serving, remove soup from heat, stir in cheese, taste, and adjust seasonings.  

WHOLE GRAIN AND OAT BAKING POWDER BISCUITS  

OK, this is it! No more searching the internet for the perfect whole grain baking powder biscuit that is low in sugar and tastes fantastic. Because I have now found the holy grail of fairly healthy biscuits. Not only are these biscuits delicious; they are a snap to prepare. And because of this, I am so excited to share this recipe with you.  

And to whom do I have to thank for this recipe? foodnetwork.com. (I would throw immoderate plaudits towards the person or persons who came up with this recipe, but his, her, or their names weren’t referenced.)

Of course, I did make a couple of simple changes from the original recipe. I reduced the amount of salt from 1 teaspoon to ¾ teaspoon. And the next time I make these amazing biscuits, I will not brush the tops with buttermilk before baking them. (I found it a waste of good buttermilk for no apparent reason. The biscuit tops didn’t brown, so why bother! Next time I make these, which I assure you will be darn soon, I am going to try mixing an egg yolk with a bit of whole milk. If that works to help make a beautiful brown top, I will edit this recipe to include that step.)

Anyway, for now, these biscuits taste wonderful, but don’t expect the tops to be gloriously brown. Ain’t going to happen unless you bake them long enough to burn the bottoms. Which is not what I would suggest! What I would recommend however, would be to serve these biscuits warm, spread with room temperature butter and either local honey or a very nice jam or jelly. Because these babies deserve only the best. As do each and every one of you! Of course!

Well, there’s not much more to report today from Lake Wobegon. (And yes, I do miss Garrison Keillor’s The Prairie Home Companion.) It was such a fun radio show. And I especially loved the description of the town. “Lake Wobegon, where all the women are strong, all the men are good-looking, and all the children are above average.” Especially the line about women. Women have always been strong, but it was nice to hear it said. (And I am taking strong to mean competent, capable, proficient, accomplished, knowledgeable, talented etc. etc., rather than merely muscular!)

So, to all you “strong” women out there who make life better for everyone you meet, I salute you. Keep up the good work. Because life is not getting easier. For anyone. And staying positive in these tumultuous times is sometimes rather difficult to maintain. I only know that because I feel it too. I would love some morning to read in the newspaper that the Ukraine was now free of Russian invasion. Or the war on poverty was winning. Or that Covid was finally obliterated. Or that everyone finally acknowledged that climate change is real. (As just a few examples.) But that is only wishful thinking. And just thinking never accomplished anything. What helps is action.

So, if you have yet to cast your ballot, please do so ASAP. And for those who have already voted – good on you!

Peace and love to all.

1½ c. whole-wheat pastry flour

1 c. old-fashioned rolled oats

2 tsp. baking powder

2 tsp. granulated sugar

¾ tsp. kosher salt 

freshly ground black pepper (not a lot)

6 T. cold unsalted butter, cut into ¼-inch pieces

1 c. buttermilk

Preheat the oven to 400-degrees.

Line a rimmed baking sheet with parchment paper.

Place the flour, oats, baking powder, sugar, salt, and pepper in a food processor. Pulse until the oats are finely ground.

Add the butter and pulse until the mixture resembles a coarse meal.

Pour into a large bowl and form a well in the center. Gently stir in the buttermilk until the dough just comes together. (I use a table knife to do my stirring.)

Dust a work surface with flour.

Turn the dough out onto the floured surface. Flatten the dough into a rectangle about 1-inch thick. Fold the dough in thirds, like a letter. Flatten and repeat from the other direction. Then roll or pat out to a generous ¾-inch thickness. Cut out rounds using a 2½ to 3-inch biscuit cutter, rerolling and patting together to cut more biscuits until all the dough is used.

Arrange on the prepared baking sheet, leaving about 2-inches between each biscuit.   

Bake the biscuits until risen and light golden, 17 to 19-minutes. Serve warm.


GRILLED HERB AND GARLIC MARINATED PORK TENDERLOIN  

Before we left home for our September trailer trip, I found this recipe on the lacremedelacrumb.com site and decided I would serve pork tenderloin prepared this way for one of the dinners we would be serving to Andy’s sister Katie and her husband Rick. We share dinner making when we travel together, so both Katie or I get a night off from meal planning and preparation. (Works great. You should try it if you too RV with others.) Anyway, I made sure I had all the ingredients I would need with me in the trailer. When it came time for the great pork tenderloin adventure, I prepared the marinade and allowed my pork tenderloins to enjoy a cold dip safely tucked away in our trailer refrigerator. Then at the appropriate time Mr. C. fired up the grill, and complete with instant internal temperature thermometer in hand, proceeded to make short work of grilling the tenderloin to perfection. Well, almost to perfection.

The meat was slightly overcooked, but it was not Mr. C’s or the thermometer’s fault. I had instructed the man behind the grill to cook the pork to 145-degrees. Which BTW, if you do a random search regarding the right internal temperature to insure medium-rare pork you will find that 145-degrees is the most common temperature quoted. That is until you come across Alex Delany’s December 18,2017 article entitled “This is the Secret to juicy pork chops, tenderloin, and more” in Bon Appétit. An excerpt from Mr. Delany’s article states “Pork should be cooked medium to medium-rare. Like steak. Like salmon. Like all the best stuff. Now, we pull pork from the heat at 135° and let the temperature rise to 145° as it rests, landing it right in the sweet spot: perfectly pink and USDA approved. (Yeah, the USDA changed its standards too.)”

So, from now on, I will be cooking pork to 135-degrees and then tenting it for about 7-10 minutes (depending on the thickness of the meat) before serving. (The tenting process helps keep the meat warm while it continues to cook and gives the juices enough time to re-absorb.)

But even being moderately overcooked, the pork was still delicious. The marinade had been extremely easy to put together and had given the pork a subtle savory flavor that was enjoyed by all.

So, if you too enjoy pork tenderloin but don’t want to spend a lot of time getting it ready for the grill, this is the recipe for you. Simple ingredients, readily available, and reasonably inexpensive. A magic combination if there ever was one!

Mr. C. has a gig which I will be attending tonight at the Rockfish Grill in Anacortes. That means I don’t have to cook dinner. And as much as I enjoy rattling pots and pans in the kitchen, I also delight in a night off occasionally. So, I’m going to allow someone else to cook for me tonight. And clean off the table and do the dishes. While all the while listening to great jazz. Life just doesn’t get much better, I’m telling you true. And if you cook your pork this way, life isn’t going to get much better for you either.

And as always, peace and love to all.   

An unpaid political announcement: Please don’t forget to vote. And please vote like your kids, grandkids, great grandchildren, nieces, and nephews’ future quality of life depends upon the outcome of the election. Because unfortunately, that just happens to be the case. At least, that’s the way it appears to me. So, please vote for peace, love, and understanding. Not hate, misinformation, and conspiracy theories.

¼ c. extra virgin olive oil

juice of ½ lemon

2 tsp. Dijon mustard

2 tsp. honey

2 garlic cloves, finely minced

1 tsp. Italian seasoning  

½ tsp. kosher salt

freshly ground black pepper 

2 sm. pork tenderloin, all fat and silver skin removed, then patted dry 

Whisk the olive oil, lemon juice, Dijon mustard, honey, garlic, Italian seasoning, salt, and pepper together in a small bowl.

Pour 3/4ths of the mixture into a large Ziploc bag along with the tenderloins. Smoosh everything together until the meat is coated with marinade. Press out excess air, seal the bag, and chill for 1-2 hours. Or longer if you have the time.

Preheat grill to medium and oil the grates.

Using tongs, transfer pork to the grill. (Discard the marinade in the bag.) Brush the top side of each tenderloin with some of the remaining marinade. Close the grill lid and cook turning every few minutes to ensure even cooking. Brush the meat with more marinade every time you turn it.

The meat is ready to come off the grill when the internal temperature reaches 135-degrees.

Remove from grill and transfer to a cutting board. Loosely tent the meat with aluminum foil and allow it to rest for 10 minutes before slicing.

SEASONED SEA SALT

And yes, I know. I have two other seasoned salt recipes on this site which BTW are easily accessed by typing the terribly catchy title “Seasoned Salt” in the search box. But I ask you, can a girl (or guy) ever have too many recipes for seasoned salt? Of course not. It’s like having too many pairs of shoes. Again, a person really can’t have more shoes than is absolutely necessary. Unless they are an Imelda Marcos want-a-be. Then that’s a different story! To my thinking, 3,000 pairs of designer shoes isn’t an extravagance, it’s a psychosis! Compared to three recipes for seasoned salt, I believe I am actually being quite reasonable and rational.

Because, what it really boils down to, is that I use seasoned salt every day. And I like to change things up so that our taste buds don’t get bored. (Plus, the latent scientist in me, really enjoys playing mixologist. And seasoned salt is just so fun to play with.)

So, I am sure you are now wondering how and when I use seasoned salt. Well, that’s easy to answer. Every morning on our eggs (easy over, scrambled, scrambles, or omelets), in many soups and stews, or anytime a little extra savory punch would ramp up the flavor of a dish.

But of course, when using seasoned salt, I have to remind myself to cut back on regular salt. But I still seem to be mentally able to make that connection. (In other regards, I’m not so sure about myself!) Anyway….

If you too enjoy making your own seasoned salt, do give this recipe a try. It’s just enough different from my other recipes as to be interesting. But be warned. This blend is really quite salty. So, go easy into that good dish.

Well, that’s it from Camano Island. It’s grey today. But not grey from smoke, but rather from cloudy skies. So, hopefully, we will get some more much needed rain. And the mountains too would profit greatly from any wet largesse that might fall their way. There are still quite a few forest fires happily burning away in our state. So, benevolent deities, if you are reading this, how about a nice steady drizzle over all the areas that need your help. Not too much water so that runoff becomes a problem. Just a nice steady light downpour. And no wind or lightning, thank you. (I have found that you must be quite specific with deities, or they will get it wrong most of the time.) (And yes, I do ask and thank deities on all kind of subjects. I like to have all my bases covered!)

Peace and love to all.   

1 c. fine sea salt

3 T. finely ground black pepper

3 T. paprika

3 T. granulated garlic

3 T. granulated onion

2 tsp. celery salt

1 tsp. chili powder

¼ tsp. cayenne

Whisk or shake altogether and store in an airtight container. Use wherever seasoned salt is necessary to your very survival.


ITALIAN SAUSAGE AND RICE STUFFED BELL PEPPERS

I always know when fall has officially arrived because bell peppers go on sale. And because I am who I am, I simply can’t pass by these big beauties without taking a couple four home with me. And although I like stuffed red, yellow, and orange peppers, my favorite is still stuffed green bell peppers. Blame my parents if blame must be assigned. Because they always stuffed green peppers. Of course, there were no red, orange, or yellow bell peppers to be had when I was a kid. Or at least in my childhood grocery shopping memory, there were not an array of colored bell peppers from which to choose. If you wanted a bell pepper, it was green. Period!

But from the first time I can remember stuffed peppers, I liked them. But then, I preferred green onions to ice cream when I was barely walking. (Or so I was told!) So, as the saying goes, there is no accounting for taste.

But as an adult, I still adore stuffed peppers. And often times, what I stuff them with is what I happen to have on hand. In this case, I can attribute this recipe to us bringing home all the non-perishables from our trailer before we take it in for winterization. I had exactly ¼ cup of a rice mixture left in one of our trailer storage containers. (Why I didn’t use that last ¼ cup in the trailer when last I made rice, I will never fathom. But then, there are lots of things about myself that I have yet to understand. So, why should a simple thing like a quarter cup of unused rice be any different? But I digress…….)

Anyway, the rice along with a half-pound of bulk Italian sausage that was languishing in our freezer, and a lone home-grown tomato that desperately needed to be eaten, all contributed to this thrown together recipe. But somehow, it worked. Also, you will notice from the picture that I used 2 red bell peppers. That’s what I had on hand. And they tasted fine. But, next time, I will make this recipe with green bell peppers. I simply like the bite from green bell peppers better. But it’s all a matter of taste, so don’t let me dictate which bell peppers you should use. Use whichever you prefer. Just make the darn things. They are easy to prepare, quite economical, and taste divine. And bake potatoes to go along with the peppers. Add a simple salad or steamed veggie and dinner is on the table. Very little fuss required. And fairly healthy too. And isn’t that we are all after these days.

So, for today, my work here is done. I’ve given you a recipe for a simple, healthy entrée. The ball is now in your court.

Peace and love to all.  

¼ c. rice (I used a rice mixture)

½ c. chicken broth

2 green bell peppers (or red, orange, or yellow if you must)

2 tsp. extra virgin olive oil

½ lb. bulk Italian sausage

¼ yellow onion, chopped

2 garlic cloves, finely minced

½ c. diced tomato, fresh or canned

½ tsp. kosher salt

freshly ground black pepper

½ tsp. fennel seeds

¼ tsp. dried oregano

pinch crushed red pepper flakes

1 c. grated cheese (Mozzarella, Jack, cheddar, etc.), divided   

Place the rice and broth in a covered saucepan. Bring to a boil. Reduce heat, leave covered, and simmer for 15 minutes or until the rice is tender but still has some bite. (Most of the broth will be absorbed at this point.) Remove from heat and let sit uncovered until needed.

Cut the bell peppers in half lengthwise. Discard the ribs and seeds. Place in a lightly greased shallow baking pan, preferably one with a lid. (If you don’t have a pan with a lid, you can cover the pan with aluminum foil after you have placed the peppers into the pan.)

Heat the olive oil in a large fry pan. And the sausage and crumble as it cooks until it’s nicely browned. Add the onion and cook until the onion is starting to soften. Add the garlic. Cook for one minute. 

Add the diced tomato. Cook until no liquid remains.

Add the salt, black pepper, fennel seeds, oregano, crushed red pepper flakes, and cooked rice. Stir to blend all the ingredients.

Remove from heat and stir in half of the cheese. Taste and adjust seasonings. Stuff the half peppers with sausage mixture, dividing equally and gently packing the mixture down.

Bake covered in a preheated 375-degree oven for 60 minutes or until the peppers are tender. Remove from oven, remove lid, and add the remaining cheese on top of the peppers. Return the pan uncovered to the oven. Bake for a few minutes until the cheese is melted. Serve hot out of the oven.


CINNAMON GRANOLA WITH DRIED FRUIT AND NUTS

OK, I know, another granola recipe. But as I have said before, we adore granola and eat it almost every morning. And I still love to experiment with different combinations of oils, sweeteners, spices, nuts, and dried fruit. But truthfully, none of my granola recipes are that different. But posting recipes keeps me off the streets and from driving Mr. C crazy. So, think of my posts as a way for me to keep thinking positive rather than dwell on all the negative things that are currently happening in our country. But enough about that!

Anyway, a couple of days ago I prepared a batch of granola using the formula you find below. And Mr. Cs comment yesterday morning, after just one bite, was “this granola is really good”. So, even though this recipe is like some of my other granola recipes, I felt compelled to post this one too. (I’m sure you can understand the logic behind my decision and can find it in your heart to forgive me.)

But, if you too are a granola lover, give this recipe a try. The flavor of cinnamon is just terrific with dried fruit. And no, you will not taste the olive oil. But the sweetness from the maple syrup comes through. Overall, when taken with fresh fruit and yogurt, this granola is a winner. But you must judge that for yourself. So, what are you waiting for? You already have your written invitation!

Peace and love to all.

½ c. extra virgin olive oil

½ c. pure maple syrup

1 tsp. kosher salt

2 tsp. ground cinnamon

2 tsp. vanilla

8 c. old-fashioned rolled oats

3 c. nuts (pecans, almonds, walnuts, hazelnuts) 

1 c. unsweetened flaked coconut

1 c. dried chopped dates

1 c. dried blueberries or dried chopped cherries  

1 c. dried chopped strawberries or dried cranberries

1 c. freeze dried blueberries, opt.

Preheat oven to 300-degrees.

In a large mixing bowl, whisk the olive oil, maple syrup, salt, cinnamon, and vanilla together. Then stir in the oats. Spread mixture on a rimmed baking sheet or sheets in an even layer and bake for 25 minutes. (The layer will be fairly thick.) (Don’t wash the mixing bowl.)

After 25 minutes, add the nuts and coconut. Bake for an additional 10-15 minutes or until the oats are a light golden brown.

Remove from oven and transfer the granola back to the large bowl and add the dried dates, blueberries, and strawberries, tossing to combine.

Allow to cool completely before adding the freeze-dried blueberries. Store in an airtight container.

Great topped with fresh fruit and Greek yogurt.